« April 2013 »
S M T W T F S
1 2 3 4 5 6
7 8 9 10 11 12 13
14 15 16 17 18 19 20
21 22 23 24 25 26 27
28 29 30
You are not logged in. Log in
Entries by Topic
All topics  «
3D paperwork
A - Z challenge 5
A - Z challenge 7
A - Z challenge round 4
A to Z challenge round 3
A to Z round 2
A to Z round 6
A-Z round 1
Around the House
Art Challenges
Artist Trading Cards
Backgrounds
Beads
Bible Journaling
Books
Boxes
Collage
Color Challenge
Coloring
cookbook
Die Cuts
Digital Projects
Digital Stamps
Drawing
Dry Embossing
Fabric Stuff
Fantastic Folds
Field Trip
Home Decor
How Does Your Garden Grow?
Hymnal Art
In The Kitchen
In the studio
Jewelry
Lettering
Links
Multi-Technique
Music to Work By
Musings
Nail Art
New Work
Online Class
Other Hobbies
Other Projects
Painting
Paper Embroidery
Paper Piecing
Photo
Pretty Paper
Quilting
Random
reading
Scrap Recovery
scrapbooking
Sewing
Sketch Challenge
Some Backlog
Stamping
Stencils
Stickers
Supplies
Teabag Folding
Techniques
Testing
tips and tricks
Tutorial
Web resources
Welcome to my Blog
Work By My Friends
workflow
Writing
Blog Tools
Edit your Blog
Build a Blog
RSS Feed
View Profile
Group One
In & Out of Studio 3D
Monday, 22 April 2013
Dizzy Daisies
Topic: Quilting

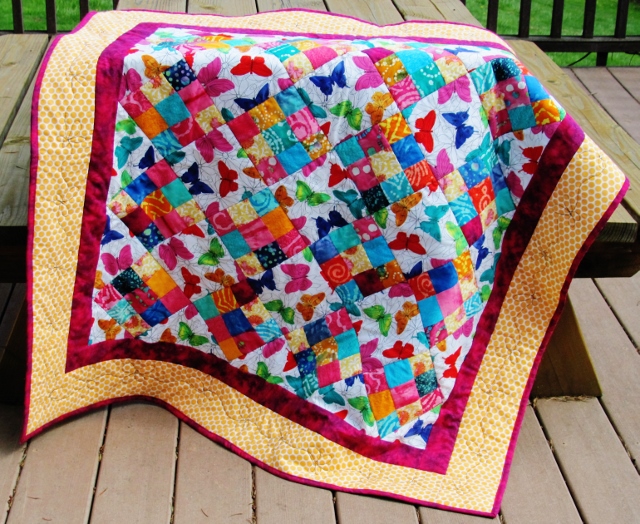
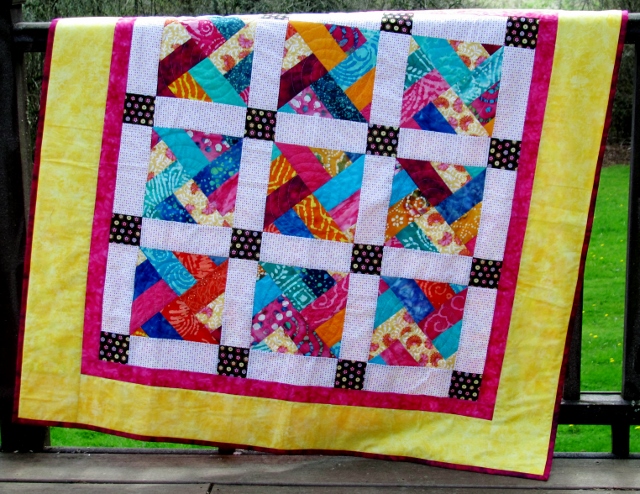
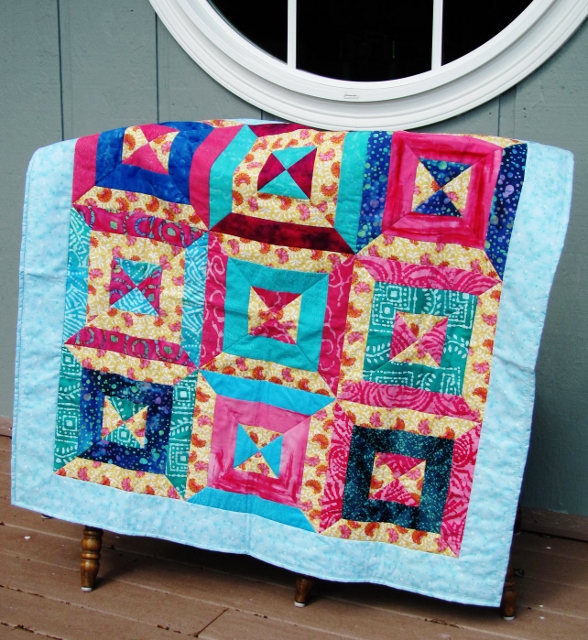
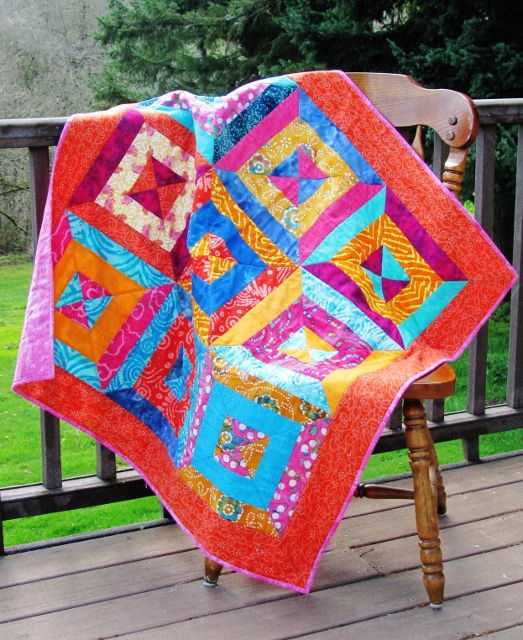
My latest quilt is 41 x 48 made from two coordinating daisy fabrics that were donated to me. I used a double pinwheel pattern from Eleanor Burns for the blocks but did my own layout as I did not have enough fabric for all the blocks her layout called for. I ended up with 14 of each block style so I used 12 of one for the center and 12 of the other for the border, separated by a white sashing. Two more blocks were split on the diagonal to make corner pieces and the rest of them will be used to make some potholders.

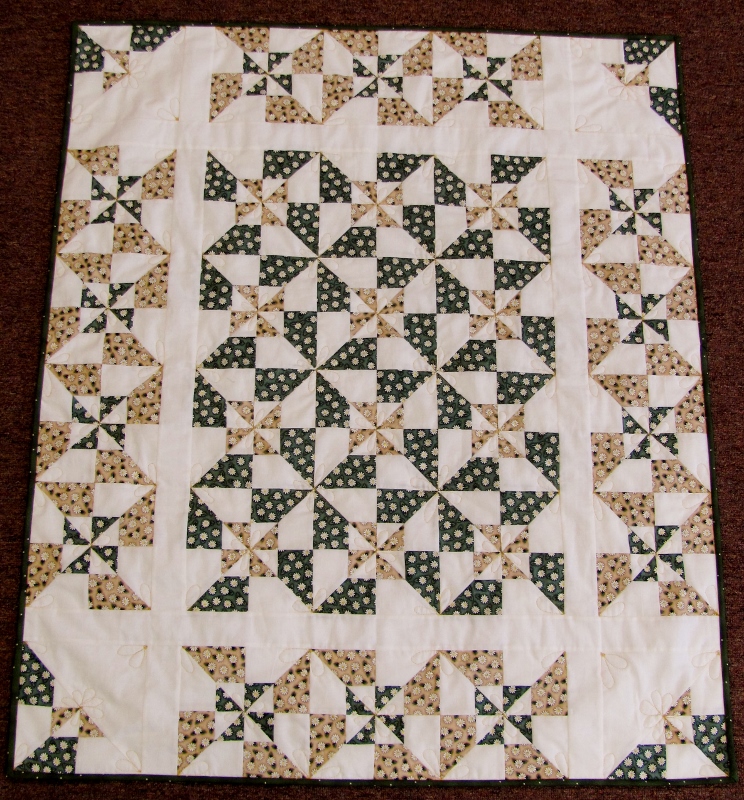
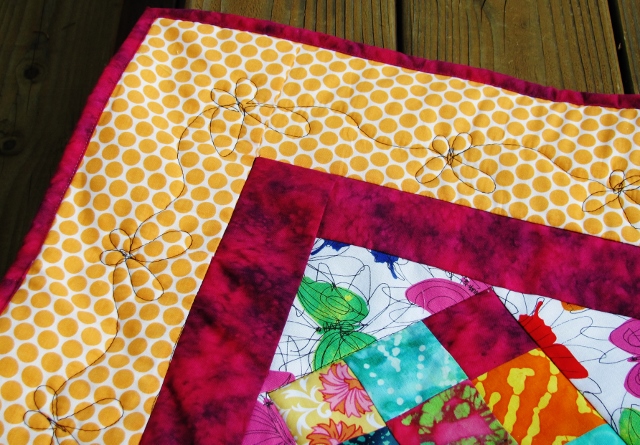
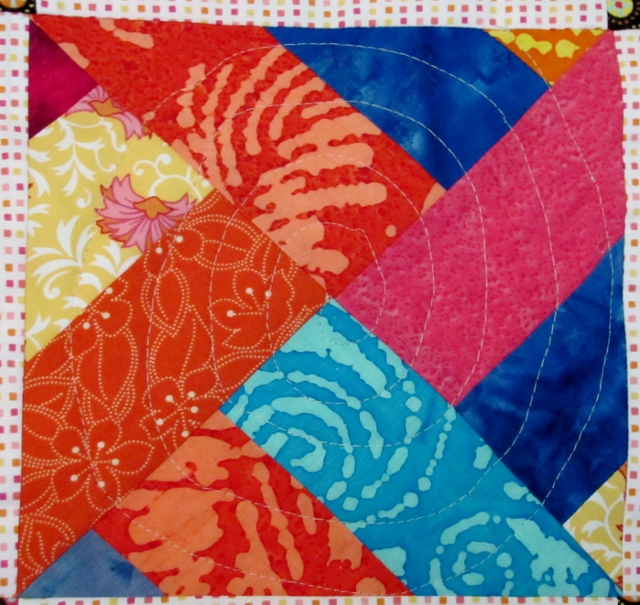
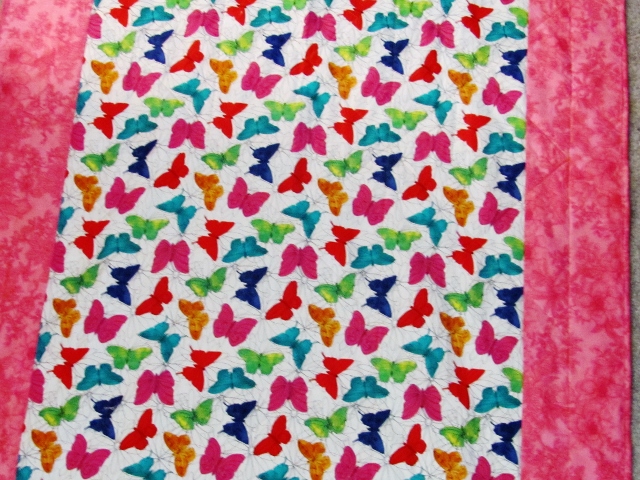
I used a golden yellow thread to quilt using free-motion daisies in the center of each pinwheel, both large and small. On corners and edges I made just half or quarter flowers as needed.

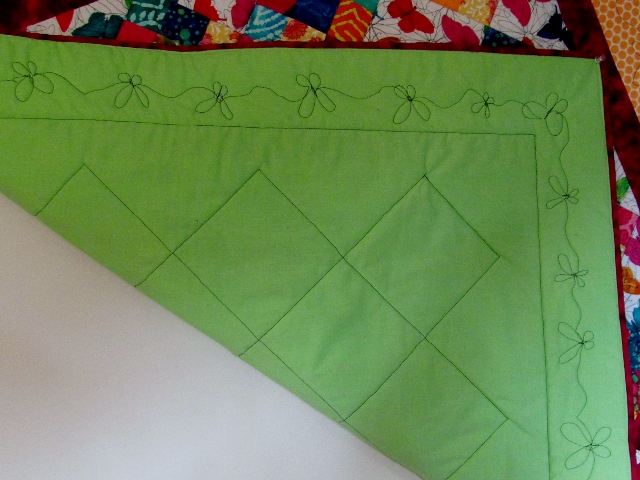
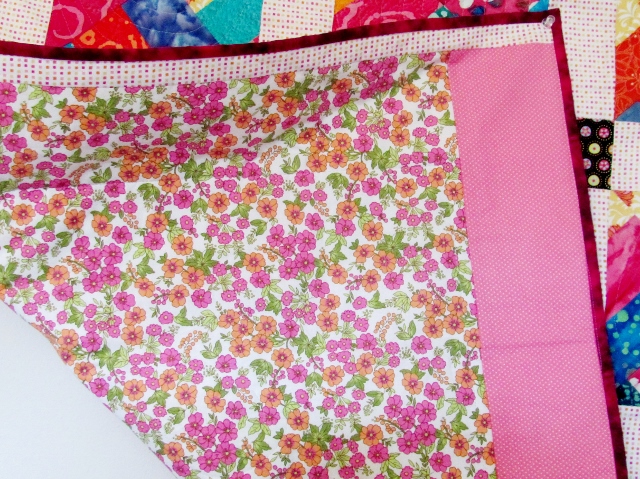
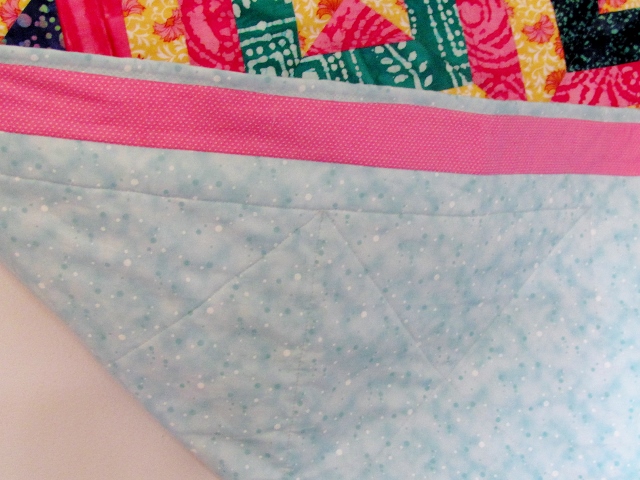
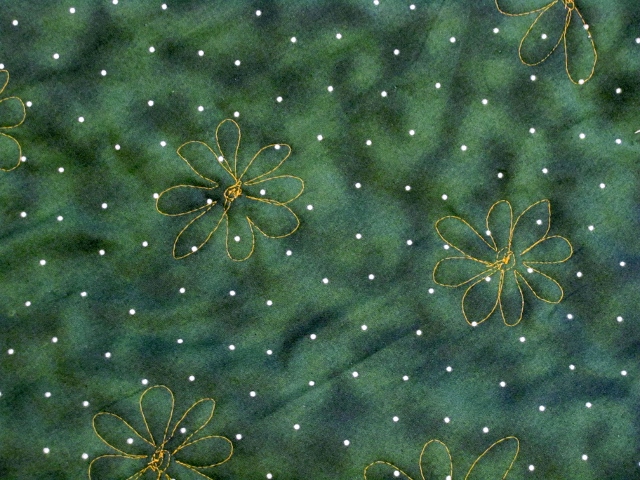
You actually see the quilting better on the back as I used the same thread over a dark green dot.

I think daisies are such a cheerful flower, don't you?

Ddd


Posted by studio3d@ccgmail.net at 12:01 AM PDT
Sunday, 21 April 2013
It's A Dry Heat
Topic: In The Kitchen

I enjoyed (past tense) so much the banana chips and dried apples that I made so decided to make more. I also wondered how it would be to have some dried mushrooms on hand so I first made a batch of those

The second day I dried banana chips:

The third and fourth days I dried batches of apples. Here is the last batch in the racks ready for the dehydrator:

What delicious, healthy snacks!

Ddd


Posted by studio3d@ccgmail.net at 12:01 AM PDT
Saturday, 20 April 2013
You Make Me Smile
Topic: Photo

Just walking along the sidewalk outside the library and my eye is caught by a little 'manhole' cover. It is probably 10 inches across and has these two holes side by side. There is a little dimple right in the center and by some strange chance a seed pod off a tree has settled across the bottom. That one random thing has instantly turned it into a little face!

It made me smile. Do I have a camera? No. Is there anyone around I can show it to? No. But it is so cute.... Oh, yeah, my phone takes pictures.

So I got out my flip phone and took a shot of it and hit the SAVE so I could show it when I got home. I even thought I might be able to get it off to my computer. Turns out I have the perfect combination of 'dumb phone, dumb plan' and I can't transfer, email, post, anything. I can JUST make calls.

So I ponder my little picture and there is a button for OPTIONS. One of them is to make the picture the wallpaper. Tah Dah! Now I see this cute little face every time I look at my phone screen (all 1.25 inches square of it) and every time - it makes me smile.

So how did I get this to show you? I had to use my regular camera to take a picture of the screen of my phone! Lame technology.

Ddd


Posted by studio3d@ccgmail.net at 12:01 AM PDT
Friday, 19 April 2013
It's Curtains For You
Topic: Sewing

In order to clean up the look in my quilt studio I decided to make curtains to cover the closet opening. While I was at it I made a matching valance for the window.

I found this wonderful fabric in the discount room at the fabric store and bought the end of the bolt. As you can see, it has sewing supplies printed all over it thread, buttons, scissors, pin cushions, and thimbles.

Because there were two separate pieces at the end of the bolt it pre-determined the amount of fabric I had for the window (just one yard.) I cut it into two pieces of 18 inches, joined them at the center and created a pocket for the rod. Hemmed all around. If I were to do this again I would make the valance shorter and fuller by making three sections of 12 inches.

The rest of the fabric was cut into three panels, rod pockets sewn and the ends hemmed. I did not join the sides of these as I wanted to be able to go in and out of the closet at more than just the ends. The pre-determined length leaves them a little short at the bottom but it will allow for some air flow so things don't get stale in there.


Both of the curtains are installed on extension rods. The closet curtains were a bit heavy causing some bowing of the rod so I put in some U-brackets at the intervals between the panels.

Ddd


Posted by studio3d@ccgmail.net at 12:01 AM PDT
Thursday, 18 April 2013
Flowers Are A Treat
Topic: Backgrounds

I tried using two blues and two greens to make the diamonds look dimensionsl on this background. It left too much space between the blocks so I filled the spaces with Mustard distress pen and it blended everything into a multi-toned green.

That was pretty boring so I got out a large floral stamp and covered the surface with the bloom. A green cardstock was selected for the text block and backed with black. Three strands of green twine were added and secured with a knot.

I bordered the floral panel with black and popped the sentiment block up on foam tape.

Ddd


Posted by studio3d@ccgmail.net at 12:01 AM PDT
Wednesday, 17 April 2013
Be Loved
Topic: Backgrounds

I got out the heart waxed paper background and colored it up in three vibrant pinks/reds. I stamped a sentiment on pink and backed it with red, creating a flag end.

Some dark pink twine was looped around the front twice and knotted.

Ddd


Posted by studio3d@ccgmail.net at 12:01 AM PDT
Tuesday, 16 April 2013
Butterscotch Background
Topic: Backgrounds

The argyle pattern of this waxed paper background turned out well in mustard yellow and gathered twig distress inks. They blended to a nice butterscotch. I wanted to see lots of the background so I banded a sentiment in brown and mounted it low on the card front.

I had some diecut swirls in a butterscotch cardstock so added them around the sentiment. I went in with a fine line brown marker and added some detail work around the ends of the swirls making them look paisley.

A brown rhinestone was added to each paisley end.

Ddd


Posted by studio3d@ccgmail.net at 12:01 AM PDT
Monday, 15 April 2013
Simple Hello
Topic: Backgrounds

Sice I had the waxed paper backgrounds out for the last few projects I decided to just keep playing with it.

I combined yellow and blue inks on this background whick blended up to a nice green. I used a dark green card base and stamped the greeting directly on the background using Staz-On.

I attached three paper flowers with glue dots and placed a black rhinestone in the center of each.

Ddd


Posted by studio3d@ccgmail.net at 12:01 AM PDT
Sunday, 14 April 2013
Frosty Woods
Topic: Stencils

Another new stencil for me is of birch trees. Love these.

I chose a waxed paper background with a crackled appearance and taped the stencil down. By blocking off the trunks I was able to ink in the sky background and the snowbanks. Then I removed the blackout paper and carefully inked just the tree trunks with brown.

After removing the stencil there was not enough definition of the trees aso I used a fine line brown pen to line along the left of them all.

I mounted on dark blue-gray and stamped a sentiment on light blue-gray. The latter got a flag end and three brown rhinestones.

Ddd


Posted by studio3d@ccgmail.net at 12:01 AM PDT
Saturday, 13 April 2013
Night In The City
Topic: Stencils

I picked up a new stencil that has solid and patterned areas for a cityscape. Not as successful using it as I would have liked but I'm willing to show what I got.

I started with some waxed paper background and used distress ink to color a big moon Then I laid on the stencil with the open pattern exposed and used more of the yellow ink. So where is it? Um, I'll tell you later.

I used Starry Sky distress ink to carefully color the sky without coloring over the buildings. Then I got the bright idea to use black distress marker to color in the patterned stencil over the buildings. WAY to juicy and the ink leaked under the stencil leaving a big mess. Rescue? Use a rag to swipe the ink straight down, coloring the buildings black. Then I wnt back in with a black Copic marker and freehanded in some building details. I stamped the Hello in the moon with Staz-On black ink and mounted the trimed artwork to a bright yellow card base.

Interlude where I scrub the stencil clean of all the ink....

So, I started over with the moon, sky and yellow building blocks on two more waxed paper backgrounds. The first time I didn't get the stencil lined up very well for the details (which are now being inked with 'black soot' dicstress) but the last one worked better. It did get more smearing of the building details so I need to learn to be more patient for the drying before buffing. I mounted one to bright yellow and one to light yellow.


With the buildings and the pattern in the sky I think these have a very industrial look.

Ddd


Posted by studio3d@ccgmail.net at 12:01 AM PDT
Friday, 12 April 2013
Hills And Valleys
Topic: Stamping

I used another scenic stamp for today's cards, With cocoa brown Memento ink. This is a vertically alligned stamp so I did four of the cards in that orientation.

The lighting is terrible for these as the lavender fades right into the white background. I used green patterned strips for backing and bordered the image panel with brown. I stamped the sentiment directly on to the green strip and used a few brown rhinestones for accent.

For the next set I changed the greeting on one and changed the rhinestones to nail head stickers for the other.

On the last one I went back to the landscape orientation and used a wider strip of green paper. I also used a violet backing card for better contrast.


I stamped the sentiment directly on the card base and finished off with a strip of brown rhinestones.

Ddd


Posted by studio3d@ccgmail.net at 12:01 AM PDT
Thursday, 11 April 2013
Landscape Landscapes
Topic: Stamping

While I had the scenic stamps holder out I decided to use another couple of them to make cards. The first I chose is a fenced pasture with trees and mountains background. I used the same colors of alcohol markers on all four of these.

Two of them were bordered with brown, backed with a purple strip and mounted on light green card bases. Text was stamped directly on the card base and the sentiment enhanced with tiny green rhinestones as a leader.

The second set got the same basic treatment with dark green card bases. The background was too dark to stamp the sentiment so I stamped it on a scrap of paper that matches the dirt road, cut a flag end and adhered it to the card front. I kept the leading green rhinestones.

All of these have the image panel mounteed on foam tape.

Ddd


Posted by studio3d@ccgmail.net at 12:01 AM PDT
Wednesday, 10 April 2013
Up On Blocks
Topic: Stamping

I had some of the images I stamped yesterday left over but they had been stamped on plain cardstock (not glossy). For the most part they took the alcohol markers OK but that purple was WAY too dark on these. I used the alcohol blender to color over the top to lighten the tone so it fits with the rest of the colors better.

I pulled out some green backing cardstock and a couple of purples in card bases. Each of the images and the green blocks were backed with black. The images are all popped up on foam tape.

I pulled out some little animal charms and tied their loops with a variety of twine colors. These are popped up on foam tape as well.

Not sure if those are zebra, wildebeast or some animal that doesn't exist except in the imagination. But they lend a cheery gleam to the design.

Ddd


Posted by studio3d@ccgmail.net at 12:01 AM PDT
Tuesday, 9 April 2013
Leafy Hello
Topic: Stamping

These projects started out when I ran across a leafy branch die cut I got a while back. I had not used it yet. I went looking for a stamp that I could use as a feature that would be complemented by the die cuts.

I selected this mountain scene from a set of scenic stamps that I have in green unmounted rubber. I stamped on glossy cardstock with Cocoa Memento Ink and colored using alcohol markers. The purples I had were too dark in relation to the other colors so I touched the tip to a blender pen and used that to color in the mountain.

I stamped the bold script greeting over the image and trimmed it out to mount on the black dotted paper. Leaves were cut from a variety of green patterned papers which were glued to overlap the image panel.

Two were designed in landscape and use violet card bases. 

Three were done in portrait orientation and mounted on lavender card bases. Here are two of them together.

Here is the third one - closer to show details.

Simple but pretty.

Ddd


Posted by studio3d@ccgmail.net at 12:01 AM PDT
Monday, 8 April 2013
Coyote Dog
Topic: Around the House

A few days ago hubby looked out the back window and spied a coyote out at the end of the yard. He has seen them at night going through the yard but always on the move. I've never seen one in the 24 years we've lived here.

Imagine our surprise that this one just wandered around a bit, looked around at the scenery and even watched us looking with binoculars for a while. It suddenly occured to us to grab the camera and see if it would hang around while we took photos.

We only got two shots before it moseyed off into the scrub brush and vanished.


I suppose this means I will be saying adios to a few bunnies, mice and other little critters that inhabit this space. But it was neat to see this awesome doggie.

Ddd


Posted by studio3d@ccgmail.net at 12:01 AM PDT
Sunday, 7 April 2013
Flight of Butterflies
Topic: Quilting

I just recently learned that a flight (flock, group) of butterflies is called a kaleidoscope. How fun is that?

The final cuts made from the strip sets are three units of 2.5 inches. These get mixed up and reassembled into 9-patches. I had enough to include 16 on a quilt (instead of the 12 shown in the pattern). These are set on point with the spacing blocks from my stash of the colorful butterfly fabric.

I gave it a double border to quiet it down a bit and then quilted the orange dot border with sketchy butterflies.

The only color in the butterfly fabrics that was not in the 9-patch fabrics was bright green so I pulled that color from my stash for the backing. The quilting was all done in black so it would stand out on the backing.

This quilt finished up at 43 inches square. It as well as the three other quilts will all go to the hospital Passages program.

Ddd


Posted by studio3d@ccgmail.net at 12:01 AM PDT
Saturday, 6 April 2013
Slightly Off Kilter
Topic: Quilting

Still working on those strip sets, the second style of cut yields two triangles per set. These get assembled in groups of four to create blocks with a twist to them.

Because of the extra strips I included I was able to put together a quilt of 9 blocks instead of the 6 blocks in the pattern. I used bits from the stash for the sashing and cornerstones and made them wider than suggested and added double borders from the stash to get more size to the quilt.

I call this quilt 'tilt-a-whirl' because of the cant to the blocks and I also used a spiral inside these squares for the quilting.

More fabrics from the stash make up the backing, with piecing to stretch to the full size needed.

Finished size is not quite square at 44 x 45 inches.

Ddd


Posted by studio3d@ccgmail.net at 12:01 AM PDT
Friday, 5 April 2013
Calmer Cousin
Topic: Quilting

The second set of 9 blocks from the strip quilt shown yesterday all contain pieces of the yellow floral fabric. This was from my stash as part of the strips added to get the full amount I wanted.

I call this quilt 'window boxes' because of this floral fabric and the squares created by the pattern.

I picked up the teal in the batiks with a teal border from my stash. This was also used on the back, along with some accent strips, and for the binding.


This quilt also measures 42 inches square.

Ddd


Posted by studio3d@ccgmail.net at 12:01 AM PDT
Thursday, 4 April 2013
54 Strips And a Dash of Stash
Topic: Quilting

How about a teaser first?

Because this is just too much wonderfullness to spring on you all at once, I will dole 4 new quilts out over the next few days.

I started from the Eleanor Burns pattern called "Twice As Nice - Plus More" which shows how to turn a 'jelly roll' into three quilts (one medium and two small). I wanted to make my quilts larger so I supplemented the 40 strips (batiks) with 14 more strips from my stash.

The strips are stitched together in sets of three and then some whacking this way and that way gives you three styles of cuts which are then assembled into blocks.

The first cut that is made from the strips makes up unto square window blocks. Because of the extra strips I put in I had enough to make 18 blocks instead of the 12 that the pattern addresses. So I split them into two sets of 9 for two square quilts.

This is the first. I call this 'black light' because it is so bright and psychadelic.

I added more from my stash for the border, backing and binding.

This quilt finished up at 42 inches square.

Ddd


Posted by studio3d@ccgmail.net at 12:01 AM PDT
Wednesday, 3 April 2013
The Flowers Die
Topic: Die Cuts

I had some ideas for using diecut flowers but don't have a die for flowers. I always had to cut them out by hand... no fun! So, on a craft supplies swap group, I saw a set of flower dies offered and in turn I offered a die that cuts parts for quilled flowers. I've never liked quilling so I was disappointed when I bought that die and never used it.

What a great trade! My partner also threw in a tiny flower die, a brackets die, and a little embossing folder with text.

Here is the main die:

It is a Sizzix that cuts three sizes / two styles of blooms.

Looking forward to using this.

Ddd


Posted by studio3d@ccgmail.net at 12:01 AM PDT

Newer | Latest | Older