« May 2013 »
S M T W T F S
1 2 3 4
5 6 7 8 9 10 11
12 13 14 15 16 17 18
19 20 21 22 23 24 25
26 27 28 29 30 31
You are not logged in. Log in
Entries by Topic
All topics  «
3D paperwork
A - Z challenge 5
A - Z challenge 7
A - Z challenge round 4
A to Z challenge round 3
A to Z round 2
A to Z round 6
A-Z round 1
Around the House
Art Challenges
Artist Trading Cards
Backgrounds
Beads
Bible Journaling
Books
Boxes
Collage
Color Challenge
Coloring
cookbook
Die Cuts
Digital Projects
Digital Stamps
Drawing
Dry Embossing
Fabric Stuff
Fantastic Folds
Field Trip
Home Decor
How Does Your Garden Grow?
Hymnal Art
In The Kitchen
In the studio
Jewelry
Lettering
Links
Multi-Technique
Music to Work By
Musings
Nail Art
New Work
Online Class
Other Hobbies
Other Projects
Painting
Paper Embroidery
Paper Piecing
Photo
Pretty Paper
Quilting
Random
reading
Scrap Recovery
scrapbooking
Sewing
Sketch Challenge
Some Backlog
Stamping
Stencils
Stickers
Supplies
Teabag Folding
Techniques
Testing
tips and tricks
Tutorial
Web resources
Welcome to my Blog
Work By My Friends
workflow
Writing
Blog Tools
Edit your Blog
Build a Blog
RSS Feed
View Profile
Group One
In & Out of Studio 3D
Friday, 3 May 2013
You... Today
Topic: Backgrounds

I liked this set of two backgrounds so much that I did not want to cover them up. I decided to mount a combination of small stamps together on an acrylic block to create a little scene with lots of open space.

On the first one I used some soft pinks and blues

...and the second one has a range of pinks and reds

I used markers to color in the dragonfly, the flower centers and the floral graphics in the large word stamp.

Mountings are on coordinating card bases under black bordering.

Ddd


Posted by studio3d@ccgmail.net at 12:01 AM PDT
Thursday, 2 May 2013
Sweet Treat
Topic: Backgrounds

More with the daisy... I loved the cheerful look of this background after coloring it and wanted to keep that light-hearted spirit going. I did this by spreading the daisies apart to expose more of the background and by using a fun sentiment in a casual font.

Black border reinforces the stamping and a pink card base reinfordes the dots in the background.

Ddd


Posted by studio3d@ccgmail.net at 12:01 AM PDT
Wednesday, 1 May 2013
Bright Birthday
Topic: Backgrounds

The color combination on this card almost looks like neon ink! I LIKE! It is still a combination of a distress ink colored waxed paper background over which a Staz-on stamped image is colored with distress markers.

In this case I spread the flowers out around a stamped sentiment and bordered it with black to reinforce the line images.

I used a card base that matched the background for contiuity.

Ddd


Posted by studio3d@ccgmail.net at 12:01 AM PDT
Tuesday, 30 April 2013
Dusty Daisies
Topic: Backgrounds

I wasn't sure what I was going to do once I colored up this background with such a bright purple. Once I pulled out the large daisy stamp, though, I knew I was on the right track. I used dusty purple and rose to color in the petals and centers. YUM!

Rose was selected for the card base to reinforce the flower centers.

The sentiment is constructed from a multi-word set that lets you mix and match for a variety of text.

Ddd


Posted by studio3d@ccgmail.net at 12:01 AM PDT
Monday, 29 April 2013
Three More Thoughts
Topic: Backgrounds

In the stamp set I used yesterday there is a second graphic flower. I decided to use that one for the card today.

The background was very soft and subdued and these flowers are casual so they made a restful combination. By using the black bordering and a sand colored card base I kept it monochrome.

As a finishing touch I placed 5-petal paper flowers in the center of each and anchored them with a black rhinestone.

Ddd


Posted by studio3d@ccgmail.net at 12:01 AM PDT
Sunday, 28 April 2013
Blocky Blooms
Topic: Backgrounds

With a busy pattern in the background I selected a more graphic type of stamp for the flowers. I colored in the open areas with distress markers and stamped a sentiment in the open area.

Behind the fine black border I added a golden card base to echo the color in the flower centers.

Ddd


Posted by studio3d@ccgmail.net at 12:01 AM PDT
Saturday, 27 April 2013
All Smiles
Topic: Backgrounds

This background turned out a little busy so I wanted to use a little boldness to bring the focus back to the sentiment.

I stamped the sentiment on a white punched circle from the scrap pile. Then I used distress ink to color the edges to match the background. a fne line marker was used to draw in some faux stitching. I had some die-cut swirls o hand so I tucked them around the circle and glued them down.

I fiinished off each of the swirls with a teal rhinestone and added one more to dot the I.

Ddd


Posted by studio3d@ccgmail.net at 12:01 AM PDT
Friday, 26 April 2013
Row Houses
Topic: Backgrounds

With this background I colored with a blue distress ink first. Since I had the house out from yesterday I used it again, stamping three times across the page. I used a fine line Sharpie to draw in architectural and siding details. I used distress markers to color in the houses and Staz-on ink to add the sentiment.

Black bordering over violet card base brings the color in to match the center house.

Ddd


Posted by studio3d@ccgmail.net at 12:01 AM PDT
Thursday, 25 April 2013
Thinking Of Home
Topic: Backgrounds

The background for this was so angular that I wanted to reinforce that look. So I used the house stamp and colored it in with markers. I stamped sentiments foloring the angles of the roof and wrapped around the bottom corner. The large word has some oen area graphics embedded so I colored them with marker as well.


A black border over a bright orange folded card base frames it out.

Ddd


Posted by studio3d@ccgmail.net at 12:01 AM PDT
Wednesday, 24 April 2013
In The Woods
Topic: Backgrounds

I had two more of the woodgrain waxed paper backgrounds made up so worked them up with the same general technique for two cards today. I had the set of skeleton leaves out for yesterday's card so I stamped three different ones as borders around the card. I used Staz-On ink for this so it would not smear when coloring. Each leaf type was colored with a different distress marker.

These panels were trimmed and bordered with black over a raspberry card base.

In each case I stamped a sentiment on green, rounded the corners, bordered in black.

In both cases the sentiment block is raised on foam tape.

Ddd


Posted by studio3d@ccgmail.net at 12:01 AM PDT
Tuesday, 23 April 2013
Treestand
Topic: Backgrounds

Back with more of the waxed paper backgrounds. This time I had woodgrain that I colored with distress ink in brown over all. Then I stamped a stand of trees at the bottom edge. They weren't wuite dense enough so I overstamped them with a skeleton leaf. Not noticable in detail but increases the density.

I used golden marker to color over the tree shapes, green over the ground, yellow over the knothole to turn it into a moon, and blue over the rest of the sky.

Hmmm, that photo is a little dark.

Anyway, I bordered with black over a lemon yellow card base and added a strip of yellow card with a stamped greeting.

Ddd


Posted by studio3d@ccgmail.net at 12:01 AM PDT
Monday, 22 April 2013
Dizzy Daisies
Topic: Quilting

My latest quilt is 41 x 48 made from two coordinating daisy fabrics that were donated to me. I used a double pinwheel pattern from Eleanor Burns for the blocks but did my own layout as I did not have enough fabric for all the blocks her layout called for. I ended up with 14 of each block style so I used 12 of one for the center and 12 of the other for the border, separated by a white sashing. Two more blocks were split on the diagonal to make corner pieces and the rest of them will be used to make some potholders.

I used a golden yellow thread to quilt using free-motion daisies in the center of each pinwheel, both large and small. On corners and edges I made just half or quarter flowers as needed.

You actually see the quilting better on the back as I used the same thread over a dark green dot.

I think daisies are such a cheerful flower, don't you?

Ddd


Posted by studio3d@ccgmail.net at 12:01 AM PDT
Sunday, 21 April 2013
It's A Dry Heat
Topic: In The Kitchen

I enjoyed (past tense) so much the banana chips and dried apples that I made so decided to make more. I also wondered how it would be to have some dried mushrooms on hand so I first made a batch of those

The second day I dried banana chips:

The third and fourth days I dried batches of apples. Here is the last batch in the racks ready for the dehydrator:

What delicious, healthy snacks!

Ddd


Posted by studio3d@ccgmail.net at 12:01 AM PDT
Saturday, 20 April 2013
You Make Me Smile
Topic: Photo

Just walking along the sidewalk outside the library and my eye is caught by a little 'manhole' cover. It is probably 10 inches across and has these two holes side by side. There is a little dimple right in the center and by some strange chance a seed pod off a tree has settled across the bottom. That one random thing has instantly turned it into a little face!

It made me smile. Do I have a camera? No. Is there anyone around I can show it to? No. But it is so cute.... Oh, yeah, my phone takes pictures.

So I got out my flip phone and took a shot of it and hit the SAVE so I could show it when I got home. I even thought I might be able to get it off to my computer. Turns out I have the perfect combination of 'dumb phone, dumb plan' and I can't transfer, email, post, anything. I can JUST make calls.

So I ponder my little picture and there is a button for OPTIONS. One of them is to make the picture the wallpaper. Tah Dah! Now I see this cute little face every time I look at my phone screen (all 1.25 inches square of it) and every time - it makes me smile.

So how did I get this to show you? I had to use my regular camera to take a picture of the screen of my phone! Lame technology.

Ddd


Posted by studio3d@ccgmail.net at 12:01 AM PDT
Friday, 19 April 2013
It's Curtains For You
Topic: Sewing

In order to clean up the look in my quilt studio I decided to make curtains to cover the closet opening. While I was at it I made a matching valance for the window.

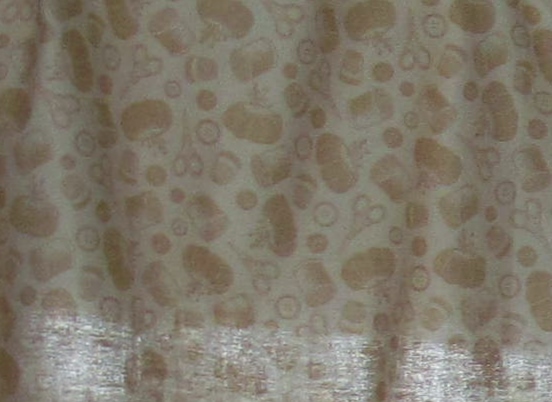
I found this wonderful fabric in the discount room at the fabric store and bought the end of the bolt. As you can see, it has sewing supplies printed all over it thread, buttons, scissors, pin cushions, and thimbles.

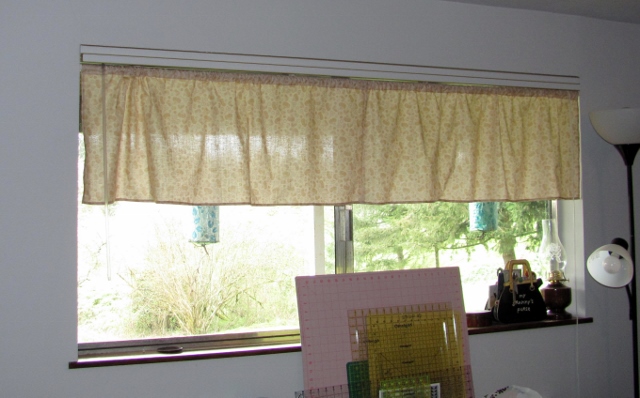
Because there were two separate pieces at the end of the bolt it pre-determined the amount of fabric I had for the window (just one yard.) I cut it into two pieces of 18 inches, joined them at the center and created a pocket for the rod. Hemmed all around. If I were to do this again I would make the valance shorter and fuller by making three sections of 12 inches.

The rest of the fabric was cut into three panels, rod pockets sewn and the ends hemmed. I did not join the sides of these as I wanted to be able to go in and out of the closet at more than just the ends. The pre-determined length leaves them a little short at the bottom but it will allow for some air flow so things don't get stale in there.


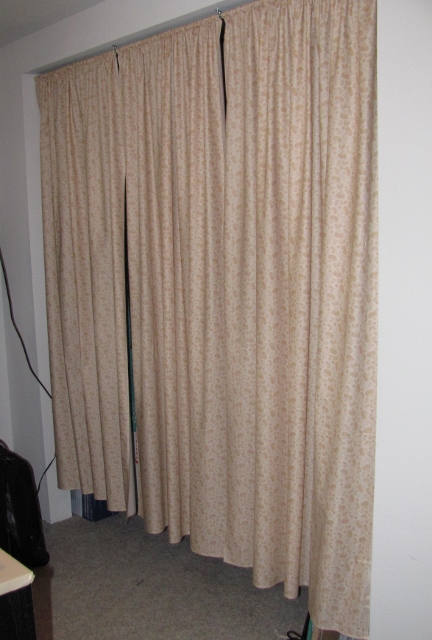
Both of the curtains are installed on extension rods. The closet curtains were a bit heavy causing some bowing of the rod so I put in some U-brackets at the intervals between the panels.

Ddd


Posted by studio3d@ccgmail.net at 12:01 AM PDT
Thursday, 18 April 2013
Flowers Are A Treat
Topic: Backgrounds

I tried using two blues and two greens to make the diamonds look dimensionsl on this background. It left too much space between the blocks so I filled the spaces with Mustard distress pen and it blended everything into a multi-toned green.

That was pretty boring so I got out a large floral stamp and covered the surface with the bloom. A green cardstock was selected for the text block and backed with black. Three strands of green twine were added and secured with a knot.

I bordered the floral panel with black and popped the sentiment block up on foam tape.

Ddd


Posted by studio3d@ccgmail.net at 12:01 AM PDT
Wednesday, 17 April 2013
Be Loved
Topic: Backgrounds

I got out the heart waxed paper background and colored it up in three vibrant pinks/reds. I stamped a sentiment on pink and backed it with red, creating a flag end.

Some dark pink twine was looped around the front twice and knotted.

Ddd


Posted by studio3d@ccgmail.net at 12:01 AM PDT
Tuesday, 16 April 2013
Butterscotch Background
Topic: Backgrounds

The argyle pattern of this waxed paper background turned out well in mustard yellow and gathered twig distress inks. They blended to a nice butterscotch. I wanted to see lots of the background so I banded a sentiment in brown and mounted it low on the card front.

I had some diecut swirls in a butterscotch cardstock so added them around the sentiment. I went in with a fine line brown marker and added some detail work around the ends of the swirls making them look paisley.

A brown rhinestone was added to each paisley end.

Ddd


Posted by studio3d@ccgmail.net at 12:01 AM PDT
Monday, 15 April 2013
Simple Hello
Topic: Backgrounds

Sice I had the waxed paper backgrounds out for the last few projects I decided to just keep playing with it.

I combined yellow and blue inks on this background whick blended up to a nice green. I used a dark green card base and stamped the greeting directly on the background using Staz-On.

I attached three paper flowers with glue dots and placed a black rhinestone in the center of each.

Ddd


Posted by studio3d@ccgmail.net at 12:01 AM PDT
Sunday, 14 April 2013
Frosty Woods
Topic: Stencils

Another new stencil for me is of birch trees. Love these.

I chose a waxed paper background with a crackled appearance and taped the stencil down. By blocking off the trunks I was able to ink in the sky background and the snowbanks. Then I removed the blackout paper and carefully inked just the tree trunks with brown.

After removing the stencil there was not enough definition of the trees aso I used a fine line brown pen to line along the left of them all.

I mounted on dark blue-gray and stamped a sentiment on light blue-gray. The latter got a flag end and three brown rhinestones.

Ddd


Posted by studio3d@ccgmail.net at 12:01 AM PDT

Newer | Latest | Older