« November 2013 »
S M T W T F S
1 2
3 4 5 6 7 8 9
10 11 12 13 14 15 16
17 18 19 20 21 22 23
24 25 26 27 28 29 30
You are not logged in. Log in
Entries by Topic
All topics
3D paperwork
A - Z challenge 5
A - Z challenge 7
A - Z challenge round 4
A to Z challenge round 3
A to Z round 2
A to Z round 6
A-Z round 1
Around the House
Art Challenges
Artist Trading Cards
Backgrounds
Beads
Bible Journaling
Books
Boxes
Collage
Color Challenge
Coloring
cookbook
Die Cuts
Digital Projects
Digital Stamps
Drawing
Dry Embossing
Fabric Stuff
Fantastic Folds
Field Trip
Home Decor
How Does Your Garden Grow?
Hymnal Art
In The Kitchen
In the studio
Jewelry
Lettering
Links
Multi-Technique
Music to Work By
Musings
Nail Art
New Work
Online Class
Other Hobbies
Other Projects
Painting
Paper Embroidery
Paper Piecing
Photo
Pretty Paper
Quilting
Random
reading
Scrap Recovery
scrapbooking
Sewing
Sketch Challenge
Some Backlog
Stamping  «
Stencils
Stickers
Supplies
Teabag Folding
Techniques
Testing
tips and tricks
Tutorial
Web resources
Welcome to my Blog
Work By My Friends
workflow
Writing
Blog Tools
Edit your Blog
Build a Blog
RSS Feed
View Profile
Group One
In & Out of Studio 3D
Friday, 29 November 2013
Big Birthday
Topic: Stamping

I needed a person-specific birthday card this week and decided to do some stamping. I started with two birthday stamps, left off the greeting on the upper one and stamped them one above the other on bright yellow cardstock. There was not much room for coloring on these but I added some bright markers to the candles and flames. I also decorated the lettering with some black dots.

This panel got bordered in black. Then I found two pieces of graphic black and white cardstock. The chevron got cut into 1/2 inch strips to use as a frame. The diagonal wide stripe got colored with a variety of bright markers.

I mounted the graphic panels onto a yellow card base and the text panel is popped up on foam tape.

I seldom decorate the inside of cards but decided to do it on this one. I cut a couple more strips of the graphic cardstocks and mounted them down the left side. Then I drew a black border to contain the elements and echo the look of a frame from the front.

The age was stamped with my 'hacked' number set and a greeting got hand-lettered. When the sentiment mentioned 'banner' I knew I needed to include one in the card. I hand-drew and decorated the banner and colored it and the numbers with bright markers.


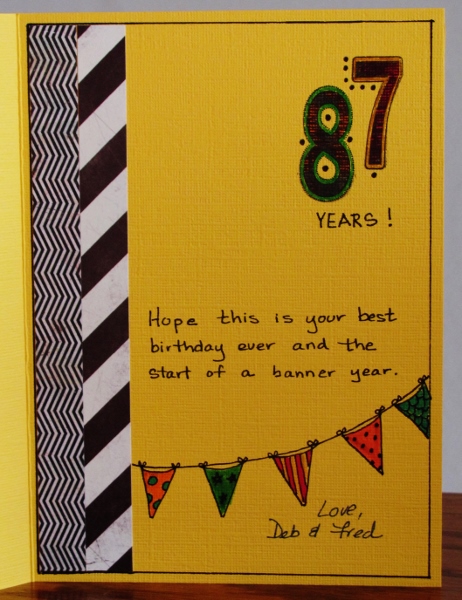
I added some black dots around the numbers to echo the dots on the front panel text.

Ddd


Posted by studio3d@ccgmail.net at 12:01 AM PST
Sunday, 1 September 2013
Applying the Lesson Learned
Topic: Stamping

As proof that I had learned my lesson, here are three more cards using the same embossed image from two days ago. That one I had colored using alcohol markers and found that they melted the embossing powder. It also removes the shine from the embossing so the image does not have a finished look.

I had stamped and embossed three other times - once on regular cardstock and twice on watercolor paper - when I created the original card. So I colored them up with watercolor markers this time. In each case I used three values on the petals, two on the leaves, and one on the stems.

This first one uses oranges for the blooms. This is the closest to the one I did with alcohol markers and it is on regular cardstock like that one, too. I used an aqua-brush to blend the colors. I bordered with neon green and black before popping up on foam tape over a patterned paper.


The next one is on watercolor paper and I used three bright pinks on the flowers. This got borders of hot pink and black and is popped up on foam tape over a houndstooth paper. I used a bright red-violet for the card base. Love the graphic look of this.


The last one is also on watercolor paper. I used dark pinks and burgundy for this image and darker greens for the leaves. A green and a black border were applied and popped up on foam tape over a third border of burgundy. I placed this all on a latice background so ithad a more formal feel than the others.

I left these all without sentiments to let the illustration remain the center of attention.

Ddd


Posted by studio3d@ccgmail.net at 12:01 AM PDT
Friday, 30 August 2013
Lesson Learned
Topic: Stamping

I needed a card for a swap that used wet embossing. This background stamp is one that I picked up for the online class 'Stretch Your Stamps' last year and I hadn't used it since. But I remembered how awesome it looked when embossed in black and colored with markers.

What I did NOT remember was that I had done the coloring before using watercolor markers. The lesson I learned doing this was that Copics, Sharpies, and other alcohol markers will melt the embossing powder and smear that color into the image.

I was fortunate that I noticed it as soon as I started the first bloom (lower left one) and after that I avoided letting the markers come into contact with the black powder.


I used three oranges, two greens, and a stem brown. Then I bordered the trimmed image in neon green, black, and pumpkin orange. This was popped up on foam tape over a black diamond background on an orange card base.

Ddd


Posted by studio3d@ccgmail.net at 12:01 AM PDT
Tuesday, 6 August 2013
Multi-Purpose Word Frame
Topic: Stamping

I have a set of clear stamps that is strictly text - individual words. These can be mounted on a single acrylic block to form sentiments and phrases. I had an idea to use multiple words to make a frame for joyous occasions.

I placed the words with three corners being made of two word phrases. After I stamped this it wasn't clear that it was not one big run-on sentence so I used markers to color block them. I also used marker to frame the center sentiment which is from a different set entirely.

On two of the cards I used two clock images to do second generation stamping in brown ink to create a background, rounded the corners and distressed the edges with old paper distress ink. The last card has no distressing or background stamping.

After that it was just the mounting. I cut a 6" paper apart so I could spread it to go to the ends of my 5x7 card base (with a thin border exposed). Then I cut and bordered an accent strip to cover this gap. I tied colored twine (on two of them), mounted the bordered sentiment on foam tape and added some bling to finish it off.

This first one I sent as a graduation card for a young lady:


And the second one was a birthday card for a man

The third one was also a birthday card but for a woman. I used a different center sentiment on this one, too.


I think this makes a good mix of masculine/feminine, non-specific celebration occasions, and vintage/modern.

Ddd


Posted by studio3d@ccgmail.net at 12:01 AM PDT
Updated: Friday, 28 June 2013 1:51 PM PDT
Friday, 7 June 2013
Write It On The Board
Topic: Stamping

I've been seeing cards all over the net with what is called the 'chalkboard technique'. I wanted to have a go at it myself and finally made some time for it.

Multiple images and sentiments are stamped on black cardstock with Versamark ink and embossed with white powder. Then some whitish chalk ink is lightly smeared onto the background to look like chalk dust. I used a white gel pen to add some doodling and some border lines. Colored pencils were lightly applied over selected areas and the piece was trimmed out. I had some black photo corners on hand so added these on all the chalkboards.

I used the same stamp combination on three pieces of cardstock and then mounted them on different color combinations of card base and chevron paper.

On the blue one I added accents of shaped rhinestones (using glue dots) and doodled in some borders and a bunch of dragonflies with black Sharpie. The dragonflies were colored in with white gel pen and over-colored with blue colored pencil.


I did a version in yellow and orange and added colored rhinestones throughout. Three paper flags were added to the right and each of these got rhinestones as well. I used the Sharpie to add doodles in the chevron paper.


Finally, I made a pink and purple combo. Shaped rhinestones, colored paper flags and some clear acrylic hearts are the accents. Sharpie doodling on the chevron paper is the finishing touch.


It is definitely a different style for me. I might try it again some time but I can't see doing it a lot. On the other hand, now I can check that off my to-do list.

Ddd


Posted by studio3d@ccgmail.net at 12:01 AM PDT
Friday, 12 April 2013
Hills And Valleys
Topic: Stamping

I used another scenic stamp for today's cards, With cocoa brown Memento ink. This is a vertically alligned stamp so I did four of the cards in that orientation.

The lighting is terrible for these as the lavender fades right into the white background. I used green patterned strips for backing and bordered the image panel with brown. I stamped the sentiment directly on to the green strip and used a few brown rhinestones for accent.

For the next set I changed the greeting on one and changed the rhinestones to nail head stickers for the other.

On the last one I went back to the landscape orientation and used a wider strip of green paper. I also used a violet backing card for better contrast.


I stamped the sentiment directly on the card base and finished off with a strip of brown rhinestones.

Ddd


Posted by studio3d@ccgmail.net at 12:01 AM PDT
Thursday, 11 April 2013
Landscape Landscapes
Topic: Stamping

While I had the scenic stamps holder out I decided to use another couple of them to make cards. The first I chose is a fenced pasture with trees and mountains background. I used the same colors of alcohol markers on all four of these.

Two of them were bordered with brown, backed with a purple strip and mounted on light green card bases. Text was stamped directly on the card base and the sentiment enhanced with tiny green rhinestones as a leader.

The second set got the same basic treatment with dark green card bases. The background was too dark to stamp the sentiment so I stamped it on a scrap of paper that matches the dirt road, cut a flag end and adhered it to the card front. I kept the leading green rhinestones.

All of these have the image panel mounteed on foam tape.

Ddd


Posted by studio3d@ccgmail.net at 12:01 AM PDT
Wednesday, 10 April 2013
Up On Blocks
Topic: Stamping

I had some of the images I stamped yesterday left over but they had been stamped on plain cardstock (not glossy). For the most part they took the alcohol markers OK but that purple was WAY too dark on these. I used the alcohol blender to color over the top to lighten the tone so it fits with the rest of the colors better.

I pulled out some green backing cardstock and a couple of purples in card bases. Each of the images and the green blocks were backed with black. The images are all popped up on foam tape.

I pulled out some little animal charms and tied their loops with a variety of twine colors. These are popped up on foam tape as well.

Not sure if those are zebra, wildebeast or some animal that doesn't exist except in the imagination. But they lend a cheery gleam to the design.

Ddd


Posted by studio3d@ccgmail.net at 12:01 AM PDT
Tuesday, 9 April 2013
Leafy Hello
Topic: Stamping

These projects started out when I ran across a leafy branch die cut I got a while back. I had not used it yet. I went looking for a stamp that I could use as a feature that would be complemented by the die cuts.

I selected this mountain scene from a set of scenic stamps that I have in green unmounted rubber. I stamped on glossy cardstock with Cocoa Memento Ink and colored using alcohol markers. The purples I had were too dark in relation to the other colors so I touched the tip to a blender pen and used that to color in the mountain.

I stamped the bold script greeting over the image and trimmed it out to mount on the black dotted paper. Leaves were cut from a variety of green patterned papers which were glued to overlap the image panel.

Two were designed in landscape and use violet card bases. 

Three were done in portrait orientation and mounted on lavender card bases. Here are two of them together.

Here is the third one - closer to show details.

Simple but pretty.

Ddd


Posted by studio3d@ccgmail.net at 12:01 AM PDT
Saturday, 23 March 2013
Sitting Pretty
Topic: Stamping

This image came to me in a swap a long time ago and I just ran across it and decided to color it up. Since I didn't stamp it I took a chance by using Copic markers as I didn't know what kind of ink was used for the image. Only the yellows used on the headband and socks bled the image ink but I don't mind.

I used three tones in the hair and two each in the skin, sweater, skirt, socks and shoes. I used a combination of Copics, Spectrum Noir, and Bic Mark-It markers. I also added a cool grey halo around her and drew in some simple lines to provide seating for her.

I picked up the colors in her hair in the houndstooth, the dots in the socks in two black dotted papers, and her clothing in a teal band of patterned paper.

The girl and her background are popped up on foam. The sentiment is stamped onto the teal strip.

Ddd


Posted by studio3d@ccgmail.net at 12:01 AM PDT
Friday, 22 March 2013
Llama Always Thinking Of You
Topic: Stamping

This is the first time I have colored this llama (one of my hand carved stamps) with Copic markers. I've usually never even done any shading on it. I actually like this effect a lot.

I trimmed him with a very fine white edge so he would stand out from the background. I chose a houndstooth to pick up color from the fur and a plue panel to mimic the eyes. The main panel was cut to reveal a thin white edge like the llama and he is popped up on foam tape.

Three square brass 'nail head' stickers mimic brads.

Ddd


Posted by studio3d@ccgmail.net at 12:01 AM PDT
Thursday, 21 March 2013
Raccoon Love
Topic: Stamping

To feature this raccoon (one of my hand carved stamps) I chose a striped paper and added a thin band of black dot paper plus a wide band of white with a scalloped border punch. I thought this would evoke the feeling of water. I popped the raccoon up on foam tape.

I added a white diecut spiral heart and added text with diedut words in tones to match the brown stripes in the paper.

Ddd


Posted by studio3d@ccgmail.net at 12:01 AM PDT
Wednesday, 20 March 2013
They're Ba-a-ack
Topic: Stamping

Just LOOK! I found even more of these stamped LOVE hearts hiding in the parts and starts drawer. SIGH, will I never see the end of these? I guess if I do I can always stamp more.

For the blue one I chose a tag and a couple of muted toned papers. This is on a soft pink card base. I also added a diecut swirl and three tinted acrylic heart stickers along the bottom.


I had a bright yellow heart as well and found some striped paper that I had colored with yellow and printed a herringbone pattern on. Some black and white herringbone coordinates with that which leads to the black and white dot. From the red in the paper I chose to add three tones of reds in blocks and swirls.

No sentiments added because, after you've said 'love' 35 times, what more do you need?

Ddd


Posted by studio3d@ccgmail.net at 12:01 AM PDT
Tuesday, 19 March 2013
Checking In
Topic: Stamping

Every now and again I sort through a box where I have just tossed miscellaneous parts that didn't get used on a project where it was planned. In just such a foray I ran across this duo of a fully stamped image and a spotlight cut of part of the same stamp. Time to put these to use.

I popped the spotlight image up on foam and selected black papers as a contrast to the tan image. I chose a coffee brown to band all of them. A simple layout.


This is one of my hand carved stamps.

Ddd


Posted by studio3d@ccgmail.net at 12:01 AM PDT
Monday, 18 March 2013
Cut, Color, Paste
Topic: Stamping

I had lots of little bits of patterned paper so I used some of them up by stamping parts of an image on them for paper piecing.

I stamped the whole image on white cardstock to start. Then I colored the flesh areas, the blouse and the skirt ruffle using Copic markers. I used four patterned paper images to cut out the hair, pinafore, bunny and boots.

I used liquid pearls on the flowers in the hair and on the dress and the buttons on the boots. Then I put Stickles on the wings.

With two completed images I chose patterned papers and card bases for each trimmed the images and rounded the corners. These are the resulting cards.


I stamped the sentiments on them,

Ddd


Posted by studio3d@ccgmail.net at 12:01 AM PDT
Monday, 4 March 2013
Sleepy Bears
Topic: Stamping

In my new sets of MFT fundraiser stamps I got two of them with bears. I especially like this sleepy bear sharing his nap time with a little mouse.

I colored these up on watercolor paper with Distress Markers and added a little line with Sharpie marker to ground him. Rounding the corners lends a more casual feel to the image.

I matched each bear up to come background papers, drew in doodle lines, and stamped the sentiments.

On this last one I replaced the sentiment with some little dream hearts.

The background papers with hearts and 'love' text match the theme.

Ddd


Posted by studio3d@ccgmail.net at 12:01 AM PST
Updated: Tuesday, 26 February 2013 9:37 AM PST
Sunday, 3 March 2013
Bent Poppies
Topic: Stamping

As a followup to the whacked bunny ears I went looking for other line image stamps in my collection that could have the background removed to make them shape shifters. I came up with a poppy image and not only cut out the petals bue made slits between the elements of the inner flower so it could shift too.

I applied the image to the acrylic block, stamped one poppy on watercolor paper then adjusted the petals to stamp two different arrangements on each sheet. I ended up with 4 groupings.

After coloring (Distress Markers and watercolor techniques) I trimmed them very close so the images would spill out of the frame. Each was paired up with matching papers and mounted to card fronts.

The doodle lines were drawn in with Sharpie marker and the sentiments stamped from the new bunny stamp sets.

Ddd


Posted by studio3d@ccgmail.net at 12:01 AM PST
Updated: Tuesday, 26 February 2013 9:37 AM PST
Wednesday, 27 February 2013
Rabbit Food
Topic: Stamping

I mangled the ears on my other bunny stamp and had a go at making some cards with it. This one is of a bunny roasting marshmallows over a campfire. I resisted the urge to blacken the marshmallows or set them afire - just left them white like they are straight out of the package.

I used lots of different color combos for the different rabbits but colored the fire and grass consistently. I trimmed the panels, rounded the corners, drew in doodle lines and mounted with a variety of matching papers.

The greetings are stamps from the bunny sets.

Ddd


Posted by studio3d@ccgmail.net at 12:01 AM PST
Updated: Tuesday, 26 February 2013 9:36 AM PST
Tuesday, 26 February 2013
Twisted Bunnies
Topic: Stamping

The bunny stamp I used yesterday has these big loopy ears. I decided to do a little surgery on him to make him more flexible. Here's how:

Here you can see the flat material inside the ears. This is what I removed:

I folded the ear in half from the end and used sharp scissors to cut a slit:


With the ear flattened back out I put the point of the scissors in the slit and cut the material out:

This is what it looks like after the surgery:


The bunny still lays normally on the acrylic block if you want it to:

But you can lift the ear off the block adjust the line and stick it back down:

Adjust one ear or both:

Now you can give your bunnies more personality. These are the cards I made - same stamping, coloring and mounting process:

Some are less successful than others:

I have another bunny stamp that I plan to subject to the same treatment before stamping him.

Ddd


Posted by studio3d@ccgmail.net at 12:01 AM PST
Monday, 25 February 2013
Bunny Bonanza
Topic: Stamping

I recently picked up some stamps from My Favorite Things and two of them are adorable bunnies. I stamped one of them on watercolor paper a few times and used Distress Markers and a water brush to color them in.

I pulled out a variety of shape dies and used a technique called 'out of the box' to cut the die shapes while leaving bits of the bunny and hearts overhanging the shape edge.

Then I scanned through my papers to select two or more to go with the coloring of each image. These are the cards I ended up with.


Something really fun with this stamp tomorrow.

Ddd


Posted by studio3d@ccgmail.net at 12:01 AM PST

Newer | Latest | Older