« April 2014 »
S M T W T F S
1 2 3 4 5
6 7 8 9 10 11 12
13 14 15 16 17 18 19
20 21 22 23 24 25 26
27 28 29 30
You are not logged in. Log in
Entries by Topic
All topics  «
3D paperwork
A - Z challenge 5
A - Z challenge 7
A - Z challenge round 4
A to Z challenge round 3
A to Z round 2
A to Z round 6
A-Z round 1
Around the House
Art Challenges
Artist Trading Cards
Backgrounds
Beads
Bible Journaling
Books
Boxes
Collage
Color Challenge
Coloring
cookbook
Die Cuts
Digital Projects
Digital Stamps
Drawing
Dry Embossing
Fabric Stuff
Fantastic Folds
Field Trip
Home Decor
How Does Your Garden Grow?
Hymnal Art
In The Kitchen
In the studio
Jewelry
Lettering
Links
Multi-Technique
Music to Work By
Musings
Nail Art
New Work
Online Class
Other Hobbies
Other Projects
Painting
Paper Embroidery
Paper Piecing
Photo
Pretty Paper
Quilting
Random
reading
Scrap Recovery
scrapbooking
Sewing
Sketch Challenge
Some Backlog
Stamping
Stencils
Stickers
Supplies
Teabag Folding
Techniques
Testing
tips and tricks
Tutorial
Web resources
Welcome to my Blog
Work By My Friends
workflow
Writing
Blog Tools
Edit your Blog
Build a Blog
RSS Feed
View Profile
Group One
In & Out of Studio 3D
Friday, 18 April 2014
Operation Write Home sketch 55
Topic: Sketch Challenge

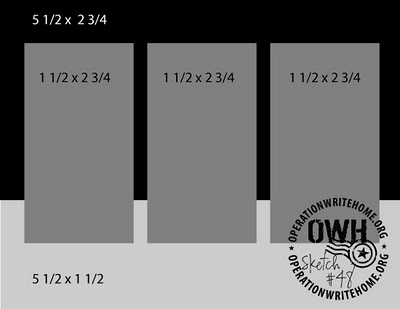
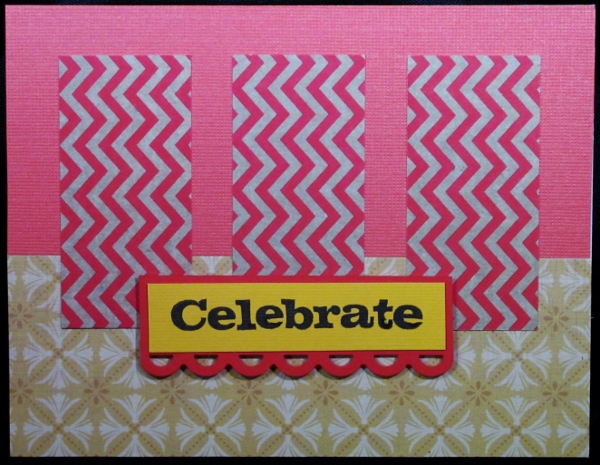
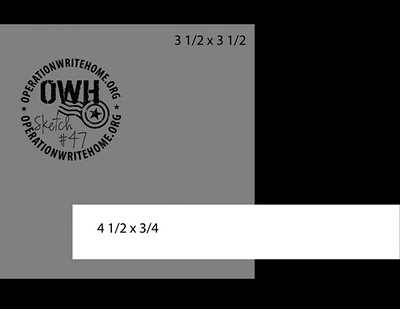
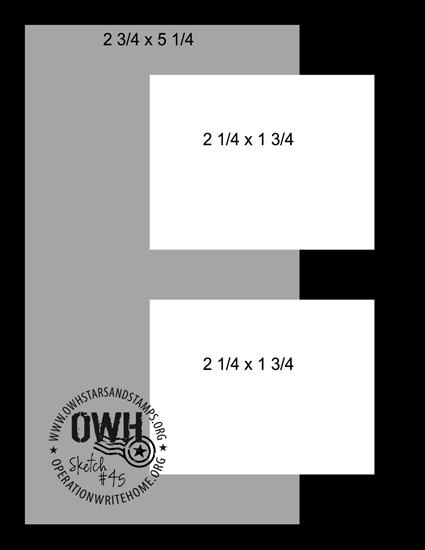
Now presenting OWH sketch 55 - and look at that, I kept to the prescribed layout two days in a row:

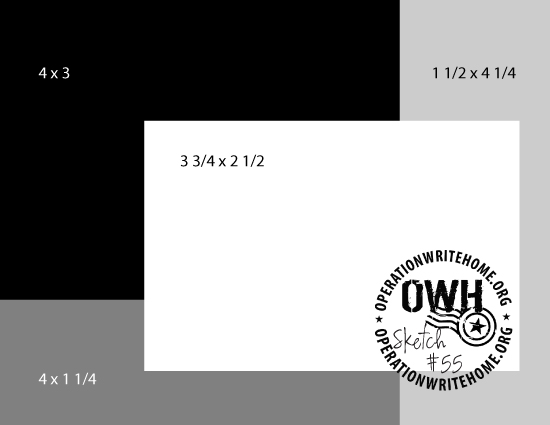
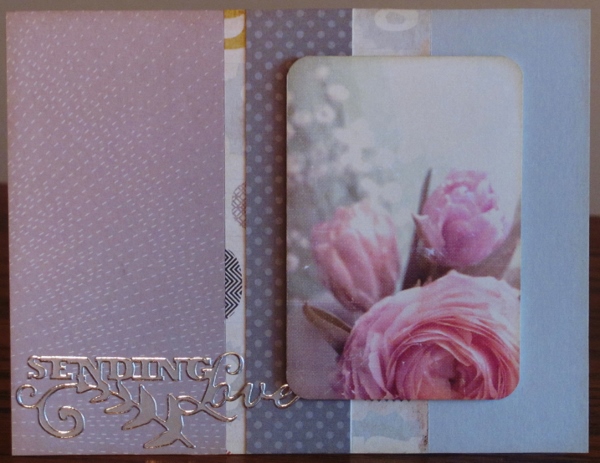
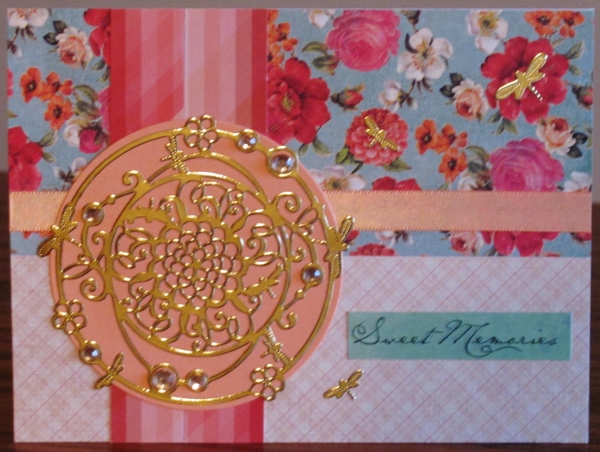
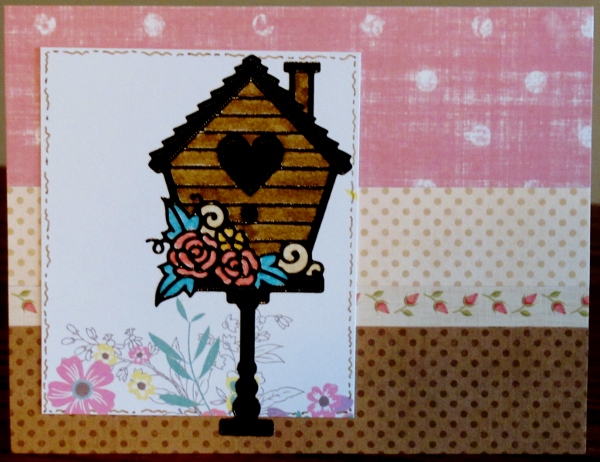
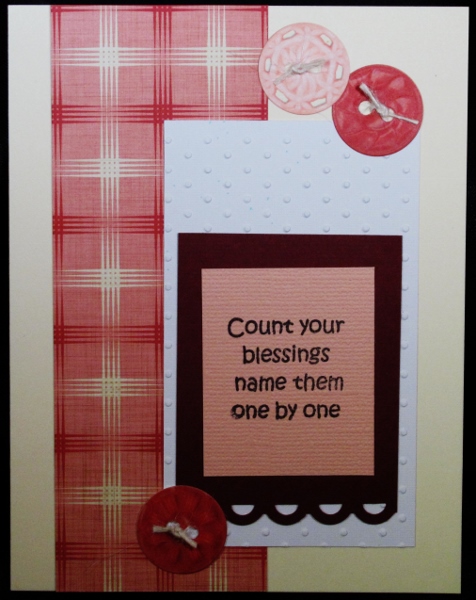
I'm so amazed I stayed with the sketch! But, then, I wasn't using all scraps like before. This allowed me to actually cut the sizes I wanted. When I think about it, the upper left piece is the only one that is not scraps so I guess I did pretty well. I cut that piece for the background because it was a companion to the flowers across the bottom edge of the center feature.

I chose to border the center element with yellow to pull that color from the background papers. By repeating that color on the stamped sentiment strip it brings the focus to the message.


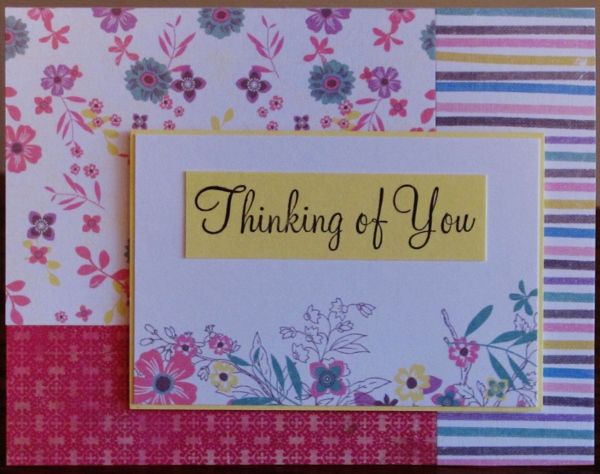
The center panel is also popped up on foam tape to add interest.

Ddd

Posted by studio3d@ccgmail.net at 12:01 AM PDT
Thursday, 17 April 2014
Operation Write Home sketch 54
Topic: Sketch Challenge

On we go - to OWH sketch 54:

Oh my goodness! Look quick! I followed a sketch!

I knew I wanted to use the map image for the round element to make it resemble a globe. I chose very plain papers for the background in colors to represent sky, earth and ocean. The chevron paper represents nothing in particular but it jazzes up the piece and the color was good.

I used a round die to cut out the globe and to emboss the edges. Then I applied Distress ink to the edges to add some dimension.

Three cardstock work stickers add a touch of whimsy.

Ddd


Posted by studio3d@ccgmail.net at 12:01 AM PDT
Wednesday, 16 April 2014
Operation Write Home sketch 53
Topic: Sketch Challenge

Here we go again - OWH sketch 53:


I promise I really did start with this sketch! When I got the two outer grey panels and the number panel between them I realized the graphic numbers were too bold and busy for what I had in mind. So I added the dotted grey strip to hide most of it.

I wanted to use a piece from the printed floral panel sheet and rounded the corners to soften it. It did not stand out from the background so I used Distress ink to darken the edges. I darkened the edges of the main card as well. My feature panel is printed directionally so I just rotated it on the card.

I went back to my new stock of Dazzles peel-off stickers and chose a silver sentiment with a flourish.

Ddd


Posted by studio3d@ccgmail.net at 12:01 AM PDT
Tuesday, 15 April 2014
Operation Write Home sketch 52
Topic: Sketch Challenge

The pendulum swings both ways as you will see in todays use of OWH sketch 52:


The biggest problem with using scraps is that they are rarely the exact size you want them to be. So when I needed a wider strip of the floral I had to splice on a strip to the bottom. The flowers didn't match up and it was pretty obvious so I added a self-stick satin ribbon across the seam.

I recently purchased a mixed bag of Dazzles (peel-off) stickers and they included this awesome medallion. I cut a circle to match the background and applied the medallion over it. I added self-stick champagne rhinestones in two sizes to circle areas of the sticker.

Three additional dragonflies and a text sticker finish this off. Compared to yesterday's card this is definitely at the other end of the pendulum swing.

Ddd


Posted by studio3d@ccgmail.net at 12:01 AM PDT
Monday, 14 April 2014
Operation Write Home sketch 51
Topic: Sketch Challenge

TIME for OWH sketch 51. Why TIME? You'll see...


This started out with a graph paper, the wavy band, a green rectangle, and the circle element punched out. Then I added the sentiment because of the clock in the circle and yawned. B-o-r-i-n-g!

I pulled out a stamp set with two clock images and applied them randomly and lightly over the background and the green rectangle. They stood out rather than blending in so I used Distress markers and an aquabrush to blend in color lightly over the clock faces.

I added a doodle line around the round piece and popped it up on foam tape to separate it from the background.

Ddd


Posted by studio3d@ccgmail.net at 12:01 AM PDT
Sunday, 13 April 2014
Operation Write Home sketch 50
Topic: Sketch Challenge

Another milestone as we reach OWH sketch 50!


Working with scraps again I came 'close' to the designated measurments on this card. In place of the foremost rectangle I applied a peel-off sticker birdhouse. I used Distress markers to color the open areas of the image to match the background elements as well as the flowers on the white piece.


I added a brown doodle line around the white piece for framing.

Ddd


Posted by studio3d@ccgmail.net at 12:01 AM PDT
Saturday, 12 April 2014
Operation Write Home sketch 49
Topic: Sketch Challenge

That was a very short break from sketches, right? Today we're back with OWH sketch 49.


I started with the floral panel which is a portion of a multi-image page. It is a bit smaller than the sketch and I also rounded the corners to soften it. The crossbar strip is from the scrap pile as it the houndstooth. However, the stripe is cut from a new page.


I used black doodle lines around one piece to tie in to the black of the stamped sentiment.

Ddd


Posted by studio3d@ccgmail.net at 12:01 AM PDT
Friday, 11 April 2014
Verdigris Nails
Topic: Nail Art

Today's nail post is not so much nail 'art' but a note on color. Rarely do I ever use only one color on my nails. I prefer to combine colors to create patterns or overlay them to make new colors.

This time I put on two base coats of robin egg blue and overlaid this with two coats of golden glitter polish. Oh yes!

Viewing the blue through the filter of the gold magically creates a greenish hue reminiscent of weathered copper. This verdigris finish has a lot of depth to it and quite a bit of shine.

I always finish up with clear topcoat and a quickdry liquid that also conditions the cuticles.

Here is a closeup of the nails.

Yep, I think I'll write down the 'recipe' for these so I can do them again.

Ddd


Posted by studio3d@ccgmail.net at 12:01 AM PDT
Thursday, 10 April 2014
Operation Write Home - sketch 48
Topic: Sketch Challenge

Time to celebrate! That's what I decided to do with OWH sketch 48:

You know, I really believe that ONE DAY I will make a card that matches the sketch. Not today, but someday! Really!

I really wanted to use up these strips of chevron paper and the background pieces I had set aside to use with them were neither wide enough to be the 'big piece' in the background. I decided to use them anyway and then discovered that the chevron pieces were also shorter than designated.

Well, that left extra room at the bottom so I decided to add a bordered sentiment. It was looking a little plain so I scallop-punched the bottom border.


The sentiment block is popped up on foam tape for a little more pizazz.

Ddd


Posted by studio3d@ccgmail.net at 12:01 AM PDT
Wednesday, 9 April 2014
Operation Write Home - sketch 47
Topic: Sketch Challenge

Sketch for today is OWH 47:

I played it fairly straight today! OK, I did cut the overall sketch down so I could leave a border of the background card exposed. This it what ties the dotted paper in with the rest of the card. And so that it would not compete with the dots I used a solid color for the background.

Having no sentiment makes this a versitile card - useable for any occasion. However, I certainly needed something more than the two blocks of patterned paper. Thus, the dragonfly sticker.

Ddd


Posted by studio3d@ccgmail.net at 12:01 AM PDT
Tuesday, 8 April 2014
Operation Write Home - sketch 46
Topic: Sketch Challenge

It is becoming obvious that I will not get through all the sketches in this year. Here we are 98 days into the year and only up to OWH sketch 46. I do, after all, have lots of other interests to pursue! Here's the sketch:


Best intentions aside, I guess the final product does have elements in common with the sketch. But several things are different as well.

I had a smaller piece to use for the light gray area, I scalloped the bottom of the white layer, and I added an additional layer on top with the sentiment. I also added three special stickers.

The white paper I used had been embossed with dots in the Cuttlebug. I felt the number and colors of the layers were going to get a bit overwhelming so I made the base of plain ivory cardstock.

The three buttons are actually stickers. I used a 1/8" punch to open the holes and knotted some cream-toned twine in the holes.

Ddd


Posted by studio3d@ccgmail.net at 12:01 AM PDT
Monday, 7 April 2014
Operation Write Home - sketch 45
Topic: Sketch Challenge

Ready for another OWH sketch? Here is number 45:

Hey this background paper looks familiar! It is leftovers from the pendant made in yesterday's post. I punched out two more circles featuring flowers to use as accents.

Then I used the supporting paper elements to cover up all the holes I had punched. The chevron paper was not as wide as designated in the sketch but actually looks better in a smaller size because of the busy print.

I added a stamped sentiment and bordered the three foreground blocks in white to separate them from the background.

The sentiment block is popped up on foam tape for interest.

Don't the circle elements look like they are holes where the background paper is showing through?

Ddd


Posted by studio3d@ccgmail.net at 12:01 AM PDT
Sunday, 6 April 2014
Last Look
Topic: Jewelry

The last project with the first round of resin is this pendant made with a floral scrapbook paper and a round punch.

I used the doming technique to make a simple disk.

This one has the gold bail visible. I only had a silver chain on hand for photography, though.

Ddd


Posted by studio3d@ccgmail.net at 12:01 AM PDT
Saturday, 5 April 2014
Domed Roses
Topic: Jewelry

One of my 6x6 scrapbook paper pads had a sheet of romantic-looking rose illustrations in little squares. I cut one of these out and used a corner rounder to soften the edges.

I used only doming on this project - no mold. The resin is poured directly on the surface and allowed to self-level right out to the edges. Surfact tension keeps it from pouring over the edges.

I decided to mount this one on angle and did so with E6000 glue and a gold pail.

Love this!

Ddd


Posted by studio3d@ccgmail.net at 12:01 AM PDT
Friday, 4 April 2014
Charming Heart
Topic: Jewelry

This parking lot find was a silver heart charm set with pink stones. I used a larger mold and first dropped pink seed beads into the resin. Then I cut the loop off the top of the charm and embedded it in the resin.

This was domed after curing and removing from the mold. A bail was attached with E6000 glue.

Ddd


Posted by studio3d@ccgmail.net at 12:01 AM PDT
Thursday, 3 April 2014
Scrappy Red
Topic: Jewelry

Another piece of the 'found in the parking lot' filigree contained red stones instead of clear. So I used a red scrapbook paper for the background but otherwise treated it just like the silver one.

Also domed after curing.

Ddd


Posted by studio3d@ccgmail.net at 12:01 AM PDT
Wednesday, 2 April 2014
Scrap Silver
Topic: Jewelry

When I went looking for things to embed in the resin I found a lot of pieced of broken jewelry that I have found in parking lots over time. One I liked a lot was a filigree piece with set stones.

I cut scrapbook paper for a background and pressed it into the resin in the mold. Then the scrap piece was added and resin poured in to cover it. Doming was done after the piece was cured and removed from the mold.

I have no idea why these gems look right when the self-adhesive rhinestones do not.

Ddd


Posted by studio3d@ccgmail.net at 12:01 AM PDT
Tuesday, 1 April 2014
Rhinestone Dragonfly
Topic: Jewelry

Just as the round rhinestones looked flattened in yesterday's project, so the rhinestone dragonfly does today. Very shiny - very flat. NOT cool!

This was also cast in a mold and domed after it had cured. E6000 used to attach a bail.

Ddd


Posted by studio3d@ccgmail.net at 12:01 AM PDT
Monday, 31 March 2014
Flattened Rhinestones
Topic: Jewelry

In experiment with the Little Windows product I wanted to try out embedding rhinestones as I thought that would give a lot of sparkle. Um... not so much. For some reason the view through the resin interferes with the refraction of light and the result looks like little shiny disks instead of sparkling rhinestones. What a disappointment!

I used a mold and embedded a set of adhesive rhinestone set into a heart pattern.


I used a scrapbook paper with faint text as a background for this pendant.

Ddd


Posted by studio3d@ccgmail.net at 12:01 AM PDT
Sunday, 30 March 2014
Little Windows Resin
Topic: Jewelry

When I was at the Sewing and Stitchery Expo at the end of February I visited a vendor I had seen the year before. I watched their schtick and decided I needed to try out the product for myself.

I have been seeing a lot of chatter about Ice Resin and had contemplated trying that out. However, here at my fingertips was a product called Little Windows so I went with that. This is the beginning kit plus two sets of molds and extra resin compound:

There are two ways of using the product - casting in molds and doming flat surfaces.  I selected some seed beads, broken jewelry parts, letter beads, scrapbook papers and rhinestones to use in my first attempts.

The resin is mixed in a 2:1 ratio for 2.5 minutes before using. It is poured and then allowed to cure for 24 hours or more.

I started with some letter beads set into one of the small square molds. I was going for a rif on the LOVE block but didn't have all the letters. So I switched up to HOPE instead. The beads unfortunately drifted apart during the curing time so it wasn't as neat as I envisioned.

After it was removed from the mold I used the doming technique to finish off the front surface.

I used E6000 glue to attach a bail on the back corner. The resin is completely clear so the block will allow whatever garment it is worn against to show through the center and edges.

I also bought the materials to make faux dichroic glass but have not tried it out yet:

You can see their website at http://www.little-windows.com/

Ddd


Posted by studio3d@ccgmail.net at 12:01 AM PDT

Newer | Latest | Older