« May 2014 »
S M T W T F S
1 2 3
4 5 6 7 8 9 10
11 12 13 14 15 16 17
18 19 20 21 22 23 24
25 26 27 28 29 30 31
You are not logged in. Log in
Entries by Topic
All topics  «
3D paperwork
A - Z challenge 5
A - Z challenge 7
A - Z challenge round 4
A to Z challenge round 3
A to Z round 2
A to Z round 6
A-Z round 1
Around the House
Art Challenges
Artist Trading Cards
Backgrounds
Beads
Bible Journaling
Books
Boxes
Collage
Color Challenge
Coloring
cookbook
Die Cuts
Digital Projects
Digital Stamps
Drawing
Dry Embossing
Fabric Stuff
Fantastic Folds
Field Trip
Home Decor
How Does Your Garden Grow?
Hymnal Art
In The Kitchen
In the studio
Jewelry
Lettering
Links
Multi-Technique
Music to Work By
Musings
Nail Art
New Work
Online Class
Other Hobbies
Other Projects
Painting
Paper Embroidery
Paper Piecing
Photo
Pretty Paper
Quilting
Random
reading
Scrap Recovery
scrapbooking
Sewing
Sketch Challenge
Some Backlog
Stamping
Stencils
Stickers
Supplies
Teabag Folding
Techniques
Testing
tips and tricks
Tutorial
Web resources
Welcome to my Blog
Work By My Friends
workflow
Writing
Blog Tools
Edit your Blog
Build a Blog
RSS Feed
View Profile
Group One
In & Out of Studio 3D
Sunday, 18 May 2014
Chewing Your Fingernails?
Topic: Nail Art

If your nails looked as refreshing as these, you might be tempted to have a little nibble! I saw an ad in a magazine, advertising nail polish in a 'pen' and showing various ways to use them for nail art. I liked the look of the watermelon slices and thought I'd give it a go with my regular nail polishes.

The layers/sequence: base coat, red (2 coats), white strip at tip, green strip at tip over most of the white, black dots, top coat, quick dry. The white and black have very fine tip brushes but the rest are all regular - in fact the red and green are from the dollar store.


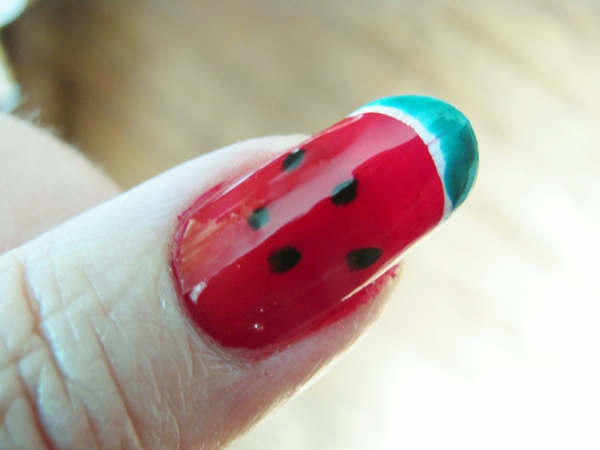
I think I'm ready for a little taste of summer.

Ddd


Posted by studio3d@ccgmail.net at 12:01 AM PDT
Saturday, 17 May 2014
Tiptoe Through the Tulip Festival
Topic: Field Trip

After living here for 34 years we finally had a year when the weather, the festival and our schedules made a favorable conjunction that allowed us to go to the Wooden Shoe Tulip Festival in Woodburn, Oregon. It wasn't warm but we came prepared with jackets and the sun actually shined enough to stave off the worst of the wind. No rain, either, so we were not slogging through muddy paths.

So many beautiful colors of tulips, in various sizes and styles. A few beds were planted with mixed bulbs so they can be harvested and sold that way. But most are in separate beds by color and variety, making a stunning display across the landscape.

This working farm is primarily for propagating bulbs for mail-order sales. Opening for the public to ramble about is a profitable sideline.

Without too much comment, here are my favorite pictures from our tour.


I believe I'll go back again someday - hopefully, not another 34 years!

Ddd


Posted by studio3d@ccgmail.net at 12:01 AM PDT
Friday, 16 May 2014
Silent Runners
Topic: Quilting

At the Sew and Stitchery Expo in February I bought a short yardage of some running wolves and then added short yardages that I thought would complement it.I had in mind to use a layout I found in the book "Nine-Patch Pizazz".  A couple of people in my quilting group had used this book for neat quilts, too.


As  you can see below, all the 9-patches are quilted with an X and the wolves are all free-motion outlined. You also get a better look at the fabric selection and the mitered corners on the border.


This quilt is roughly 42x54 and will go to the hospital's Passages program.

Ddd


Posted by studio3d@ccgmail.net at 12:01 AM PDT
Thursday, 15 May 2014
You're Not Seeing Double
Topic: Quilting

At first glance you might think this is a repeat of the quilt I showed yesterday. However, I did warn you there that I had enough blocks to create two lap quilts - this is the 'other' one.

I changed the layout of the blocks so the four quadrants had diagonal lines of the small blocks radiating out from the center.

To quilt it I just stitched a center line down each of those diagonals.

I call this one "The More Things Change" as a nod to the book the block comes from (Loose Change) and the fact that I changed the layout.

This is quilt 21 for the Passages program at the hospital.

Ddd


Posted by studio3d@ccgmail.net at 12:01 AM PDT
Updated: Thursday, 17 April 2014 11:41 AM PDT
Wednesday, 14 May 2014
Raggedy Bows
Topic: Quilting

This is my 20th quilt for the hospital Passages program!

It was inspired by a video from the Missouri Star Quilt Company (http://www.youtube.com/watch?v=gyZu-j720nw) with a guest from Kansas Troubles. This was from their new book called Loose Change.

It uses one 'layer cake' and one 'charm pack' and takes advantage of the fact that these precuts have pinked edges. I used a marbled layer cake (10 inch squares) and a charm pack (5 inch squares) from Kansas Troubles called Sweet Pea.

The process is to center a charm on a contrasting layer cake with BOTH pieces right sides up. Then the edges of the charm are stitched down 1/8 inch from its edges. Then the pieces are cut through into quarters and arranged pleasingly. This created enough squares to make two lap quilts. I added a border of yardage from Kansas Troubles.

On this quilt I arranged the squares so the little surface blocks formed bows.

For the quilting I did free-motion double loops inside the bows.

I used the border material to create the binding.

Ddd


Posted by studio3d@ccgmail.net at 12:01 AM PDT
Tuesday, 13 May 2014
Dance Music
Topic: Paper Embroidery

In an alphabetical paper embroidery swap we're up to the letter D and the assignment was "D is for Dance".

I had the pattern for my ballet dancer and pricked it out on an embossed cardstock with a colored background. I used only a taupe for the skin and hair and pink for the dress.

I selected a kraft cardstock and diecut a frame. This was run through the Cuttlebug with a music score folder and I used some Distress Ink to color up the raised areas and popped the whole frame up on foam tape.

As a last step I used a paint brush to apply taupe and pink Liquid Pearls to the dancer.


The text is a puffy acrylic sticker.

Ddd


Posted by studio3d@ccgmail.net at 12:01 AM PDT
Monday, 12 May 2014
Four Friends
Topic: Quilting

While waiting for someone I had driven to an extended medical appointment I took out a graph paper notebook and started doodling quilt block designs. One that I really liked I drew up in Electric Quilt 7 when I got home and worked on coloring it up.

Loved it! Once I had decided to use two bright warms and two bright cools - with two values of each on a light grey background, I was off to the fabric store. I selected fabrics from P&B Textiles for the most part. I did have to select a teal batik to get one tone and the black and grey are both marble/shadow fabrics.

This quilt came together exactly as I envisioned it - a lap quilt for friends who are moving to a new home. I named this quilt "Four Friends".


I love how the use of a darker triangle at the intersection really reinforces the visual illusion that one block weaves under the next.

I quilted with shadow lines 1/2-inch inside each of the grey areas.

I decided to use the black borders to work as a logical break point for the continuous design.

Ddd


Posted by studio3d@ccgmail.net at 12:01 AM PDT
Sunday, 11 May 2014
Fresh Scraps
Topic: Scrap Recovery

I am trying not to let the scraps get too out of hand again. Yesterday I had used most, but not all, of a blue pinstripe paper from a 6x6 pad. I scrambled through the table scraps I had left from the recent marathon session of collage backgrounds and came up with some other bits of paper that would combine well with this large chunk.

By chance, I noticed a tag in the bin that looked great with this background. I had to border it with a bit of burgundy to keep it from fading right in. I even used a bit of the pinstripe to create a faux ribbon for the tag.

I had some stickers that suited this color scheme, too. So I used one on the background and one on the tag, aligned along their edges. With the tag and top flower mounted up on foam tape the flower becomes 3D.

The three hearts on the right are from the same sticker sheet as the flower.


The bottom of the tag made the perfect place to stamp a sentiment. It is subtle because of the pattern there but with the little black stitching printed on the tag the sentiment fits right in.

Ddd


Posted by studio3d@ccgmail.net at 12:01 AM PDT
Saturday, 10 May 2014
Sticking To It
Topic: Stickers

I recently picked up some vellum stickers of flowers. I had used some of the hydrangeas to create a background a few days ago and wanted to play with more of them.

This time I layered six of them on plain white paper and fussy cut around the whole border. Then I used some warm grey Copic markers to shade those in the back tomake them recede. From a new paper pad I selected a greyed blue pinstripe and then a scrap of green for the background.


The front bouquet had a violet ribbon printed on it so I tied an actual ribbon bow and glued that on over it.

No sentiment was used as this allows the card to be used on any occasion.

Ddd


Posted by studio3d@ccgmail.net at 12:01 AM PDT
Friday, 9 May 2014
Looking Like It Was Planned
Topic: Scrap Recovery

Serendipity came into full play in the construction of this scrappy card. I had a big chunk of the floral and used narrow strips left and right that reflected the same colors as the print.

Lo and behold, a sheet of text stickers matched in both theme and color as did the last two pink layered flowers I had left.


The flower centers had glitter so I sealed it with Glossy Accents.

Ddd


Posted by studio3d@ccgmail.net at 12:01 AM PDT
Thursday, 8 May 2014
Stripes of Stripes
Topic: Scrap Recovery

This card is not as complicated as it appears. The upper portion is actually a print of various strips and the first seam on the background is not until below the pink chevron. I just added a few more pastel strips from the scraps to fill the bottom area.

Someone sent me a sheet of the HUGE glittery birthday stickers and one made the perfect centerpiece for this card.

Ddd


Posted by studio3d@ccgmail.net at 12:01 AM PDT
Wednesday, 7 May 2014
Going Green
Topic: Scrap Recovery

Green scraps took the stage next. With such big bold blocks of color I needed to go with black Dazzles for enough contrast.

I used 6 stickers from a sheet featuring bicycles: the bike, the balloons, handlebar tassles (2), gift on the back, and the 'road' at the bottom.

The greeting is from a peel-off sheet of stickers - not Dazzles.

Ddd


Posted by studio3d@ccgmail.net at 12:01 AM PDT
Tuesday, 6 May 2014
Grey Lady
Topic: Scrap Recovery

Scraps in shades of grey make for a very elegant background. I wanted to keep that classy feel so I used a white Dazzles sheet in a doily cut.

To create contrast I had to diecut a round as a backer for the doily. It was not quite large enough to go to the edges so I drew around those extending tips with a fine line black marker.

The text is a clear sticker.

Ddd


Posted by studio3d@ccgmail.net at 12:01 AM PDT
Monday, 5 May 2014
Feather Duster
Topic: Scrap Recovery

Gray, green and yellow combine surprisingly well in these three scraps.

I opened a new sheet of Dazzles feathers - this time in silver to go with the grey.

The sentiment is from an old sheet of silver Dazzles.

Ddd


Posted by studio3d@ccgmail.net at 12:01 AM PDT
Sunday, 4 May 2014
Thinking Of Blue
Topic: Scrap Recovery

The blue scraps I had left were all shorter so I had to turn this card upright with stripes running side to side.

Here's a Dazzles sheet I hadn't used yet so I dug right in and used the largest gold doily on the sheet.


I went back to some old Dazzles sheets to find a sentiment sticker for this one.

Ddd


Posted by studio3d@ccgmail.net at 12:01 AM PDT
Saturday, 3 May 2014
Oh So Blue
Topic: Scrap Recovery

I had a few more blue scraps than red so I was able to make two cards instead of just one. These blues have a bit of green tint to them so I went with gold embellishments.

I went back to the sheet of feather stickers and the same text sticker that I started this series with. 


I think this really turned out elegantly.

Ddd


Posted by studio3d@ccgmail.net at 12:01 AM PDT
Friday, 2 May 2014
Red Hot Scrappin'
Topic: Scrap Recovery

Having used up the brown table scraps I moved on to the reds. I didn't have as many of these - in fact, only enough to make ONE card!

I actually used reds AND pinks and stayed with a straightforward striped background. With such a bright layout I needed to go very dark for the embellishments. I pulled out a black Dazzles sheet that was all various banners. I cut one word in two so I could fit the words on the stripes. The black strips give the banners something to 'hang' from and I curved the banners as I applied them

I used a black marker to draw little bows at the banner ends.

Ddd


Posted by studio3d@ccgmail.net at 12:01 AM PDT
Thursday, 1 May 2014
Say Goodbye To Brown
Topic: Scrap Recovery

I didn't realize I had quite so many brown scraps in all those sorted envelopes! I mean, really? Seven cards?

This one used the largest scrap I had on hand along with one plain strip. The potted sunflower was colored with the same three markers I've been using all along on this series.

Oh, Look! I didn't stamp the sentiment on this one. This time I used the text afailable on the Dazzles sheet.

Ddd


Posted by studio3d@ccgmail.net at 12:01 AM PDT
Wednesday, 30 April 2014
Put It In a Pot
Topic: Scrap Recovery

I moved on to another sunflower sheet of Dazzles and this time the plants are potted. I still kept coloring them - with the same three markers as I used before.


I like how the upper left snippet, which is actually scrollwork, resembles a garden of flowers. The vertical decorative strip is also a Dazzles.

Ddd


Posted by studio3d@ccgmail.net at 12:01 AM PDT
Tuesday, 29 April 2014
Oooh, I Love a Little Side Step
Topic: Scrap Recovery

The card today looks remarkably like yesterday's. However, I grouped the sunflowers on the left corner instead of the right. I colored the blooms again, used the same corner flourish and stamped the sentiment.


I like the little snippet of music in the corner.

Ddd


Posted by studio3d@ccgmail.net at 12:01 AM PDT

Newer | Latest | Older