« July 2014 »
S M T W T F S
1 2 3 4 5
6 7 8 9 10 11 12
13 14 15 16 17 18 19
20 21 22 23 24 25 26
27 28 29 30 31
You are not logged in. Log in
Entries by Topic
All topics  «
3D paperwork
A - Z challenge 5
A - Z challenge 7
A - Z challenge round 4
A to Z challenge round 3
A to Z round 2
A to Z round 6
A-Z round 1
Around the House
Art Challenges
Artist Trading Cards
Backgrounds
Beads
Bible Journaling
Books
Boxes
Collage
Color Challenge
Coloring
cookbook
Die Cuts
Digital Projects
Digital Stamps
Drawing
Dry Embossing
Fabric Stuff
Fantastic Folds
Field Trip
Home Decor
How Does Your Garden Grow?
Hymnal Art
In The Kitchen
In the studio
Jewelry
Lettering
Links
Multi-Technique
Music to Work By
Musings
Nail Art
New Work
Online Class
Other Hobbies
Other Projects
Painting
Paper Embroidery
Paper Piecing
Photo
Pretty Paper
Quilting
Random
reading
Scrap Recovery
scrapbooking
Sewing
Sketch Challenge
Some Backlog
Stamping
Stencils
Stickers
Supplies
Teabag Folding
Techniques
Testing
tips and tricks
Tutorial
Web resources
Welcome to my Blog
Work By My Friends
workflow
Writing
Blog Tools
Edit your Blog
Build a Blog
RSS Feed
View Profile
Group One
In & Out of Studio 3D
Friday, 18 July 2014
Operation Write Home - sketch 105
Topic: Sketch Challenge

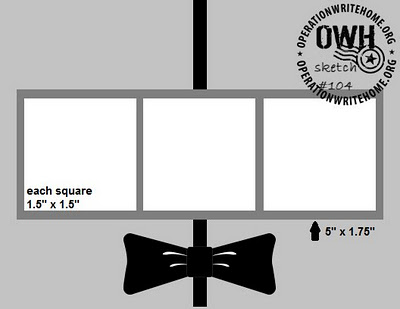
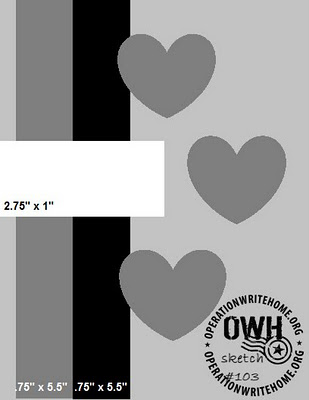
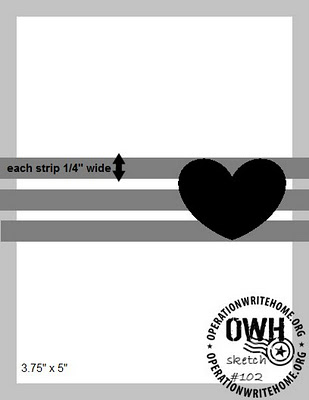
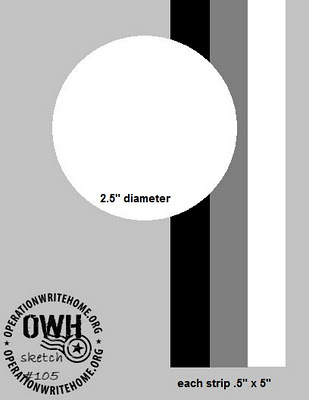
Sometimes a little silliness is in order. OWH 105 was my opportunity:


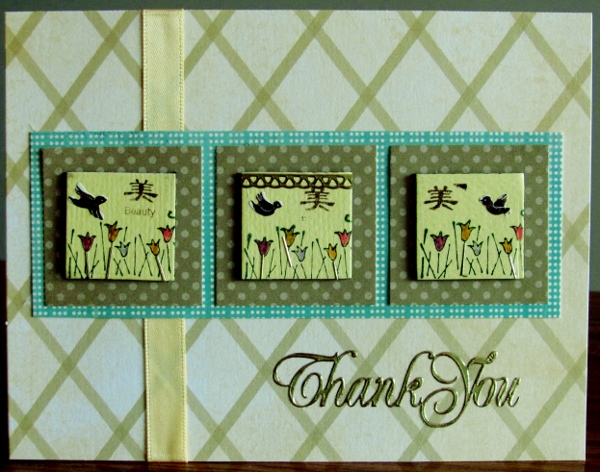
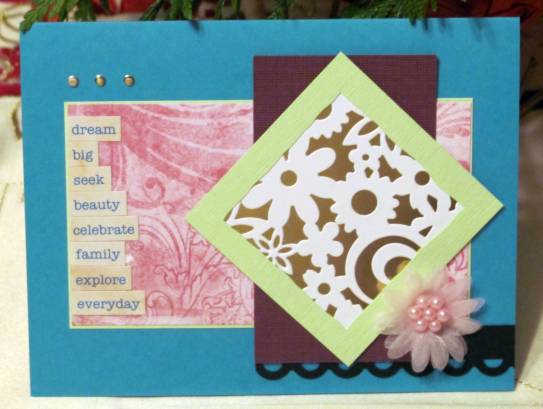
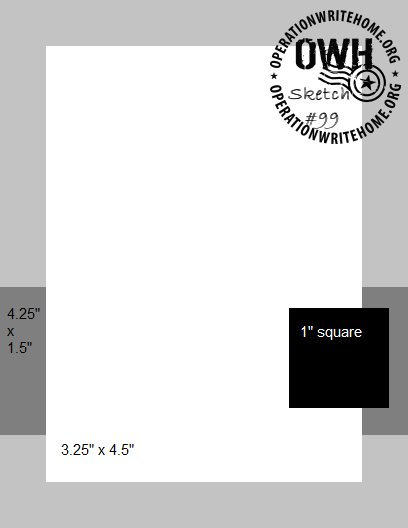
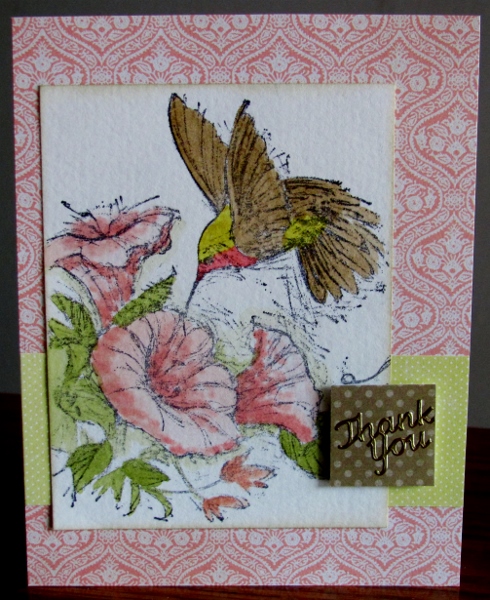
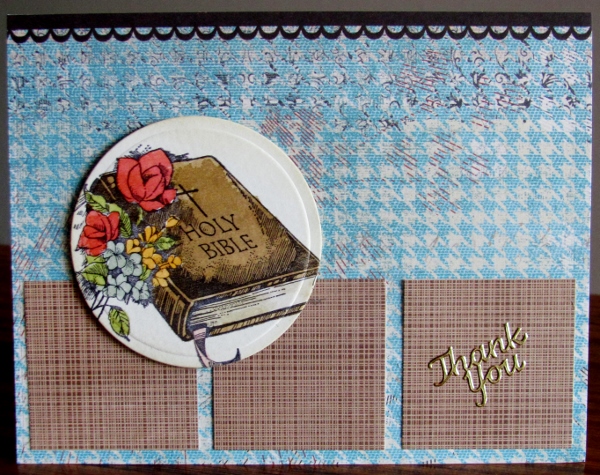
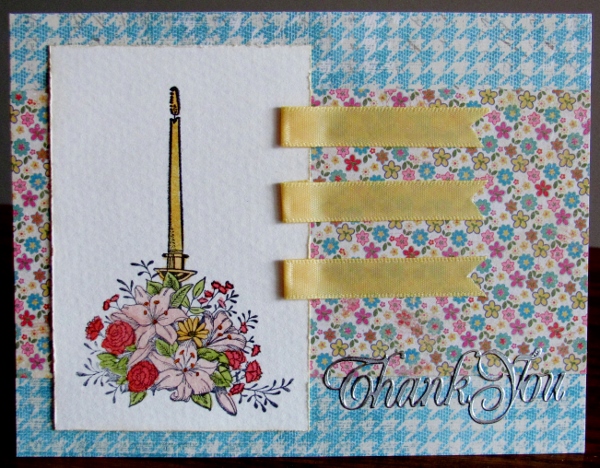
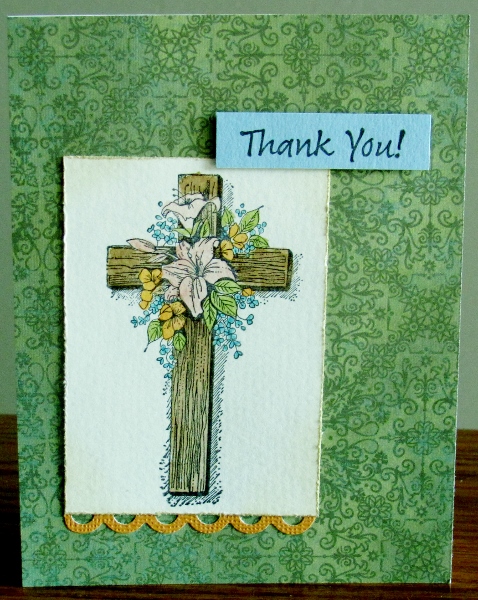
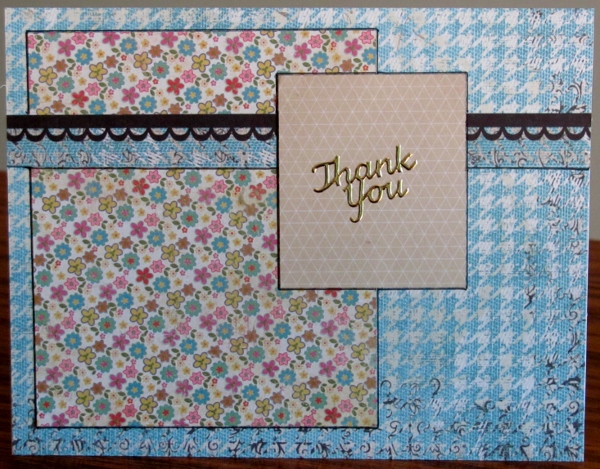
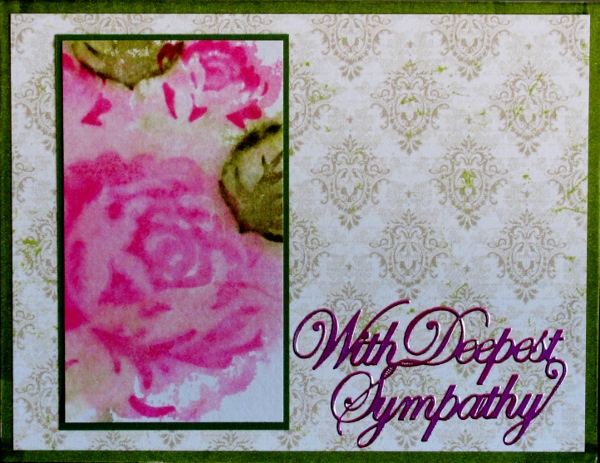
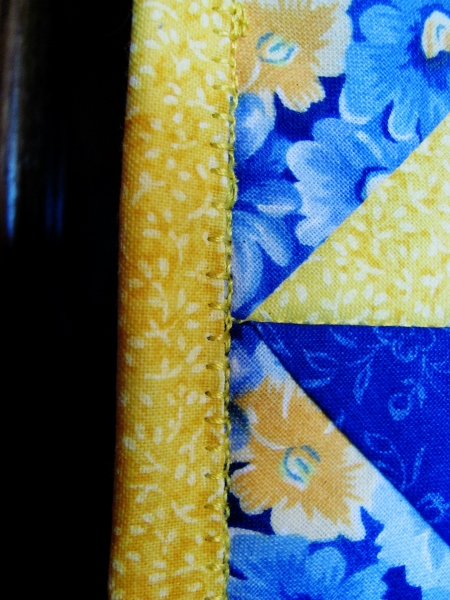
I started by stamping a flower head on watercolor paper and using Distress Marker ink and an aquabrush to to the coloring. I cut it out using a round die and left it in the die to impress the rim around the edge.

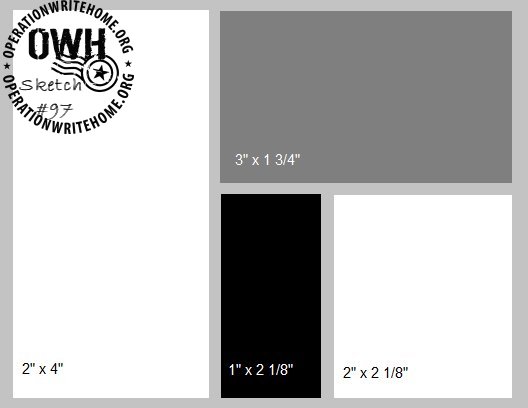
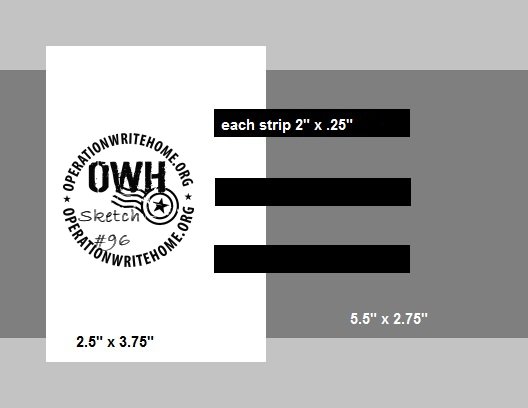
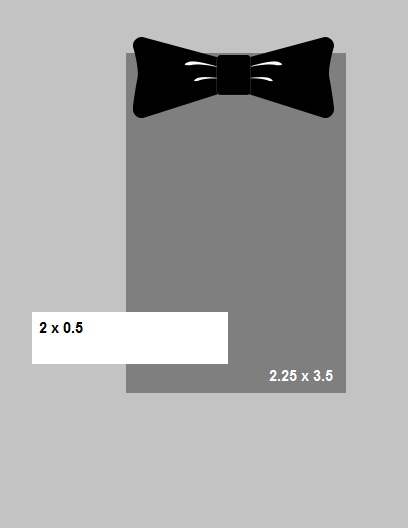
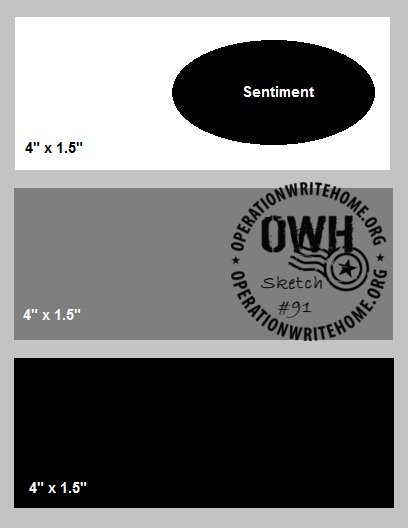
A crazy paper for the background set the tone for the rest of this. I cut the three paper strips using colors from the image and assembled the card front while popping the image up on foam tape.

I added the stamped sentiment as a banner at the left and then found that the flower head was just 'floating' there. So I used a fine line black marker to sketch in a stem and two leaves. I used a Distress Marker to color these in for a little whimsy.

Ddd


Posted by studio3d@ccgmail.net at 12:01 AM PDT
Thursday, 17 July 2014
Operation Write Home - sketch 104
Topic: Sketch Challenge

And now, back to some original works. I haven't used OWH sketch 104 before:

I can't remember why I had three 'inchies' laying on the desktop but  they sure fit the bill for this sketch. I framed them up in the 1.5 inch squares called for in the sketch and continued with the layering specified.

I decided to 'split' the center element by moving the ribbon to the left and substituting a sentiment for the bow, moved to the right.


Those inchies are leftovers from years ago and were made with stamps (flowers and chop), stickers (birds, trim and gold stems) on yellow chipboard.

Ddd


Posted by studio3d@ccgmail.net at 12:01 AM PDT
Wednesday, 16 July 2014
Operation Write Home - sketch 103 (reprise)
Topic: Sketch Challenge

For old time's sake let's take a second look at OWH sketch 103:


When I showed this on October 5, 2012 I remember sharing that the first thing that popped into my head when I saw the sketch was Christmas ornaments. The baubles were cut from a patterned paper and then enhanced with a second layer of the tree on each. The edges were toned with Distress Ink to add to the look of a sphere.

I added a background of scraps from a collection of 12 x 12 Christmas papers. Each of the baubles got a twine hanger and a gold metallic cardstock 'cap'.

The sentiment is cut words from another paper from the set.

Ddd


Posted by studio3d@ccgmail.net at 12:01 AM PDT
Tuesday, 15 July 2014
Operation Write Home - sketch 102
Topic: Sketch Challenge

OWH sketch 102 wants to feature a great background:


I didn't have a particularly great background to use so I decided to create my own. I started with a tone-on-tone paper and stamped a medium sized line-art background stamp multiple times to cover the paper. This I cut to size and mounted over a contrasting patterned paper. 

I dug out a wide selection of metallic stickers of butterflies and used those that most matched the size of the stamped butterfly underneath - selecting from both gold and soft teal.

The teal stickers were from a set of nested Dazzles where the same images are provided in teal, gold and pink. I used some of the waste from the pink sheet to cut the strips for the center and then constructed one butterfly from the sheets for a feature element and popped it up on foam tape.

I colored dot elements in the background to match the pink strips and added a gold peel-off sentiment.

Ddd


Posted by studio3d@ccgmail.net at 12:01 AM PDT
Monday, 14 July 2014
Operation Write Home - sketch 101 (reprise)
Topic: Sketch Challenge

OWH sketch 101 is another that I used more than once - but at different times:

Back on February 12, 2012 I created this card. With a bear from a stamp catalog which I colored, some black and white striped paper, which I also colored, two patterned papers and some twine. The sentiment is a silver Dazzles sticker.

Then on October 4, 2012 I used the sketch again to create a Christmas card. The birds are part of a 12 x 12 paper I cut down. I used slichtly larger banner triangles to make them accomodate the red foil letter stickers. The sentiment at the bottom is part of the same sticker sheet.

Where I used black bordering papers on the first card, I used dashed doodle lines on this one to keep a more homespun feel.

Ddd


Posted by studio3d@ccgmail.net at 12:01 AM PDT
Sunday, 13 July 2014
Operation Write Home - sketch 100 (reprise)
Topic: Sketch Challenge

Here we are at another milestone - OWH sketch 100 - and it isn't even an original card because I used the sketch before.

Actually, I used the sketch twice before - but both cards on the same day - February 11, 2012.

This was a period when I was doing a lot of scrap recovery. This card used an old card front cut into a tag, a diamond of printed cardstock, an illustration from a stamp catalog, and a left over bit of paper trim. I added some colored cardstock, a strip of bling and a silver peel-off sentiment.

The second card has more original elements but the diecut insert in the diamond shape was cut off a commercial card front, and the scallop paper and silk flower were left over table scraps.


The words on this card are from a random words sticker page.

Ddd


Posted by studio3d@ccgmail.net at 12:01 AM PDT
Saturday, 12 July 2014
Operation Write Home - sketch 99
Topic: Sketch Challenge

You really need a 'stand-out' image to make OWH sketch 99 look its best:

Fortunately, I planned ahead and stamped one of my favorite images on watercolor paper and painted it using Distress Markers as the colorant. I also used 'old paper' Distress Ink to tone the edges.

The background papers were selected based on the colors in the image.

I popped the 1-inch square up on foam tape and used a gold peel-off sticker for the sentiment.

Ddd


Posted by studio3d@ccgmail.net at 12:01 AM PDT
Friday, 11 July 2014
Operation Write Home - sketch 98
Topic: Sketch Challenge

Up for another sketch? Here's OWH #98 for you:

Another watercolored stamped image takes center stage today. I used a round die in the Cuttlebug to cut the image and to create the raised edge around it. Then I used 'old paper' Distress Ink to tone the edges.

I wanted the layout to be more subdued than the sketch so I used the same papers for the three blocks instead of three different ones as suggested. These were selected to match the Bible. A background, which came with the scalloped top trim, was selected to go with some of the flowers.

I placed a gold peel-off sticker for the sentiment. I used the right box for this for a little balance.

Ddd


Posted by studio3d@ccgmail.net at 12:01 AM PDT
Thursday, 10 July 2014
Operation Write Home - sketch 97 (reprise)
Topic: Sketch Challenge

It sure makes the sketch challenge go by faster when I've already used some of them! Such is the case with OWH sketch 97:


I used this for a Christmas card challenge on September 30, 2012. Cards going to OWH have to 'beat the season' by many, many weeks in order for them to have time to reach the shipper, get reviewed, get sorted, get packages, get shipped, reach the troops, be selected by a service member, get mailed home and be received by their loved one in time for the specified holiday.

Here is the card I made for that challenge using a variety of Christmas papers and some clear stickers.

Even the sentiment is a clear sticker, although from a different set than all the poinsettias.

Ddd


Posted by studio3d@ccgmail.net at 12:01 AM PDT
Wednesday, 9 July 2014
Operation Write Home - sketch 96
Topic: Sketch Challenge

As seen in OWH sketch 96, sometimes the designer's idea is really a good one:


Despite the 'appearance' I did follow the dimensions given. Their sketch is not to scale. Again, this started with an image stamped on watercolor paper and painted with Distress Inks and an aquabrush.

The image panel is roughed around the edges and tinted with 'old paper' Distress Ink.

I chose papers to complement the image and added ribbon snippets where the sketch shopw paper strips. I gave them banner ends and folded under the left edge.


I added a silver Dazzle sticker for the sentiment.

Ddd


Posted by studio3d@ccgmail.net at 12:01 AM PDT
Tuesday, 8 July 2014
Operation Write Home - sketch 95
Topic: Sketch Challenge

You'll have to stand on your head to see how I used OWH sketch 95:

This sketch just wasn't working for me with the image I wanted to use so I turned it 180 degrees.

I stamped the image on watercolor paper and painted it using Distress Marker ink as the colorant.

Papers were chosen to go with the paint colors and I used a border punch to replace the bow in the sketch. 

The edges of the image were distressed with a tool and then toned with 'old paper' Distress Ink.

The sentiment is popped up on foam tape.

Ddd


Posted by studio3d@ccgmail.net at 12:01 AM PDT
Monday, 7 July 2014
Operation Write Home - sketch 94
Topic: Sketch Challenge

When the OWH sketchmakers created #94 it's like they could see my desktop and knew what elements I had scattered there:


From cards made in recent days I still had out that new 6x6 paper pad, the butterfly stickers, and a stamp and ink. Still further back I had used the decorative paper in the strip and that was in my 'recent scraps' envelope. That made this card come together very quickly and only one element had to be cut to size.

I like the clean finish of this card.

Ddd


Posted by studio3d@ccgmail.net at 12:01 AM PDT
Sunday, 6 July 2014
Operation Write Home - sketch 93
Topic: Sketch Challenge

What's with the lopsided elements on the OWH sketches? Here's another one on sketch 93:

Well, I don't like it so I'm not going to use it! I just left that layer off entirely.

I searched through my sticker bin for this floral because I knew it would look great in this setting. The papers were selected with the floral in mind which explains why they look so good together. The background, frame and strip are all from a new 6x6 paper pad I found on sale for $1.97! I wish they were't quite so distressed but I do like them for the most part.

The 3D sentiment sticker I've had in my stash for quite a while and I've used many from these sheets. There are still more left, too (YAY!)

Ddd


Posted by studio3d@ccgmail.net at 12:01 AM PDT
Updated: Friday, 6 June 2014 7:24 AM PDT
Saturday, 5 July 2014
Operation Write Home - sketch 92
Topic: Sketch Challenge

OWH sketch 92 inspired me more than yesterday:

I like the way the elements overlap one another in this sketch.

I started with more of the blue houndstooth paper for the background. I also cut a piece of decoration from the same paper for the center strip. I chose a small floral with the same blue in it and then a neutral print for the smallest block.

Once the elements were all in place I used a fine marker to define the edges.

The sentiment is a gold peel-off sticker.

Ddd 


Posted by studio3d@ccgmail.net at 12:01 AM PDT
Friday, 4 July 2014
Operation Write Home - sketch 91
Topic: Sketch Challenge

I am NOT in love with OWH Sketch 91:

I guess it's all in the selection of materials, and maybe I just didn't have a good 'vision' for using this one. I started by turning the sketch on the side.

Some blue houndstooth started this card by serving as the background. I had three strips of light cardstock - two were the same print. These were cut to size and adhered. I wish I had left off the cross sticker. After I had adhered the swoosh of butterflies the cross seemed like too much.

I had selected the sentiment but it was too wide to go directly on the strip. So I create a little 'banner' for it to match the butterflies.

Ddd 


Posted by studio3d@ccgmail.net at 12:01 AM PDT
Thursday, 3 July 2014
Berry Sweet
Topic: Die Cuts

Many, many years ago I ran across an idea for a card embellishment and tucked it away in the back of my brain 'for later'. Mostly because I didn't have the punches or dies to make it come to life.

Since coupons and papercrafting sales were in my schedule a few weeks ago I made it a point to buy a heart punch and a set of flower dies. I had wanted these for quite a while and when I got them home it suddenly occured to me that I now had the elements to make this sweet strawberry.

From red cardstock I punched the heart and then used a corner rounder on the bottom. From green cardstock I diecut a flower, cut it in half and layered it at the top of the heart. The addition of 'seeds' with Liquid Pearls brings the berry to life.

I first made a card with a single berry, using a cross-hatched brown background. I used green cardstock to diecut swirls and leaves and glued everything down. I stamped the sentiment in black. Then, to tie the elements together, I outlined one word in red and created a drop-shadow on the vines in black.

Then I made a second card with two berries on it - all of the processes and materials are the same.


The two cards do use different flourishes for the vines.

Ddd


Posted by studio3d@ccgmail.net at 12:01 AM PDT
Wednesday, 2 July 2014
New Best Friend
Topic: Around the House

We have a new visitor to the house that, I swear, thinks she is the family dog. She comes up to the patio door and, if nobody pays attention to her she will lay down on the mat and go right to sleep.

Now I know that having a passel of kids is probably wearing her out but, really!

I ignore her but hubby shoos her down the stairs and then tosses her all kinds of treats: marshmallows, slices of bread, crackers with butter, leftovers from dinner...

She shows up earlier and earlier, now arriving on the step long before he gets home from work. 


I know, I know, "Isn't she cute?" Well, yes she is cute, but she's also eating me out of house and home.

Pathetic how that begging thing works so well.

Ddd


Posted by studio3d@ccgmail.net at 12:01 AM PDT
Tuesday, 1 July 2014
The Cliche of Christmas In July
Topic: How Does Your Garden Grow?

Technically, this is not 'in the garden' but it IS plant-based!

Last Christmas a friend gave us a poinsettia. I would occasionally give it a bit of water but was forgetting so much that I finally moved it to the kitchen window. The green leaves all fell off but the blooms remained. 

Then, around the middle of MAY little green leaves began appearing. I encouraged it by watering more often and, yes, it got more leaves.

So, here at the first of July, I have a happy and healthy poinsettia that I am hoping I can keep alive until December.


Without a doubt this is the longest any plant has LIVED in my house.

Ddd


Posted by studio3d@ccgmail.net at 12:01 AM PDT
Monday, 30 June 2014
Sadly Needed
Topic: Stamping

I was truly saddened to need another sympathy card so soon.

I had a single one of the watercolor stamping roses left and it was already trimmed. This got bordered by a matching paper and thus began the layout process.

I found a nice, subtle paper for the background and wanted to include a border around it also. Unfortunately, I did not have any more of the border used on the feature. So I used a Distress Marker to color the edges of the white base card and trimmed the background paper to let that color peek out.


I found a large silver Dazzles sticker for the sentiment and colored it with alcohol marker while it was still on the sheet.

Ddd


Posted by studio3d@ccgmail.net at 12:01 AM PDT
Sunday, 29 June 2014
Adriana's Garden
Topic: Quilting

Someone made a gift of many fabric scraps to our quilt group. We took whatever we wanted to make quilts and I chose three coordinating fabrics: a bright yellow, a dark blue and a floral with yellow, white and two tones of blue. 

This went into my stash until I watched a video on 'tube quilting' as demonstrated by Jenny Doan of the Missouri Star Quilt Company (check it out here www.youtube.com/watch?v=vOWSp0mTTqE). It is a simple way to cut a lot of blocks all at once and they can be arranged in many ways for a great graphic look.

I made this lap quilt for a child mentored by my daughter.


I was ready for the quilting and binding just as I got my new sewing machine so, of course, I had to try it out. All of the quilting is done with bright yellow thread in the ditch. The ends are all outlined around the yellow pieces. Then both long strips are stitched between the colors. The center is quilted in a grid through all the diamonds in both horizontal and vertical directions.

I also got to machine stitch the binding - LIKE!

Then I learned how to use the fancy stitches for lettering and used that for the quilt label. I stitched with yellow on a piece of fabric to match the backing then pressed it and attached it with Steam-a-Seam2.

Much more to learn on my sewing machine but this was a great start.

Ddd


Posted by studio3d@ccgmail.net at 12:01 AM PDT

Newer | Latest | Older