« May 2015 »
S M T W T F S
1 2
3 4 5 6 7 8 9
10 11 12 13 14 15 16
17 18 19 20 21 22 23
24 25 26 27 28 29 30
31
You are not logged in. Log in
Entries by Topic
All topics  «
3D paperwork
A - Z challenge 5
A - Z challenge 7
A - Z challenge round 4
A to Z challenge round 3
A to Z round 2
A to Z round 6
A-Z round 1
Around the House
Art Challenges
Artist Trading Cards
Backgrounds
Beads
Bible Journaling
Books
Boxes
Collage
Color Challenge
Coloring
cookbook
Die Cuts
Digital Projects
Digital Stamps
Drawing
Dry Embossing
Fabric Stuff
Fantastic Folds
Field Trip
Home Decor
How Does Your Garden Grow?
Hymnal Art
In The Kitchen
In the studio
Jewelry
Lettering
Links
Multi-Technique
Music to Work By
Musings
Nail Art
New Work
Online Class
Other Hobbies
Other Projects
Painting
Paper Embroidery
Paper Piecing
Photo
Pretty Paper
Quilting
Random
reading
Scrap Recovery
scrapbooking
Sewing
Sketch Challenge
Some Backlog
Stamping
Stencils
Stickers
Supplies
Teabag Folding
Techniques
Testing
tips and tricks
Tutorial
Web resources
Welcome to my Blog
Work By My Friends
workflow
Writing
Blog Tools
Edit your Blog
Build a Blog
RSS Feed
View Profile
Group One
In & Out of Studio 3D
Tuesday, 12 May 2015
Operation Write Home - sketch 219
Topic: Sketch Challenge

Nothing new here - that's how I approached OWH sketch 219:

Leftovers used: green from the elegant floral that went out of bounds, yellow chevron from yesterday's card, purple strip from the scrap bin, grey dot from the scrap bin, chevron circle from a long-ago project and vellum round overlay from sticker sheet used last week.

All these were pulled in response to the choice of the floral sticker! I stamped the sentiment directly onto the background and 'oopsed' a little smear which I covered with some lavender pearls, which I added to the dotted I's as well.

The dot embellishments were represented with some blush 'clear' dots.

Ddd


Posted by studio3d@ccgmail.net at 12:01 AM PDT
Monday, 11 May 2015
Operation Write Home - sketch 218
Topic: Sketch Challenge

I found exactly the sketch to use for a diecut I had left over from another project - OWH sketch 218:

WOW! Look at all those measurements! It's really much simpler than that. I use the measurements of the main elements and cut the backing pieces 1/8 inch larger each way. I like the thinner 1/16 borders that result for most cards. That is especially true when the borders are very high contrast, like this red.

I pulled the colors from the vinyl sticker of the girl with her birthday cake. I was glad to have the perfect place to use the diecut word, too.

The multicolored dots and the bright yellow chevrons are calmed down by the black stripe but still looks fresh and fun.

Everything is unified by those thin red borders.

Ddd


Posted by studio3d@ccgmail.net at 12:01 AM PDT
Updated: Wednesday, 20 May 2015 10:36 AM PDT
Sunday, 10 May 2015
Operation Write Home - sketch 217
Topic: Sketch Challenge

Look this way, no, look that way! I had to do a bit of a change-up with OWH sketch 217:

The hedgenog sticker (yes I found three more of them in my stash -YAY!) was looking the wrong way for the sketch so I flipped it side to side.

I keyed all the backing papers and borders off the colors in the sticker - in fact, gray, teal, red and white are all in the 'love love love' background paper!

The sentiment was already stamped but I had to do a bit of refining in the coloring as the stamp was not solid on the textured paper.

I had one last ladybug on the sticker sheet so I added him in place of tthe three dot embellishments, although in a different placement.

Ddd


Posted by studio3d@ccgmail.net at 12:01 AM PDT
Saturday, 9 May 2015
Operation Write Home - sketch 216
Topic: Sketch Challenge

Would you believe you can turn OWH sketch 216 into pure elegance?

On this sketch there are some options built in - although it says 'circular or round element' (aren't those the same thing?) the sketch actually shows an oval!

I had a large floral sticker set that I wanted to use and it was even larger than the background panel. So I let it spill over the edges and I LOVE it! I chose a green pattern for back there and it looks like more leaves.

I pulled lavender from the floral for all the borders and used a smaller version of one bloom for the 'round' element.


The patterned paper up front picks up all the colors of the floral and I stamped the sentiment directly onto it.

Ddd


Posted by studio3d@ccgmail.net at 12:01 AM PDT
Friday, 8 May 2015
Operation Write Home - sketch 215
Topic: Sketch Challenge

It takes several days to weeks to make one quilt and I can make 12-16 cards in one day - but each item only gets one day featured on the blog. I guess it all evens out.

Today the feature is OWH sketch 215:

Lots of layers on this one. I chose to start with a sticker that wasn't even the shape or size of any of the designated parts.

I added a dotted layer behind the butterfly sticker to start it off. The floral layer came next and I chose the cream layer to lighten it all up. I chose to use coral for the stamped sentiment.

Black backing throughout unifies everything and keeps the black stamping from standing out too much.


Looks like that butterfly is just flitting through the garden!

Ddd


Posted by studio3d@ccgmail.net at 12:01 AM PDT
Thursday, 7 May 2015
Waves Of Mystery
Topic: Quilting

I participated in a mystery quilt through Missouri Star Quilt Company a couple of months ago. It was an interesting experience, especially choosing colors without knowing how they would be used together.

We needed a background fabric - I chose red. Then we needed 5 colors with a dark and a light of each. For these I chose brown,

teal,

gray,

blue

and green.

Of each color combination, ONE of the fabrics has a metallic shine in the pattern. The red does, too.

This was a 6 week adventure, plus the run-up that gave us the fabric requirements and the initial cutting instructions. I added one more column to the left side to balance it.

I quilted it in diagonal squares and added binding with the red.

The finished size is 50 x 62.

Ddd


Posted by studio3d@ccgmail.net at 12:01 AM PDT
Wednesday, 6 May 2015
Birds All Around
Topic: Quilting

This quilt is made with a totally different method as it is NOT pieced.

Instead, each circle is made inside out with feature fabric, batting and backing and stitched all around. Then batting is trimmed close to the stitching and a slit is made on the feature fabric near the side edge. The circle is turned right side out through this slit and pressed.

Rows are sewn together along one edge (a straight line across, not following the curve) then these rows are sewn to one another and all the curved edges are turned back over the front side and topstitched.

I used bird fabric for the center section and a floral around the outside. The birds are all backed with various greens to call to mind leaves in the trees and the florals are all backed with various teals to represent the sky.


I did not turn in the outer edges so it leaves a beautiful scallop.


Because all of the rounded edges come to the front the back becomes a grid of squares. Actually, because I stitched my circles with wider margins on the sides than the top and bottom My back came out as rectangles.


The resulting quilt is 42 x 50.

Ddd


Posted by studio3d@ccgmail.net at 12:01 AM PDT
Tuesday, 5 May 2015
Operation Write Home - sketch 214
Topic: Sketch Challenge

At last, a chance to use up LOTS of table scraps! Here is OWH sketch 214:


There is a lot of flexibility in the use of the strips along to top. I gathered a variety and cut different widths. These were adhered to a base piece of cardstock and then trimmed to the specified size for the panel.

I then chose a piece of vellum printed in white with butterflies. I ran this through the Xyron to cover the back with adhesive and laid it over the stripped panel. Trimmed to size, it was then adhered to the top of the card front.

I then added the two bottom panels.


I went 'off sketch' at this point and added a pre-stamped sentiment panel, bordered in coral.

Ddd


Posted by studio3d@ccgmail.net at 12:01 AM PDT
Monday, 4 May 2015
Operation Write Home - sketch 213
Topic: Sketch Challenge

How about another sketch? Today we have OWH sketch 213:

As usual, I started by selecting a feature element, in this case a rose sticker, followed by choosing coordinating papers first from the scrap bin and then the 6x6 paper.

I chose a diagonal plaid for the background and it has a little pink line through it that goes with the flower.

Two strips of green pull color from the leaves and this is echoed in the bordering green.

A little strip of text adds to the casual feel.


The sketch does nothave a sentiment block but It had a nice open space to hold one. I used a pre-stamped sentiment with a whimsical look and used alcohol marker to tine the paper to blend better with the background.

Ddd


Posted by studio3d@ccgmail.net at 12:01 AM PDT
Sunday, 3 May 2015
Operation Write Home - sketch 212
Topic: Sketch Challenge

OWH sketch 212 is presented with some options:

I chose to take the options further and eliminated the outer border.

I decided to use four tabs as the sketch illustrates but I wanted to make them of folded ribbon for a different look. Then I thought, why not use ribbon for the narrow band as well? Why not?

I had started out by selecting a 3D sentiment sticker (the very last one I have) and keyed all the paper and ribbon colors off of that.

Truly love the rich teal papers which are actually greener than they appear here.


I have visions of someday using this sketch again by using those little banners to stand in for piano keys.

Ddd


Posted by studio3d@ccgmail.net at 12:01 AM PDT
Saturday, 2 May 2015
Operation Write Home - sketch 211
Topic: Sketch Challenge

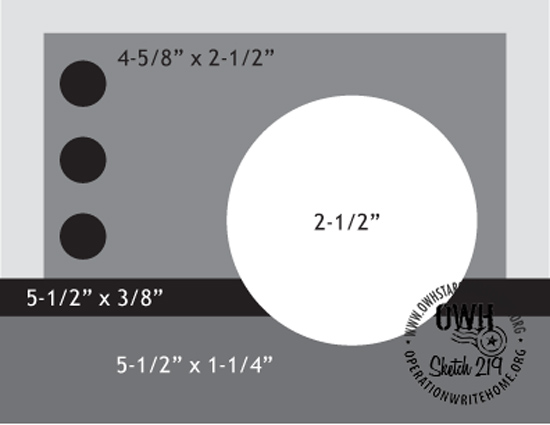
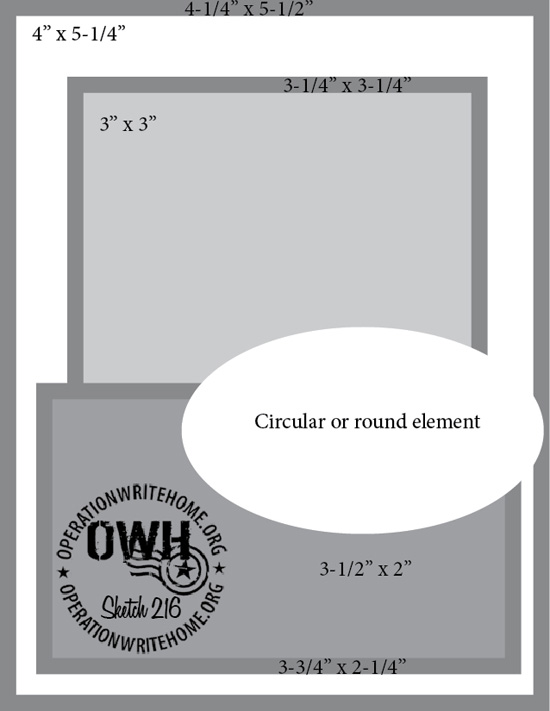
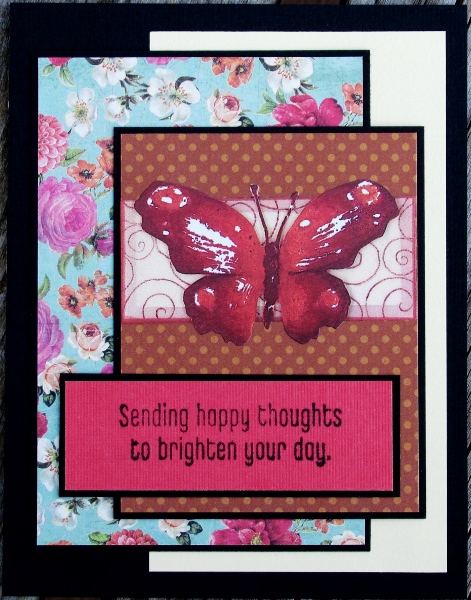
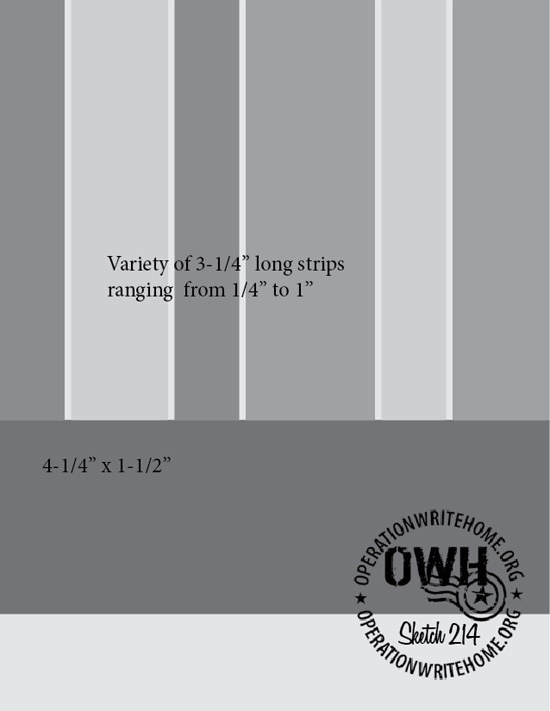
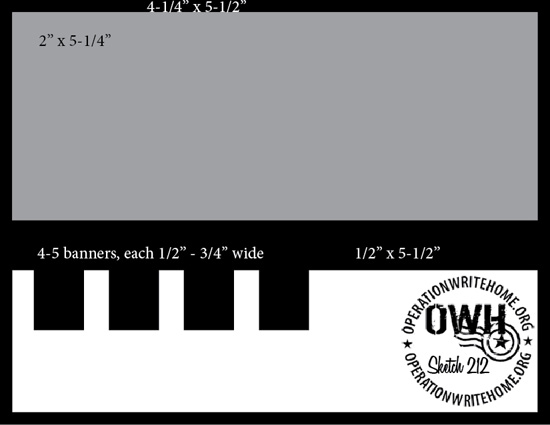
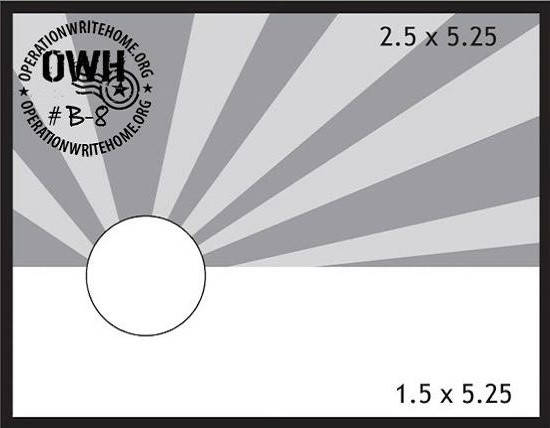
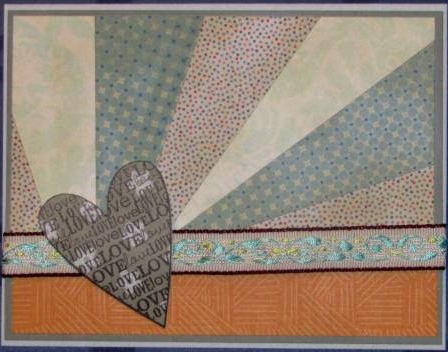
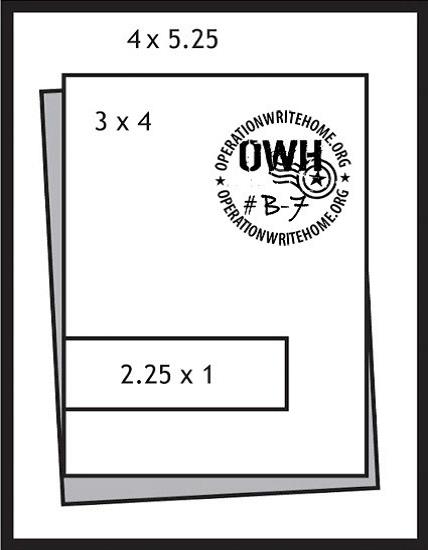
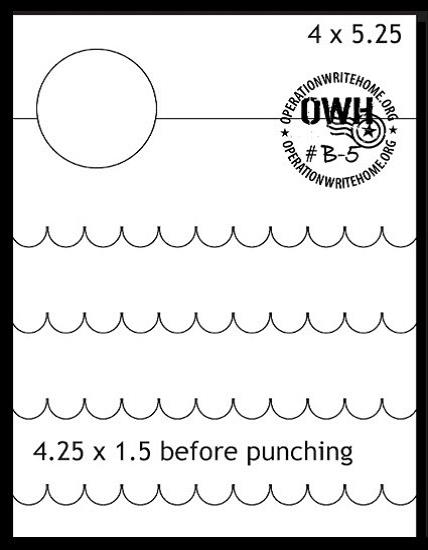
Today - a little about my process. We'll illustrate with OWH sketch 211:


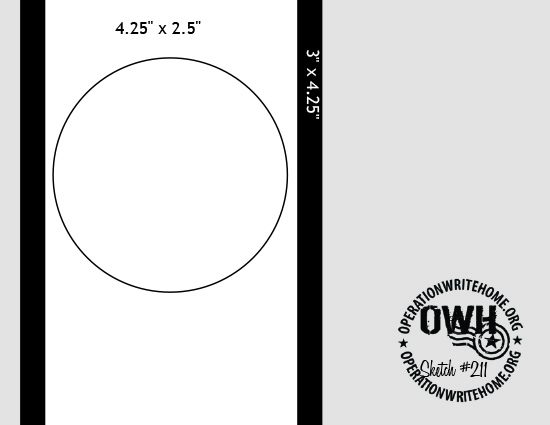
I work from a PDF of all of the sketches that I have punched and keep in a ring binder. I pull out the next 1, 2 or 3 pages (depending on how much time I have to play) and lay them out on the table.

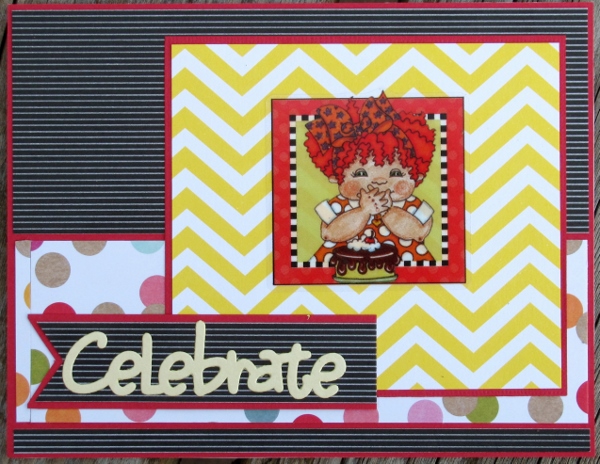
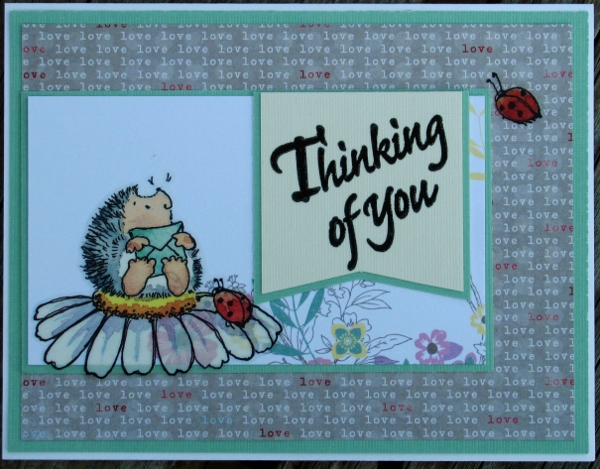
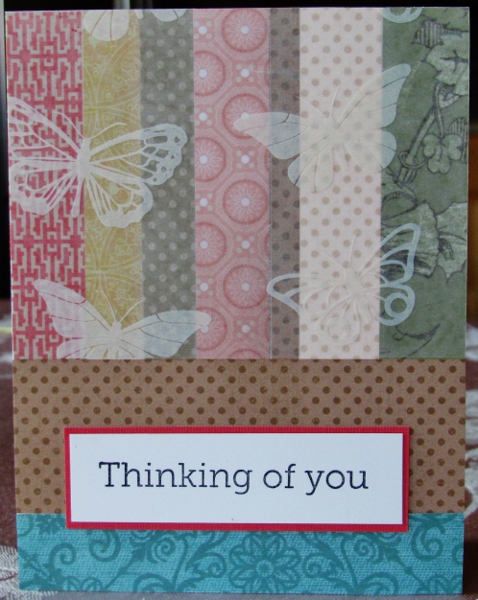
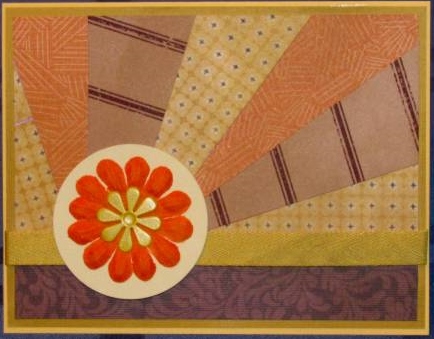
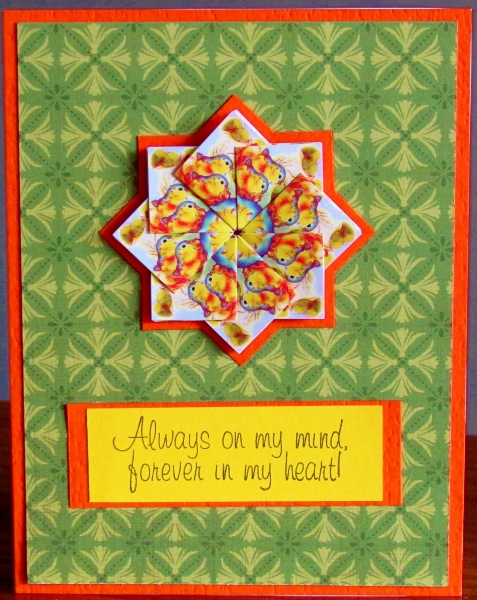
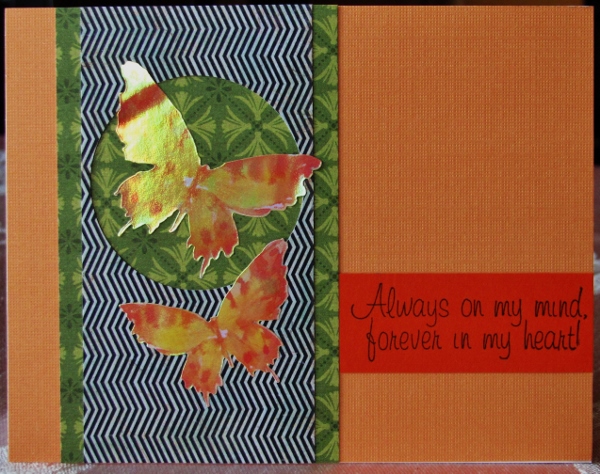
Then I go through my stickers, diecuts and other decorative elements and assign one to each of the sketches I have laid out. For this sketch, I selected a sheet of butterflies and chose to work with the orange ones.

After all of the sketches have a feature element assigned, I stack up the sheets so I have only the next one exposed.

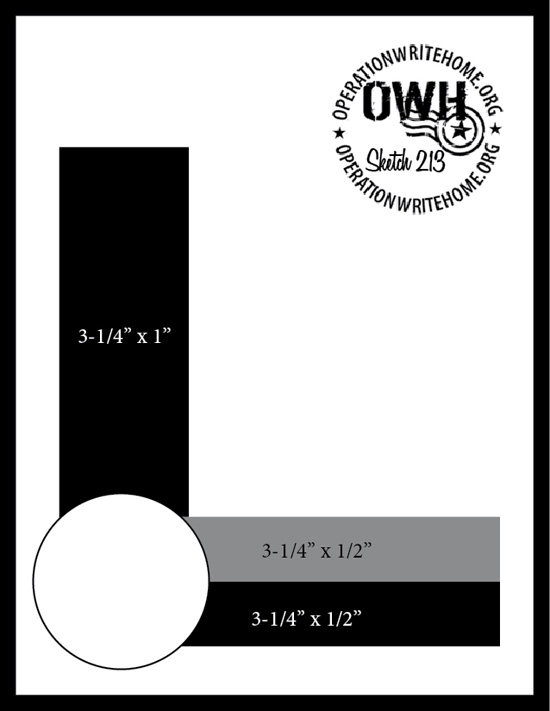
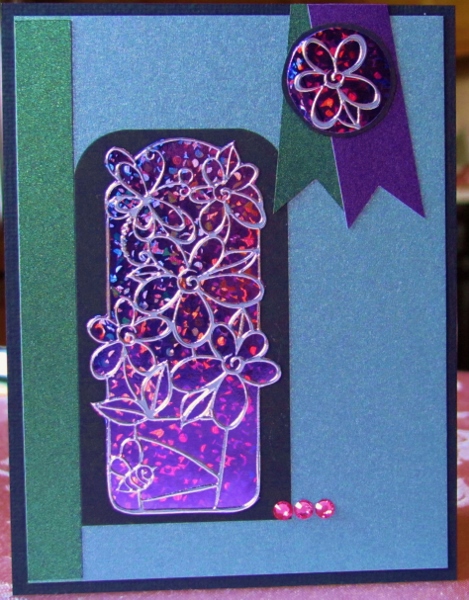
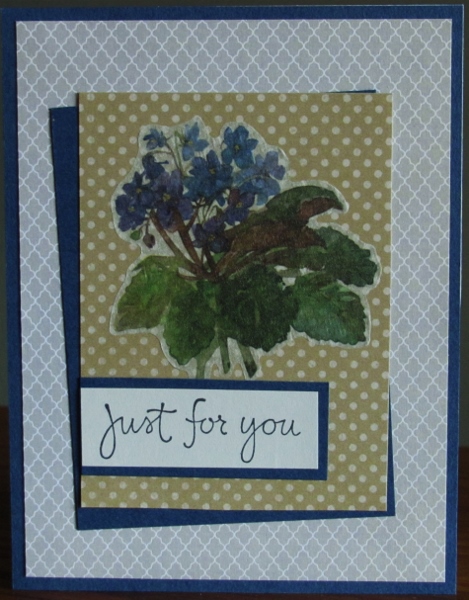
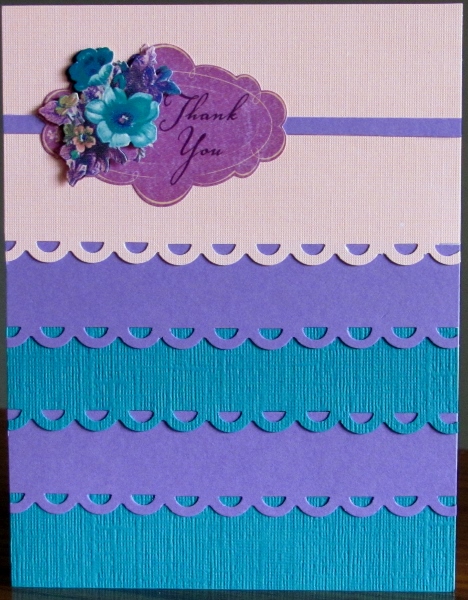
With the feature element in hand I start going through the scrap bin, then the scrap files, then the 6x6 files to find papers with the right colors that are of a size that are suitable for the sketch. For this sketch I had the black zigzag in the scrap bin, the green was cut from a new 6x6 page, and the orange was in the pre-cut solids.

I decided to punch out the circle for the backing paper to show through instead of punching a new paper to overlay it.

The card was all assembled and the butterflies stuck on.


Unless the sentiment is contained on the feature element, I usually select this last. It will depend on the sketch and the balance of the layout to find just the right thing.

I select fron pre-stamped sentiments on white or colored papers, from stickers (in a section labeled 'blah, blah, blah'), rubons, peel-offs, and diecuts. In this case I selected a pre-stamped sentiment on orange.

Ddd


Posted by studio3d@ccgmail.net at 12:01 AM PDT
Friday, 1 May 2015
Operation Write Home - sketch 210
Topic: Sketch Challenge

Sometime it would be fun to go back to the original posts for the sketches and see what other people made with them. I wonder how much they look alike and how they have been changed to look different. Here is OWH sketch 210:


In my case, I left out the three dots in the left strip and replaced them with a sticker floral. I selected papers from the scrap bin to complement those in the flowers, setting the tone for my interpretation.

I wanted something to remain in the spirit of the sketch with a nod to the dots, so I added a strip of rhinestones on the separating edge of the crosspieces.


It still looked too plain so I brought in a pre-stamped sentiment in yellow.

Ddd


Posted by studio3d@ccgmail.net at 12:01 AM PDT
Thursday, 30 April 2015
Operation Write Home - sketch 209
Topic: Sketch Challenge

I realized that, by skipping over to the bonus sketches for a while I was not staying true to my plan to use all the sketches 'in order'. Unfortunately, I don't know when all of the bonus sketches originated so I have decided to do them at the end of the run of regular sketches. Here is OWH sketch 209:


I had this silver peel-off floral panel that I wanted to use, even though it was a bit smaller than the sketch. I stuck it on top of a holographic purple paper and trimmed against the sticker edges.

A single bloom was mounted to more of the paper and punched with a round punch. Both got black backing.

I used three shimmer papers for the other parts and assembled it according to the plan of the sketch.


I used rhinestones for the three dots in the sketch, but used smaller ones andchanged the placement.

Ddd


Posted by studio3d@ccgmail.net at 12:01 AM PDT
Wednesday, 29 April 2015
Operation Write Home - bonus sketch B6 - again
Topic: Sketch Challenge

When I set out to make OWH sketch B6 I had two sets of scalloped squares to choose from for the cake layers. The set I used for today's card are the larger of the two so I had to make a few adjustments in the card design.

First of all, It left me room for larger white border stickers to use for the icing. Second, there was a larger base layer. This allowed me to diecut the text out of the layer and then inlay the same work cut from a different paper.

Because the cake was larger, I had to make a smaller cake plate. This one is made from a scallop punched strip over a half-circle punched out.


I decorated the layers with floral stickers.

Ddd


Posted by studio3d@ccgmail.net at 12:01 AM PDT
Tuesday, 28 April 2015
Loving Cats
Topic: Paper Embroidery

Let's take a little break from the sketches, shall we?

I needed a paper embroidery for a swap in the alphabet series. This assignment was "K is for Kitties".

I had a lot more cats in my file of patterns than I realized, but I fell in love with these cuddling cats. I don't know the resource for the pattern but it has been printed out with the legend 'free pattern from files'.

I pricked it out on grey paper with soft coral dots. The cats were stitched with two shades of brown with grey whiskers.

The pattern has a heart in the sky but I changed it to a crescent moon and stitched it in yellow.

I poked holes in the sky and installed tiny star brads. These started out white but I colored them with a bright yellow Sharpie marker.


I gave the whole thing a coral border and added a yellow sentiment, bordered and cut as a flag.

Ddd


Posted by studio3d@ccgmail.net at 12:01 AM PDT
Monday, 27 April 2015
Operation Write Home - bonus sketch B8 (reprise)
Topic: Sketch Challenge

Back on September 30, 2011 I used one of the bonus sketches to make a zillion cards from my scraps. Here is OWH sketch B8:


And here a a few of the cards I make with it:


They all use scraps and ribbon, some use stickers and some stamps. The first one uses a silk flower and a flower brad, too.

Ddd


Posted by studio3d@ccgmail.net at 12:01 AM PDT
Sunday, 26 April 2015
Operation Write Home - bonus sketch B7
Topic: Sketch Challenge

Still lots of bonus sketches to use up. This is OWH sketch B7:


Even with the one panel on the tilt, I think this layout looks rather formal. So I selected some low key papers, dark borders and an elegant floral illustration - a vellum sticker.

A simple grey diamond is used for the background and a tone-on-tone dot for the floral backing. Navy blue makes up the bordering in all cases.


The sentiment is stamped on a light grey and bordered for impact.

Ddd


Posted by studio3d@ccgmail.net at 12:01 AM PDT
Saturday, 25 April 2015
Operation Write Home - bonus sketch B6
Topic: Sketch Challenge

I've been thinking a card like this for a while and was excited to see this sketch come up that gave me the excuse to proceed with my idea. This is OWH sketch B6:


The idea I had? Use scalloped edge dies to make layers to construct a cake.

I had to go with the size of the dies I had on hand so my 'layers' end up smaller than on the sketch. So I just added a cake plate!

I used white peel-off sticker borders as the icing along the top. Then I used vellum floral stickers to decorate the layers.


I used all shimmer papers for the elements for the cutouts. I also diecut text and glued it across the cake plate.

Ddd


Posted by studio3d@ccgmail.net at 12:01 AM PDT
Friday, 24 April 2015
Operation Write Home - bonus sketch B5
Topic: Sketch Challenge

These bonus sketches are proving to be quite innovative. I hope that trend continues. This is OWH sketch B5:


There's that 3D sentiment sticker again! This is the last of this exact one I have, but there is one left with a slightly different design.

I like this simple open scallop because it still gives a lacy look without being too fussy.

I simply layered repeating rows of solid cardstock with the dark colors from the sentiment sticker at the bottom and the light pink from the floral area at the top. I added a thin strip of the purple to mimic the horizontal line on the sketch.

I wanted this to be simpler than the sketch so I ran everything all the way to the edges of the card front instead of leaving a border.

Ddd


Posted by studio3d@ccgmail.net at 12:01 AM PDT
Thursday, 23 April 2015
Operation Write Home - bonus sketch B4
Topic: Sketch Challenge

Another bonus sketch for you today! This is OWH sketch B4:


That centerpiece made me think of the teabagfolding I used to do a lot of. I looked in the drawer of those supplies and found a couple of packets of papers that were gifted to me in a swap. I used one set to made a simple folded medallion. The result was much smaller than the sketch but ther ARE just guidelines, after all.

I used the colors of the folding papers to choose the rest of the papers, orange for bordering, yellow for the sentiment and a green pattern for the background.

I used the orange to border the medallion and the sentiment, but cut the sentiment down so it did not compete.


I don't know if you can tell, but the papers for the medallion feature little yellow and orange birds. The fold exposes a pair of them in each corner.

Ddd


Posted by studio3d@ccgmail.net at 12:01 AM PDT

Newer | Latest | Older