« September 2015 »
S M T W T F S
1 2 3 4 5
6 7 8 9 10 11 12
13 14 15 16 17 18 19
20 21 22 23 24 25 26
27 28 29 30
You are not logged in. Log in
Entries by Topic
All topics  «
3D paperwork
A - Z challenge 5
A - Z challenge 7
A - Z challenge round 4
A to Z challenge round 3
A to Z round 2
A to Z round 6
A-Z round 1
Around the House
Art Challenges
Artist Trading Cards
Backgrounds
Beads
Bible Journaling
Books
Boxes
Collage
Color Challenge
Coloring
cookbook
Die Cuts
Digital Projects
Digital Stamps
Drawing
Dry Embossing
Fabric Stuff
Fantastic Folds
Field Trip
Home Decor
How Does Your Garden Grow?
Hymnal Art
In The Kitchen
In the studio
Jewelry
Lettering
Links
Multi-Technique
Music to Work By
Musings
Nail Art
New Work
Online Class
Other Hobbies
Other Projects
Painting
Paper Embroidery
Paper Piecing
Photo
Pretty Paper
Quilting
Random
reading
Scrap Recovery
scrapbooking
Sewing
Sketch Challenge
Some Backlog
Stamping
Stencils
Stickers
Supplies
Teabag Folding
Techniques
Testing
tips and tricks
Tutorial
Web resources
Welcome to my Blog
Work By My Friends
workflow
Writing
Blog Tools
Edit your Blog
Build a Blog
RSS Feed
View Profile
Group One
In & Out of Studio 3D
Monday, 21 September 2015
A Kiss To Miss
Topic: Around the House

The other day both of us walked all over the deck, arranged chairs and a fold-out table, wiped down the chairs and when we sat down were shocked to see a little visitor up with us on the second story. Somehow we had managed to miss seeing him in all the activity and yet had missed stepping on him, too!


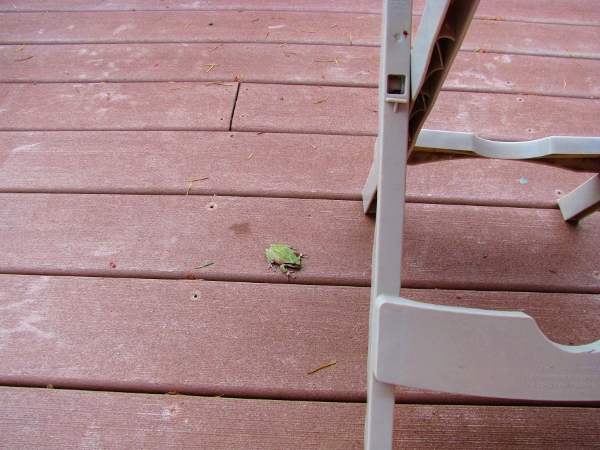
He was so still we weren't certain he was still among the living but, when he was nudged onto a newspaper for transport, he demonstrated his good health and leaping abilities.


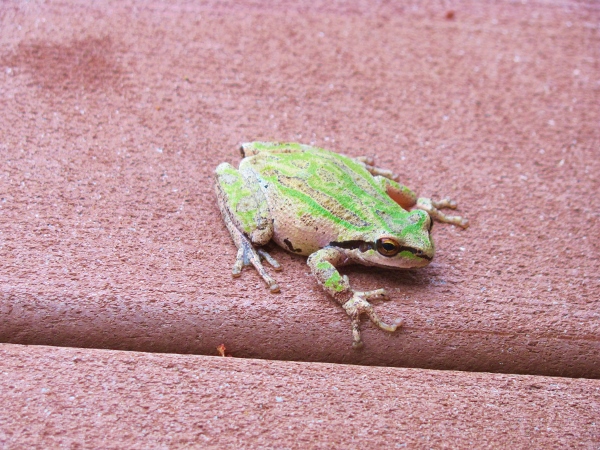
Look at those cute sucker toes!

I assume he was able to crawl up the siding to get up to the deck. He did NOT take the same route down, though. Our hudges with the newpaper encouraged him to take a giant flying leap off the edge of the deck. 


We must assume he landed gently and hopped away to a new home (because we would to hate to think anything bad happened to him).

Ddd


Posted by studio3d@ccgmail.net at 12:01 AM PDT
Sunday, 20 September 2015
The Stars Still Shine
Topic: Beads

When I got an email that a local bead store was having a BIG sale pending closing the store at the end of August, I went in mid-month to have a look-see.

The owner asked if she could help me find anything and I explained that I really wanted to learn how to do beading beyond just stringing strands. She politely told me I should have come in before because she USED TO do classes several times a month. Then she sat down, picked up her cell phone, and proceed to play Candy Crush. Thank you SO much for your service!

I wandered around and picked up a few things that interested me anyway and got the 50% discount.

I didn't learn anything new and ended up doing exactly what I had been doing all along... stringing strands. I did, however, make two nested strands to switch things up a bit.

The beads I bought were the irridescent stars, the Irridescent drops and the clear blocks. From my own stash I pulled polished garnet chips. Way up at the top where you can't see them are 3/4" gold tubes and a magnetic closure.


The other thing I did new on this piece was use beading thread with knotted ends instead of stretchy cord or beading wire with crimp beads.

Ddd


Posted by studio3d@ccgmail.net at 12:01 AM PDT
Saturday, 19 September 2015
Waxed Paper in the Cuttlebug
Topic: Backgrounds

I was telling someone the other day about how to use waxed paper in a Cuttlebug folder to iron between glossy cardstock pieces and ink/buff for a great background. In the middle of the explaination I found that I had several pieces of this prepared cardstock so I demonstrated the inking step (to ooohs and aaahs).

I used Shaded Lilac Distress ink.

I didn't have an illustration to match the lilac but found a printed tag that looked good with it. I cut a slit in the top and the bottom and wove a strip of dotted paper through.

I gave the card a thin border of green and mounted it on a lilac card base.


I had a pre-stamped sentiment on glossy cardstock. I used the lilac inkpad to color it to match the background and popped it up on foam tape.

Ddd


Posted by studio3d@ccgmail.net at 12:01 AM PDT
Friday, 18 September 2015
Letterpress Stars Still Shining
Topic: Dry Embossing

This really is the last of the letterpress backgrounds.

When looking for patriotic papers I found a great blue stripe that looks like matress ticking. I set it up beside the red star letterpress and added a strip of red dot and a scalloped piece of denim blue.

I added Stickles to the scallop to give it a 'spangled' look.


A pre-stamped sentiment fount its way onto the striped paper and I used colored pencils to add some detail work.

Ddd


Posted by studio3d@ccgmail.net at 12:01 AM PDT
Thursday, 17 September 2015
Letterpress Is Still In the Stars
Topic: Dry Embossing

HA! Just when you thought I was all done with the letterpress technique (I did say I was done) I ran across two more pieces I had made and turned them into cards. I had originally set them aside because they were splotchy but after I trimmed them down to pieces that were the best parts they were still big enough to use.

Both use the same folder - the stars. One today, one tomorrow...

I started out going for a patriotic theme so I pulled out a distressed blue paperfor the background. Another paper had a linen look with what looked like stitched flowers along two edges. I trimmed these away with a craft knife and used colored pencils to give them some color.

I didn't want to add green and spoil the two-tone look so I colored the leaves and stars lightly with yellow.


Simple layering on a dark red card base was followed with the tuck-in of a prestamped sentiment.

Ddd


Posted by studio3d@ccgmail.net at 12:01 AM PDT
Wednesday, 16 September 2015
Letterpress and Watercolor
Topic: Dry Embossing

For this letterpress card I combined techniques used on previous ones.

I used a folder of a flower garden in a landscape format.  I applied ink only to the background (sky), blending blue and yellow for some interest. As before I misted the cardstock and the folder then ran it through the Cuttlebug and dried it with a heat gun.

I pressed inkpads to acrylic blick and used an aquabrush to 'watercolor' the leaves and flowers. After this layer was dry, I applied darker versions of the same inks to portions of the illustration.

When this was dry I used a fine-line black marker to trace out all the raised areas of the design. I also used the marker to add a double lne border all around the card 'behind' the flowers. I gave this a double green border.


I used jet black Archival ink to stamp the greeting directly on the panel.

Ddd


Posted by studio3d@ccgmail.net at 12:10 AM PDT
Tuesday, 15 September 2015
Letterpress To the Limit
Topic: Dry Embossing

You would never guess how this was made if not for all the step-by-step that I have been posting.

To start with, I inked the folder with four different Distress pads using the corners of them toapply color to specific areas. I used peacock feathers for the background and picked raspberry and mustard for the flowers. Mowed lawn was used for the leaves.

I did the same as on the previous cards, misting for cardstock and the folder before running through the Cuttlebug and drying with the heat tool.

I pressed these same ink pads to an acrylic block and picked up the color with a brush to paint onto the white lines.

Finally, after drying with the heat tool, I used a fine-line black marker to trace all the lines in the design.


I found a sentiment printed on vellum and trimmed it to allow more of the original art to show around the edges. It is mounted with tiny glue dots and there are black rhinestones to cover them.

I mounted this on a black card base.

Ddd


Posted by studio3d@ccgmail.net at 12:01 AM PDT
Updated: Wednesday, 19 August 2015 7:25 AM PDT
Monday, 14 September 2015
Letterpress With Leaves
Topic: Dry Embossing

I watched an episode of "Scrapbook Soup" on public television with a guest from Spellbinders who demonstrated using embossing folders and inkpads to make letterpress backgrounds. I chose seven different embossing folders and used a variety of additional techniques to make each card different.

For this fifth background I used a brocade folder. I smeared the  Distress ink pad over the surface of the folder and misted it with water. I also misted a piece of white cardstock and inserted it in the folder. Once through the Cuttlebug and I hit it with the heat gun to dry it.

Then I used the same ink pad to apply direct to paper hitting just the raised parts, changing them from white to colored. I had a vellum sheet with colorful leaves printed on it. I ran it through the Xyron to apply adhesive to the entire back of it. This was adhered to the letterpress piece and both were trimmed together.

I used a 1/2" corner chomper to round all four corners. Then I tied twine around the panel and attached a pre-stamped sentiment.

I used a dotted card base for this one.

Ddd


Posted by studio3d@ccgmail.net at 12:01 AM PDT
Sunday, 13 September 2015
Letterpress With Hummingbird
Topic: Dry Embossing

More letterpress with the Cuttlebug. This is the fourth of seven I made in this project series.

For this card I used the leafy branch folder. I smeared the bundled sage Distress ink pad over the surface of the folder and misted it with water. I also misted a piece of white cardstock and inserted it in the folder. After running through the Cuttlebug I hit it with the heat gun to dry it.

I used the bundled sage Distress marker to create drop shadows under the leaves. Then I attached a pre-stamped sentiment to it.

The hummingbird is printed on vellum. I ran the whole piece through the Xyron to apply adhesive to the whole back of it. Then it was placed on the leafy panel and both together were trimmed to size.


I hand drew in the eye on the bird and mounted the background to a sage green card base.

Ddd


Posted by studio3d@ccgmail.net at 12:01 AM PDT
Saturday, 12 September 2015
Letterpress Porcelain
Topic: Dry Embossing

Creating more cards using the Spellbinders demonstrated technique using embossing folders and inkpads to make letterpress backgrounds.

This is the third of seven different embossing folders I played with.

For this I used a larger folder with a stylized vine border on one side. I smeared the scattered straw Distress ink pad over the surface of the folder and misted it with water. I also misted a piece of white cardstock and inserted it in the folder. It was run through the Cuttlebug and then I hit it with the heat gun to dry it.

On this one I grabbed the scattered straw Distress marker and sketched in drop shadows under all the white elements. Itrimmed this panel into a tallformat and attached it to a dark yellow card base.

A pre-stamped sentiment on white was bordered with more of the dark yellow and popped it up on foam tape.


Hard to see in the photo bur the upper edges of all the white elements have a little Stickles sparkle.

Ddd


Posted by studio3d@ccgmail.net at 12:01 AM PDT
Friday, 11 September 2015
Letterpress Hearts
Topic: Dry Embossing

After watching an episode of "Scrapbook Soup" on public television on  using embossing folders and inkpads to make letterpress backgrounds I decided to try a variety of enhancements to make cards.

This is the second of seven different embossing folders I played with.

For this one I used was the hearts folder. I smeared the barn door Distress ink pad over the surface of the folder and misted it with water. I also misted a piece of white cardstock and inserted it in the folder. Once through the Cuttlebug and I hit it with the heat gun to dry it.

I scallop punched the top edge, stamped some unreadable script over the surface with aged mahogony Distress ink and applied Stickles to random hearts.

I stamped the same script onto some red paper to match the card base.  Then I punched a heart from it and applied it on the surface of the card. A prestamped sentiment was trimmed and then I smudged ink on the edges before attaching it.


As a finishing touch I placed a single red rhinestone in the center of the 'o' on the sentiment.

Ddd


Posted by studio3d@ccgmail.net at 12:01 AM PDT
Thursday, 10 September 2015
Letterpress In My Cuttlebug
Topic: Dry Embossing

I was watching an episode of "Scrapbook Soup" on public television and the guest from Spellbinders demonstrated using embossing folders and inkpads to make letterpress backgrounds. I have done this before but decided to do more and try a variety of enhancements to turn them into cards.

I chose seven different embossing folders to play with.

The first one I used was the herringbone folder. I smeared the concord grape Distress ink pad over the surface of the folder and misted it with water. I also misted a piece of white cardstock and inserted it in the folder. Once through the Cuttlebug and I hit it with the heat gun to dry it.

I didn't do anything more to the background. I trimmed it and attached it to a blue base card. I had a collection of vellum elements and one that looked like stained glass was a perfect blend of the purple and blue.


I added a stamped sentiment to the bottom of the illustration and popped the vellum piece up on foam tape.

Ddd


Posted by studio3d@ccgmail.net at 12:01 AM PDT
Wednesday, 9 September 2015
Pink and Turquoise
Topic: Paper Embroidery

I HAD this post ready, typed, posted to go live today, and POOF I have no idea where it went. It may pop up later at some random time but I wanted you to have it NOW, when it is scheduled!

--------------------------------------------------------------------

The assignment: Make a paper embroidery card with pink and turquoise.

That combination made me immediately think of those 1960s Christmas trees made of silber tinsel with the rotating color wheel light. HA! So I deided to recreate the 'magic' in thread.

I selected a bright turquoise and stitched with bright pink thread. I added pink rhinestones where the pattern showd beads because I wanted them to appear more like baubles.


Bordering is bright pink to match the thread.

I used alcohol markers to color a silver peel-off sticker and cut it apart to mount it top and bottom.

Ddd


Posted by studio3d@ccgmail.net at 12:01 AM PDT
Tuesday, 8 September 2015
Singing the Summer Blues
Topic: Paper Embroidery

Assignmment: make a paper embroidery card with the theme 'summer'.

To me summer is all about flowers and butterflies. I love them both. I am always fascinated by the variety and the profusion of both.

I had this great 3D image of blue flowers and chose a 'vine' border to stitch for a framing element. Blue cardstock was the base and I used dark green thread to go with the leaves.

A dark green layer is off centered for a little interest and I added a butterfly mounted 3D.

You can see I added just a touch of stickles glitter to the centers of the flowers.


It's now off to its new home in the UK.

Ddd


Posted by studio3d@ccgmail.net at 12:01 AM PDT
Monday, 7 September 2015
Fairy Ring
Topic: Paper Embroidery

Swap assignment for one of the paper embroidery groups was 'fairy/fairies'. I don't have any fairy patterns but I did have some fairy stickers whose wings can be bent up for a 3D effect.

I selected a yellow patterned paper and chose a ring of butterflies for the stitching pattern.

I first stitched with a bright blue shimmer thread using every other hole then went back and did the other holes with a light blue shimmer.


The fairy sticker rests in the center of the ring and the card is finished with a dark redborder and a shimmery dark blue folded card base.


I chose to not include a sentiment on this one.

Ddd


Posted by studio3d@ccgmail.net at 12:01 AM PDT
Updated: Wednesday, 5 August 2015 2:17 PM PDT
Sunday, 6 September 2015
Stitch and Swap
Topic: Paper Embroidery

It's been a while since I did any paper embroidery as I have been concentrating on those OWH sketches. But I signed up for a swap so really needed to get cracking on a card.

The assignment was to combine paper embroidery with 'decoupage'. Now in the US we usually call these 3D papers and the term decoupage is used to refer to a collage method where the layers are sealed under varnish. But in the UK (and probably the rest of the world) our 3D papers are called decoupage. Good to know I won't have to seal my card in varnish!

I've used the stitched round frame before - and with decoupage - and it turned out great so I decided to use that again. I selected a dark and a light rose and a dark green to go with the coloring of the picture I was going to use.

After stitching, I used a craft knife to carefully cut away the inside of the circle. Then I placed the rose picture behind with places that I knew would be layered extending behind.

This made it so that those layers would overlap the edges of the circle providing more dimensionality.


I colored a silver peel-off greeting sticker with alcohol marker and applied to the upper edge and then used a trio of bright pink rhinestones at the bottom.

The distressed borders at the top and bottom are part of the original paper I selected for the stitching. I finished off by trimming so that a border of the burgundy base card shows around all four edges.

Ddd


Posted by studio3d@ccgmail.net at 12:01 AM PDT
Updated: Tuesday, 4 August 2015 11:25 AM PDT
Saturday, 5 September 2015
Big Blue Beads
Topic: Beads

Some months back I was given a little jar and little package of bright blue beads - imagine the giver's surprise when she gets them back as a birthday gift!

My first step was to arrange the large beads in a balanced layout on my bead board. Then I had to decide how best to string them because some were large hole (like Pandora) and some small hole (standard beads). In looking through my own bead stash I found a bag of small faceted beads in the same blue and they fit through the holes of the large beads perfectly!

So I used beading wire to string a leader and ender of the small beads and then alternated the large hole beads with the small hole ones using the small faceted beads for the large hole beads to ''ride over". Depending on the size of the bead it might take from one to three beads to fill the center.


You can see the beads have silver hardware on them and the large faceted beads have a aurora finish.


I used a screw-type closure at the back.

Ddd


Posted by studio3d@ccgmail.net at 12:01 AM PDT
Friday, 4 September 2015
Operation Write Home - sketch 259
Topic: Sketch Challenge

GRAND FINALE!

The last sketch (forever) from Operation Write Home was published back in July. Even though I did not make a card from it to sent to them (it came out after my last box was mailed in) I did commit to completing my self-challenge of using every single one of the sketches so I did nake a card to keep in my own stash to be used when an occasion arises.

Here is the sketch for OWH 259:


Pretty plain, which always means there is lots of opportunity for interpretation.

I remembered having some fancy-edged diecut rectangles and squares so went searching for one that was close to the specified size. This one had to have one edge cut to get it down to the right shape even though the scalloped edgeextends it beyond the measurements given.

I masked the scallops and stamped my hand-carved butterfly onto the white background.

I chose a neutral backing paper with some subtle text on it. One edge (from a 6x6 sheet) had a scrollwork pattern so I trimmed it away to use as the band across the bottom.

I had the text printed on a vellum strip and secured it to the scrollwork. The skewing off to the right needed a bit of balance which called for the rhinestones on the left end.

I used alcohol markers to color the butterfly to match the background.


I trommed down the entire piece to leave a white border showing from the card base.


So, now that that challenge is fulfilled, what shall be the next?

Ddd


Posted by studio3d@ccgmail.net at 12:01 AM PDT
Thursday, 3 September 2015
Bringing Home the Tree
Topic: Stamping

Time to make art for the County Fair!

We'll start with the assignment for a Christmas card with rubber stamping.

I began the process by inking a pine tree stamp with Distress Markers and stamping it on white cardstock. I masked the tree and inked an old-fashioned car with black Distress Marker and stamped that. I added brown Distress marker to color the car.

I masked the car and tore some post-it paper. This was used to mask a line below the car and blue Distress ink was brushed upward to create a snow bank. The torn paper was moved higher and blue inked again. Then a layer of brown was inked under the car followed by two higher snow banks.

At last, I moved the mask higher and stamped bare trees.

I removed all the masks and then used foam with Blue Distress ink to color the sky. I used a Distress Marker to sketch in a shadow underneath the car to ground it.

I stamped the greeting in the lower corner with black archival ink.

Stickles glitter was used sparingly across the tops of the snow banks and then dotted in the bare trees.


I used a brown bordering paper and then mounted it all on a green card base.

Ddd


Posted by studio3d@ccgmail.net at 12:01 AM PDT
Wednesday, 2 September 2015
Blue Lightning
Topic: Nail Art

When you paint long nails it gives a very large canvas for nail art. It also makes wild and crazy artwork look not so 'out there'.

This time around I wanted a look that spoke of summer storms so chose a sky blue and added silver lightning. The lightning is stylized to be two zigzag lines plus the tips.


The glitter makes the camera freak out and not completely focus.


It won't last ALL summer but we'll see what comes next when the time comes.

Ddd


Posted by studio3d@ccgmail.net at 12:01 AM PDT

Newer | Latest | Older