« November 2015 »
S M T W T F S
1 2 3 4 5 6 7
8 9 10 11 12 13 14
15 16 17 18 19 20 21
22 23 24 25 26 27 28
29 30
You are not logged in. Log in
Entries by Topic
All topics  «
3D paperwork
A - Z challenge 5
A - Z challenge 7
A - Z challenge round 4
A to Z challenge round 3
A to Z round 2
A to Z round 6
A-Z round 1
Around the House
Art Challenges
Artist Trading Cards
Backgrounds
Beads
Bible Journaling
Books
Boxes
Collage
Color Challenge
Coloring
cookbook
Die Cuts
Digital Projects
Digital Stamps
Drawing
Dry Embossing
Fabric Stuff
Fantastic Folds
Field Trip
Home Decor
How Does Your Garden Grow?
Hymnal Art
In The Kitchen
In the studio
Jewelry
Lettering
Links
Multi-Technique
Music to Work By
Musings
Nail Art
New Work
Online Class
Other Hobbies
Other Projects
Painting
Paper Embroidery
Paper Piecing
Photo
Pretty Paper
Quilting
Random
reading
Scrap Recovery
scrapbooking
Sewing
Sketch Challenge
Some Backlog
Stamping
Stencils
Stickers
Supplies
Teabag Folding
Techniques
Testing
tips and tricks
Tutorial
Web resources
Welcome to my Blog
Work By My Friends
workflow
Writing
Blog Tools
Edit your Blog
Build a Blog
RSS Feed
View Profile
Group One
In & Out of Studio 3D
Tuesday, 3 November 2015
Doggies in the Window
Topic: Quilting

I took the same idea used in the monkey quilts and translated it into a quilt with puppies.

Someone had given me a print with crowds of dogs on it. I didn't have much so carefully measured to figure out the maximum size of squares I could cut to get 9 even blocks.

Then I calculated the width of block borders needed to bring them up to 12 1/2 inches. These were cut out of dog paw prints - 5 in black and 4 in brown.

I banded the puppies with the paws and then set them in alternating color blocks.


I used a grey patterned fabric border that pulls color from the big fluffy dog featured in the center column.

Ddd


Posted by studio3d@ccgmail.net at 12:01 AM PST
Monday, 2 November 2015
Wild Baby
Topic: Quilting

Next up in the lineup of baby quilt tops is one created with a variety of patterns in very odd greens and browns. Taken together they give the feeling of wild animal prints although none of them really are!

I used a 36 inch grid to create a variety of block sizes that could be mixed and matched to give a totally random arrangement.


I used a tan 2 inch border to bring this up to 40 inches.

Ddd


Posted by studio3d@ccgmail.net at 12:01 AM PDT
Sunday, 1 November 2015
Tiny Dot Monkeys
Topic: Quilting

The second of the monkey quilt tops uses the same fabric, same layout, same colors... but I used a black fabric with tiny colored dots for the border. The dots are the same size as the eyes on the monkeys so I reinforces their faces.


These are so bright and cheerful.

Ddd


Posted by studio3d@ccgmail.net at 12:01 AM PDT
Big Dot Monkeys
Topic: Quilting

Many years ago someone gifted some crazy monkey fabric to me. I used some on a Project Linus quilt and put the rest away thinking "when will I ever need monkeys again?"

When I got this fabric out again I calculated how large I could cut the monkeys in order to get 18 blocks. Then I needed to cut block borders to bring them up to 12 1/2 inches.

I decided to use alternating colors (red and yellow) to separate the blocks from each other. Two quilt tops were created from these blocks.

For the first one I found in my stash a black fabric with the perfect large dots in the same blended neons as the monkeys and used this as the border.


Posted by studio3d@ccgmail.net at 12:01 AM PDT
Friday, 30 October 2015
Primarily Baby
Topic: Quilting

For the baby quilt tops that will be completed by others I did several sketches of blocks that could be easily constructed into 36 inch squares.

For this one I used red yellow and blue blocks in 6x12. These made larger blocks of 12x18.


A dark blue 2 inch border brings it up to 40 inches. This makes the math easy and ensures that a single width of yardage will complete the backing.

Ddd


Posted by studio3d@ccgmail.net at 12:01 AM PDT
Thursday, 29 October 2015
Broken Rainbow - v.4
Topic: Quilting
The fourth quilt top made from the 12 1/2 inch striped sections used up the last of the 32 that I had created.

Here is the result:


This one did not have a predominant color in the blocks. I banded it with a yellow green border.

Ddd


Posted by studio3d@ccgmail.net at 12:01 AM PDT
Wednesday, 28 October 2015
Broken Rainbow - v.3
Topic: Quilting

This is the third of the quilt tops made from the bazillion strips of 2" widths from piles of my scraps, sewed together end to end, in color order.

When the strip was long enough I brought the ends together and sewed side-by-side the full length. This was repeated until I had one long striped piece 12 1/2 inches wide and cut this into sections 12 1/2 inches long and had enough for 32 blocks. I sorted them based on predominant colors and created four 9-patch quilt centers of 36 inches. Then each one got a 2 inch border to created a completed top of 40 inches.

Here is the third of these:

Although this was predoinantly yellows and golds I chose to band it with a purple. teal that had some yellow in it.

Ddd


Posted by studio3d@ccgmail.net at 12:01 AM PDT
Tuesday, 27 October 2015
Broken Rainbow - v.2
Topic: Quilting
The second of the strip quilts from the bazillion strips of 2" widths from piles of my scraps. As stated yesterday, these were long, short, medium... I sorted them into piles by color: yellow, golden, brown, pink/red, purple, blue, teal, green, yellow green. Then I sewed them together end to end, one from each pile round and round until I ran out of one color (blue).

Judging the strip was long enough I brought the ends together and sewed side-by-side the full length. This was repeated until I had one long striped piece 12 1/2 inches wide.

I cut this into sections 12 1/2 inches long and had enough for 32 blocks. I sorted them based on predominant colors and created four 9-patch quilt centers of 36 inches. Then each one got a 2 inch border to created a completed top of 40 inches.

Here is the second of these:


This one was predominantly blue and I used a blue border to reinforce that.

Ddd


Posted by studio3d@ccgmail.net at 12:01 AM PDT
Monday, 26 October 2015
Broken Rainbow - v.1
Topic: Quilting

A group project has our quilting ladies churning out tops for baby quilts that will go to a reservation with our youth at spring break. Later these will be backed, quilted and bound - but not necessarily by the person who constructed the top. So I am going to show these even though they are unfinished.

I first cut a bazillion strips of 2" widths from piles of my scraps. These were long, short, medium... I sorted them into piles by color: yellow, golden, brown, pink/red, purple, blue, teal, green, yellow green. Then I sewed them together end to end, one from each pile round and round until I ran out of one color (blue).

Judging the strip was long enough I brought the ends together and sewed side-by-side the full length. This was repeated until I had one long striped piece 12 1/2 inches wide.

I cut this into sections 12 1/2 inches long and had enough for 32 blocks. I sorted them based on predominant colors and created four 9-patch quilt centers of 36 inches. Then each one got a 2 inch border to created a completed top of 40 inches.

Here is the first of these:


This one was prominently pink and I banded it with tan.

Ddd


Posted by studio3d@ccgmail.net at 12:01 AM PDT
Sunday, 25 October 2015
Fall Palette
Topic: Color Challenge

One of the card-making lists issued a challenge to create a card with a specific palette:


We could use the feature color plus either the top row of colors or the bottom row. I chose the top row.

The way my computer is set up I have to write down the colors with descriptions and then try to find/match those colors when I get down to the studio. It's harder than it sounds!

I started by selecting the Distress inks that I thought were closest (Squeezed Lemonade, Aged Mahogany, Weathered Wood and Dusty Concord). Then I chose cardstock to match those. In the end, I overestimated the intensity of the purple so my card is brighter than the palette supplied.

I selected a piece of sheet music and distressed it with the yellow and grey. Then I used the mahogany and grey as borders with a torn strip of the grape as an accent.

I stamped a vase of flowers on yellow and cut it out. Then the vase and the leaves were colored with Distress markers.

I used two punches to make tiny flowers out of all four colors of the cardstock, shaped them with a ball tool over foam, and stacked contrasting colors together. These were then glued over the whole bouquet.

I then applied Liquid Pearls (Bisque) to the centers of all the flowers.


I had used one flower as an accent at the base of the vase and needed something to balance that out. So I punched a butterfly from grape and from yellow and stacked them in the upper left. I added the same Liquid Pearls to the body of the butterfly.

Ddd


Posted by studio3d@ccgmail.net at 12:01 AM PDT
Saturday, 24 October 2015
Cut Flowers
Topic: Quilting

From a collection of fabrics in the stash of leftovers I pulled enough to construct a quilt in the disappearing hourglass. This was a tutorial from the Missouri Star Quilt Company. It is a variation on the disappearing pinwheel that I have done a couple of times but gets the pinwheel turned into an hourglass at the step before the cuts are made.

I have had such fun using these construction methods but it is certainly a challenge to work with so many bias seams.


This quilt gets its name from the flowers in the fabrics and the fact that they have been cut all to pieces.


Although it is difficult to see in the photos I quilted this with the overall vines and leaves.

Ddd


Posted by studio3d@ccgmail.net at 12:01 AM PDT
Friday, 23 October 2015
Peacock Feathers
Topic: Quilting

And on marches the quilt parade...

I called this one 'Peacock Feathers' just because of the color scheme but also because of the look of the marbled fabric used in the large bands.

I separated the large blocks with narrow black sashing which gives the quilt a stained glass look.

I first bought the marbled fabric for the stash and had it for about a year before I bought the two purples and two teals to go with it. They were all of the same line so the swirls in all four fabrics are the same.


The backing is a soft green dotted fabric that pulls color from the marbled.

Here you can see the simple quilting of side-by-side waves.


The quilting is done in purple verigated thread.

Ddd


Posted by studio3d@ccgmail.net at 12:01 AM PDT
Thursday, 22 October 2015
Butterflight
Topic: Quilting

When I made the lily quilt I stitched up all the hourglass blocks and then discovered I had twice as many as I needed. I couldn't let those go to waste so I cut plain squares from a green batik from the stash to stand in for the square-in-a-square lily blocks.

I used the same layout and then realized it was too plain. I pulled a glittery butterfly print for a wide border and then, from its scraps, I cut out individual butterflies, backed them with Steam-a-Seam2 and ironed them onto the pieced top in a rising flight.


I used black thread to 'sketch' twice around each butterfly and connect them.


The background was quilted in a blending thread using free-form butterflies.


The outside border was quilted with large loops.


I didn't have enough of the backing fabric so I added a couple of wide stripes of fabric from the stash to enlarge it.


Whatever thread I was using on the front, I kept the bobbin thread black. Look at how the butterfly quilting shows up on the backing stripes.


Now THAT'S a save from the scrap pile!

Ddd


Posted by studio3d@ccgmail.net at 12:01 AM PDT
Wednesday, 21 October 2015
Sherbet Stars
Topic: Quilting

If you want the back story on this quilt, you can read all about it on yesterday's post.

The second quilt I made with this Chain of Stars pattern from Kimberly Einmo's mystery quilt on Craftsy was made using coral, brown and two green fabrics. I love the yummy combination of these together.

This is the wall hanging size (I call it a lap quilt) like the other and they are about 48 inches square.


I repeated the use of leaves and vines for the quilting as I did on the last one.

This is a beautiful pattern that I may use again (maybe more than once). The hardest part is decifing on the fabrics to use.

Ddd


Posted by studio3d@ccgmail.net at 12:01 AM PDT
Tuesday, 20 October 2015
Raspberry Stars
Topic: Quilting

One of the quilting teachers from Craftsy will be teaching TWO of the classes I'm taking on an upcoming cruise. One of those classes is for a mystery quilt.

I wasn't too thrilled with the resulting mystery quilt with another instructor and wanted to make sure this would be a more positive experience. So when I found that she has a mystery quilt class on Craftsy I decided to give it a whirl.

I pulled out scraps to put together a 6-fabric colorway and actually came up with two of them that I liked. I couldn't decide which to go with so I cut all the parts and made two versions of the same quilt.

The pattern is called Chain of Stars by Kimberly Einmo. We had instructions for our choice of baby, lap, full, queen or king size. I chose to make both of mine lap size (although she calls it a wall hanging). Here is the first one that I finished using a palette of raspberry, medium green and chocolate brown. 


I did the quilting with an over all meandering leaf and vine.


I had not done leaf and vine before but really like how it turned out.

Ddd


Posted by studio3d@ccgmail.net at 12:01 AM PDT
Monday, 19 October 2015
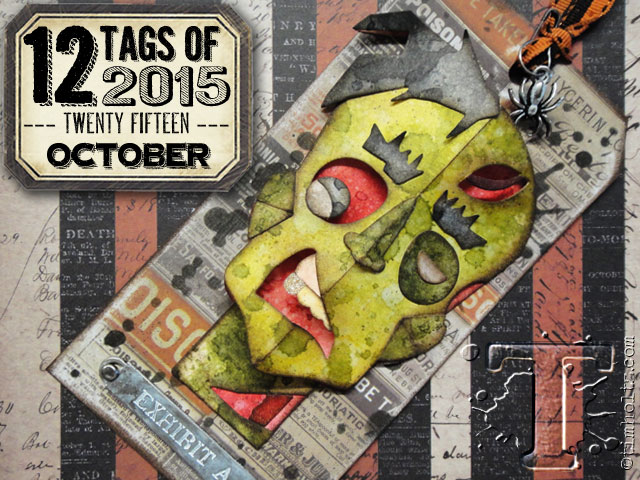
12 Tags of 2015 - October
Topic: Multi-Technique

I can't believe we're up to October already with this year-long challenge!

Here is the inspiration piece from Tim. He went with a distinctly Halloween tag, but I am NOT all about Haloween.


I went back to the very basic idea that Tim used and focused on 1) wrinkle-free distress backgrounds 2) layering diecuts made from those backgrounds 3) a word feature. Granted, I used diecuts that are nothing like Tim's and worked on a large showpiece instead of a tag, but the process is similar and led to a project I am proud of (much more than if I had made a Halloween tag).

Here are the steps I used:

- create wrinkle-free distress background in 6 color-ways

- diecut and punch various 'scene' parts from the backgrounds

- ink edges of each piece with Distress Ink using a foam blender

- attach a piece of copper ColorMe paper to a heavy base layer

- use Distress Ink and blending foam to color background

- ink edges using Distress Ink

- add large distressed background over the ColorMe background

- assemble diecut parts into a 'scene' using foam tape to raise in successive layers

- diecut a script word from distress background paper

- layer word over fancy diecut label


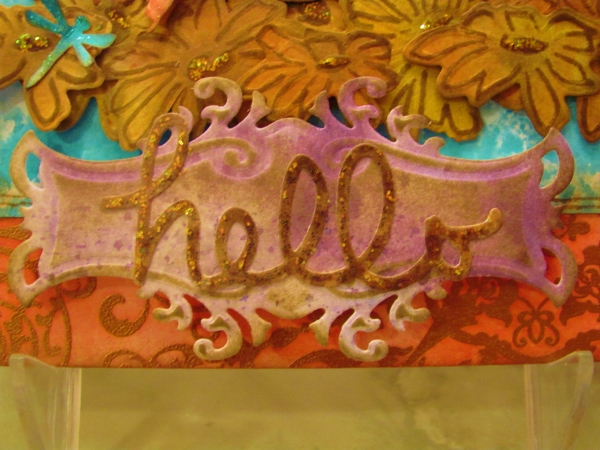
- attach to main piece using several layers of foam tape

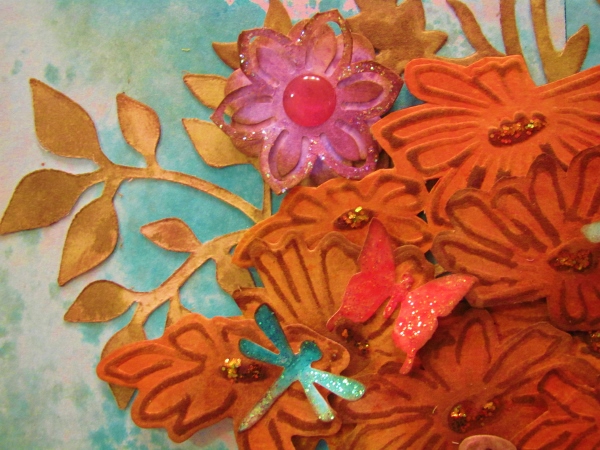
- use various colors of Stickles to decorate elements of the scene


- add a double line around the main piece with the fine tip of a Distress marker

- present on a picture holder stand

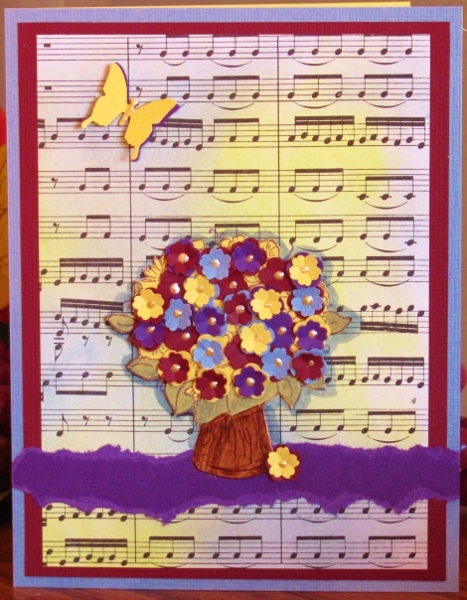
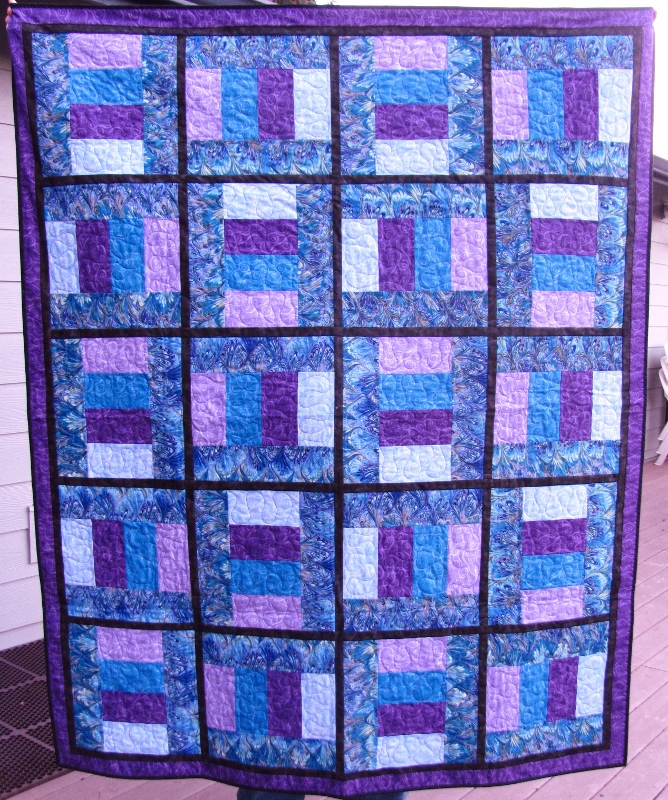
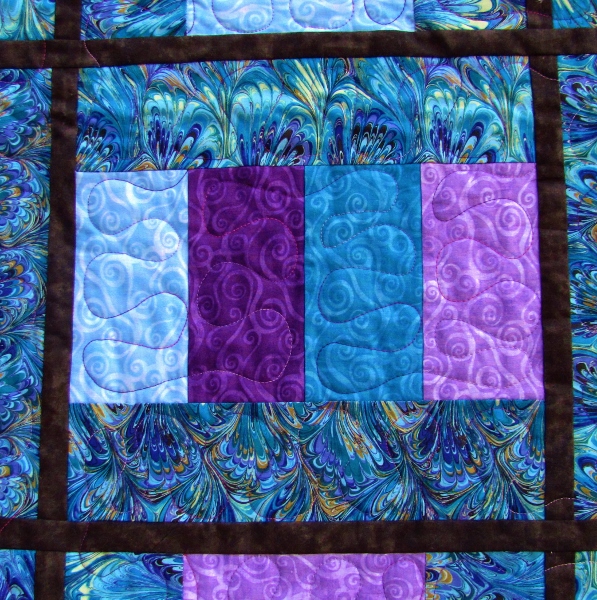
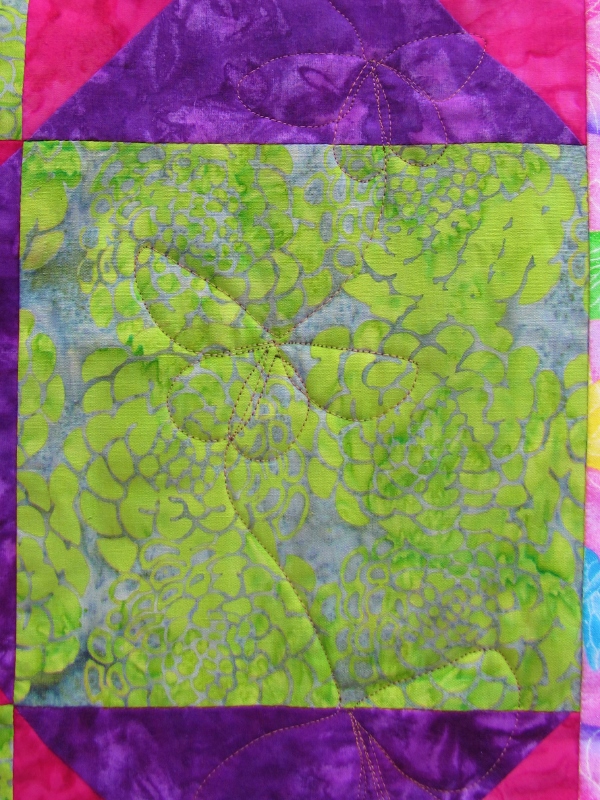
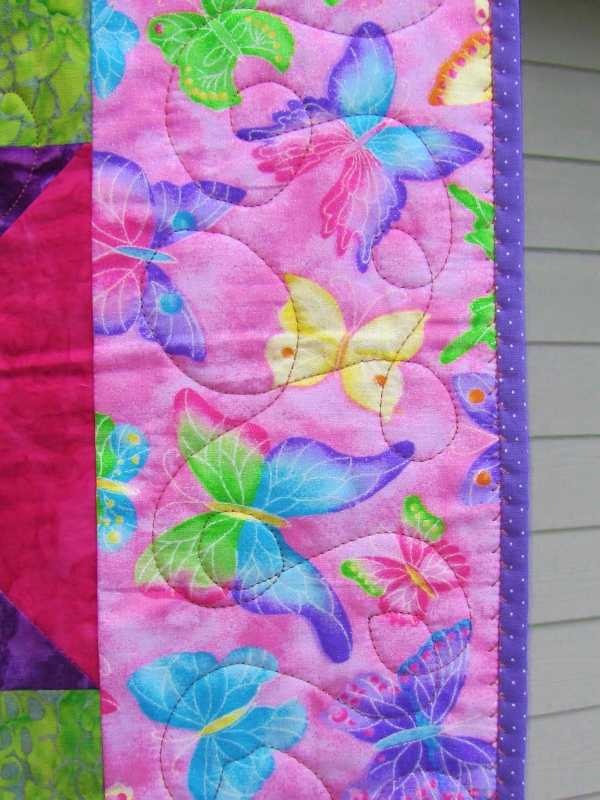
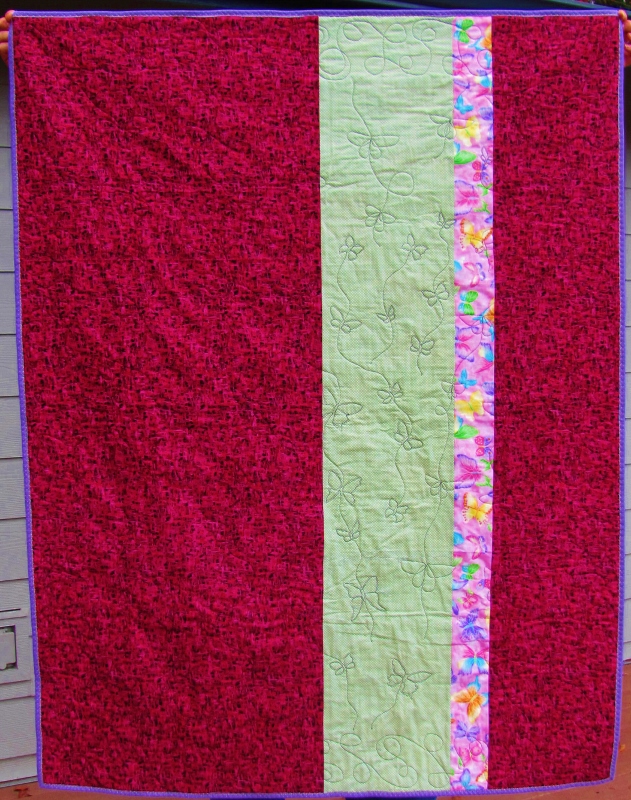
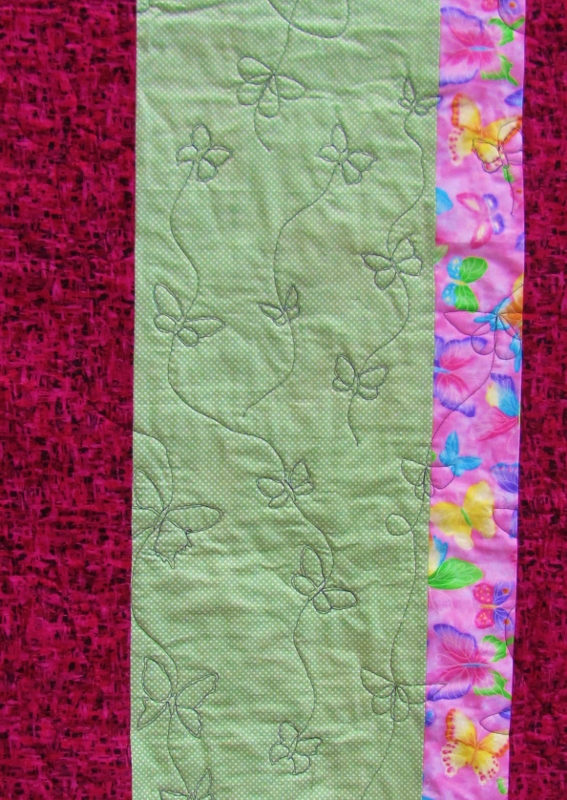
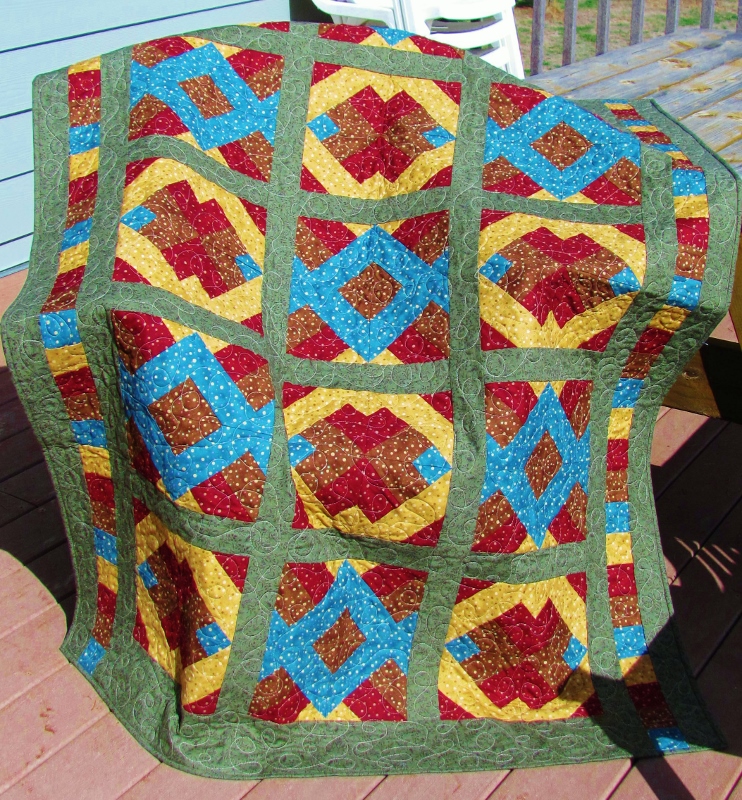
Here is the finished piece:

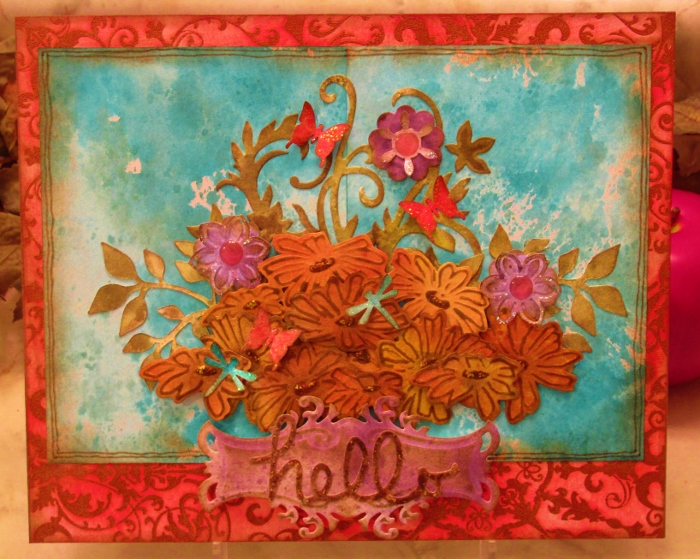
Ummm, yeah. That is NOT a Zombie Head Tag!

Ddd


Posted by studio3d@ccgmail.net at 12:01 AM PDT
Sunday, 18 October 2015
Well, Hello Kitty!
Topic: Paper Embroidery

Swap theme for our paper embroidery group was 'a card for a child'. Well, I don't know of a little girl living who isn't enamored with Hello Kitty.

I found this pattern in the file of freebies I have printed off and stitched her up in the traditional colors - black and bubble-gum pink.

Those same colors were selected for the backing layers, using graphic lines for some bright, party fun.


I selected a black peel-off sticker sentiment and then chose a flower from the same sticker sheet to overlay the bow on her head.

Ddd


Posted by studio3d@ccgmail.net at 12:01 AM PDT
Saturday, 17 October 2015
Tiny Bubbles
Topic: Quilting

When I fould a 'manager's special' at 40% off at the fabric store I had to buy some yardage in every color it was available. This bubble fabric came in tan, brown, red and teal.

I used a tutorial from the Missouri Star Quilt Company called the Amazing Jelly Roll from 3 Dudes Quilting. It essentially has you sew four strips together side-by-side, measure the total width, and cut lengths to match so you end up with squares. These are laid, right sides together so the strips go horizontal on one and vertical on the other. You stitch 1/4 inch all around the outside and then cut on both diagonals. You end up with four squares with a mix of vertical and horizontal stripes. So Cool!

I arranged the resulting blocks into two types of blocks and assemgled the quilt with sashing. My quilt was MUCH longer than wide so I gathered all the left overs from the strip cutting and made side borders for the quilt, followed by another green border.


I quilted with a light cream thread in loop-the-loops.


The quilt ended up larger than anticipated do the backing I had chosen was notbig enough. I took some of the scraps from the bubble fabrics and pieced a giant stripe for the back, off-centered for impact.

I obviously used cream thread in the bobbin as well, so you get a good view of the quilting here, too.

Ddd


Posted by studio3d@ccgmail.net at 12:01 AM PDT
Friday, 16 October 2015
Pickalily
Topic: Quilting

This quilt was totally inspired by the lily fabric I found in the red tag bin at the local fabric store.

I surrounded the feature squares with green batik and then used the bright pink and purple to build hourglass blocks of the same size.

It is a very simple layout that really calls attention to the lilies.


The quilting is grasses in all of the lily fabric and triple teardrops in all of the triangles.


This is also a Passages quilt for the hospital.

Ddd


Posted by studio3d@ccgmail.net at 12:01 AM PDT
Thursday, 15 October 2015
Tipsy Triangles
Topic: Quilting

From my quilting mini-marathon, today we are looking at 'Tipsy Triangles'. This is the other half of the charm pack that was given to me. It was a mix of blues and browns. I had already used the blues for the quilt shown yesterday so I added enough browns from my stash to make enough for this quilt. The background is all muslin from my stash, but from different sourdes so some have more color than others.

The pattern is a tutorial called 'Falling Triangles' from the Missouri Star Quilt Company.


I quilted this all over with interlocking triangles of various shapes and sizes.


This will go to the hospital for the Passages program - number 37!

Ddd


Posted by studio3d@ccgmail.net at 12:01 AM PDT

Newer | Latest | Older