« November 2015 »
S M T W T F S
1 2 3 4 5 6 7
8 9 10 11 12 13 14
15 16 17 18 19 20 21
22 23 24 25 26 27 28
29 30
You are not logged in. Log in
Entries by Topic
All topics  «
3D paperwork
A - Z challenge 5
A - Z challenge 7
A - Z challenge round 4
A to Z challenge round 3
A to Z round 2
A to Z round 6
A-Z round 1
Around the House
Art Challenges
Artist Trading Cards
Backgrounds
Beads
Bible Journaling
Books
Boxes
Collage
Color Challenge
Coloring
cookbook
Die Cuts
Digital Projects
Digital Stamps
Drawing
Dry Embossing
Fabric Stuff
Fantastic Folds
Field Trip
Home Decor
How Does Your Garden Grow?
Hymnal Art
In The Kitchen
In the studio
Jewelry
Lettering
Links
Multi-Technique
Music to Work By
Musings
Nail Art
New Work
Online Class
Other Hobbies
Other Projects
Painting
Paper Embroidery
Paper Piecing
Photo
Pretty Paper
Quilting
Random
reading
Scrap Recovery
scrapbooking
Sewing
Sketch Challenge
Some Backlog
Stamping
Stencils
Stickers
Supplies
Teabag Folding
Techniques
Testing
tips and tricks
Tutorial
Web resources
Welcome to my Blog
Work By My Friends
workflow
Writing
Blog Tools
Edit your Blog
Build a Blog
RSS Feed
View Profile
Group One
In & Out of Studio 3D
Thursday, 12 November 2015
Liquid Pearl Birdcage
Topic: Stencils

Paper crafting group challenge in October was 'birds and birdhouses'. I guess a birdcage is a bird house so that is what I did.

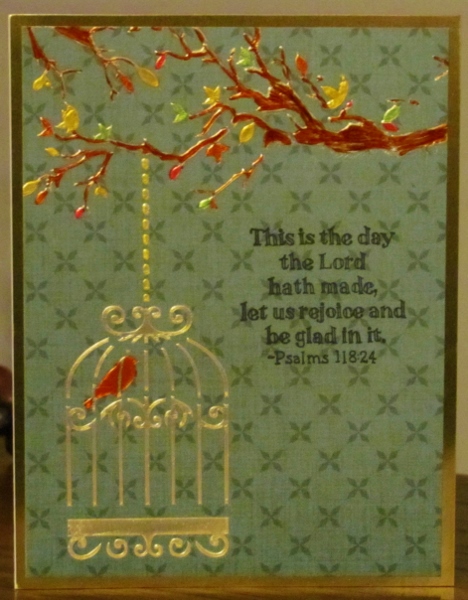
I have a stencil that includes four birdcages hanging from branches with a couble of birds in the tree.

I used tape to block out all but one of the birdcages and all the birds that were free. I kept the one bird inside the cage.

I used a squeegee to spread Liquid Pearls (color: bisque) through the stencil onto printed cardstock. The stencil was removed and the pattern allowed to dry completely on its own.

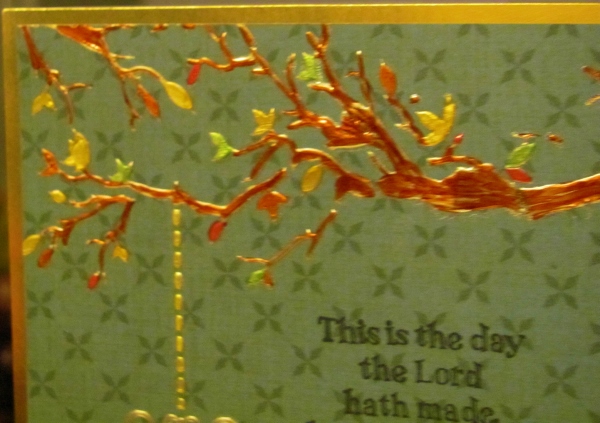
I then used Copic markers to color in the bird and the leaves and branches.

I cut the panel to size and stamped a sentiment on the side.


Here you can see the coloring better


I mounted this on shiny gold cardstock, then to a folded card base.

Ddd


Posted by studio3d@ccgmail.net at 12:01 AM PST
Wednesday, 11 November 2015
Blended Butterflies
Topic: Stencils

I liked the use of stencils in overlapping watercolor pencils that I did yesterday so I decided to do it again. This time I used three butterfly diecuts and arranged them in a rising flight design.

Once again, the elements looked too flat, so I used a Sakura glitter pen to draw and color in the patterns that were on the dies.

The effect is great in person but sure does mess up the photography!

I ounted this on a patterned paper with yellow and grey chevrons.

I stamped a greeting on the side and used the glitter pen on the double lines in the lettering.


What am I going to do about this camera?

Ddd


Posted by studio3d@ccgmail.net at 12:01 AM PST
Tuesday, 10 November 2015
Blended Blooms
Topic: Stencils

I saw Sandy Allnock doing a watercolor pencil technique the other day on her blog and decided to give it a try. She was using the blanks left over from diecutting for her outlines but I already had stencils so decided to use that instead.

The stencil (mine were poppies) is laid over watercolor paper and traced partway around (I am using the bloom heads only) with a watercolor pencil. The next bloom is laid overlapping it and another color is used to draw the new bloom head. Where they cross one another an in-between color is used.

When all the flowers are traced the same pencils are used to lightly fill in the blooms with color. The stems and leaves are drawn in with green.

An aquabrush was used to blend the pencil color inside the cross-over areas first, left to right. I then did the same with the stems and leaves and finally I went back to the left and did the blending on the bloom heads (this gave the first pass some time to dry a little before wetting the adjacent areas.

I did go back with some contrasting colors and add a bit to the bottom area of the lighter blooms as a shadow area as they looked too flat.

After drying, I trimmed the panel and stamped a sentiment in black and mounted the piece on a yellow base card. I also added a single doodle line in black to go with the sentiment.


Sandy also did the same with a line of hanging Christmas ornaments and suggested that it would look nice with fall leaves as well.

Ddd


Posted by studio3d@ccgmail.net at 12:01 AM PST
Monday, 9 November 2015
Wide Yellow Bordered Blocks
Topic: Quilting

After making those blocks stretched with white diagonals I still had a pile of the same fabrics cut to 6x6 inches. I decided to make a balanced grid of them with the colors running on the diagonal.

The blocks finished at 5 1/2 inches square which required a wider border to bring the finished top up to 40 inches. I had to cut the border at 4 inches which will finish at 3 1/2.


I was short of all the colors except the yellow to use in the border. It turned out to be the perfect one to use as it brightens this quilt top right up.

Ddd


Posted by studio3d@ccgmail.net at 12:01 AM PST
Sunday, 8 November 2015
I Didn't Do It!
Topic: Work By My Friends

I haven't shared work by my friends for a long time. I participate in swaps year-round on four different lists. Plus, several people send birthday cards and some send RAKs.

I won't try to identify who made these, because you wouldn't know them anyway, but you may be interested to know that they come from the USA, Canada, England, Australia, New Zealand, France, South Africa, The Netherlands, and others I may have forgotten.


These are just the ones received in 2015. We are finding ourselves swapping with the same people over and over as many find the international postage to be a burden.

Thank you to all my friends!

Ddd


Posted by studio3d@ccgmail.net at 12:01 AM PST
Saturday, 7 November 2015
Tow-may-tow / Tow-mah-tow
Topic: In The Kitchen

Mid-October the tomatoes started falling off the vines whether they were ripe or totally green. I picked (and picked up) all of them, washed and sorted them and this is what I ended up with.

First, all the ripe ones:


Then, the ones that were starting to turn. These will ripen in the kitchen window:


Followed by the totally green ones that were larger which I sliced to bread and freeze to make fried green tomatoes. These made three layers on a cookie sheet in the freezer:


Finally, the ends and sides of the sliced ones and chunks of totally green ones that were not large enough to slice. These went through the food processor and got bagged for the freezer to make green tomato bread later:


I ended up with enough chopped tomato to make 20 loaves.

Ddd


Posted by studio3d@ccgmail.net at 12:01 AM PST
Friday, 6 November 2015
Baby Boxes
Topic: Quilting

When I was cutting up fabric scraps I did a stack of them cut at 6 inches square. Then I started making all these quilts and realized the math (not my favorite subject) worked out perfectly with 6 1/2 inch squares so they would be even after the seam allowances were stitched.

Harrumph!

So I cut all of them in half diagonally and added a white fabric strip and squared them up. Still more math problems as they ended up 1/8 inch less than what I had intended.

I went ahead with the construction and then added a 1/2 inch white border and finished with a dark blue border.


With all this math fiddling I only ended up 1/4 inch short overall. I'm calling that good.

Ddd


Posted by studio3d@ccgmail.net at 12:01 AM PST
Thursday, 5 November 2015
Patriotic Stars
Topic: Quilting

I'm still churning out the tops for baby quilts. I pulled out a star-covered white fabric that featured two tones of blue stars plus red ones, all in varying sizes. To this I added a single red and a dark and light blue.

I cut pieces measuring 6 1/2 by 3 1/2 and matched each color to a star. These created square blocks which I arranged to come up with a 36 inch arrangement of diagonal chevrons.


The addition of a 2 inch border brings this up to 40 inches square.

Ddd


Posted by studio3d@ccgmail.net at 12:01 AM PST
Wednesday, 4 November 2015
Spinwheels
Topic: Quilting

I had some large squares of red and green to use for one of these baby quilt tops and wanted to try another arrangement of the disappearing pinwheel.

This one trades the corner pieces for the side pieces and then turns them to make the pinwheel into a large spinner.

I added sashing between the blocks to bring the center up to 36 inches.


I gave the outer border another 1/4 inch to achieve the desired 40 inch measurement.

Ddd


Posted by studio3d@ccgmail.net at 12:01 AM PST
Tuesday, 3 November 2015
Doggies in the Window
Topic: Quilting

I took the same idea used in the monkey quilts and translated it into a quilt with puppies.

Someone had given me a print with crowds of dogs on it. I didn't have much so carefully measured to figure out the maximum size of squares I could cut to get 9 even blocks.

Then I calculated the width of block borders needed to bring them up to 12 1/2 inches. These were cut out of dog paw prints - 5 in black and 4 in brown.

I banded the puppies with the paws and then set them in alternating color blocks.


I used a grey patterned fabric border that pulls color from the big fluffy dog featured in the center column.

Ddd


Posted by studio3d@ccgmail.net at 12:01 AM PST
Monday, 2 November 2015
Wild Baby
Topic: Quilting

Next up in the lineup of baby quilt tops is one created with a variety of patterns in very odd greens and browns. Taken together they give the feeling of wild animal prints although none of them really are!

I used a 36 inch grid to create a variety of block sizes that could be mixed and matched to give a totally random arrangement.


I used a tan 2 inch border to bring this up to 40 inches.

Ddd


Posted by studio3d@ccgmail.net at 12:01 AM PDT
Sunday, 1 November 2015
Tiny Dot Monkeys
Topic: Quilting

The second of the monkey quilt tops uses the same fabric, same layout, same colors... but I used a black fabric with tiny colored dots for the border. The dots are the same size as the eyes on the monkeys so I reinforces their faces.


These are so bright and cheerful.

Ddd


Posted by studio3d@ccgmail.net at 12:01 AM PDT
Big Dot Monkeys
Topic: Quilting

Many years ago someone gifted some crazy monkey fabric to me. I used some on a Project Linus quilt and put the rest away thinking "when will I ever need monkeys again?"

When I got this fabric out again I calculated how large I could cut the monkeys in order to get 18 blocks. Then I needed to cut block borders to bring them up to 12 1/2 inches.

I decided to use alternating colors (red and yellow) to separate the blocks from each other. Two quilt tops were created from these blocks.

For the first one I found in my stash a black fabric with the perfect large dots in the same blended neons as the monkeys and used this as the border.


Posted by studio3d@ccgmail.net at 12:01 AM PDT
Friday, 30 October 2015
Primarily Baby
Topic: Quilting

For the baby quilt tops that will be completed by others I did several sketches of blocks that could be easily constructed into 36 inch squares.

For this one I used red yellow and blue blocks in 6x12. These made larger blocks of 12x18.


A dark blue 2 inch border brings it up to 40 inches. This makes the math easy and ensures that a single width of yardage will complete the backing.

Ddd


Posted by studio3d@ccgmail.net at 12:01 AM PDT
Thursday, 29 October 2015
Broken Rainbow - v.4
Topic: Quilting
The fourth quilt top made from the 12 1/2 inch striped sections used up the last of the 32 that I had created.

Here is the result:


This one did not have a predominant color in the blocks. I banded it with a yellow green border.

Ddd


Posted by studio3d@ccgmail.net at 12:01 AM PDT
Wednesday, 28 October 2015
Broken Rainbow - v.3
Topic: Quilting

This is the third of the quilt tops made from the bazillion strips of 2" widths from piles of my scraps, sewed together end to end, in color order.

When the strip was long enough I brought the ends together and sewed side-by-side the full length. This was repeated until I had one long striped piece 12 1/2 inches wide and cut this into sections 12 1/2 inches long and had enough for 32 blocks. I sorted them based on predominant colors and created four 9-patch quilt centers of 36 inches. Then each one got a 2 inch border to created a completed top of 40 inches.

Here is the third of these:

Although this was predoinantly yellows and golds I chose to band it with a purple. teal that had some yellow in it.

Ddd


Posted by studio3d@ccgmail.net at 12:01 AM PDT
Tuesday, 27 October 2015
Broken Rainbow - v.2
Topic: Quilting
The second of the strip quilts from the bazillion strips of 2" widths from piles of my scraps. As stated yesterday, these were long, short, medium... I sorted them into piles by color: yellow, golden, brown, pink/red, purple, blue, teal, green, yellow green. Then I sewed them together end to end, one from each pile round and round until I ran out of one color (blue).

Judging the strip was long enough I brought the ends together and sewed side-by-side the full length. This was repeated until I had one long striped piece 12 1/2 inches wide.

I cut this into sections 12 1/2 inches long and had enough for 32 blocks. I sorted them based on predominant colors and created four 9-patch quilt centers of 36 inches. Then each one got a 2 inch border to created a completed top of 40 inches.

Here is the second of these:


This one was predominantly blue and I used a blue border to reinforce that.

Ddd


Posted by studio3d@ccgmail.net at 12:01 AM PDT
Monday, 26 October 2015
Broken Rainbow - v.1
Topic: Quilting

A group project has our quilting ladies churning out tops for baby quilts that will go to a reservation with our youth at spring break. Later these will be backed, quilted and bound - but not necessarily by the person who constructed the top. So I am going to show these even though they are unfinished.

I first cut a bazillion strips of 2" widths from piles of my scraps. These were long, short, medium... I sorted them into piles by color: yellow, golden, brown, pink/red, purple, blue, teal, green, yellow green. Then I sewed them together end to end, one from each pile round and round until I ran out of one color (blue).

Judging the strip was long enough I brought the ends together and sewed side-by-side the full length. This was repeated until I had one long striped piece 12 1/2 inches wide.

I cut this into sections 12 1/2 inches long and had enough for 32 blocks. I sorted them based on predominant colors and created four 9-patch quilt centers of 36 inches. Then each one got a 2 inch border to created a completed top of 40 inches.

Here is the first of these:


This one was prominently pink and I banded it with tan.

Ddd


Posted by studio3d@ccgmail.net at 12:01 AM PDT
Sunday, 25 October 2015
Fall Palette
Topic: Color Challenge

One of the card-making lists issued a challenge to create a card with a specific palette:


We could use the feature color plus either the top row of colors or the bottom row. I chose the top row.

The way my computer is set up I have to write down the colors with descriptions and then try to find/match those colors when I get down to the studio. It's harder than it sounds!

I started by selecting the Distress inks that I thought were closest (Squeezed Lemonade, Aged Mahogany, Weathered Wood and Dusty Concord). Then I chose cardstock to match those. In the end, I overestimated the intensity of the purple so my card is brighter than the palette supplied.

I selected a piece of sheet music and distressed it with the yellow and grey. Then I used the mahogany and grey as borders with a torn strip of the grape as an accent.

I stamped a vase of flowers on yellow and cut it out. Then the vase and the leaves were colored with Distress markers.

I used two punches to make tiny flowers out of all four colors of the cardstock, shaped them with a ball tool over foam, and stacked contrasting colors together. These were then glued over the whole bouquet.

I then applied Liquid Pearls (Bisque) to the centers of all the flowers.


I had used one flower as an accent at the base of the vase and needed something to balance that out. So I punched a butterfly from grape and from yellow and stacked them in the upper left. I added the same Liquid Pearls to the body of the butterfly.

Ddd


Posted by studio3d@ccgmail.net at 12:01 AM PDT
Saturday, 24 October 2015
Cut Flowers
Topic: Quilting

From a collection of fabrics in the stash of leftovers I pulled enough to construct a quilt in the disappearing hourglass. This was a tutorial from the Missouri Star Quilt Company. It is a variation on the disappearing pinwheel that I have done a couple of times but gets the pinwheel turned into an hourglass at the step before the cuts are made.

I have had such fun using these construction methods but it is certainly a challenge to work with so many bias seams.


This quilt gets its name from the flowers in the fabrics and the fact that they have been cut all to pieces.


Although it is difficult to see in the photos I quilted this with the overall vines and leaves.

Ddd


Posted by studio3d@ccgmail.net at 12:01 AM PDT

Newer | Latest | Older