« December 2015 »
S M T W T F S
1 2 3 4 5
6 7 8 9 10 11 12
13 14 15 16 17 18 19
20 21 22 23 24 25 26
27 28 29 30 31
You are not logged in. Log in
Entries by Topic
All topics  «
3D paperwork
A - Z challenge 5
A - Z challenge 7
A - Z challenge round 4
A to Z challenge round 3
A to Z round 2
A to Z round 6
A-Z round 1
Around the House
Art Challenges
Artist Trading Cards
Backgrounds
Beads
Bible Journaling
Books
Boxes
Collage
Color Challenge
Coloring
cookbook
Die Cuts
Digital Projects
Digital Stamps
Drawing
Dry Embossing
Fabric Stuff
Fantastic Folds
Field Trip
Home Decor
How Does Your Garden Grow?
Hymnal Art
In The Kitchen
In the studio
Jewelry
Lettering
Links
Multi-Technique
Music to Work By
Musings
Nail Art
New Work
Online Class
Other Hobbies
Other Projects
Painting
Paper Embroidery
Paper Piecing
Photo
Pretty Paper
Quilting
Random
reading
Scrap Recovery
scrapbooking
Sewing
Sketch Challenge
Some Backlog
Stamping
Stencils
Stickers
Supplies
Teabag Folding
Techniques
Testing
tips and tricks
Tutorial
Web resources
Welcome to my Blog
Work By My Friends
workflow
Writing
Blog Tools
Edit your Blog
Build a Blog
RSS Feed
View Profile
Group One
In & Out of Studio 3D
Monday, 7 December 2015
Golden Wreath
Topic: Dry Embossing

Oh. My. Yes.

From a shiny gold oversized dry embossing I cut down right to the edges of the wreath. 

I mounted this on a pearlized cream cardstock base and trimmed it with three strips of gold peel-off borders.


I added a peel-off greeting inside the lower panel.

This card i much larger than my usual at 5 x 7 inches.

Ddd


Posted by studio3d@ccgmail.net at 12:01 AM PST
Sunday, 6 December 2015
All That Glitters
Topic: Dry Embossing

Like the candles yesterday, the embossing used today was also on the super-shiny green cardstock. In fact, they were on opposite end so the same page before I cut them apart.

The tree, however, was not so plain as it was of a decorated tree. I started adding rhinestones over top of the embossed garlands and before I knew it I was in a bling frenzy.


I even added a sticky-back rhinestone star on the top.

Ddd


Posted by studio3d@ccgmail.net at 12:01 AM PST
Saturday, 5 December 2015
Simply Shiny Green
Topic: Dry Embossing

If this dry embossed image had been on white it could have been colored in a veritable rainbow. But, instead, it was embossed on super-shiny dark green. Any color added would be invisible.

So I simply trimmed it, mounted it on a yellow card base and that is all.


I will probably add a sentiment block to this one after I determine the recipient. It is just too plain like this.

Ddd


Posted by studio3d@ccgmail.net at 12:01 AM PST
Friday, 4 December 2015
Silver Reindeer
Topic: Dry Embossing

When I received this dry-embossed image it was HUGE! Like, 8 1/2 x 5 1/2 huge. I couldn't image using it at that size so I trimmed a main image down to the size that would fit on a card front.

The super-shiny silver was a bit confusing with all that was going on. So I used a sanding block to rough up the raised areas. Then I used alcohol markers to color in the branches, reindeer and harness.

I left the snow white.


I added Stickles to the snowbanks but left the falling snow plain.

Ddd


Posted by studio3d@ccgmail.net at 12:01 AM PST
Thursday, 3 December 2015
Sculpted Snowflakes
Topic: Dry Embossing

Just in time for holiday card making a swap partner included lots of Christmas-themed pages in the embossed papers she sent. YAY!

Not only that, many of them are embossed on super-shiny metallic cardstock. YAY YAY!

I didn't choose one of the shiny ones today, though. Even though it was buttery yellow and mostly just scrolls, this impression reminded me of snowflakes. As it happens, I had some white diecut snowflakes already on hand so I cut them into pieces and glued them on top.


I added two different Stickles as outlines on the snowflakes.


I am undecided on whether to include a sentiment.

Ddd


Posted by studio3d@ccgmail.net at 12:01 AM PST
Wednesday, 2 December 2015
Sunset on the Frog Pond
Topic: Quilting

I put the odd fabric versions together first and have finally come to the version that I bought the fabric for in the first place.

THIS version of the disappearing 9-patch appears just as I designed it in my head when I first saw these three fabrics: the blue with frogs, the yellow with stars and the bright orange. The orange matches some of the stars and some of the frogs. Some of the stars also match the blue in the water.


This is the 19th quilt top for the baby donation project.

Ddd


Posted by studio3d@ccgmail.net at 12:01 AM PST
Tuesday, 1 December 2015
Spring at the Frog Pond
Topic: Quilting

I combined the frog print fabric with some yellow star yardage and some green from the stash. I didn't have enough of the frogs for all the blocks so I used another blue for the blocks in the center.

The center was not quite big enough so I added an inner border of striped fabric.

The outer border is more of the green used in the smaller blocks.

The construction is a disappearing 9-patch which is so easy and quick to put together.


The frog print and yellow with stars were bought together for this project.

Ddd


Posted by studio3d@ccgmail.net at 12:01 AM PST
Monday, 30 November 2015
Shadows On the Wall
Topic: Around the House

I noticed the other day how, when the sun shone in the window at a certain time of day, the shadows created by one of my decorating vignettes made a little artwork of its own.

The trick is catching it at the perfect time - we're not always looking at that wall when it happens.

I tried to get a good photo of it, but it does not come out as neat as just gazing at it in real life.

I did get a couple that are passable. The 'live' version has a yellow cast to it, but the photos come out with a blue tint. I adjusted that to make it look more vintage with a color correction to sepia tones.


Now I might have to start decorating with an eye to what kind of silhouette they will make!

Ddd


Posted by studio3d@ccgmail.net at 12:01 AM PST
Sunday, 29 November 2015
Orange Frog Pond
Topic: Quilting

Here is number 17 in my series of tops for baby quilts.

The blue fabric is covered with yellow and orange frogs along with some sort of bugs. I used a dark coral patterned fabric and some brighter marbled fabric.

This is constructed as a disappearing 9 patch.

When I got the center done I discovered I had been a little enthusiastic with the trimming in squaring up and was goung to be short one inch of the desired 40 for the quilt top. So I added a striped 1/2 inch inner border before the patterned coral outer border which had already been cut.


Yes, it really IS this bright!

Ddd


Posted by studio3d@ccgmail.net at 12:01 AM PST
Saturday, 28 November 2015
I'll Put a Hexie On You
Topic: Sewing

My sister and I have had a long-standing bond over how much we dislike hexagons in quilting and sewing. I think it harkens back to grandmother's day when they were all the rage, then they became popular during our teen years, and now they are back AGAIN!

We whine and moan about being exposed to them (and those annoying yo-yos, too) and have sworn to not use them.

... then I went on a quilting cruise and our welcome bag had a kit in it for making little one-inch hexagons (hand stitched, no less) - calling them addictive and contagious.

The provided fabric was even ghastly, so I took some left over from one of the classes and, while we were going through the locks in the Panama Canal, I cut and stitched together 7 in one color and 7 in another and then stitched them back to back.

Now what? I have a lame coaster.

I took it to the next 'Open Sew' time and used the decorative stitches in the sewing machine to 'draw' radiating lines until it looked like a snowflake. I can almost pretend it doesn't look like hexagons anymore.


I've already determined how I'm going to get it out of my house... with a ribbon loop it will become an ornament and end up in the Christmas stocking of someone special.

Hope her sense of humor is intact! Hi Sis Laughing

Ddd


Posted by studio3d@ccgmail.net at 12:01 AM PST
Friday, 27 November 2015
12 Tags of 2015 - November
Topic: Techniques

Time for a new 'tag' from Tim Holtz's 12 tags of 2015 series. I can hardly believe that I have kept up with this challenge all 11 months, to date. Only one month to go. This has worked out so well, I will strongly consider continuing if Tim keeps up the challenge.

Here is Tim's version:


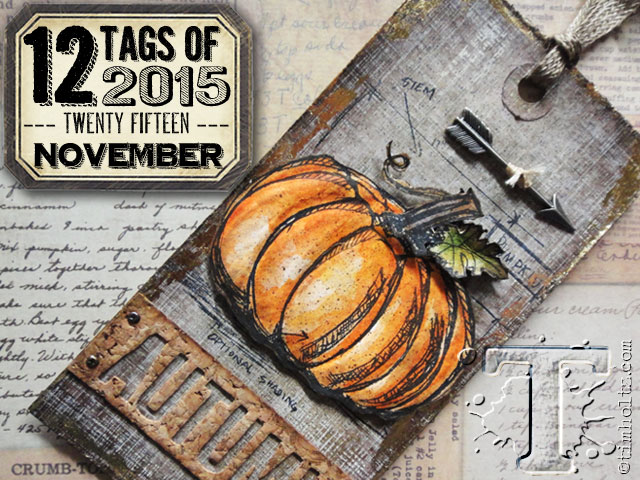
Fair warning: my version looks nothing like this (as usual)!

Here is the process I followed for my project...

- cut a piece of kraft cardstock for the front of a card

- place a dot of metallic pearl acrylic paint on non-stick craft sheet

- roll a brayer over paint to apply a thin coat to the roller

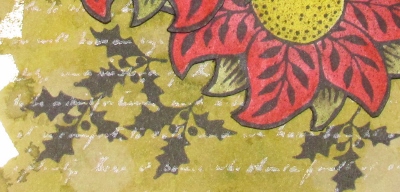
- apply paint to a background stamp with the brayer (I used a script stamp)

- stamp onto the cardstock and immediately clean brayer, craft sheet and stamp with soap and water

- dry image with heat tool

- use distress inks on craft sheet to create a 'wrinkle-free' background (I used crushed olive, peeled paint and frayed burlap)

- dry with heat tool

NOTE: the stamped acrylic paint resists the distress ink


- ink the edges with foam tool and distress ink (I used frayed burlap)

- sprinkle with water droplets, let stand shortly, blot and dry with heat tool

- use black archival ink to stamp the outline of what will be the feature image

- use tape runner to apply gold foil along the edges


- stamp the feaure image onto watercolor paper using black archival ink

- use distress markers as ink to watercolor paint the image (I used festive berry and aged mahogany, peeled paint and forest moss, mustard seed and shabby shutters)

- dry with heat tool

- use bulb sprayer to spritz a dark marker over the image (I used gathered twig)

- hold to light and trace image lightly with pencil on the BACK of the paper

- spritz back with water and use a ball tool to burnish outlines over craft foam

- dry with heat tool

- cut out image

- use black marker to color the cut edges

- use foam tape to mount to card front over the stamped outlines

- use black archival ink to stamp greeting and auxillary images


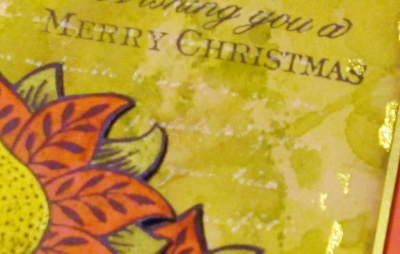
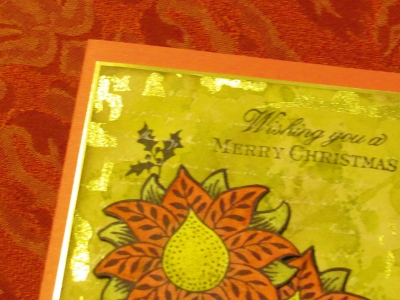
NOTE: the image above is the best color rendition

- adhere created panel to bordering gold cardstock

- adhere to folded card base with foam tape (I used a dark pink to match the poinsettias

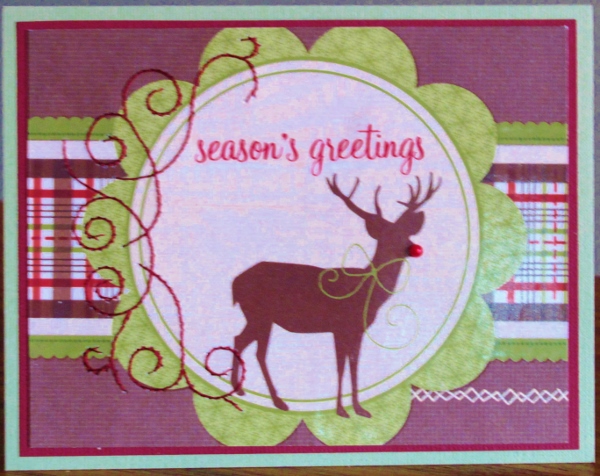
And here is the completed card:


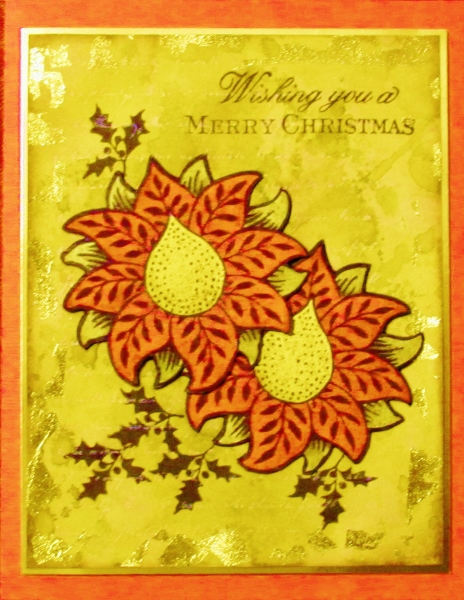
The image I used is actually an art deco flower stamp but I turned it into a poinsettia with my color choices. I stamped, colored and cut the blossoms separately and layered them on the card front.

Ddd


Posted by studio3d@ccgmail.net at 12:01 AM PST
Thursday, 26 November 2015
Q Is For Quaint
Topic: Paper Embroidery

When I looked in the online dictionary for the definition of 'quaint' I found this:

quaint [kwÄ nt] - Adjective. attractively unusual or old-fashioned: "quaint country cottages". Synonyms: picturesque, charming, sweet, attractive.

Well, I think that definitely describes the pattern I chose to stitch up for this swap. I designed this pattern years ago but haven't stitched it too many times.

Information on the net indicates that Oregon has the most covered bridges of all the western states. At one time there were 700 (they counted only those built for vehicle traffic) but now we are down to 51.

I just love the look of them.

One time I painted one in watercolor, my sister did one in crossstitch and our brother did a lovely photograph - all for our parents - each of use working in our specialty medium. Such fun!

Anyway, I stitched this with appropriate colors - most of the bridges are either red or white.

I mounted it on a grey background along with a couple of borders of lacy printed paper and one of thin red.


A bordered flag sentiment echoes the water color and I added a bronze square sticky-backed 'nail head' set on point.

Ddd


Posted by studio3d@ccgmail.net at 12:01 AM PST
Wednesday, 25 November 2015
Baby Garden
Topic: Quilting

More from the scrap stash and the donation box... I had enough of four fabrics to cut big squares to make a different arrangement of the disappearing pinwheel from Missouri Star Quilt Company.

I made four of one color combo and five of the other so I could arrange them in an alternating setting.

I've mentioned before how challenging it is to work with so many bias edges. I did spray and press the squares with Mary Ellen's Best Press before I started stitching and cutting so they were better stabilized. I hope to keep this in mind for the future.

I used a striped fabric for the border that I picked up at a yard sale. It was over 2 yards in length and I got it for fifty cents!


This is the 16th quilt top in this project series.

Ddd


Posted by studio3d@ccgmail.net at 12:01 AM PST
Tuesday, 24 November 2015
Baby Quilt 15
Topic: Quilting

The baby quilt project continues.

I pulled out an old tutorial from Craftsy that I had used before. So complicated looking and absolutely easy and quick to construct. This whole thing came together in about 6 hours!


I think I have 8 more tops prepped and ready to stitch. If I do a couple more after that (I have LOTS of scraps left) I will have 25 of them to contribute to the project.

Ddd


Posted by studio3d@ccgmail.net at 12:01 AM PST
Monday, 23 November 2015
Baby Diamond Strips
Topic: Quilting

I am back at the Baby quilt tops again. This is number 14.

The idea for the design is from a recent tutorial on Missouri Star Quilt Company. Jenny started with layer cakes so her rectangles were 4 1/2 x 9 1/2 finished. I wanted mine to finish with two rectangles at 6 inch squares so the center area would be 36 inches. This made my rectangles 3 x 6 finished. I cut my flippy corners at 2 inches.

All of the rectangles were scraps from my stash and gifted to me. I went with mostly florals, focusing on red, rose and blue flowers. Some supporting fabrics pulled out more blue.

The flippy corners, sashing and inner borders were from some yardage that matched the darker colors in the florals.


I added a 1 inch border to the sides and 2 inch borders to the top and bottom to bring the final size to 40 inches.

Ddd


Posted by studio3d@ccgmail.net at 12:01 AM PST
Sunday, 22 November 2015
Bring On the Bubbly
Topic: Paper Embroidery

WOW! If you thought I was rushing Christmas, get a load of the New Year's card I did!

To be fair, the swap this is for is due December 1 so I am not that early.

The first question was "what color of thread do you use to represent a clear liquid and clear glass?" It's not an easy choice. In the end, I chose silver for the background card and decided to use a very pale verigated thread with a little yellow, blue, green and pink.

The pattern included the stars above the glasses. Not sure why but I decided to leave them in.

I added some irridescent rhinestones in the liquid and as bubbles above the glasses and they pick up the same colors as the thread.

I mounted the card on some shimmery purple over shimmery white.


I used a rubon for the text.

Ddd


Posted by studio3d@ccgmail.net at 12:01 AM PST
Saturday, 21 November 2015
Rudolph In Stitches
Topic: Paper Embroidery

Next swap card ready... assignment: reindeer.

I had some 12x12 printed cardstock that I picked up a few years ago and cut it up into pieces suitable for card fronts. I chose one with a deer in a circle element with other decorative patterns in the background.

Since the requirement was to include paper embroidery, I pulled out the circle frame I've used several times and arranged it to lay along the left border of the feature circle. I pricked it into the cardstock and then free-handed a few extra scrolls.

The swirls of this mimic the big bow on the reindeer's neck and the color echoes a portion of the plaid.

I mounted the piece on a bordering burgundy then on a dusky green card base.


I used a rubon for the text and added a sticky-back red pearl to decorate the nose. Hello Rudolph!

Ddd


Posted by studio3d@ccgmail.net at 12:01 AM PST
Friday, 20 November 2015
White on White
Topic: Paper Embroidery

I have been bemoaning the lack of quality in the photos my camera takes but today is a whole nother level. But, then again, trying to photograph white on white is difficult with any camera out there.

That was the assignment: paper embroidery using only white.

I chose a rose pattern and then edited, adjusted and did my own thing with it before stitching it with white thread on white cardstock.

I used the Cuttlebug to diecut some lettering from the panel but then left it in place instead of popping it out.

It needed a bit more interest so I added a scalloped edge to the bottom.


The stitched panel is mounted on a white card base using foam tape.

Ddd


Posted by studio3d@ccgmail.net at 12:01 AM PST
Thursday, 19 November 2015
Round and Round
Topic: Paper Embroidery

Yeah, it's another Christmas card - in paper embroidery. But very soon I will be caught up with these assignments and we can continue with other things for awhile. 

On the other hand, the holidays WILL come in a few weeks time and more cards are still needed. Expect to see them here...

In the meantime, here is the latest. Since the assignment was very generic "make a PE Christmas card" I went with an iconic image, stitching a wreath.

This pattern was stitched in metallic gold and metallic green and then red beads were added for berries.

After it was stitched, I decided I wanted it to be cut into a circle. Well, those beads do not play nicely with the diecutter. I do have a 'B plate' thickness plate with a round aperture in it. It is designed to use with the Cuttlebug folders so only the outer area will make the impression, leaving a blank space in the middle. But I used it to surround the beads while using a scalloped circle die.

I mounted the resulting piece over a red cardstock, then over a green cardstock base.


I added the greeting with a rubon.

Ddd


Posted by studio3d@ccgmail.net at 12:01 AM PST
Wednesday, 18 November 2015
A Little Early
Topic: Paper Embroidery

I know it seems a little early to be posting Christmas stuff, but If swaps are going to be done on time to send to a partner overseas in time for them to use it as one of their personal greeting cards, then I has to be early.

I actually completed this back in October but that WAS to early for me to post it.

The assignment was to make a paper embroidery card with a poinsettia. This pattern is a freebie from so many years ago I don't have any clue who designed it. In fact there are no stitching directions so I just winged it. I stitched with red, green and yellow threads on black cardstock for the contrast.

I mounted the stitched panel on bright yellow cardstock and added the text with rubons.

Ddd


Posted by studio3d@ccgmail.net at 12:01 AM PST

Newer | Latest | Older