« February 2016 »
S M T W T F S
1 2 3 4 5 6
7 8 9 10 11 12 13
14 15 16 17 18 19 20
21 22 23 24 25 26 27
28 29
You are not logged in. Log in
Entries by Topic
All topics  «
3D paperwork
A - Z challenge 5
A - Z challenge 7
A - Z challenge round 4
A to Z challenge round 3
A to Z round 2
A to Z round 6
A-Z round 1
Around the House
Art Challenges
Artist Trading Cards
Backgrounds
Beads
Bible Journaling
Books
Boxes
Collage
Color Challenge
Coloring
cookbook
Die Cuts
Digital Projects
Digital Stamps
Drawing
Dry Embossing
Fabric Stuff
Fantastic Folds
Field Trip
Home Decor
How Does Your Garden Grow?
Hymnal Art
In The Kitchen
In the studio
Jewelry
Lettering
Links
Multi-Technique
Music to Work By
Musings
Nail Art
New Work
Online Class
Other Hobbies
Other Projects
Painting
Paper Embroidery
Paper Piecing
Photo
Pretty Paper
Quilting
Random
reading
Scrap Recovery
scrapbooking
Sewing
Sketch Challenge
Some Backlog
Stamping
Stencils
Stickers
Supplies
Teabag Folding
Techniques
Testing
tips and tricks
Tutorial
Web resources
Welcome to my Blog
Work By My Friends
workflow
Writing
Blog Tools
Edit your Blog
Build a Blog
RSS Feed
View Profile
Group One
In & Out of Studio 3D
Friday, 5 February 2016
Global Beauty
Topic: Scrap Recovery

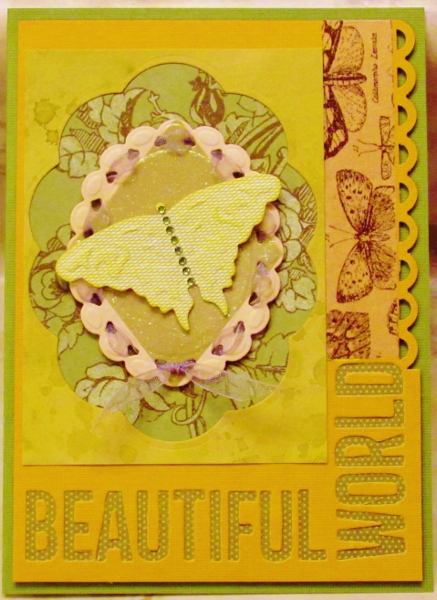
When I made the card a few days back with all the diecuts on it I used a new die set to cut out two words. In doing that I ended up with the letters theselves that were left over.

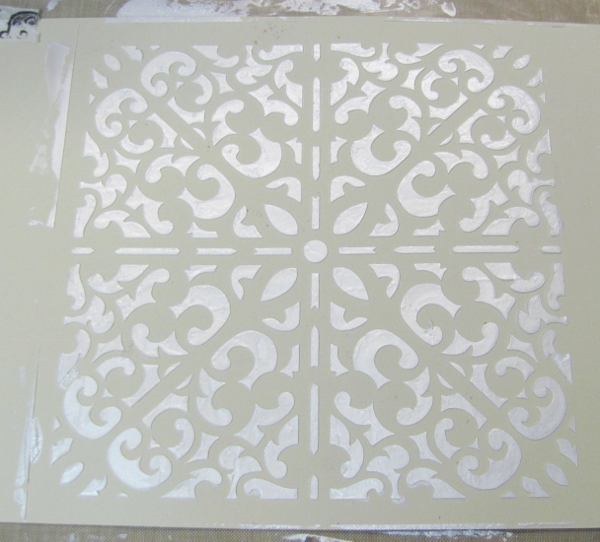
I went through other scraps left over from previous sessions and came up with a piece of embossed white cardstock that I had sponged color onto.

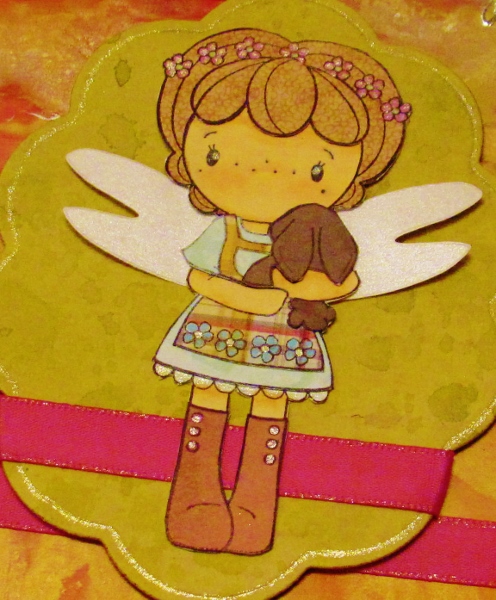
The final piece I scrounged was a stamped image on watercolor paper. The stamping had not turned out well so I had set it aside. When I pulled it out I used a fine black marker to redraw all of the lines and then I painted it using Distress Ink as watercolors.

I pulled out a piece of green cardstock for the base card, echoing the color from around the globe. I placed a lace-printed paper at the top and added a sketched line around it.

I then tore and inked the edges of the stamped image and adhered it in the center.

The diecut words went on the bottom along with a dragonfly punched from some wrinkle-free distress background. I used a fine black marker to add some hashing to the green base card and the dragonfly wings, then added circles to the dragonfly body.

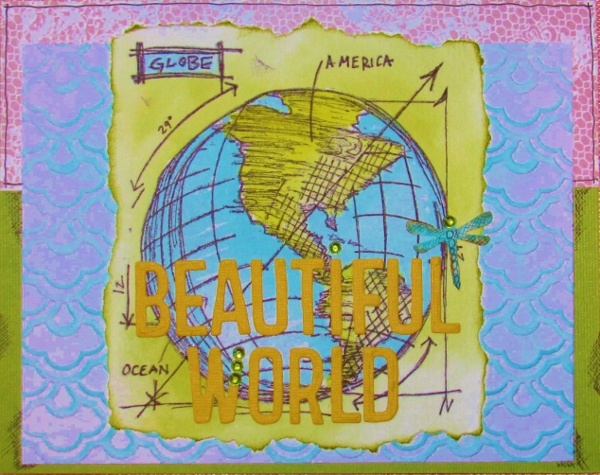
There was a bit of an issue with one leg of the 'W' when I peeled off the tape I used in aligning the letters. I used a line of green rhinestones to cover it and then added one to the dragonfly head and dotted the 'I' with another.

Ddd


Posted by studio3d@ccgmail.net at 12:01 AM PST
Thursday, 4 February 2016
Baby Quilt Slide Show
Topic: Quilting
I wanted to share a slide show I created with all 60 of the baby quilts our group finished. Unfortunately, I am new to the world of video creation and cannot get the video itself to post here.

However, I did get it to post on my Flickr page so I can give you a link to click on and you can view it there.

https://www.flickr.com/photos/mystudio3d/24132612803

I hope you enjoy seeing what we created.

Ddd


Posted by studio3d@ccgmail.net at 12:01 AM PST
Updated: Monday, 1 February 2016 1:52 PM PST
Wednesday, 3 February 2016
Scrap Heap Rescue
Topic: Scrap Recovery

A bunch of years ago I cut parts from the cover of a printed cardstock pad and dropped this piece in the scrap drawer. I was going through the drawer planning to winnow it an toss a lot of it out but this piece got moved to the 'use it' pile instead.

I pulled out a random selection of brown cardstock to use for bordering and a white diecut butterfly.

I chose a white embossed background and used a foam applicator to color the raised areas with Broken China Distress Ink. Over this I added the scrap panel on foam tape.

The butterfly got Old Paper Distress Ink applied to it and three oval rhinestones for a body. This was mounted to the scrap panel with the wings raised.

I bordered a pre-stamed sentiment and mounted it at the top of the scrap panel.

Ddd


Posted by studio3d@ccgmail.net at 12:01 AM PST
Tuesday, 2 February 2016
Petite Mondrian
Topic: Scrap Recovery

I had one small piece of the color blocking left. It got black bordering and then it kind of looked like a picture you might hang on the wall!

I pulled a piece of red embossed cardstock to stand in for the 'wallpaper' and gave that a black border as well.


A prestamped word was bordered in black and mounted next.

Here's where the analogy of the picture on the wall ended - when I added a diecut butterfly with inked edges and rhinestones on the body.


Everything is popped up on foam tape for dimension.

Ddd


Posted by studio3d@ccgmail.net at 12:01 AM PST
Monday, 1 February 2016
More Mondrian
Topic: Scrap Recovery

A smaller chunk of the color blocked piece I created for yesterday's card was cut and bordered in black for today. I popped it up on foam tape over an embossed white cardstock and added this to a black base card for bordering it.

I had a diecut butterfly on white that I colored with Distress ink to match and bordered it in black to use. It is also up on foam tape.

I bordered a pre-stamped scripture with black and used foam tape to raise it up to the same level ad the color block panel.

Ddd


Posted by studio3d@ccgmail.net at 12:01 AM PST
Sunday, 31 January 2016
a la Piet Mondrian
Topic: Scrap Recovery

I pulled out a bunch of scrap pieces I had left over of wrinkle-free Distress backrounds. As I had used the different colors for various projects I had just been tossing the leftovers in a bin.

I pulled out a piece of 8.5 x 5 black cardstock and ran it through the Xyron machine to apply adhesive. Then I carefully cut and placed various shaped and sized blocks of the colors while leaving spaces of the black background showing through in 1/8 inch widths.

Then I ran it back through the Xyron to apply adhesive over the whole colored surface.

I used this adhesive to hold clear embossing powder on the surface and melted it with the heat gun.

I cut a piece of this to 4 x 5.25 and mounted it on an A2 black cardstock for mounting on a white card base.

I had three flowers that had meen diecut from a piece of the blue Distress background and the edges had been distressed with Gathered Twig ink. I used a piercing tool to punch through them and the background and added three colored flower brads to hold them in place.

I bordered a pre-stamped text in black and layered it on top of the grid but tucked under a flower.

The resulting card is actually much brighter but the flash kind of grayed it out as it reflected off the clear embossing.

Ddd


Posted by studio3d@ccgmail.net at 12:01 AM PST
Saturday, 30 January 2016
Heart Strings
Topic: Paper Embroidery

The pattern I chose for a Valentine swap is one that fascinates me. A simple circle of evenly spaced holes is turned into a heart by stitching two layers with different combinations of using the holes in singles and pairs.

Hard to describe but effective when executed.

I stitched with red thread over a chocolate brown paper printed with music notes.

I trimmed this and added it to a cardstock printed with lace. To this main layer I added a thin satin ribbon at each end and then a red heart ribbon just inside this.


I used a grey base card that matched that in the lace layer.

Ddd


Posted by studio3d@ccgmail.net at 12:01 AM PST
Friday, 29 January 2016
What's That?
Topic: Paper Embroidery

The assignment for this swap was 'abstract'. Generic enough?

I pulled out a pattern I created years ago and pricked it out on a subrle dotted cardstock.

I started at the outer edge and stitched the first row with red thread. The next row uses orange thread and the inner row is yellow.

In mounting I used a large scallop border punch at the bottom edge. Then I added a scalloped yellow layer and a scalloped orange layer underneath.

The base card is red so there is a replication of the color layers in the stitching.


I placed a thick acrylic heart sticker in the center of the stitched motif as a finishing element.

Ddd


Posted by studio3d@ccgmail.net at 12:01 AM PST
Thursday, 28 January 2016
Easter Cross
Topic: Paper Embroidery

Getting ahead on my swaps again. This time it is for an Easter card in paper embroidery.

I decided to combine my own cross pattern (designed in 2003) and the flowers from a free pattern I had in my files.

I picked a patterned paper with some scrollwork and a floral on it. I pricked out the floral over the printed ones and decided to stitch them in similar colors.

This was only mildly successful as they blended in a little too well. To recover them I did an outline of the elements in metallic gold thread.


I had planned all along to work the cross in the metallic gold thread and it was pricked out in the open space on the paper.


I bordered the card with shiny gold and used a green base card that matches the stitched leaves in the floral.

Ddd


Posted by studio3d@ccgmail.net at 12:01 AM PST
Wednesday, 27 January 2016
And NOW We Have a Bingo
Topic: Die Cuts

I decided to have another go at the papercrafts bingo again, this time using the correct grid!

I actually made a bingo two ways on this by using: Diecuts, Spring and Ribbons from one column and Punches, Ribbons and Green from one row. I also used Flowers from elsewhere on the grid but it didn't line up with any other items that I used on the card.

I used the topic of 'die cuts' for this entry because I used so many of them on this project. From front to back the die cuts are: butterfly (cut from fine green diamond cardstock), scalloped oval medallion (cut from a cream cardstock with textured diamond), scalloped frame (cut from wrinkle-free distress background and layered over green floral), words (cut from golden cardstock with Tim Holtz dies and backed with a fine green dotted paper).

I wove sheer ribbon through the holes on the medallion and knotted it at the bottom. The scallop up the right side is a border punch and the butterfly has a line of green rhinestones as the body.

I added a strip of butterfly washi tape just inside the punched scallop border.


There is foam tape under the golden layer, under the medallion and raising the butterfly wings.

I gave the project a green base card.

Ddd


Posted by studio3d@ccgmail.net at 12:01 AM PST
Tuesday, 26 January 2016
Floral Shuffle
Topic: Quilting

So, today really IS the last baby quilt in the donation project. I finally reached the nice round number of 25 and have decided that is the best place to stop.

I used the same pattern as yesterday from Karla Alexander the author of Stack, Shuffle and Slide.

This time the fabrics were leftovers from my duffle bag and coordinating fabrics from the stash.


Again, I finished the backing, quilting and binding on this one so I could go as a completed project to the collection point on time.

Project done - What's next?

Ddd


Posted by studio3d@ccgmail.net at 12:01 AM PST
Monday, 25 January 2016
I Only Thought I Was Done
Topic: Quilting

I must admit to a bit of a quirk when it comes to numbers I feel comfortable with. I like numbers that are 'fun' like 11:11 on the clock, 318830 that spells my name upside down, and 252 that goes with an old joke by George Carlin.

I also like getting out of bed when the clock reads on the hour and will actually watch the clock to wait for it!

I feel uncomfortable when things don't come out evenly and so, when I ended up my baby quilt top project with 23, I couldn't stop thinking about 'rounding up' to 25 as a good stopping point.

I had taken a workshop with Karla Alexander, the author of this book:

She gave us a handout with one of the easiest blocks to make with just 5 fabrics and I used that to make my two additional quilts.

Sharing today the one made from scraps left over from my mystery quilt made on the cruise last fall.


Since I was running up against the deadline for the end of the project I chose to do the whole job, right through the backing and quilting. These quilts all have a binding made by double-turning the border to the back and top stitching it.

Tomorrow will be the last (25th) quilt in the baby quilt project.

Ddd


Posted by studio3d@ccgmail.net at 12:01 AM PST
Sunday, 24 January 2016
Top Of the Heap
Topic: Quilting

And as my final baby quilt top for the church project I created a 14 x 14 grid of 2.5 inch squares that were the final small scraps from all the other baby quilt tops I had made.

This collection of scraps was brighter than those I used in the last grid quilt and I enhanced that by using a bright turquoise border.


This is number 23 - and I am done!

Ddd


Posted by studio3d@ccgmail.net at 12:01 AM PST
Saturday, 23 January 2016
Paper Bingo Three
Topic: Paper Piecing

And here we are with my third misguided papercraft bingo. I'm not sure yet if I will go back and try to create with the CURRENT bingo challenge, or not. For this card I used "Paper Piecing", "Patterned Paper" and "Ribbon".

For this one I chose a couple of background papers I had created a while back and combined them. The back layer, bordered by a white shimmer cardstock over a magenta base card, is an alcohol ink/metallic marble on glossy cardstock. Over this I used a diecut shape cut from a wrinkle-free Distress panel.

For the stamped image, I colored all the skin with alcohol markers and paper pieced the hair, clothing and bunny.

I used a craft knife to trim close around the image, separating it from its white background. I used a die to cut two skinny hearts from shimmer paper and used them behind the image as wings.

I used glimmer gel pen on the flowers in her hair, her eyes, the lace hem and the buttons on her boots.

I was liking this glimmer so I added it to the rim of the diecut background and on both edges of the ribbons.

I used a large silver peel-off greeting at the top of the card.

Ddd


Posted by studio3d@ccgmail.net at 12:01 AM PST
Friday, 22 January 2016
Bingo Papercrafting
Topic: Paper Piecing

With still the wrong bingo challenge in hand I used the paper piecing parts I had set aside to make another card. This time I used, from the bingo grid, "Paper Piecing", "Candy Dots" and "Blue".

I chose a white cardstock with embossing on it and sponged on blue Distress Ink to show off the texture, rounded the corners and mounted it on a blue card base - also with rounded corners.

On the stamped image, I used alcohol markers to color all the skin areas and the ground and then paper pieced the hair, clothing and bunny with scrapbook papers.

I used gel pens to color in the flowers in her hair and on her apron, her eyes and the buttons on her boots.

I only had clear candy dots so used them over the flowers on the apron.

I used a craft knife to cut along the edges of the image and slid the halves of a die cut butterfly in to replace the stamped wings. These were popped up on foam tape.


I rounded the corners on the image panel and popped it up on foam tape over the background. Then I used glitter dust gel pen over the wings and the lace on her hemline.

Ddd


Posted by studio3d@ccgmail.net at 12:01 AM PST
Thursday, 21 January 2016
Craft Bingo
Topic: Paper Piecing

I am SO-O-O-O-O lost! I set aside a papercrafting challenge to work on later and then, when I pulled it out, I pulled out an OLD one that looked similar to it instead. So I made three cards for the challenge and then can't use them for that after all!

The challenges were both papercrafting bingo where a 3 x 3 grid is filled with techniques, colors, etc and you make a card that uses three of them that appear in a line in any direction - 8 combinations are possible.

So, for the first card I chose to use "Birthday", "Yellow", and "Paper Piecing".

Quite a while back I had stamped an image on various scrapbook papers as well as on a white background. Then I put them all in an envelope to use later... hey, it's later!

On the white layer I used alcohol markers to color all the areas of skin. Then I cut all the papers and layered them onto the hair, clothing and bunny.

I used alcohol markers to color a ground for her and colored her wings with very pale yellow.

I bordered the trimmed image with bright yellow and popped it up on foam tape over sheet music I had sponged yellow and grey Distress Inks onto.


For embellishments I added rhinestones over the flowers in her hair, Liquid Pearls to the buttons on her boots and the flowers on her dress and glitter dust gel pen to her wings.

I used a large silver Dazzle sentiment at the top.

Ddd


Posted by studio3d@ccgmail.net at 12:01 AM PST
Wednesday, 20 January 2016
Leftover Stencil Pattern
Topic: Backgrounds

I had one more of the stencil impressions, this one was a 'second generation' pull so it did not have as much ink on it. I decided to trim it down and use it 'as is' rather than trying to alter it.

I used a foil 3D image in an oval and centered it on the background.

I also used a coordinating strip from the foil sheet to border the top and bottom.

There were four foil blocks in various colorings and I used one of these, raised up on foam tape, to display silver peel-off text.


I placed this on a violet base card with a border showing all around.

Ddd


Posted by studio3d@ccgmail.net at 12:01 AM PST
Tuesday, 19 January 2016
Three Step Background
Topic: Backgrounds

I went to a lot of trouble to create a great background and then covered it up! LOL!

When I made the December 2015 'Tag' from Tim Holtz, I used a piece of white cardstock to blot off the extra Distress Stain from the stencil after spraying it. It's been sitting on my work table waiting for inspiration and this was the day.

The stencil was this one:


The Distress Stain had been sprayed through the stencil (blue in color) and the leftover stain stayed on the surface. When the white cardstock was pressed onto it the stencil itself made the impression, not the holes in the stencil.

The next step I took, after trimming the piece to card size, was to do a letterpress technique using picked raspberry Distress ink and a Cuttlebug folder called Ornamental Iron.

I smeared the ink on the inside of the folder and centered the blue printed layer inside it. When it was run through the Cuttlebug the ink was transferred at the same time as the impression was being raised. This also made three colors as the blue original and the raspberry letterpress combined where they overlaid into a violet.

The third step was to take a Distress Ink pad in Black Soot and swipe it over the top of the raised areas of the ornamental iron impression.

I really liked the way this came out. However, it was pretty bright to use it on the card with the images I had chosen so I overlaid it with vellum to mute it.

I added a 3D tea time image to the front with some ribbon across the bottom to serve as a table.


I mounted this on a violet base card and used a silver peel-off greeting sticker.

Ddd


Posted by studio3d@ccgmail.net at 12:01 AM PST
Monday, 18 January 2016
Bug-Eyed
Topic: Paper Embroidery

Next up in the series of paper embroidery cards I got done was one for a swap on Owls. I found a free pattern of an owl that I had never done up before. Just ugly enough to be cute.

I selected a patterned orange and cream background cardstock and stitched with various shades of orange and brown.

I added white gel pen to the center of the eyes as the placement on the cardstock had them coming out with two different colors.

I selected a matching leafy background for an additional layer and bordered both layers with chocolate brown.


This turned out to be a fall card even though it will be swapped out in February.

Ddd


Posted by studio3d@ccgmail.net at 12:01 AM PST
Sunday, 17 January 2016
R Is For Roses
Topic: Paper Embroidery

Seems that, between all the groups I belong to, there are several swaps or challenges every year with the theme 'roses'. But it is a topic I like so I do most every one.

I do own several patterns where the embroidery itself forms the roses. But I had a great diecut foil 3D picture and decided to use that in a frame.

I used a verigated pink thread for one series of scrolls and a burgundy for the other, matching the colors in the flowers. I did the stitching on a cardstock with extremely small chevrons in gray and white.

When I got to the steps of mounting I cut off the ends of the cardstock and turned them over to show a two-toned pink houndstooth.


The photo shows this with too much blue. The burgundy layering matches the thread in the darker scrolls.

Ddd


Posted by studio3d@ccgmail.net at 12:01 AM PST

Newer | Latest | Older