« April 2016 »
S M T W T F S
1 2
3 4 5 6 7 8 9
10 11 12 13 14 15 16
17 18 19 20 21 22 23
24 25 26 27 28 29 30
You are not logged in. Log in
Entries by Topic
All topics  «
3D paperwork
A - Z challenge 5
A - Z challenge 7
A - Z challenge round 4
A to Z challenge round 3
A to Z round 2
A to Z round 6
A-Z round 1
Around the House
Art Challenges
Artist Trading Cards
Backgrounds
Beads
Bible Journaling
Books
Boxes
Collage
Color Challenge
Coloring
cookbook
Die Cuts
Digital Projects
Digital Stamps
Drawing
Dry Embossing
Fabric Stuff
Fantastic Folds
Field Trip
Home Decor
How Does Your Garden Grow?
Hymnal Art
In The Kitchen
In the studio
Jewelry
Lettering
Links
Multi-Technique
Music to Work By
Musings
Nail Art
New Work
Online Class
Other Hobbies
Other Projects
Painting
Paper Embroidery
Paper Piecing
Photo
Pretty Paper
Quilting
Random
reading
Scrap Recovery
scrapbooking
Sewing
Sketch Challenge
Some Backlog
Stamping
Stencils
Stickers
Supplies
Teabag Folding
Techniques
Testing
tips and tricks
Tutorial
Web resources
Welcome to my Blog
Work By My Friends
workflow
Writing
Blog Tools
Edit your Blog
Build a Blog
RSS Feed
View Profile
Group One
In & Out of Studio 3D
Friday, 22 April 2016
Art Lover's Dream
Topic: Field Trip

Before planning our trip to California, I had never heard of the Getty Center. Hubby was the one who added it to our itinerary. SO glad he did!

Many years ago I took college courses called Survey of Art 101 and 102. Through the photos in the textbook and the slide shows (in a darkened room, just after lunch - zzzzzz) I was exposed to the great artists and their works thoughout history. I have since always desired to tour the Louvre, the National Gallery in Washington, DC, or the National Gallery in London. I just wanted to see the brushstrokes for myself.

What I did not know was that the Getty Center is considered to be among the top 25 museums in the world... and I got to go there!

Not knowing the scope of the collection we did not leave ourselves nearly enough time so we only saw about 1/4 of the permanent collection and none of the special collections, sculpture gardens, or botanical gardens.

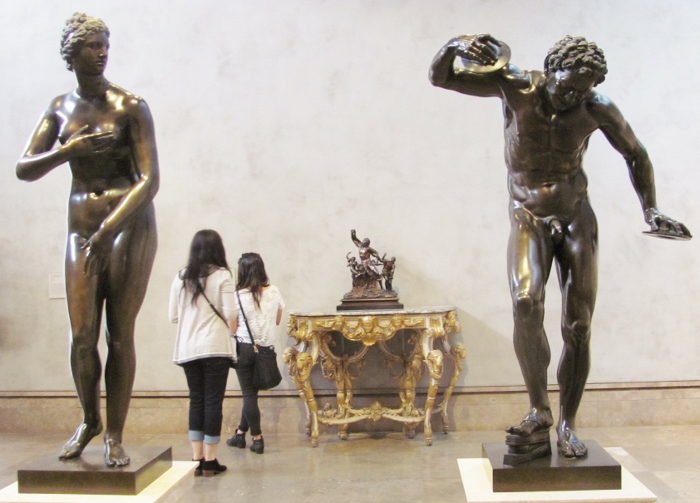
In the galleries, nothing was roped off, so you could stand with your face literally inches from the surface of a noted artist's work and see every dot of color and every brushstroke. Here are some of those I photographed (a couple I have lost the artist info).

There was one room of just illuminated manuscripts.

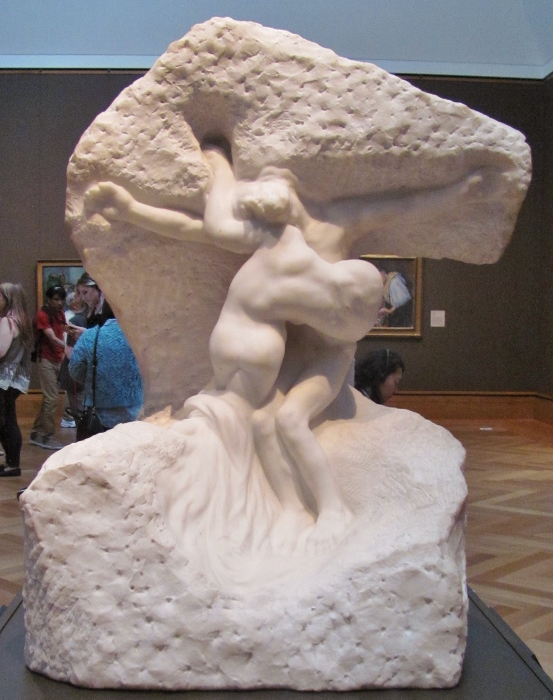
Sculptures included a Rodin:


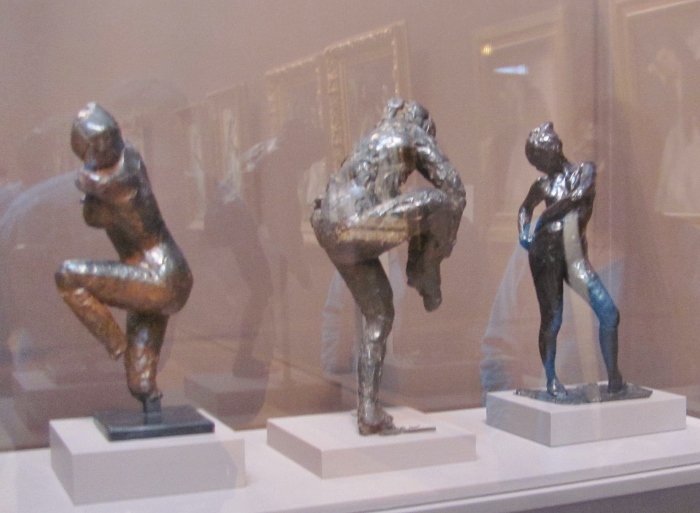
...and several by Degas:

I don't have info on the scultors of these figures:


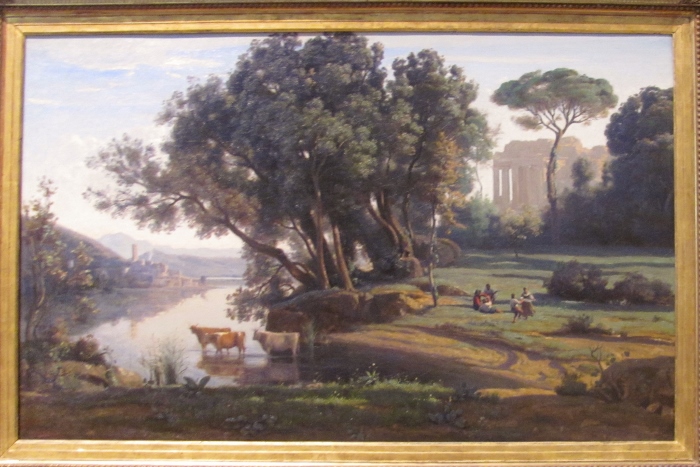
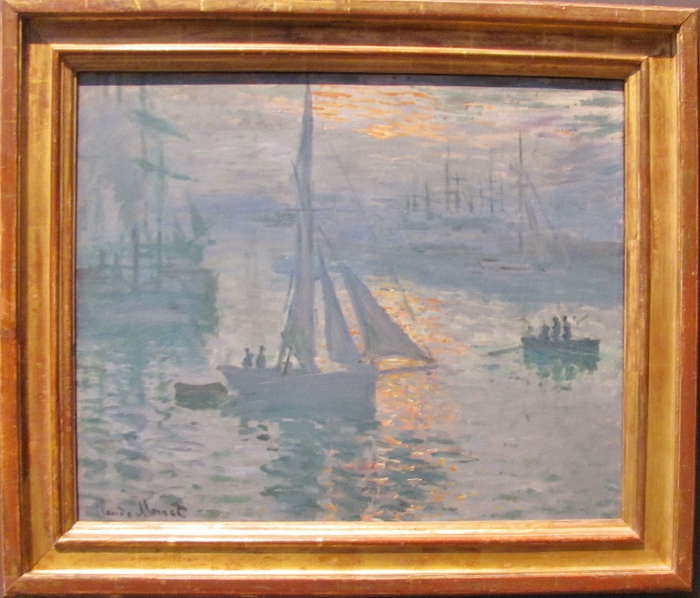
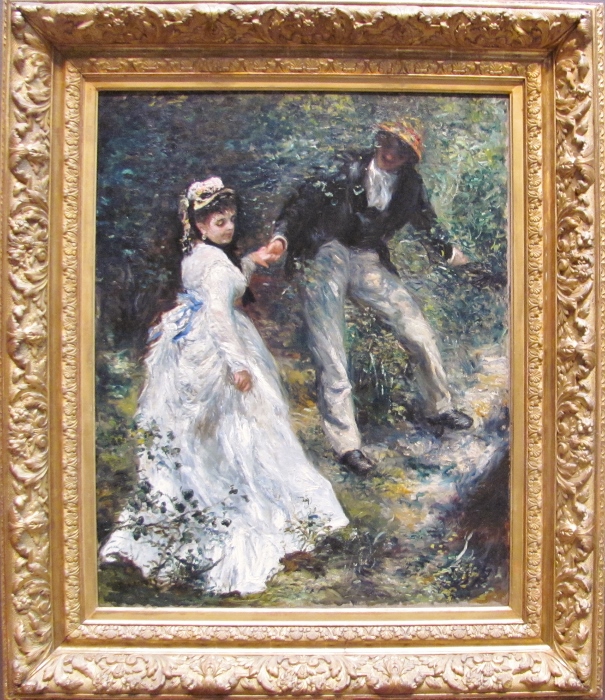
Among my favorite paintings are these by

Goya:


Camut:


Monet:


2 by Renoir:


Sargent:


and my dream viewing - Van Gogh:


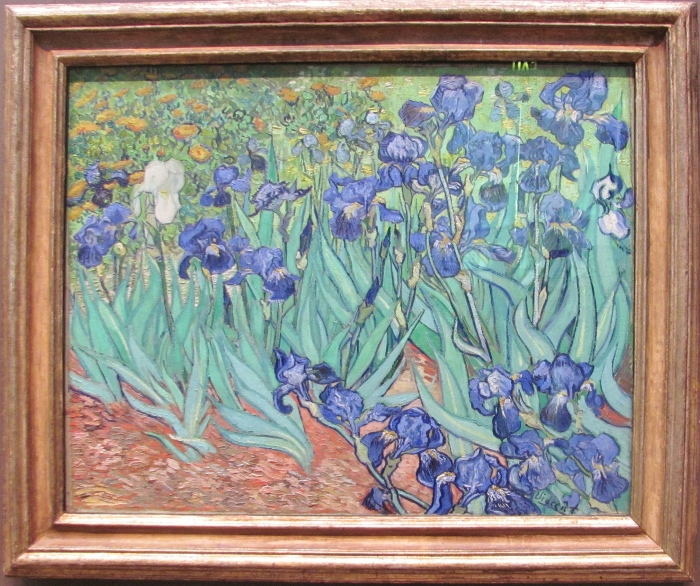
Standing in front of these magnificent works (and many more) was a thrill and we have promised ourselves we will be back to spend more than one day exploring this place in detail.

Ddd


Posted by studio3d@ccgmail.net at 12:01 AM PDT
Thursday, 21 April 2016
26 Miles Across the Sea...
Topic: Field Trip

Santa Catalina Island, often called Catalina Island, or just Catalina, is a rocky island off the coast of the California in the Gulf of Santa Catalina.  The island is 22 miles long and 8 miles across at its greatest width. Despite the song lyrics, the island is located about 22 miles off shore south-southwest of Los Angeles. A ferry travels several times a day from Long Beach.


Coming into the harbor at Avalon we were struck by how mountainous it was and how small the town was, despite its popularity.


Many tours will take you up into the hills for hiking, zip-lining, and other adventures. Other tours included parasailing, mini-sub, and glass-bottom-boats.

We chose to rent a golf cart and toured ourselves over the roads up in the hills overlooking the town.


Ice cream, walking the streets, and a late-afternoon ferry completed our full-day trip to Catalina.

Ddd


Posted by studio3d@ccgmail.net at 12:01 AM PDT
Wednesday, 20 April 2016
Worse Than a Stick In the Mud
Topic: Field Trip

Not actioned packed, but educational. Our next stop was a visit to the La Brea Tar Pits. This was something I was fascinated with.

Out in front is one of the tar pits complete with bubbling gasses, oil slicks and the stinky smell of fresh asphalt.

Inside the large museum are the massive skeletons of (many extinct) animals large and small that have been excavated from the tar over the years. These include mastadons, saber-tooth cats, camels, dire wolf, horses, bison. Other smaller animals like rabbits, skunks, and various birds still live today.


As you tour the grounds you can see crates and containers of animals and materials from the excavations that have not been processed yet, more open tar pits, and go in the building where the current excavation is taking place.

In this pit they are at about 16 feet down and you can see the string grid that they use to keep track of exactly where everything was found.

Totally fascinating!

Ddd


Posted by studio3d@ccgmail.net at 12:01 AM PDT
Tuesday, 19 April 2016
Universal Universe
Topic: Field Trip

One of our adventures while in LA was to visit Universal Studios.

We're neither one much for 'rides' so we stuck to the tour. It did include three 4D experiences that were pretty awesome, but don't lend themselves to photography.

The tour of the lot takes you through a western set, a lakefront town, a city, and different time period residential. All of them are 2-dimensional - just fronts.

This area was being used for filming of a TV series thile we drove past.

At one point they let loose water to flood a street (yes you can get wet).

Back from the tour we walked around the grounds where they have lots of shops and restaurants whose facades mimiced those seen in various Universal movies and TV productions. This Lucy look-a-like danced in the street.


There were characters and set pieces for posing, too.


We saw everything we wanted to see here.

Ddd


Posted by studio3d@ccgmail.net at 12:01 AM PDT
Monday, 18 April 2016
By the Sea
Topic: Field Trip

We're off on an adventure! We didn't go far, just one state south of home but what a change it was.

Did you know that the Queen Mary had been changed into a hotel? It is moored at Long Beach, California and the nightly rate is very reasonable.


The ship has been preserved in its historic elegance so, if you're looking for all the conveniences of modern hotels, you won't find them here. Just look at these views from around the ship:


No, this isn't the wave of the future - in fact it is no longer working. But it is neat to see how the elegant and monied used to sail.


A llittle chart on the 'welvome aboard' brochure allows one to 'read' the flags.


Unlike modern cruise ships, there are no balcony cabins. But, the cabins are easily twice as large and an outside cabin sports two portholes with a view of downtown Long Beach and the marina.


We enjoyed a four day stay while we explored the Los Angeles area.

Ddd


Posted by studio3d@ccgmail.net at 12:01 AM PDT
Sunday, 17 April 2016
These Pants Flow
Topic: Sewing

One more pair of pants for travel.

I got a fabric that has a crinkle to it in a light taupe. I stitched these up with the same new pattern as the blue and black.


Yep - the same elastic waistband:


These got a simple hem, serged and then turned under twice and top-stitched.


All ready to fly away with a wardrobe of new pants!

Ddd


Posted by studio3d@ccgmail.net at 12:01 AM PDT
Saturday, 16 April 2016
Black Pants
Topic: Sewing

The next pair of slacks I made were black.


These also have the elastic waistband:


These pants got a blind hem.


Two pair down.

Ddd


Posted by studio3d@ccgmail.net at 12:01 AM PDT
Friday, 15 April 2016
Blue Trousers
Topic: Sewing

I put that new serger and my new custom pants pattern to work immediately.

I bought three pieces of 100% polyester yardage to make trousers for travel.

The first pair I made was navy blue. Yes, they DO hang strangely on the hanger - but the important thing is that they hang right on my body!


The waist is elastic and there are no pockets in this pattern.


I gave this pair a one-inch cuff and pressed in a sharp crease.


Nice!

Ddd


Posted by studio3d@ccgmail.net at 12:01 AM PDT
Thursday, 14 April 2016
New Workhorse In the Stable
Topic: Sewing

I recently had the opportunity to buy a gently used Baby Lock Imagine serger at a very good price. It had belonged to the cousin of a friend and she had only used it a few times fefore she passed away.

I took it straight to the shop for an overhaul and then set it aside hoping to learn to use it at the Sewing and Stitchery Expo. Unfortunately, the class I wanted was full so I just took one that gave tips for advanced use. I did buy that book/dvd on using a serger.

None of this had any effect on my being freaked out by the thought of threading a serger and knowing that sharp blade was lurking near the presser foot.

So, I took the machine with me to quilting group on my recent visit where I knew there were some serger users who could help me out.

Much to my delight, I found that my machine has air-treading of the two looper threads! With the help of Ruth and three sets of printed directions I was soon threaded up with 4 cones and serging samples.


Now it's time to take on some 'real' projects.

Ddd


Posted by studio3d@ccgmail.net at 12:01 AM PDT
Wednesday, 13 April 2016
Polka Pants
Topic: Sewing

I decided it was time to break out the pants patterns I bought at the Sewing and Stitchery Expo last month. I chose to work with the DVD/Pattern called Master Pants from FitNice System.


I took my measurements, drew out the tissue pattern, made some alterations as recommended and then made my 'muslin' (sample) from a warm gray flannel with yellow dots.

They turned out great and though there were a few more adjustments to make for future finished trousers, these will be great for hanging out around the house.

Yes, I'm wearing my furry slippers for this viewing.

Don't judge MY shape, just the pants.

Ddd


Posted by studio3d@ccgmail.net at 12:01 AM PDT
Tuesday, 12 April 2016
Choking Hazard
Topic: Sewing

While I was in the mode of alterations I dug out a top that has pockets on the sides near the underarms for carrying materials out of sight. I use mine for wallet, cash, etc. when traveling.

The problem was that the neckline was so high that it rested up around the throat. Not only was it uncomfortable to wear but I have no tops with necklines that high so it came off like I was wearing a high-neck white t-shirt under everything - NOT a good look.

I fixed this by putting the garment on, topping it with my lowest neckline top, and marking the opening with a Sharpie marker. Then I took it off and made a line 1/4 inch outside that marked line.

The new neckline was then enclosed in fold-over elastic which was sewn with a tripple-stitch zig-zag.

The last step was to take a tuck at the end of the V-neck.

This is the result:


The garment is body-hugging so the ripple on the neckline disappears when it is being worn.

Ddd


Posted by studio3d@ccgmail.net at 12:01 AM PDT
Monday, 11 April 2016
Hemmed In
Topic: Sewing

I bought a blouse about this time last year and have only worn it occasionally. The other day I realized what it was that I was having an issue with - the elastic in the hem.

This elastic made the back of the blouse ride up to the waistline in the back but was loose enough that the hem dropped down in the front. The result was very unattractive.

I decided to remove the elastic and re-hem the blouse so it would just hang free.

This is the result:


Such a simple fix!

Ddd


Posted by studio3d@ccgmail.net at 12:01 AM PDT
Sunday, 10 April 2016
Special To Me
Topic: Stamping

The last couple of days I told you about a technique I found at http://stamptv.ning.com/video/embossing-over-watercolor called embossing over watercolor.


By scribbling on watercolor paper with three values of a color and of green where you want flowers and leaves then spritzing with water and using a heat gun to dry the piece, you set up for a floral background.

Versamark is used to stamp solid flower heads over the colored areas and solid leaves over the green areas then they are embossed with clear powder and a heat gun.

Sponging over the surface with dark ink lets the flowers and leaves shine through and then any extra ink is buffed off with a paper towel.

The second piece I did had better composition and more even results so I decided to use it as a whole background.


I tied twine in three strands and added a pre-stamped sentiment with a border popped up on foam tape.

Each flower got a pink rhinestone center and the whole piece was added to a green base card.

Ddd


Posted by studio3d@ccgmail.net at 12:01 AM PDT
Saturday, 9 April 2016
Watercolor Under Gloss
Topic: Stamping

I started yesterday telling you about a technique I found at http://stamptv.ning.com/video/embossing-over-watercolor called embossing over watercolor.


On watercolor paper you scribble three values of a color where you want flowers, then three values of green where you will stamp the leaves.

You spritz with water and use a heat gun to dry the piece.

Stamp solid flower heads with Versamark over the colored areas and  solid leaves over the green areas then emboss with clear powder a heat gun.

Sponge over the surface with dark ink and buff any extra off with a paper towel.

This is the second half of the first piece I made:


I mounted this on foam tape over a chevron paper and a text strip. Then I tied with twine and added a text tag.

The base card is burgundy cardstock.

Ddd


Posted by studio3d@ccgmail.net at 12:01 AM PDT
Friday, 8 April 2016
Embossing Over Watercolor
Topic: Stamping

I was watching some video tutorials on my favorite blogs the other day and ran across a technique I had not used before. If you want to see the original, visit Gina K Designs at http://stamptv.ning.com/video/embossing-over-watercolor for a technique she calls embossing over watercolor.


Start with watercolor paper and scribble three values of a color where you want flowers, then three values of green where you will stamp the leaves.

Spritz the surface with water and let the colors bleed. When it gets where you want it to be, use a heat gun to dry the piece.

Ink a solid flower head with Versamark embossing ink and stamp over the colored areas, Ink solid leaf with Versamark ink and stamp over the green areas. Cover with clear embossing powder and set with heat gun.

Use a foam tool and dark ink to sponge over the surface. The embossing will resist the ink but you can buff any extra off with a soft cloth or paper towel.

With the first one I made, I cut the piece in two and made separate cards out of them.

The first is shown here

I used walnut ink for the dark background. I made a base card with a green floral and strips of coordinating papers.

I added twine and a little tag before popping the focal up on foam tape.

Ddd


Posted by studio3d@ccgmail.net at 12:01 AM PDT
Thursday, 7 April 2016
Sunset Nails
Topic: Nail Art

Here are the products I used to create nails with a sunset look:

From the left - base coat, two coats of sheer white, makeup sponge with stripes of purple, red and copper and used to sponge on the nails. This was done twice. The sheer with glitter went on over the top, followed with clear topcoat.

This is a messy process so it takes a lot of cotton swabs dipped in polish remover to get all the over-sponging off the cuticles and sides of the fingers.


I like the effect of a sunset sky.


As always, I'm a fan of layering glitter on my nails, so that adds to my satisfaction with this manicure.

Ddd


Posted by studio3d@ccgmail.net at 12:01 AM PDT
Wednesday, 6 April 2016
S Is For Swirls
Topic: Paper Embroidery

The paper embroidery alphabet swaps are marching right along. The current one assigned us to do Swirls for the letter S.

I flipped through a lot of borders and frames for one that I liked, thinking I would add some 3D florals to it.

But then I ran across this cupcake with swirled icing and I knew that was what I wanted to stitch.

I picked an embossed white cardstock with more swirls and pricked out the pattern on that.

I chose a bright verigated thread for stitching and then used a lighter thread for the candle plus light yellow for the flame.

I mounted the stitched panel on a bright floral over a white base card.


I used a colored flower with a rhinestone center and a silver peel-off for embellishment.

Ddd


Posted by studio3d@ccgmail.net at 12:01 AM PDT
Tuesday, 5 April 2016
Charm Cuff
Topic: Jewelry

When I ran into a particularly long wait time at the fabric cutting counter in Joann Fabrics I had time to wander up and down Every.Single.Aisle. and it STILL wasn't my turn yet.

However, I had plenty of time to paw through the closeout bins at the ends of aisle and found some great bargains. One of my scores was these cuff bracelets with screw-off endcaps allowing one to add large beads and charms. I got one for $1.49 as well as a package with two gold ones, and some different styled wrap-around ones.

The charms they were selling were hideous so I brought home just the bracelets.

For this one I added some square beads with symbols and initials, silver spacer rings and charms on jump-rings.


Ready for a birthday coming up next month.

Ddd


Posted by studio3d@ccgmail.net at 12:01 AM PDT
Monday, 4 April 2016
Marbled Eggs
Topic: Backgrounds

I have lots of that shaving cream background left so I decided to use some of ut to cut eggs directly out of. I was able to get three eggs from each of two sheets.

I decorated each of the eggs with white peel-off stickers and layered them on printed backgrounds.

This card with a woodgrain background got a printed strip and a rub-on greeting. 


A more busy background with a dotted strip makes for a more lively picture. I used a gold peel-off sentiment.


I combined two sentiment rub-ons for the last card featuring dots and a little flowered strip.


On each of these cards, the let egg is mounted up on foam tape.

Ddd


Posted by studio3d@ccgmail.net at 12:01 AM PDT
Sunday, 3 April 2016
Eggcelent
Topic: Backgrounds

When I cut the eggs out of the white on yesterday's cards I ended up with two whole eggs ready to add to a third card. BONUS!

I used a bit of Distress to shade the lower edge and then decorated them with rows of little flower stickers.

The right eggs is flat against the background while the left one is raised up on foam tape.


I added text with a rub-on and placed the background on a white base card.

Ddd


Posted by studio3d@ccgmail.net at 12:01 AM PDT

Newer | Latest | Older