« December 2016 »
S M T W T F S
1 2 3
4 5 6 7 8 9 10
11 12 13 14 15 16 17
18 19 20 21 22 23 24
25 26 27 28 29 30 31
You are not logged in. Log in
Entries by Topic
All topics  «
3D paperwork
A - Z challenge 5
A - Z challenge 7
A - Z challenge round 4
A to Z challenge round 3
A to Z round 2
A to Z round 6
A-Z round 1
Around the House
Art Challenges
Artist Trading Cards
Backgrounds
Beads
Bible Journaling
Books
Boxes
Collage
Color Challenge
Coloring
cookbook
Die Cuts
Digital Projects
Digital Stamps
Drawing
Dry Embossing
Fabric Stuff
Fantastic Folds
Field Trip
Home Decor
How Does Your Garden Grow?
Hymnal Art
In The Kitchen
In the studio
Jewelry
Lettering
Links
Multi-Technique
Music to Work By
Musings
Nail Art
New Work
Online Class
Other Hobbies
Other Projects
Painting
Paper Embroidery
Paper Piecing
Photo
Pretty Paper
Quilting
Random
reading
Scrap Recovery
scrapbooking
Sewing
Sketch Challenge
Some Backlog
Stamping
Stencils
Stickers
Supplies
Teabag Folding
Techniques
Testing
tips and tricks
Tutorial
Web resources
Welcome to my Blog
Work By My Friends
workflow
Writing
Blog Tools
Edit your Blog
Build a Blog
RSS Feed
View Profile
Group One
In & Out of Studio 3D
Tuesday, 20 December 2016
12 Tags of 2016 - October
Topic: Multi-Technique

I realized I got way behind on completing the projects Tim Holtz designed for his blog. With three projects left to do and only 11 days to get them done in the year assigned, I decided I had better get crackin'.

I had written out the steps Tim used when the bog posts first appeared but it had been so long that I had to look the post up before I started so I could refresh my mind on what the goal was!

Here is the techniques Tim combined:

And here is his project for October:


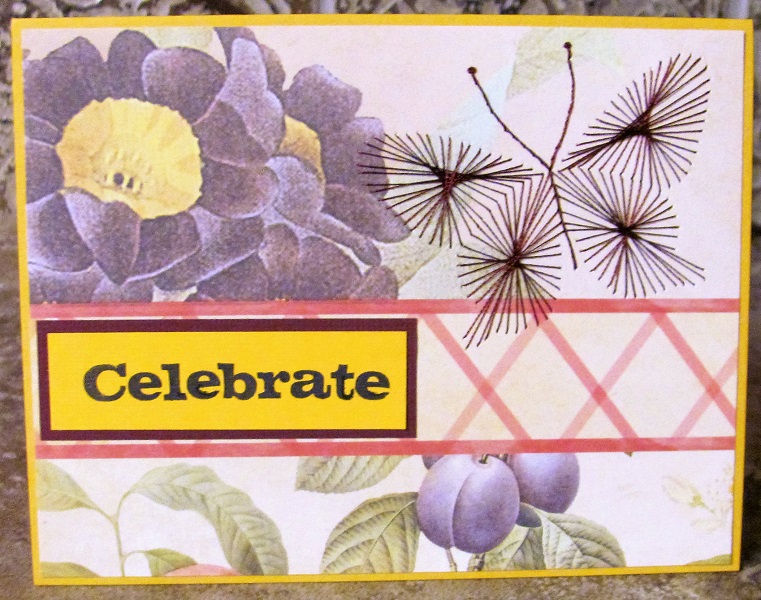
Tim went all out for Halloween in the October tag but, it being so late, I decided to go in a whole different direction. Here are the steps I used for my project:

- On a base surface create a patchwork collage of various elements according to the desired theme, using a matte medium as a glue and a sealant. 

- I started with two papers with cutout sections. These I overlaid with printed tissue paper, then I went to town with all sorts of butterfly stickers, staying with the more realistic-looking ones.

- Allow the collage to fully dry

- Lightly sand edges

- Apply Picket Fence Distress Stain over surface and wash/wipe away some to create a shabby effect

- Use Distress Ink pad in Black Soot to darken the edges of the panel

- Use Distress Marker in Black Soot to create a drop shadow under all the butterflies and immediately smudge with finger to soften

- Spatter with black ink

- Use word dies to punch out the word 'beautiful' in the background

- Back the work cut-out with bright paper

- Stamp hand-carved butterfly on bright paper and again on shimmer paper

- Carefully cut out both butterflies

- Stamp just the antennae on the background

- Glue the shimmer paper butterfly to the background, aligning with the antennae

- Use wet glue to attach only the body of the bright butterfly to the shimmer layer

- Fold up the wings on the bright layer and then attach to the shimmer layer using a small bit of foam tape

Ready for the reveal?


You can see I once again made a display piece instead of a tag. I chose to make this one for use in the Spring.

Ddd


Posted by studio3d@ccgmail.net at 5:24 PM PST
Monday, 19 December 2016
Bible Journaling - John 10:27
Topic: Bible Journaling

Today I set aside the quilting projects and got out my journalling Bible.

I had collected some photos of sheep from the internet onto my phone so I decided to use John 10:27 as the reference.

I sketched the sheep in my sketchbook and outlined it in dark black ink. This allowed me to trace it in pencil into the Bible where I used the black fineline marker to finalize the illustration. I added curly wool to him and then finished with colored pencils.

The text section was sketched out in pencil directly on the page and then refined with the black fine line marker.


I highlighted the scripture in the text where it passes behind the head of the sheep.

Ddd


Posted by studio3d@ccgmail.net at 3:18 PM PST
Wednesday, 7 December 2016
When Were You Last Carded?
Topic: Scrap Recovery

I usually work on Christmas cards throughout the year but I haven't been working a lot on cards for a while now. When I opened my card box I found I had FOUR cards done for Christmas! That will NOT do.

I pulled out my 'parts and starts' drawer and found I had three years' worth of card fronts saved from ones we had received from friends and family. 

I set to work trimming down the artwork I wanted to re-use. Then I went through my bin of Christmas papers and selected one to go with each illustration. Next it was on to choosing a solid bordering paper.

I cut all the parts to size and layered them on white base cards. I was working in two basic sizes: 5.5 x 4.25 and 6 x 4.5 (these were the envelope sizes I had on hand).

The final step was to pull out the Christmas sticker bag and find appropriate color/style stickers for each card face. I did not do this with those whose artwork already contained a sentiment.

These are the cards I ended up with - four photos:


My last batch of cards were part of a "10 Free" offer from Shutterfly. I didn't make the cards by hand but the illustration is a photo of a hummingbird painting that I did and uploaded to the site.


NOW I'm ready to write our Christmas letter and get to addressing the envelopes. I will probably have leftovers to start the bin for next year.

Ddd


Posted by studio3d@ccgmail.net at 7:46 AM PST
Monday, 5 December 2016
It's Beginning to Look Like Christmas
Topic: Quilting

For a couple of years I have been wanting to make a quilted tree skirt but had to wait until I found just the right pattern. In the November/December 2015 issue of Fons and Porter's Love of Quilting magazine I found just what I wanted. Then this summer I chose a perfect range of fabrics in the outdoor sale at Fabric Depot.

Not a one of the fabrics are Christmas fabrics. One of them has a little red flower on a white field but it is more of a daisy-like shape. No trees, no hokly, no snowflakes, no snowmen or santas or reindeer. They are just red, green and toast in small geometric patterns.

The pattern uses a LeMoyne Star and lots of diamonds.


It also uses THIRTY-SIX 'Y' SEAMS! Holy moly, that's a lot! Special templates are used to trim the corners of the squares so they fit together at the edges and the LeMoyne Star was supposed to be trimmed with a special tool but I wasn't going to buy it just for this project so I developed my own trimming method. this caused my triangles in the stars to become paralellograms instead. (No mistakes - just creative choices).

AND if one is not an expert at binding corners they will be by the end of this - 9 outer corners and 8 inner corners. A circle at the center used bias binding which was a new process for me.

Here is the over-all view:


I added ties to the open edges to close the back:


I pieced the back so I wouldn't have to buy more yardage to make one large piece. This is where eight of the Y seams are (in those outer edges).


I like this project very much! time to trim the tree.

Ddd


Posted by studio3d@ccgmail.net at 7:24 PM PST
Saturday, 26 November 2016
Floaters
Topic: Around the House

While we were looking through the binoculars at the beaver we could see a bir partially concealed standing at the far side of the pond. I took several photos of it and enlarged them to try to identify it.


In this one he is in the upper left of the screen:


Here's a color enhanced one:


Color enchanced one of him in the water:


Here he is with his girlfriend:


In my mind the term 'wood duck' sprang to mind and when I looked it up there he was pictured. Whoever took this photo had a much better view and got this great photo of both the male and female wood duck.


Isn't he beautiful? There are various versions of wood ducks with slightly different patterning, but this is the closest I found - given the restricted view we had

We've not had any of these before and we've been here since 1989!

10 Canada geese have moved into the pasture across the road and down one house. They totally ignore the 5 horses that live there.

Then today we saw 10-12 hummingbirds flitting in and out of the branches of the maple tree in the front yard.

The birds are taking over!

Ddd


Posted by studio3d@ccgmail.net at 2:38 PM PST
Friday, 25 November 2016
The Back and Forth
Topic: Around the House

Now that fall is here and the leaves hav cleared from the trees, we have a nice view of the neighbor's pond again. When the air is still we watch for ripples on the water as a signal that the beaver is out and about.

The other day we watched with the binoculars as braches were gathered from the north side of the pond and transported to the south (the whole pond is a little less than 1/2 acre)

We had watched a documentary on beavers last year so we know that they use the trees and branches for two thing - building their dens and stocking food for winter (they eat the bark from small branches).

We also assume this is a male beaver and not too old as it is new to the area and the males go off to set up a new home site when they have finished their apprenticeship of building with their parents and are ready to find/attract a mate. We're guessing, since he was here last year too, that he is about 4 years old.

In any case, after watching with the binoculars, it occured to us to see if we could get photos.


fun, huh?

We're still not too thrilled with his den-building as he has changed the place where the creek exits so it no longer goes under the pasture access through the culvert but flows over it about 50 feet away.

Giant rodents - gotta love em!

Ddd


Posted by studio3d@ccgmail.net at 10:18 AM PST
Wednesday, 23 November 2016
Bible Journalling - Psalm 147:4
Topic: Bible Journaling

The journal page I did in my Bible this time is Psalm 147:4.

I started with the lettering this time and tried to make creative designs. 

I wanted to use a night sky for obvious reasons and needed a base to ground it. To do that I drew a night skyline of high-rises and residences. I colored these with black, dark greys, dark brown and dark green.


The sky is colored with layers of three pencils - a red-violet, a purple and a dark blue. These were worked around drawn stars.


Some of my favorite parts of the lettering are: the numbering, the moon as the letter 'C', a star in each letter of the word 'each', and a name badge for the word 'name'.

This whole area was colored in a variety of yellows.

Ddd


Posted by studio3d@ccgmail.net at 12:01 AM PST
Tuesday, 22 November 2016
Rainbow Pencils
Topic: Coloring

Since I bought my set of 72 Prismacolor pencils I have kept them in their original order in the tin, carefully removing individual pencils to color with and returning them to the same slot when done.

The drawback to this was that each of the three trays was a 'step up' from the next smaller set of pencils so had a full range of colors. Each had a few greens, a few reds, a few yellows...

To color a tree, for instance, I might pull and use greens from al three trays and it was difficult to compare tones and tints to find the ones I wanted.

I broke down and pulled all the pencils out of the trays and arranged them by chroma. The first two trays are the rainbow rundown: red, orange, yellow, green, blue, indigo, violet. The third tray contains the two metallics (gold and silver) the white and black and all the browns, warm greys and cool greys.


This arrangement made them so much easier to work from.

I'll show tomorrow the Bible journalling page I worked from this new pencil lineup.

Ddd


Posted by studio3d@ccgmail.net at 12:01 AM PST
Monday, 21 November 2016
Simple Celebration
Topic: Paper Embroidery

Many times the concept is more attractive than the execution... I think that is true of the card being shared today.

I had a butterfly to embroider and blank area on a floral card. I chose colors to complement the floral and stitched by the directions.

I ended up with a flat, lifeless piece.

I tried to rescue it with the use of a bright stamped greeting bordered in the same color as the butterfly.


I pulled in more of the yellow by using it for the card base and allowing a border to show all around the card.

Ddd


Posted by studio3d@ccgmail.net at 12:01 AM PST
Sunday, 20 November 2016
Blessing of the Trees
Topic: Paper Embroidery

When I pricked out this embroidery pattern of trees I had every intention of making this a Christmas card. I would have done this by decorating a single tree with beads.

However, after I got all the trees stitched - each in a different shade of green - I liked the effect of having a simple grove of trees. I decided to leave them plain.

The background is a subtle woodgrain.

The addition of a bordered sentiment in dark yellow calls attention to the single star.


I used a dark green patterned paper for the borders.

Ddd


Posted by studio3d@ccgmail.net at 12:01 AM PST
Saturday, 19 November 2016
Let Your Light Shine
Topic: Paper Embroidery

I haven't joined any paper embroidery swaps or challenges for a while now so those arts were set aside while I persued other things. While on vacation recently, I took along my paper embroidery kit with some cards to work on. It makes a nice activity that allows for watching the scenery, chatting with others and/or watching lectures and concerts (when they don't lower the lights).

I finished up three stitchings which I could turn into cards when I got home.

This card was pricked out in a floral/swag on a two-toned houndstooth paper. I had included a red/pink/teal funky floral so stitched the flowers and swag to match.

After cutting the pieces to size I found the floral too bright so I layered a quote on vellum over the top and wrapped the edges to the back.


I mounted the decorated panel to a soft blue card base.

Ddd


Posted by studio3d@ccgmail.net at 12:01 AM PST
Friday, 18 November 2016
Denim Glitter
Topic: Nail Art

It's been a while since I posted nail art. I was waiting for my nails to grow back out after the last breakage.

A trip to the dollar store the other day netted me 10 new bottles of polish. My store carries a brand called L.A.Color. I find it to be long lasting with little chipping for up to two weeks. I always start with Revlon base coat and I add up to three color layers followed by Revlon top coat.

I rarely use one color as I like the depth I get by combining colors and textures.

I started this manicure with a pale, almost gray, purple. I did two layers of this. Then I added a clear containing two sizes of silver glitter.

The final effect makes the color look more blue and it comes off resembling a glittery denim.


No need for fancy patterns and stuff when the polish itself can present such a stunning look.

Ddd


Posted by studio3d@ccgmail.net at 12:01 AM PST
Thursday, 17 November 2016
Little Flower Burst
Topic: Quilting

This is the 56th quilt I have made for the Passages program at the hospital!

I started a couple of years ago by buying the pink floral fabric at the outdoor sale at the BIG fabric store. I had nothing to go with it and thought it looked like a little girl fabric so I set it aside.

Then I came across a pattern for an expanded pinwheel and decided to purchase fabric to use with the floral.

I bought a layer cake in teal in a line called Stonehenge. It has a marble look to it and is in five grades of intensity.

The construction is simple half-square triangles.

The yellow border is color pulled from some of the flowers in the pink print.

I only quilted in the ditch around the diamonds.

Ddd


Posted by studio3d@ccgmail.net at 12:01 AM PST
Wednesday, 16 November 2016
Birdcage Panel
Topic: Quilting

At the Sew and Stitchery Expo in March I picked up a panel print in the big bin of 'fabric by the pound' at one of the booths.

Having cut it apart I selected the center piece plus some of the outer border to use and combined these with coordinating colored borders from my stash.

I varied the width of the borders and just kept building and building. I did increase the width of the top and bottom on one border to make the quilt longer.


As far as quilting, I followed the lines of the print in the birdcage and along the first border of red hourglasses. I traced around the roses in the next border, added loop-the-loops in the border with tiny flowers.

The gray border was covered with a pattern of roses and leaves.


Then in the wide red border I made giant roses in cream thread.


I like this more than I expected to.

Ddd


Posted by studio3d@ccgmail.net at 12:01 AM PST
Tuesday, 15 November 2016
Waterlilies
Topic: Quilting

Another oversized lap quilt today.

The pattern for this was an online freebie that was designed to feature a specific line of fabric.

I had chosen the feature fabric without buying anything to go with it. I found coordinates in the stash, though.

I really didn't visualize how large this was going to be as it would have been just as well to remove one row and one column.


The quilting is simple stitch in the ditch beside the large and medium squares plus diagonals through them.

The back is yellow and the binding matches the medium blue squares.

Ddd


Posted by studio3d@ccgmail.net at 12:01 AM PST
Monday, 14 November 2016
Calico Windows
Topic: Quilting

The pattern for the quilt today is from a Fons & Porter Quick Quilts issue. I don't have a date as I tore the pages out of the magazine.

I had a number of small-print florals from donations as well as various fabrics that went with them from my stash. I made the elongated four-patch from lights and mediums and used darks for the window frames. The over-all tie-in factor is the orange dot fabric and the center cornerstone on which they turn.

This block does require some partial seaming and the block itself is huge (there are only 6 blocks in this quilt).


This is a larger lap quilt that will go to Passages.

Ddd


Posted by studio3d@ccgmail.net at 12:01 AM PST
Sunday, 13 November 2016
Twisted Ribbons
Topic: Quilting

I love the patterns found on Missouri Star Quilt Company. I think the pattern I used today is called Ribbon Stars. 

I picked up three disparate purples from full bolts being de-aquisitioned from the church costume closet - I think they were probably used for the three wise men. Several of us cut off a couple of yards to use.

When the purples were next to each other they really didn't go together. Then I went to a yard sale this summer and a lady was selling yardage left over from bridesmaid dressed - a black with flowers in all three of the purples! They also had some blue so I brought in that color in sashing.


The quilting is loop-the-loops in an overall coverage.

The backing was also in the costume closet - dark burgundy with a glitter on it.

Ddd0


Posted by studio3d@ccgmail.net at 12:01 AM PST
Saturday, 12 November 2016
All-Natural Pinwheels
Topic: Quilting

I found the pattern for today's quilt in a Fons & Porter Love Of Quilting magazine. Unfortunately, when I cut the templates out of the pages (which I had torn out of the magazine) it cut the magazine date off.

In any case, I went through my fabrics and pulled out the least attractive (I won't call them ugly) ones that I could find that went together.

Strangely, it didn't look too bad when it was all combined.

I did some straight-line quilting in the individual triangles and then some triangle loop-the-loops treating the four outer borders as one.

Ddd


Posted by studio3d@ccgmail.net at 12:01 AM PST
Friday, 11 November 2016
Northern Lights
Topic: Quilting

I was on a deadline for the day the Chaplain from the hospital was going to come and pick up the donation quilts for Passages. I've been very haphazardly working on getting several finished that I've been working on since I cut several kits in June.

For several days the last two weeks I've been quilting every day and finally finished up SEVEN of them!

I'll space these out over the next week.

Today it is a quilt I call Northern Lights. I picked up several mill-ends at the Sew and Stitchery Expo in February from a booth that has odd cuts in big bins. When I grabbed them I thought of them as Spirograph prints but in putting them together I started calling them Planetarium.

I cut all the pieces of the pattern I had selected but when I laid them out they were all too busy together.

I dropped in a 1/4 inch red sashing and BOOM!


Totally spectacular!

Ddd


Posted by studio3d@ccgmail.net at 4:48 PM PST
Wednesday, 2 November 2016
Bible Journaling - Isaiah 40:31
Topic: Bible Journaling

I had wanted to do this scripture for some time and then it was the sermon topic last Sunday in our series on 'Promises'. Well, how could I NOT do it now?

I combined two photos, one for the eagle and one for the background, to create the scene. 

The text style is from a book on creative lettering.

I chose to make this a double page spread for more impact as I could make the bird so much larger that way.


Many more to come.

Ddd


Posted by studio3d@ccgmail.net at 9:57 AM PDT

Newer | Latest | Older