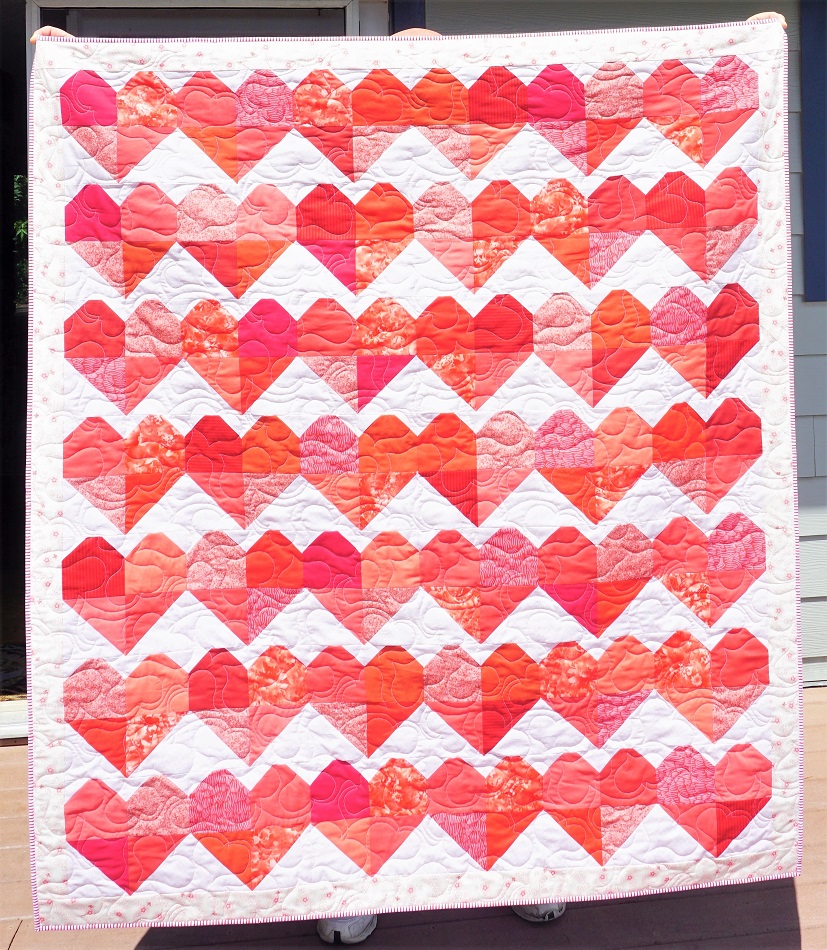
« April 2021 »
S M T W T F S
1 2 3
4 5 6 7 8 9 10
11 12 13 14 15 16 17
18 19 20 21 22 23 24
25 26 27 28 29 30
You are not logged in. Log in
Entries by Topic
All topics
3D paperwork
A - Z challenge 5
A - Z challenge 7
A - Z challenge round 4
A to Z challenge round 3
A to Z round 2
A to Z round 6
A-Z round 1
Around the House
Art Challenges
Artist Trading Cards
Backgrounds
Beads
Bible Journaling
Books
Boxes
Collage
Color Challenge
Coloring
cookbook
Die Cuts
Digital Projects
Digital Stamps
Drawing
Dry Embossing
Fabric Stuff
Fantastic Folds
Field Trip
Home Decor
How Does Your Garden Grow?
Hymnal Art
In The Kitchen
In the studio
Jewelry
Lettering
Links
Multi-Technique
Music to Work By
Musings
Nail Art
New Work
Online Class
Other Hobbies
Other Projects
Painting
Paper Embroidery
Paper Piecing
Photo
Pretty Paper
Quilting  «
Random
reading
Scrap Recovery
scrapbooking
Sewing
Sketch Challenge
Some Backlog
Stamping
Stencils
Stickers
Supplies
Teabag Folding
Techniques
Testing
tips and tricks
Tutorial
Web resources
Welcome to my Blog
Work By My Friends
workflow
Writing
Blog Tools
Edit your Blog
Build a Blog
RSS Feed
View Profile
Group One
In & Out of Studio 3D
Tuesday, 13 April 2021
Very Complimentary
Topic: Quilting

As a complement to the placemats posted yesterday, the same family member requested the same pattern (Road to Oklahoma) in the same colors (blue and yellow) but designed as a bed runner for a queen bed. This is the first bed runner I have ever made.

On the traditional Road to Oklahoma there is a single block with a diagonal design which, when rotated on alternate blocks, forms the stars and chains. However, it also creates each of the large squares out of a four-patch - a seam right through the middle both ways. I did not find this attractive and also did not want the bulk of all those extra seams.

So, I worked backward from the end product layout and redrafted the pattern to be constructed in two different blocks - a sawtooth star and an uneven 9-patch. I cut all the parts with my Accuquilt using the 8-inch qube.

For assembly, I alternated each of the 9 pairs of blocks (making sure to keep the florals facing the right way) into a long unit and then constructed strips of the outer pieces and sewed them on. Last step - the 3-inch border.

I quilted on the diagonal throughout.


This fits a queen bed.

I had intended to bind in the same dark blue as the border but ran out of that fabric. I used the lighter blue for the binding which emphasizes the star points.

Ddd


Posted by studio3d@ccgmail.net at 10:19 AM PDT
Monday, 12 April 2021
Oklahoma Picnic
Topic: Quilting

Wow, it has been a long time since I posted on the blog! I am generally doing something that warrants posting, like Bible journaling (but I have been doing scripture writing, a devotional and verse mapping rather than artwork in the Bible or a hymnal) or traveling (none of that going on) or quilting (but I have been making tops and setting them aside to do in a batch).

Up to now, I've had nothing finished for posting.

However, I did make a couple of placemats on request. The pattern was already chosen (Road to Oklahoma) as was the palatte (blue and yellow). I used my Accuquilt cutter to make all the parts and the 6-inch qube made it easy.

Because I wanted the design centered on the 12x18 mat, the standard method of making the base block and twisting/turning to create the mat was not going to work. So I broke down the drawn design and cut parts to assemble in columns.

Here are the finished placemats (yes there were only 2, as requested.)

These were quilted in the ditch to maintain their clean look.

Ddd


Posted by studio3d@ccgmail.net at 12:01 AM PDT
Thursday, 11 February 2021
Beside the Still Waters
Topic: Quilting
"Beside The Still Waters"
 
When I went on a retreat to the beach about 3 1/2 years ago we stopped at a little roadside quilt shop (Garibaldi?) where several of us bought panel prints to make quilts. I just decided what I wanted to make with mine.
 
I used it to make a wall hanging with a pattern called Secret Window from Jordan Fabrics. The background fabric is a batik and I also used it on the back.


I quilted with a variegated green thread but found that there were contrasts in the wrong areas so I ‘re-variegated’ it using alcohol markers! Now it blends in better.


I did the quilting on my regular machine and it looks like I am sorely out of practice. In my defense, I was actually trying to follow the margins of the color variations, not trying to make a regular meander.
 
This wall hanging is for me to keep.
 
Ddd


Posted by studio3d@ccgmail.net at 5:16 PM PST
Tuesday, 9 February 2021
Garden Variety Bunnies
Topic: Quilting

I love a good pun or any play on words and often employ them in naming my quilts (in case you hadn't noticed).

Today I finished up this quilt for myself and, because each block is different and most are florals, I named it Garden Variety Bunnies.

This is from a pattern called Country Bunnies and I selected 16 fat quarters that went well together and a whole variety of neutrals for background. The only things that are common between all the elements are the lavender collars on the rabbits, their tails and the dotted cornerstones.


In these couple of closeups you can better see some of the free-motion quilting I did. The outer border is leaves and vines, the sashings are reversing loops, the block backgrounds are meander with a squiggle under the bunny. All of the bunnies are 'outlined' with little scallops facing the inside edge and a looping fill. The tails are filled with swirls.


I selected a lavender sheet to use for the backing (matches the collars on the rabbits) and binding. However, it turned out to be cotton/poly in a strange weave that made it extremely ravel-y. I left the excess batting and backing on the quilt while I secured the binding and then used the serger to overlock the edges while its blade trimmed off the quilt. This was all covered when I turned the binding over to the back and stitched it down. Whew!

First quilt of the year is DONE! Gonna be snuggling under this one tonight.

Ddd


Posted by studio3d@ccgmail.net at 5:11 PM PST
Thursday, 31 December 2020
Two Magical Squares
Topic: Quilting

Just by the skin of my teeth I finished these last two quilts within the year - bringing the total to 26, a new high for a single year. These also bring the total I will have donated to our hospital to 99 though these won't be delivered to them for a month or so.

I found the pattern for these in a quilting magazine and it was a totally new concept for me. Start with 4o squares and frame them with sashing and cornerstones on two sides. Set them together in a 5 x 8 layout (leave that one side and top without sashing). From the bottom left corner slice at a 45 degree angle to the right side. Take the resulting bottom triangle and stitch it to the top. You now have a trapezoid. Make another 45 degree angle from side to side and sew the resulting triangles together. Magically you end up with a rectangle again but one in which the squares are all set on point.

I changed the pattern by using wider strips for the sashing and ended up with quilts mesuring 50 x 60 inches.

I really don't like to make a project and then start over and make another just like it. So I let these quilt 'grow up together' step by step. They are made from essentially the same supplies although I did run short on the yellow for the inner border and made it pink (matching the sashing) on the other quilt. Everything was cut together, centers stitched one after the other, border one added to both, outer border added to both and placed on the longarm one after the other on one long backing and batting. Then they were bound one after the other.

The first one throughout all the steps was this one - called First Among Equals (for the process of creating identical quilts in tandem). 


With the exception of the yellow cornerstones and border are all from black and blue background calicos and pink daisy fabric from my late sister's stash.

Here's a closeup of the fabrics. It is quilted with a fine yellow thread.

The second quilt I called Save the Last Dance For Me. This was because it was the last one done AND the song was playing on my iPod during the binding process.


The color really isn't as fat as it appears in the photo. Here are the fabrics and you can see the heavier pink thread used for quilting.


The backing was selected to go with the vintage feel of the calicos. It is a parchment colored print with ledger entries in sepia script dated in the 1700s.


That's it! A close to another quilt year in grand fashion.

Ddd


Posted by studio3d@ccgmail.net at 7:12 PM PST
Sunday, 13 December 2020
I Love Jelly
Topic: Quilting

"I Love Jelly" may seem to you like a strange name for a quilt but here goes my reasoning: The quilt is made entirely of jelly roll strips AND it spells out the word 'love'. So there you have it!

As soon as I saw the tutorial for this on the Missouri Star Quilt Company I knew it would be perfect for my granddaughter who just announced her engagement.

The pattern is "Through Love" from Taren Studios and makes a lap quilt of 64x78 inches. Although the pattern is for black, white and a single solid I bought the jelly roll used by MSQC with a rainbow of ombre strips and tried to match the color placements they used as much as possible.

This is definitely best viewed from a distance as the effects of the optical illusion are totally lost at close range.


For the binding I used strips from the backing fabric which is a riot of color called 'Smashing Atoms". So much fun.

On a side note, this is the 24th quilt I have made this year. That is a new record for me - the nearest I have done before was the year I made baby quilts for the mission group at church to take to the Warm Springs Indian Reservation. That year I made 23.


Ddd


Posted by studio3d@ccgmail.net at 5:11 PM PST
Saturday, 28 November 2020
Water Dog
Topic: Quilting

I got back to a little bit of quilting today!

I bought this as a kit back in February - a small wall hanging in the 'watercolor' style. All of the squares for the landscape background were pre-cut. I had to buy the fusible grid interfacing. The fabrics and patterns for all the picture pieces were included but I had to provide the fusible and cut them all with tiny sharp scissors.

After assembly I used my domestic sewing machine to free-motion a meander across everything but the dog.


I provided the border (2 1/2" jelly roll strips), backing (woodgrain), batting (warm & natural, hanging sleeve (paw prints), and binding (plain black) from my stash.

This is a little (OK, a LOT) formulaic for my style but when I saw it at the Sewing Expo I wanted to make it as a gift in memorial of our black lab who has been gone many years.

The title of the quilt - Water Dog - refers to Chuck's breed as well as the quilt style (watercolor quilt).

Ddd


Posted by studio3d@ccgmail.net at 12:01 AM PST
Wednesday, 23 September 2020
Bid Me Goodnight
Topic: Quilting

Once again, the entry title is the name of my latest quilt - a kind of inside joke because it will be 'bid' on at auction and it is a queen-size bed quilt. This is only the 5th time I have made a queen quilt (also have done 1 king) - not a big percentage out of 202 quilts!

This quilt was made by request, for a fund-raiser auction, but I used mostly fabrics I had on hand.

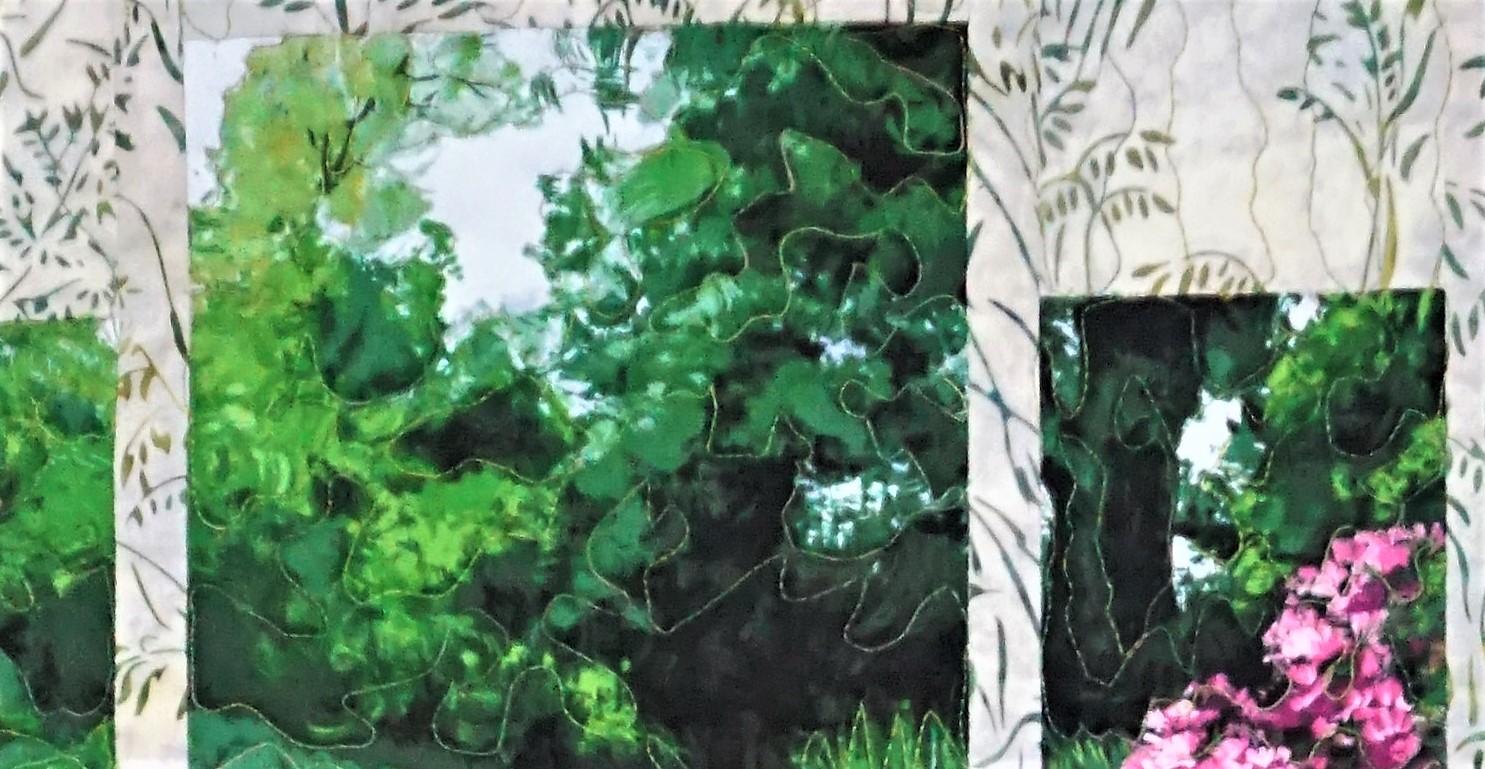
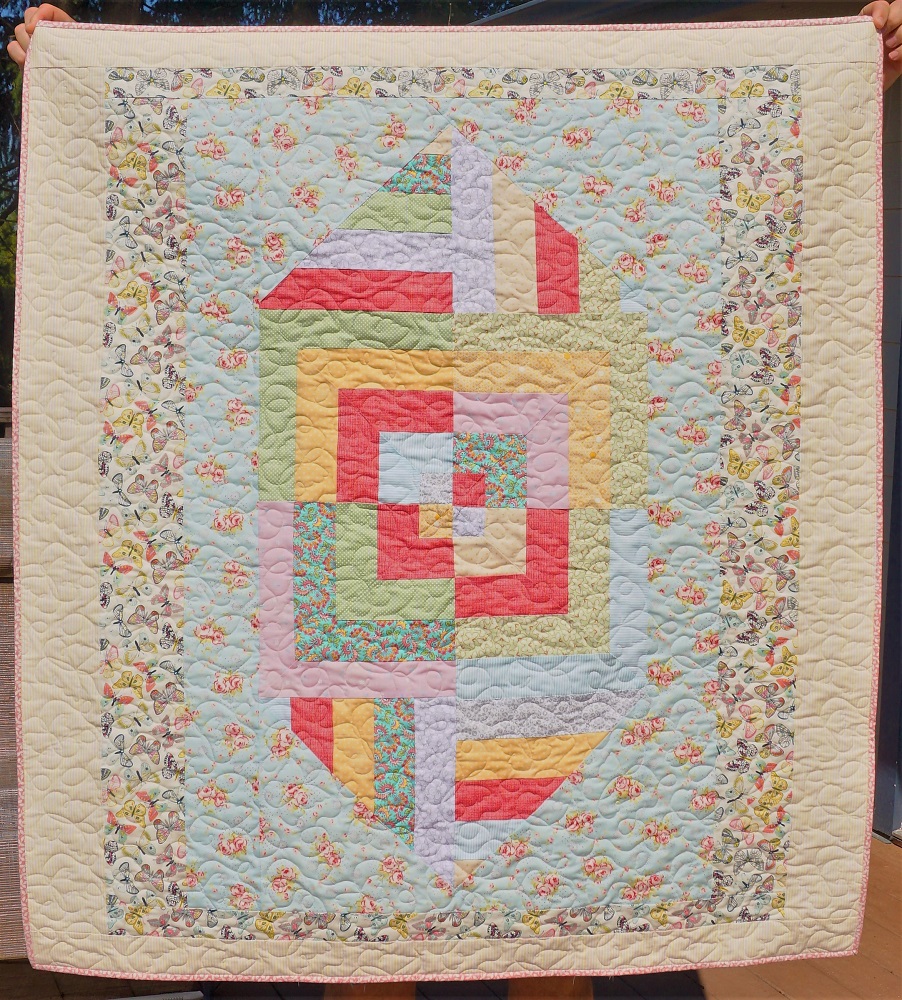
The initial plan was to use a panel I had with 18 units of paintings of Alaska wildflowers. I had picked this up on a vacation cruise some years ago and was waiting for the right pattern to come along. When I saw a tutorial on Missouri Star Quilt Company for using 2" blocks to surround 6" squares I knew I had the right pattern for me. Only problem was that the floral centers were 6x12, so I had to adjust the pattern. Done.

That tutorial used a 'jelly roll' of 2 1/2" strips to create the surrounding blocks. I happened to have a kit, given to me as a gift, with beautiful batik fabric strips. I never liked the pattern in the kit so these had sat languishing in the stash. Eureka! The colors were perfect with the flower portraits.

Then I got the request that the quilt be queen sized. Hmmm, I had enough for a lap quilt! So I rummaged through my stash and found some florals that I could add in, even if they were not the portrait style - same color ranges, though. I had to add in some other batik fabrics (cut into strips) so there would be enough to surround all the blocks. This gave me the opportunity to weed out some of the original batiks that were red or black or navy blue that really did not suit the pallette.

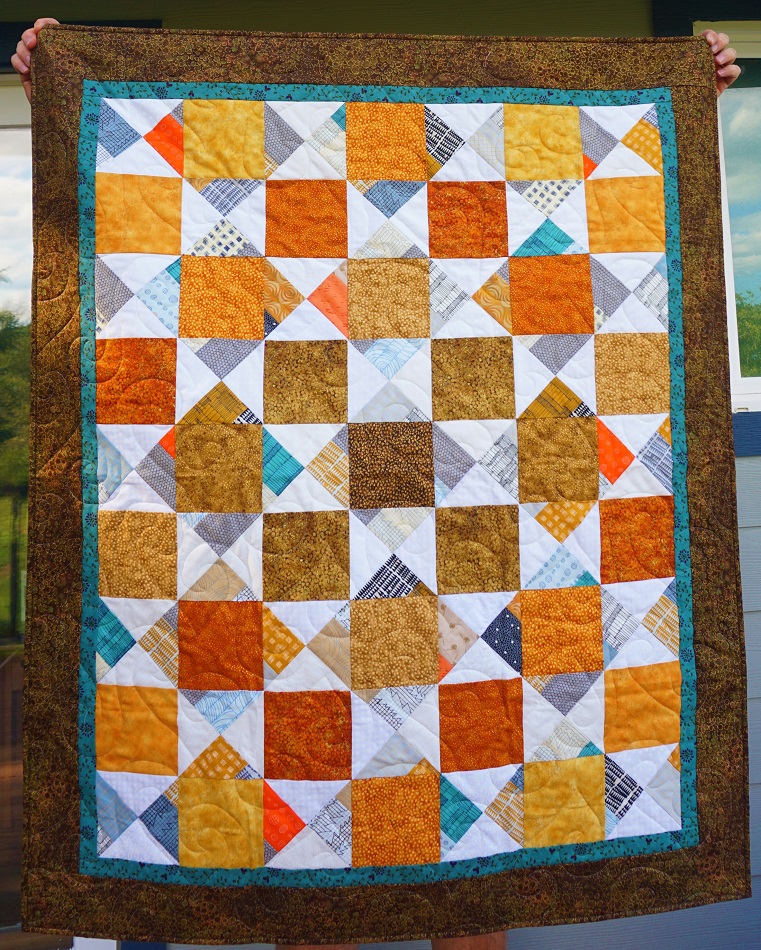
SO - I laid it all out, sewed together in a 7 across by 4 down grid only to realize I had the mattress dimensions backwards! AAAAAaaaarrrrgggghhhh! Now, what to do? Take off one column from the side, cut and block-border two more of the fabrics and create an addition row at the bottom. Now I had a grid layout of 6 across and 5 down with the exact dimensions of a queen mattress. Whew!

I calculated what borders I would need to create a drop on three sides. From my stash I added a 2 inch border all around, a 4 inch border to the sides and bottom (plus a 2 inch top border) and an 8 inch border to the sides and bottom. At the corners of the 4 and 8 inch borders I put in cornerstones of 2" blocks left over from the block bordering. This gave me a 14" drop.

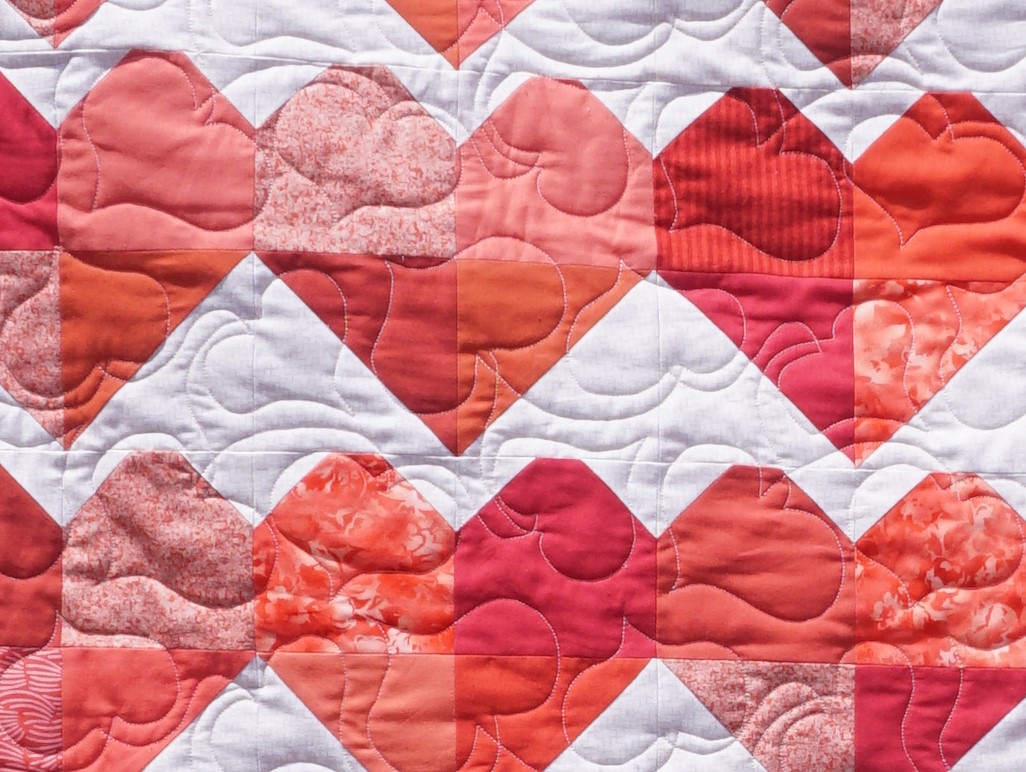
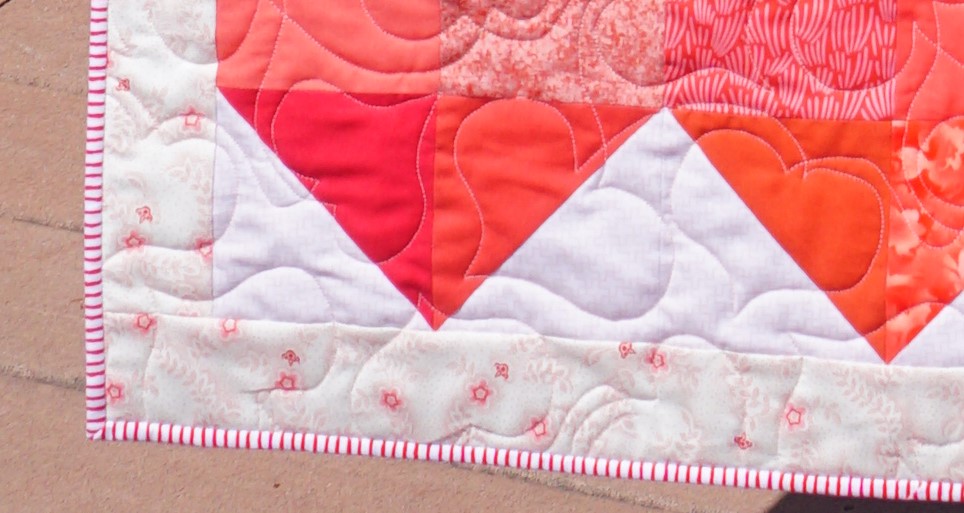
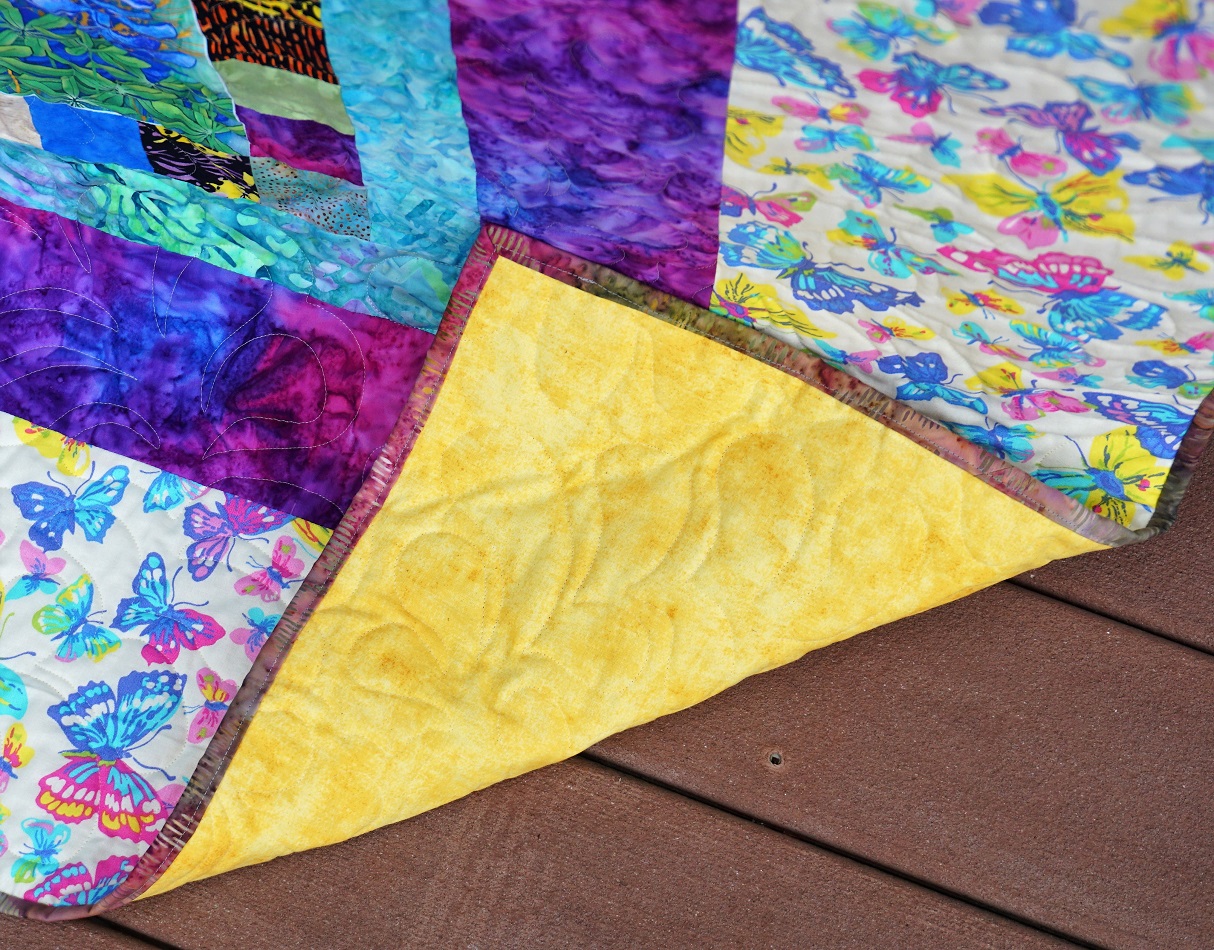
This was quilted with 'bountiful feathers' from Urban Elementz with a 'silver' gray thread, yellow backing and Hobbs Heirloom cotton/polyester blend batting. Binding is one of the batiks that has a color blend from grayed green to red violet.

Throughout this process, with all of its changes, someone commented "You are truly creative." My response, "You mean, 'you really make it up as you go along'!" (More than you know)

When I was truly all done I had big chunks left of the yellow backing fabric, the widest border fabric and another of the border fabrics. So I made a set of matching pillowcases to go with it. By placing these at the top of the bed it will make up for there not being a lot of quilt at the top edge to enclose pillows like you would with a bedspread.

After all that, are you ready for some pictures?

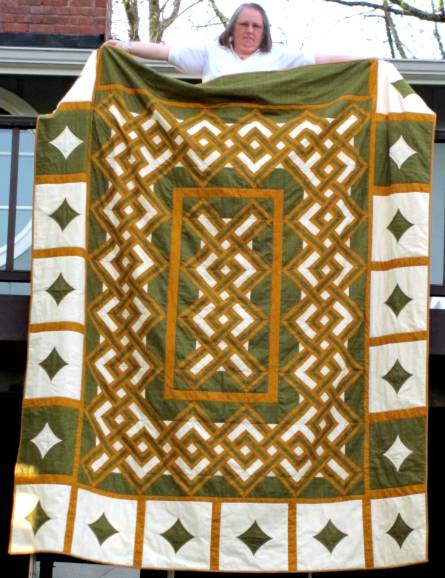
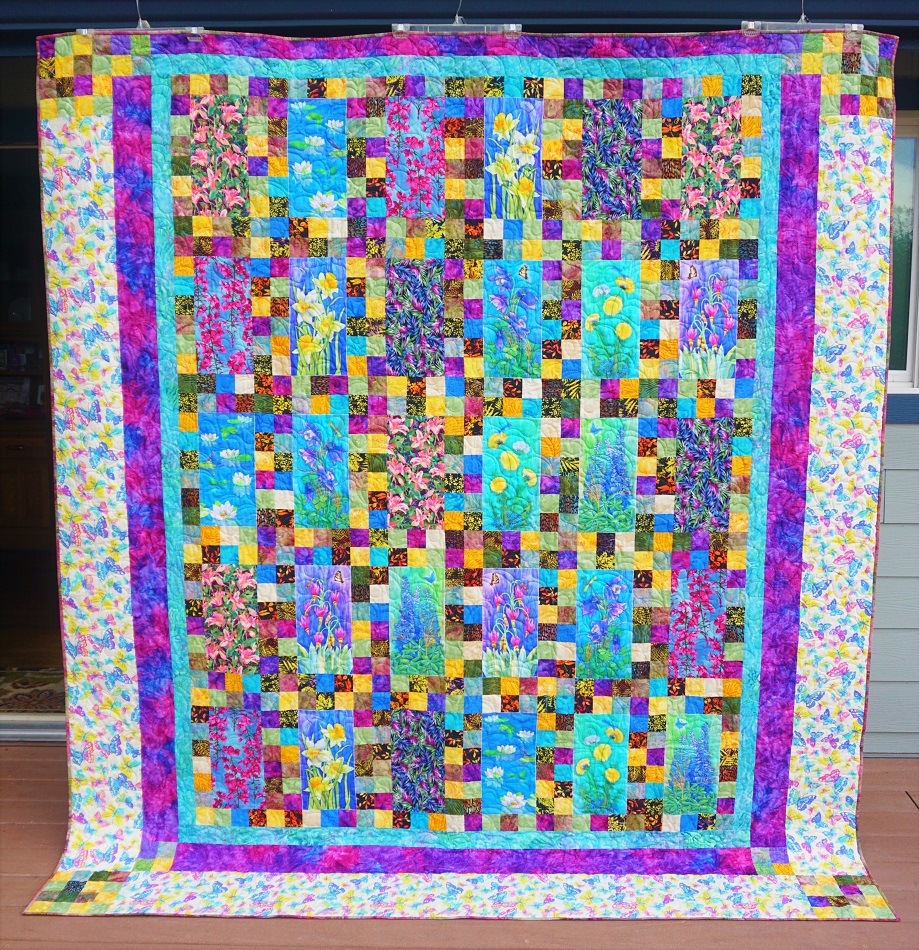
The only place tall enough to display it was on pant hangers hooked to the house gutter. It still drags at the bottom.

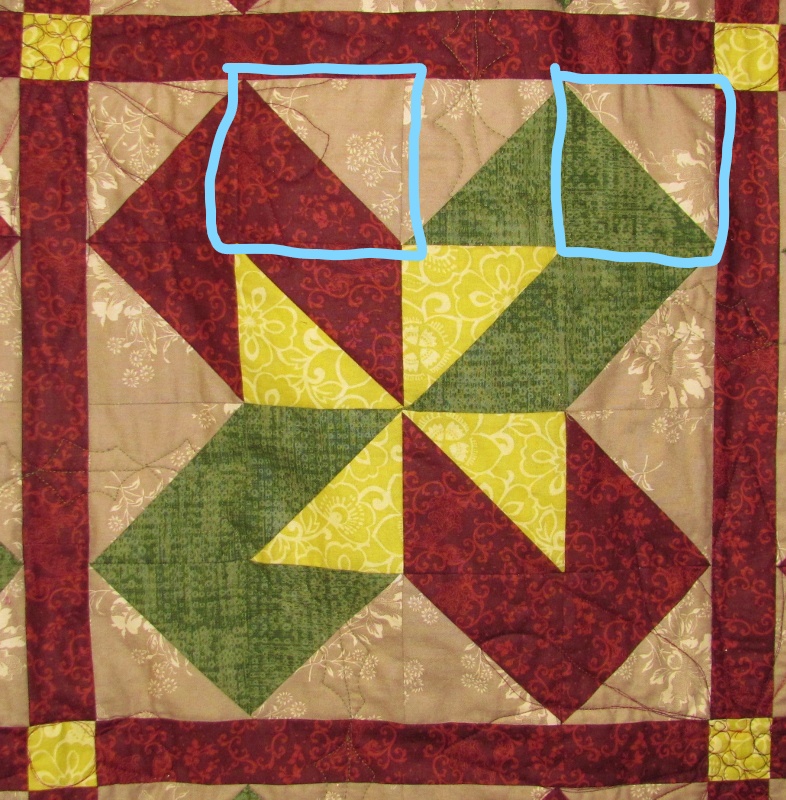
Look how well those batik blocks pull out the colors from the flower panels.

A better view of the floral fabrics:


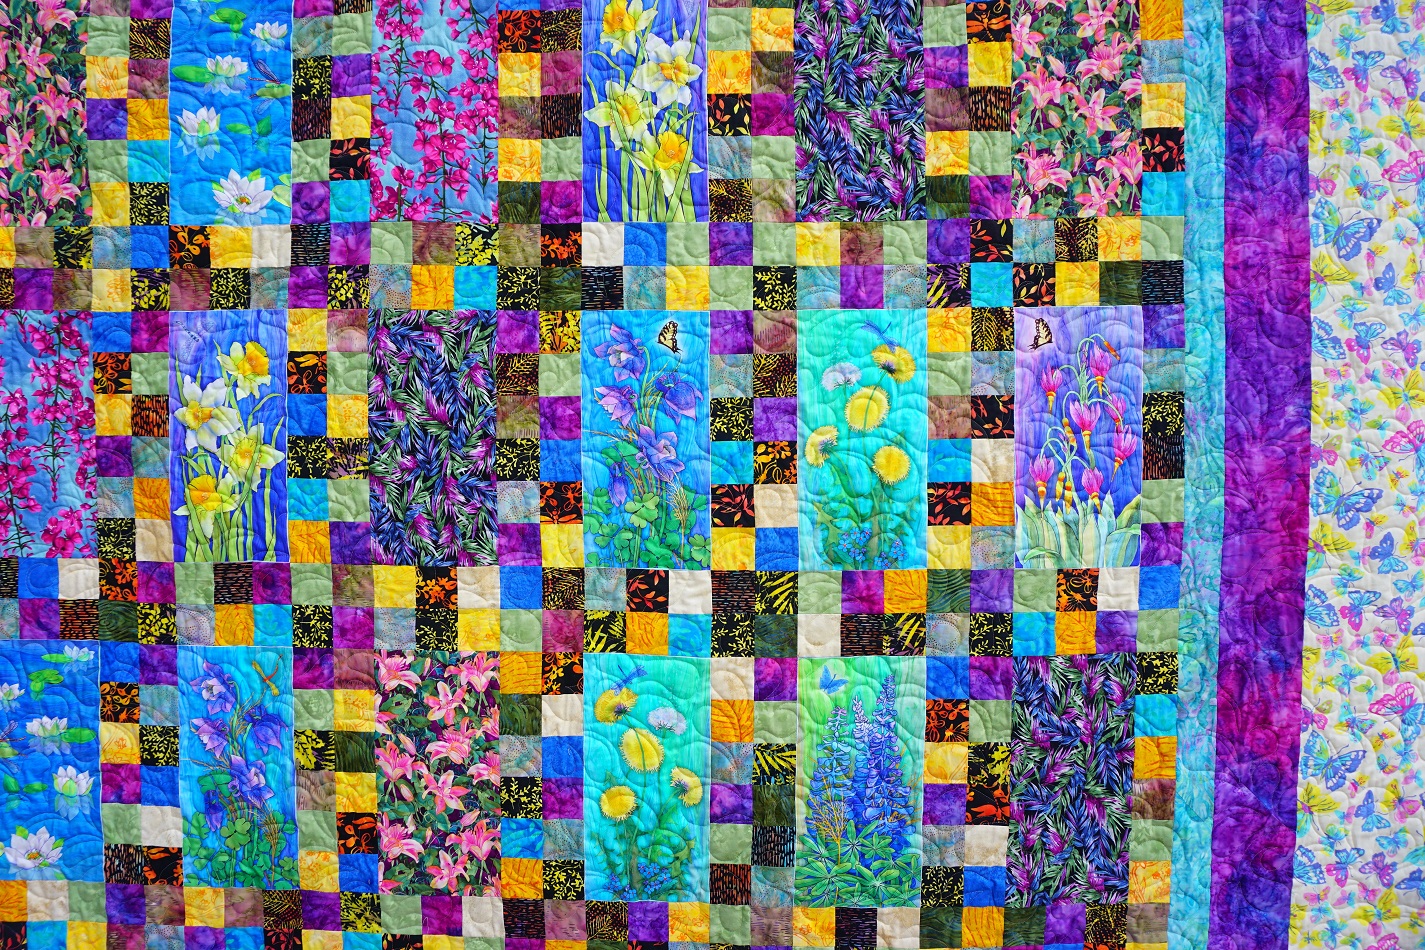
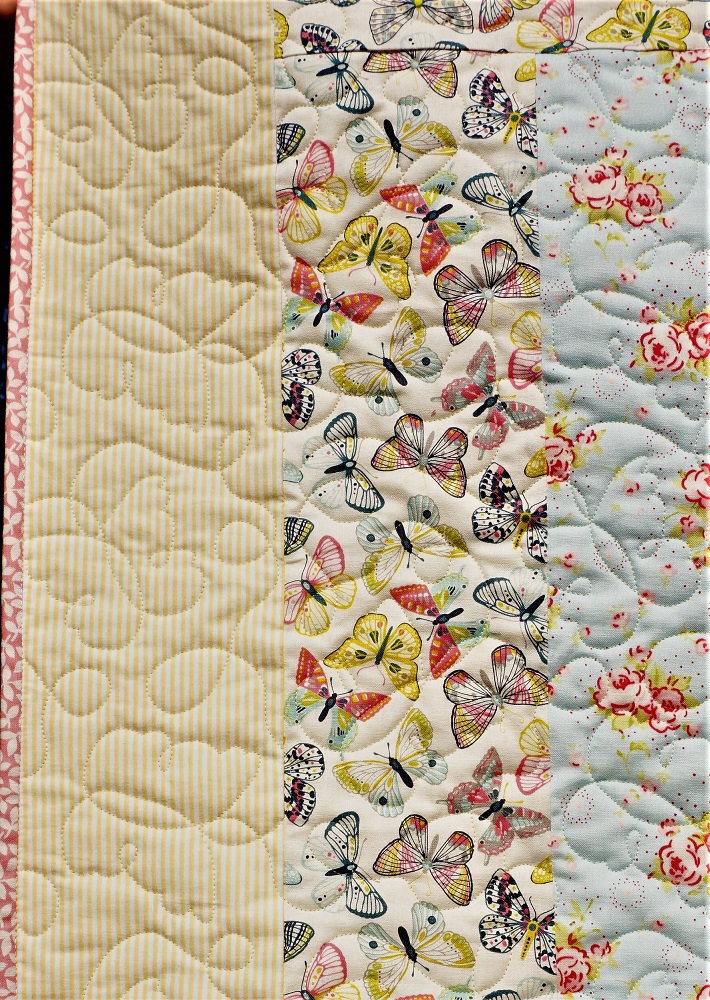
A closeup of one of the wildflower portraits. You can see how this one has a dragonfly. Others have butterflies which will play into the outer border.


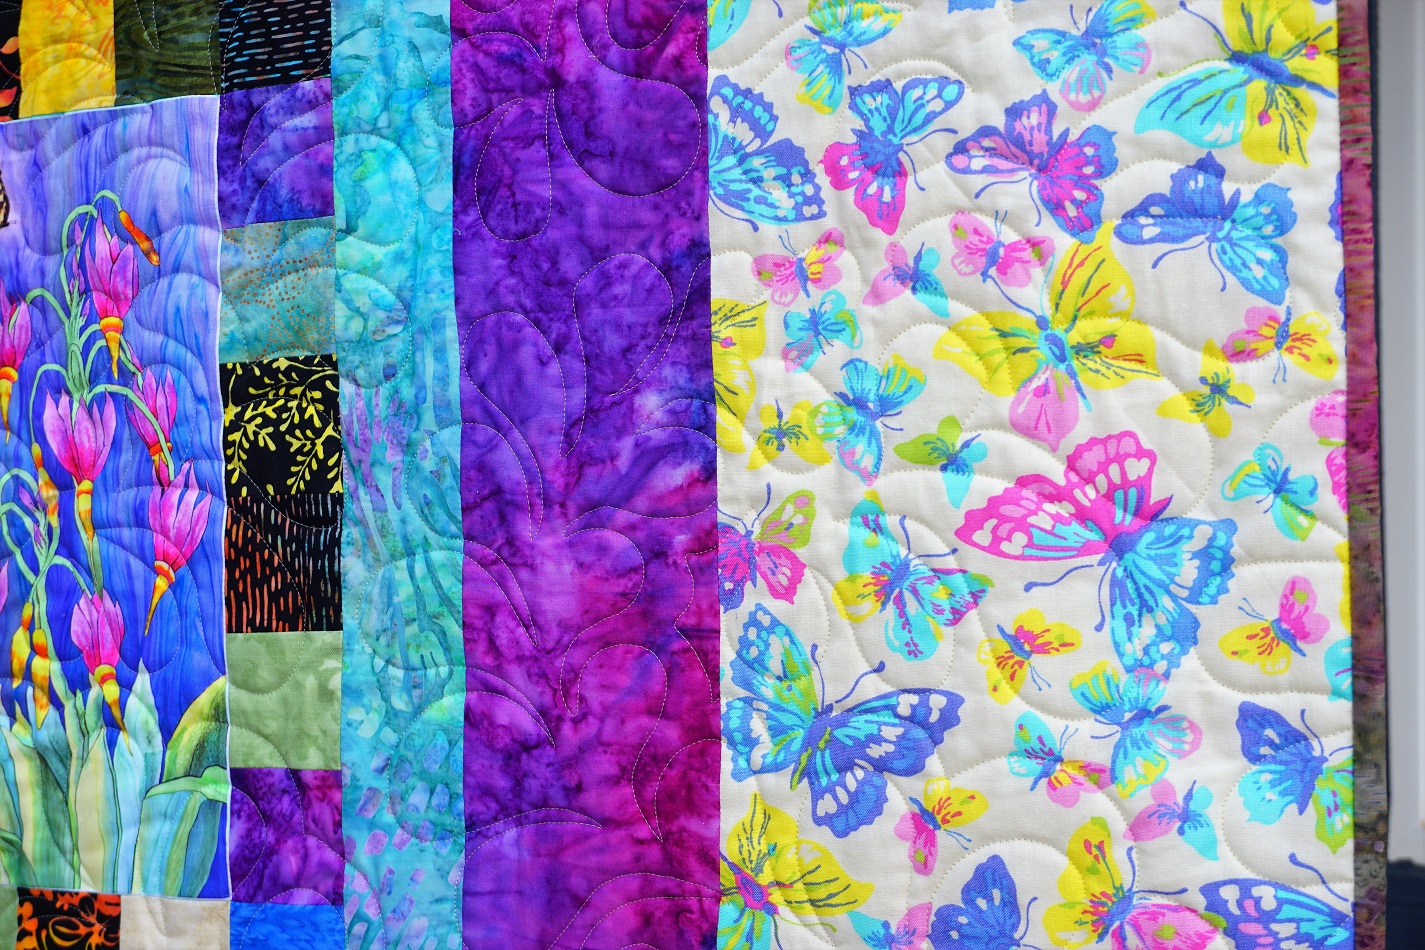
Here you can see the quilting pattern as well as the sequence of the three borders (2", 4", 8"). The colors in the butterfly print were a perfect match for the florals and it was already in my stash!


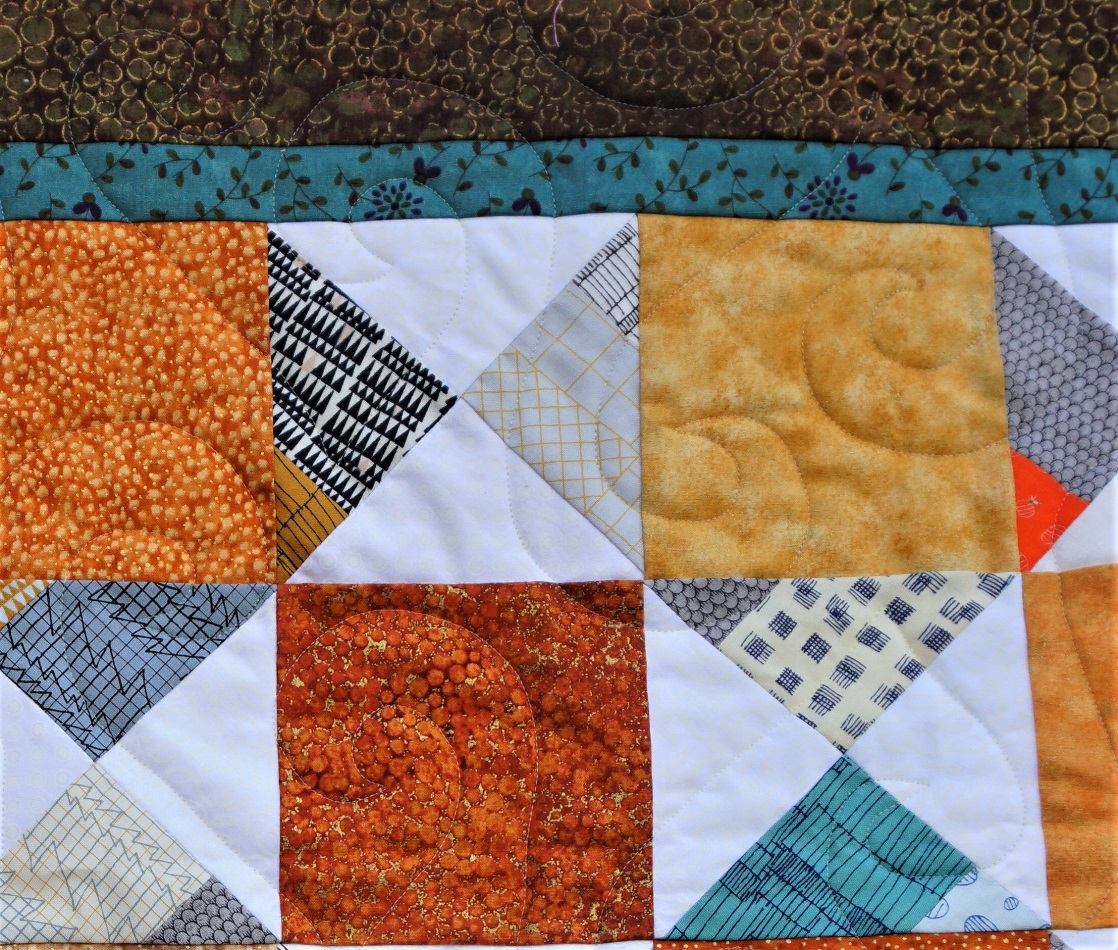
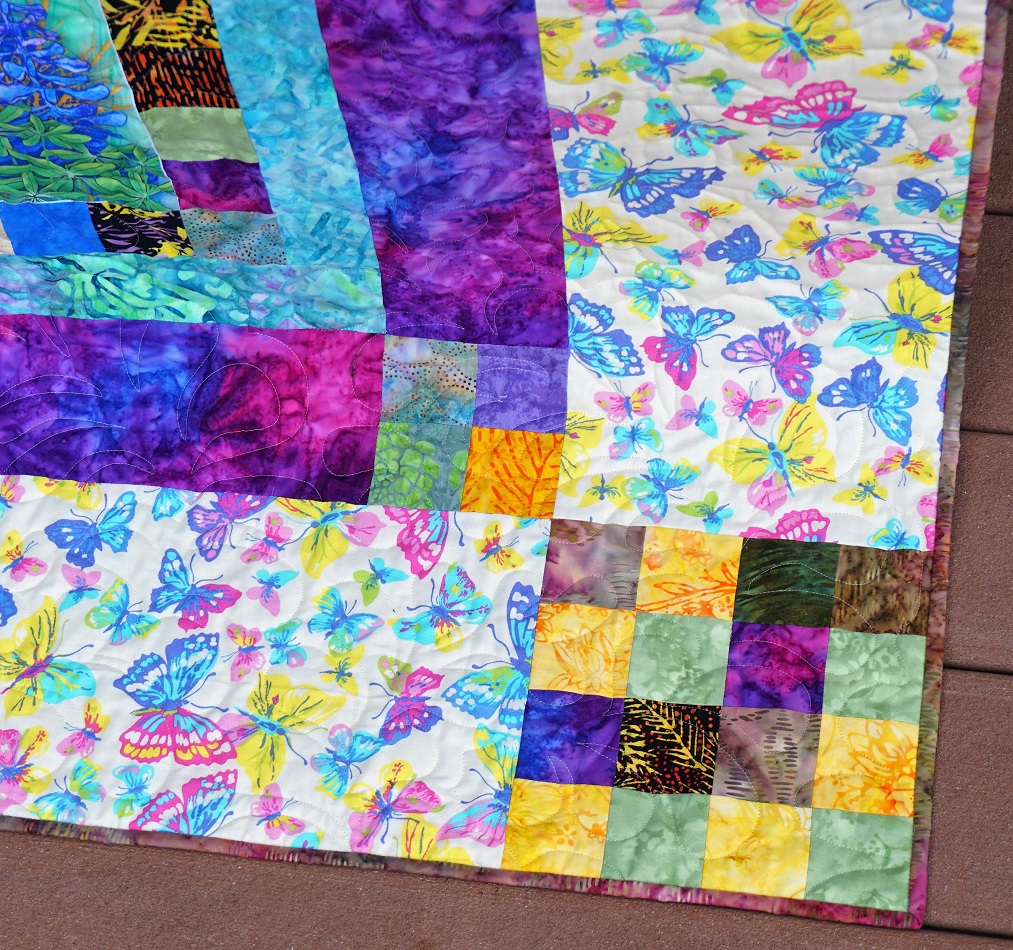
Here is a view of the pieced cornerstones in the borders.


And a peek at the backing and binding.


I didn't get a photo of the pillowcases. They are yellow with a butterfly cuff and a 1" flange of the teal border.

Ddd


Posted by studio3d@ccgmail.net at 12:01 AM PDT
Monday, 24 August 2020
The Shirts Off My Back
Topic: Quilting

Armed with a stack of my grandson's t-shirts, collected by his mom, I set out to make my first t-shirt quilt ever!

The first step was to read all about it - advice from other quilters on materials (stabilizers, sashing, batting, backing, threads) and on methods (pressing seams, quilting, special needles). I experimented with various layouts and finally realized I was going to need to put in a couple of extender rows to get the size out of only 15 shirts. I ended up adding the back of one shirt that had gradeschool classmates' names on it so I would have 16 to work with.

I pulled 3 different flannels from my sister's stash - one for sashings and backing, one for the panels and binding, and one for the outer border. After cutting off all the shirt fronts I ironed on the stabilizers and then measured to find the largest size I could get. As it turned out I could cut 13.5 inch squares from all but one shirt and for that I could bring it up to size by adding borders all around (from the back of a black shirt.)

The extending panels ended up being one near the top that ran the full width of the quilt and one near the bottom the width of two shirts. I had a plan for those so they wouldn't be so plain.

So assembly took place, sandwiching and quilting was accomplished and then I put my plan into place for the panels - iron-on lettering! I had my brother and sister-in-law use their Cricut machine to cut 'collegiate' style letters to spell out NEBRASKA in red as well as his last name, HOOPS, in black. I used a combination of the Cricut Press and my iron to apply the letters. I had already quilted at this point so it took some work to get the letters to stick down in the stitched valleys.

Here is the final result (followed by detail shots of the custom quilting in the shirts, by theme)


Details:

This got outlining of the image plus background stippling.


This is the one shirt I had to extend to reach the size of the rest. I filled the background with bubbles.


Archerygot a background of pointy meandering


Rise up was outlined and filled with scallops.


The first banner with iron on lettering. The quilting was varying depths of chevrons to echo the fabric print.


Swirly waves fill this background around the logo which is outlined.


It was perfect that this logo sat up so high. It fit perfectly in the windshield of a stylized Jeep logo.


Never having seen this show I had no idea what was up with the pineapple. But I figured it must be important since it was on a LOT of the pictures I saw. So I just madea large one on the left and meander filled the rest.


Simple echo quilting


Beets, of course!


The basketball net is not obvious on this one but yo can see the 'swoosh' as the ball goes through it!


Hard to see - left half is tire treads, right half is silhouette of Jeep tire with Jeep logo on the hubcap.


The lower panel had blank shirt backs on each end. On this side I made an X-Box controller.


Easy to assume that this is a sports reference, but it is actually his name!


Since this blank block was red, it was begging for the outline of the state.


Our bass player got three lines of music staffs with random notes for the background.

 
Tennis shoes! In a continuous line drawing.


More echo quilting


And the last is allover meandering.

So what do you think of my result?
 
As long as the 'kid' likes it, I'm happy!
 
Ddd

Posted by studio3d@ccgmail.net at 12:01 AM PDT
Wednesday, 29 July 2020
All-Star Animals
Topic: Quilting

Even though I am not being paid for making this quilt, I am still considering it to be a commisioned piece. The fabric was furnished to me with the request that I make a large lap quilt for a fundraiser for the Oregon Zoo.

This was such fun fabric and great colors. I did add some of my fabric from the stash to broaden the variety but kept them in the same colors (black, medium and light grey, and yellow.

I had a general idea of what I wanted to do - fussy-cut centers of stars that featured the animals from the print. I used graph paper to draft out a plan that used:

1) 170 two inch half-square triangles with a light grey floral print and 4 black fabrics with figures in taupe:


2) 36 four inch blocks of zebra print set on point inside white corners.


3) 22 six inch blocks of sawtooth stars with a variety of fabrics used for the points, white background and animal centers.


4) 10 eight inch blocks of sawtooth stars with two different fabrics used for the points, white background and animal centers.


5) 8 ten inch blocks of two-toned stars with animal centers set on point.


6) 8 twelve inch blocks of four fabric sawtooth stars with 6 inch stars in the centers.


When you put it all together you get a colorful and fun layout with lots of movement.


A grey 3 inch border frames this, followed by a binding of the small black polkadot.

The backing is the zebra fabric and I used a 5-point star-and-loops pantograph to quilt it with light grey thread.

You cannot see it in the photos but I used bright yellow thread to write in script "The Oregon Zoo" up the lower left border and "All-Star Animals" down the upper right border.

The auction for the items donated to the Oregon Zoo will start August 1st and continue for 2 weeks. I hope this makes a lot of money for them.

Ddd


Posted by studio3d@ccgmail.net at 10:15 PM PDT
Saturday, 18 July 2020
Little Orphan Angles
Topic: Quilting

Well, I think I am done rooting in the 'orphan blocks' bin for a while! The 'Mitered Mania' quilt I made in January yielded 5 extra blocks and 2 additional strip triangles that did not match up. So I tore apart the 5th block into two triangles and made an arrangement with four blocks in the center with two triangles placed on each end.

Strange shape. I pulled out some recently used backing fabric to add corner triangles and then side borders (blue floral). 

Still needing to grow this I looked in my drawer of fabrics with a variety of colors in them. Eureka! I found a piece of butterfly fabric with all the right colors. It was then that I noticed that the green strips in the blocks had butterflies. I used this new fabric (leftover from my sister's stash) for uneven borders to expand the width more than the length.

To keep expanding the size I pulled out another recent backing fabric (the yellow pinstripe was back for all of the last three quilts I finished) and added another round of uneven borders.


Now with a 'theme' of butterflies emerging I decided to quilt with loops and butterflies. I used a fine, light yellow thread for this.


The binding is the same as the backing used on this quilt.

Ddd


Posted by studio3d@ccgmail.net at 11:55 AM PDT
Thursday, 16 July 2020
Point Taken
Topic: Quilting

Having used up all the squares I could get out of the recent strip sets I found that I still had an upright triangle that could be cut from each end of each set. I did this and when I opened them and rotated two of them together on the long edge they made little hourglass units.

Of course now I am dealing with true leftovers and having created all these units I had to figure out a way to set them together to create a quilt top. I measured the hourglass units and discovered I could sliver trim them and get 5 inch squares. This meant I could set them alternating with charm squares for a perfect fit.

The question was, 'do I have any charm squares?' Yay, the answer was, 'yes'!

I had leftovers of a couple of stacks in a range of orange/golden/rust that I set in a gradiant arrangement and alternated with the hourglasses turned this way and that to form a secondary pattern of diagonal squares.


How those metallic finish warm colors changed the look of these scraps (again). I accented the teal in the blocks by adding a narrow inner border.

Here you can see the metallic finish on the squares and the brown border as well as the edge to edge quilting.


I truly used up every scrap of these orphaned strip sets after cutting all I needed for that first quilt, 'Get To The Point'.

Ddd


Posted by studio3d@ccgmail.net at 6:40 PM PDT
Wednesday, 15 July 2020
More To The Point
Topic: Quilting

The reason for naming this quilt as I have is a direct result of the block origins.

You will remember the last quilt entry was titled 'Get To The Point' - an arrangement of mountain-like peaks. Well, when cutting the tube strips for that quilt one must match up identical squares. But it you cut more blocks to the end of the strip set you end up with one extra block that does not match anything. In fact, you could get one extra from each side making TWO mismatched blocks.

So I cut all those extras and then arranged them as pinwheels with no matching combinations. This was not large enough and I wanted some sashing so I went back to the orphan blocks bin and found several black and white blocks from my late sister's stash. These I cut into sashing for the verticals and then I cut whole black and white strips for the horizontal sashing.

A couple of borders brought it up to a small lap size.

Look how the orange border transforms the 'theme' from gold and gray of the previous quilt to a lovely orange and black, perfect for a fan of the Oregon State Beavers.


Even though the pinwheels are all straight lines and points I wanted to make the quilting in swirls to show their potential for movement.


This is a pantograph from Urban Elementz.

Ddd


Posted by studio3d@ccgmail.net at 12:01 AM PDT
Tuesday, 14 July 2020
Get To The Point
Topic: Quilting

This quilt has been languishing in the longarm pile because I couldn't decide how to do the quilting on it. I ended up doing a lot of research while other quilts jumped the line to get completed first. Sometimes it just happens that way.

The pattern for this was from an online blog entry and is a 'tube quilt' I used a jelly roll I picked up at a quilt guild's stash-buster sale for $10. I didn't really like the prints in the roll but for $10 I couldn't leave it there!

A tube quilt like this starts with two strips sewn together side by side, then laid on a wide strip of the background fabric and stitched up both sides, creating a tube.

One then cuts triangles from alternate side seams and, when they are pressed open they become a half-square triangle block with two colors in the one side and a solid background in the other. (Got that?)

As you move down the tube you get two block colorways depending on the side of the strips you car cutting from. Match up two that are the same and rotate one of them and you create a mountain.

These are placed side by side to create rows which are then stacked for the overall layout.

The jelly roll was not enough to complete enough matching sets so I threw in a few strips from my stash. The background is made up of a mixture of white-on-white fabrics.

When it came to the quilting I did not want to use an overall edge to edge design. This stumped me for quite a while but I finally settled on swirly clouds for the background and point to point arcs for the strip sets.


This was all done with free-motion quilting as was the continuous pattern in the borders.


This was a totally new process for me as I waited until all of the other quilting was done and then rolled the quilt forward and back on the machine to complete each section.

The binding was just a bit brighter than I would have liked but it was what I had on hand.

Ddd


Posted by studio3d@ccgmail.net at 10:02 AM PDT
Saturday, 11 July 2020
The Greatest of These
Topic: Quilting

This quilt was FOURTH on my list to finish. I had the first three already pieced, matched with backing and batting and ready to go on the longarm.

Then I caught a new glimpse of the supplies for this one and I just had to pull it out and work on it.

The supplies included two charm packs of coral solids that I got on sale for less than $5 each. I had cut four fabrics from my stash to have enough for the pattern. Speaking of that, the pattern was only a magazine ad for a fabric line from 3 years back and I couldn't find the actual pattern for it. Fortunately, it was a simple thing to see that I just needed half-square triangles and blocks with two snowballed corners.

The background fabric was from my stash, a print with a little basket-weave look to it.


As usual, my camera colors are off - this is much too orange. Think pink!

I used a new pantograph for the quilting pattern - hearts! and used pink thread top and bottom.


I had originally planned to bind with the same fabric as the outer border, but it just looked unfinished. So I pulled out a red and white stripe and I am SO glad I did.


This is a 52x60lap quilt that will be an engagement gift.

Ddd


Posted by studio3d@ccgmail.net at 3:14 PM PDT
Thursday, 25 June 2020
Wild Goose Chase
Topic: Quilting

More play with the orphan block bin....

First a peek at the final result and then a step-by-step on the source of the blocks used.

This is a smaller lap quilt which could be a wall hanging, too.


The starting point for this was the center block. The orphan bin also contained some leftover strip sets from the same source.


This was the source of all those dotted fabrics - From October 2015:


One of the blue blocks was what I had on hand


Then I matched in some half square triangles


Which were orphans of this quilt from Debember 2015


This quilt is ALL half square triangles and I used both the red/tan and the green/tan combinations.


I kept pulling scraps from the leftover 2 1/2 inch strips bag to build the size with borders upon borders.

When I got to a reasonable size I didn't want to put on a big clunky border so I found some fabrics that came to me from my sister's stash and played with my new Accuquilt cutter to create a bunch of flying geese. These were arranged going in one direction so they chase around the quilt.


Yesterday's quilt border leftovers provided the fabric for the striped binding. (In turn, the cut-offs from the backing on this one provided the binding for that one.)

Quilting is done using a pantograph that mimics the flowers in the dark bordering strip (and spacing pieces toward the center).

This was made in the "add a little and set aside till the next idea comes" manner and I quite like the final result.

Ddd


Posted by studio3d@ccgmail.net at 8:37 AM PDT
Wednesday, 24 June 2020
Random Nature of Things
Topic: Quilting

As long as I have been quilting (not quite 10 years) I have been saving the leftover blocks from quilts I have made. Sometimes it was because the pattern changed along the way so I didn;t need all I had made, sometimes the process of making the block made more than the pattern called for.

I keep all of these in a case labeled 'Orphan Blocks' although it sometimes contains strips sets that were sewn but not needed or parts of blocks.

I decided to sort through that bin and start with a block as the focal piece and then build around it with other blocks, partial blocks and strip sets that either used the same fabric or was coordinating in color combinations.

This is the first one I completed. After the main image I will show where the original blocks came from and note their vintage!


The feature block in the center came from the same original quilt as the diagonal stripes.


These were leftover parts from a Celtic Knot quilt I made in April 2012.


The white block with the cathedral window was part of the border.


The angled stripe blocks werepart of what made up the knots.


When rummaging for coordinating bits I found some that originated in this Quilt made in May 2014.


Parts that came from this were used here in the new quilt:


I used leftover 9-patch blocks to make faux cathedral windows to mimic the center block.

The borders around the center block came from leftover strip sets.


All of that green background was also salvage. A local lady was a manufacture's representative who had 'books' of fabric samples to take to the fabric stores so they could order stock. When those books were outdated she would put them in a big yard sale and sell the swatches by the pound. The swatches were all random sizes so I used my Accuquilt to cut standard 6.5 inch blocks.

You can see that the angled stripes were not large enough so I framed them in the same fabric used on the cathedral blocks. That framing fabric is the WRONG side of fabric recently used on the All-American Style quilt made earlier this year.

I quilted the green background with leaves and vines and also carried that in a more linear fashion into the strips bordering the center block.

The cathedral squares got some echoing curves and straight line quartering. I used a looping meander around the center cathedral block.


And there you have it - my first orphan block recovery project.

Ddd


Posted by studio3d@ccgmail.net at 10:21 PM PDT
Thursday, 4 June 2020
All-American Style
Topic: Quilting

This was an easy quilt to name. Pattern is a tutorial from Missouri Star Quilt Company called 'Turn Style'. Fabrics from my stash in red, white and blue. Fabric with historic American flags all over makes up the border and the cornerstones. Quilted with stars in bright yellow thread. It all came together as All-American Style.

The block pattern is a disappearing hourglass that starts with two ten inch squares - stitch, whack, stitch, repeat... Made in two color combinations and assembled by alternating the directions, separated by gold sashings.


Isn't that flag fabric neat? I wish I had bought much more of it when I was it originally. But I can't find it anymore.

I wanted the quilting to be noticable so I used bright yellow thread and stitched stars and swirls to stay with the patriotic theme.


The colors appear brighter than they actually are in this photo. I used the same blue for the binding.

Ddd


Posted by studio3d@ccgmail.net at 9:19 AM PDT
Monday, 25 May 2020
Ninty Eight Point Six
Topic: Quilting

On Facebook I got notification through one of the quilting groups I am on that a lady was sponsoring a 'quarantine quilt-along'. She would provide the pattern and do periodic instructions throughout the day. We would follow the directions and do our piecing between her live broadcasts.

I chose to pull black-and-white fabrics from my stash along with a fabrics I have disliked since the moment it came to me (from a grab-bag my sister-in-law got at an auction). Very strange piece.

My quilt ended up at 49 x 65.


Over 6000 people world-wide participated in the quilt-along.

So I finished this up today on the longarm machine. I used a pantograph of large flowers with cream thread. It doesn't put up too much contrast on the darker fabrics.

I chose a black on white dot for the binding.


Not my usual style at all. But there was no telling what the result was going to be before we started.

Because it was a quarantine quilt I named it Ninty Eight Point Six.

Ddd


Posted by studio3d@ccgmail.net at 8:30 PM PDT
Friday, 22 May 2020
Betty's Love Of Cabins
Topic: Quilting

A few years back our group was given a whole lot of fabric by the family of a lady who had passed away. Her name was Betty. We've all been using it and we refer to the results as 'Betty Quilts'.

One of the fabrics I took was printed with blocks of faux applique. I used some in a quilt before but I had 13 of the applique prints left. I cut them down to use as centers in 12" blocks created by adding three rounds of scrappy log cabin strips (cut using a friend's die cutter).

Twelve of the resulting blocks were sashed together with a dotted fabric and then I used more Betty fabric for the outer borders.


The over-arching theme of these fabrics is 'hearts'. So after I had quilted around the motif in the applique blocks, the applique blocks themselves and the sashings, I quilted free-hand hearts in all the outer borders.


Then I found the perfect fabric for the binding in my sister's stash - the perfect blue with little irregular hearts.

This will go to the hospital for their Passages program.

Ddd


Posted by studio3d@ccgmail.net at 6:14 PM PDT

Newer | Latest | Older