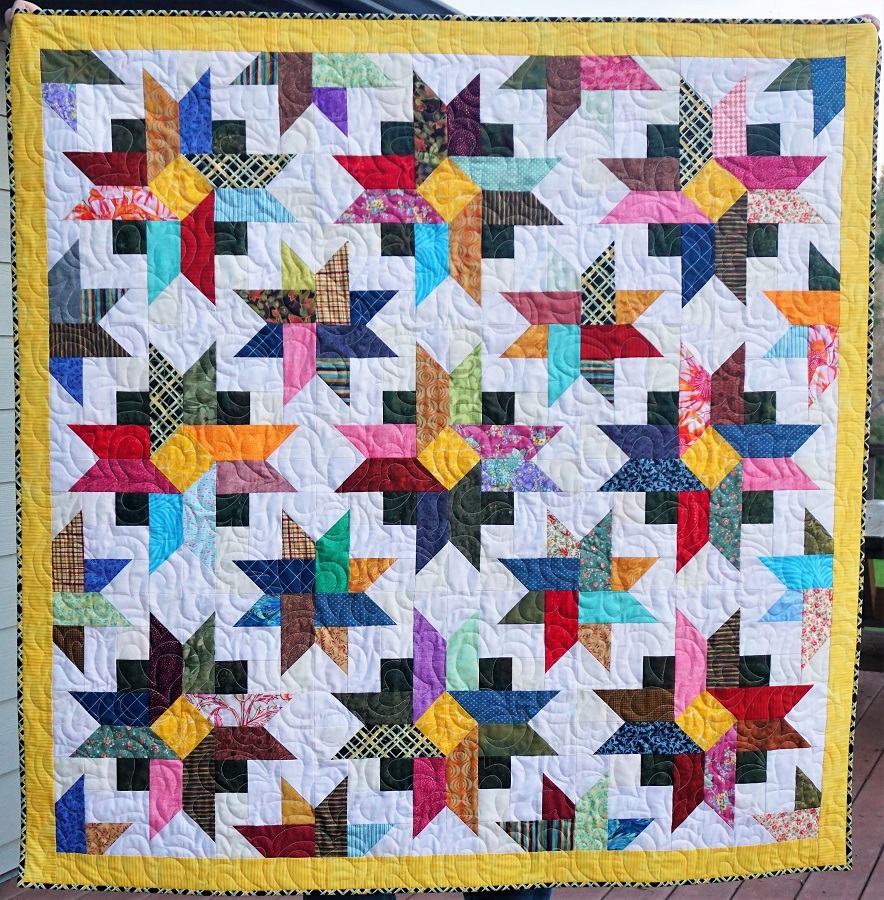
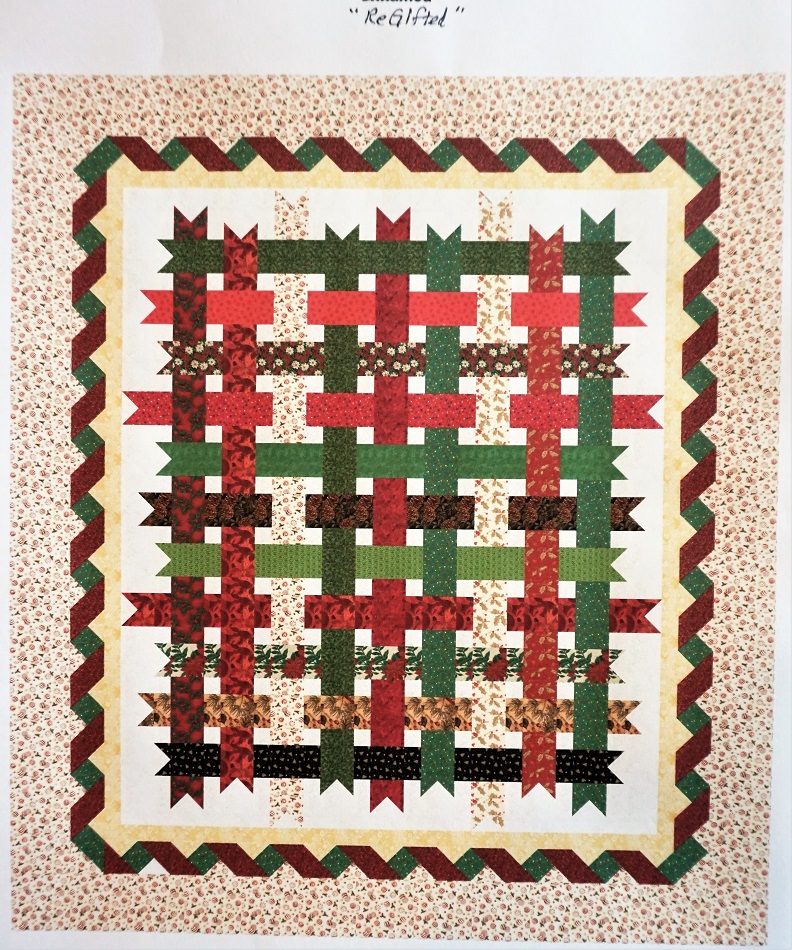
« February 2022 »
S M T W T F S
1 2 3 4 5
6 7 8 9 10 11 12
13 14 15 16 17 18 19
20 21 22 23 24 25 26
27 28
You are not logged in. Log in
Entries by Topic
All topics  «
3D paperwork
A - Z challenge 5
A - Z challenge 7
A - Z challenge round 4
A to Z challenge round 3
A to Z round 2
A to Z round 6
A-Z round 1
Around the House
Art Challenges
Artist Trading Cards
Backgrounds
Beads
Bible Journaling
Books
Boxes
Collage
Color Challenge
Coloring
cookbook
Die Cuts
Digital Projects
Digital Stamps
Drawing
Dry Embossing
Fabric Stuff
Fantastic Folds
Field Trip
Home Decor
How Does Your Garden Grow?
Hymnal Art
In The Kitchen
In the studio
Jewelry
Lettering
Links
Multi-Technique
Music to Work By
Musings
Nail Art
New Work
Online Class
Other Hobbies
Other Projects
Painting
Paper Embroidery
Paper Piecing
Photo
Pretty Paper
Quilting
Random
reading
Scrap Recovery
scrapbooking
Sewing
Sketch Challenge
Some Backlog
Stamping
Stencils
Stickers
Supplies
Teabag Folding
Techniques
Testing
tips and tricks
Tutorial
Web resources
Welcome to my Blog
Work By My Friends
workflow
Writing
Blog Tools
Edit your Blog
Build a Blog
RSS Feed
View Profile
Group One
In & Out of Studio 3D
Friday, 4 February 2022
Doing What I Am Supposed To Do
Topic: Bible Journaling

 I'm finding that the scriptures selected for the class Seeing the Scriptures have often already been journaled in my bible. I have been working around this in three ways: 1) work in my interleaved bible 2) make a tip-in page for my most used bible 3) add more art to a page that has already been used.

For this page I used the third option. I only had fancy lettering of the scripture in the left margin. I added a simple illustration over the text to show how the scripture can be applied in my own life.


The illustration is done with Micron pen and I added just a bit of shading on the left bottom and around it with a regular graphite pencil. I smudged it a bit with my finger for blending.

Easy Peasy!

Ddd


Posted by studio3d@ccgmail.net at 12:01 AM PST
Thursday, 3 February 2022
Hope In Him
Topic: Bible Journaling

I started another online class called Seeing the Scriptures. It teaches a way of doing study on your selected verse, working through a process of 'headwork', 'heartwork' and 'artwork', to guide toward designing something that is an artistic representation of that verse.

It can be applied to any art venture - jewelry, painting, quilting, or bible journaling.

In the first homework lesson we did the study on Isaiah 40:31. In my prior work with this verse I did the 'expected' bald eagle flying through the mountains.

This time my study led me to focus on having HOPE in God and how that gives us strength.

I wanted to incorporate the word into an EKG strip so used a piece of graph paper printed with pink and added light brown very thin lines to make the grid smaller. After doing the heartbeat and lettering I cut the strip and tore off the ends like one would see in the doctor's office.

I glued this into the bible and added the rest of the phrase in black pen.


I did a little shading on the right and borrom edges to make the strip look more dimensional.

Ddd


Posted by studio3d@ccgmail.net at 1:54 PM PST
Wednesday, 2 February 2022
Let's Meet At the Cabin
Topic: Quilting

When you work on two quilts at a time the finish of the second one comes quickly on the heels of the first.

I actually cut the pieces for this quilt a couple of years ago when I had borrowed an Accuquilt cutter from a friend along with a few of her dies. I cut two full sets of Log Cabin strips then divided them up so I had one set of blocks with a 6 inch center wrapped with cabin strips. I made another quilt using 6 inch log cabins bordered with wide strips to make 12 inch blocks.

Then I had left this set of 12 inch log cabin blocks - enough for 12 blocks.

Although it made for a smaller quilt I decided to butt the blocks tight together rather than using sashing. Then I finished it off with a 3 inch border.


I didn't realize until I went to store it for later giving that all three of thelast quilts I've made have yellow borders!

Because this is a traditional pattern I gave it traditional quilting using a feathered pantograph.


The entire quilt is from scraps in the stash.

Ddd


Posted by studio3d@ccgmail.net at 3:32 PM PST
Tuesday, 1 February 2022
Crystal Doorway
Topic: Quilting

Are you old enough to remember those beaded burtains that were popular in the 1960s?

Missouri Star Quilt Company shared a tutorial on a quilt called Chandelier that certainly had that vibe for me. I pulled fabric scraps from my stash for this and used a cotton/poly blend in taupe for the background (left over from sister's stash passed down to me).

I was excited to be able to use my new Accuquilt setting triangle dies until I realized the quilt blocks were 8.5 inches. The setting triangles I have are for either 8 inch or 9 inch blocks. I just used the 9 inch set and trimmed the whole quilt edge before adding the border.


I used a semi-floral pantograph for the quilting.


This whole quilt has a fresh, modern vibe.

Ddd


Posted by studio3d@ccgmail.net at 12:01 AM PST
Monday, 31 January 2022
Revisiting Four Old Artworks
Topic: Bible Journaling

I have been gradually taking photos of my old artwork and adding it to my interleaved bible along with writing out scriptures to accompany them.

Today I have four to share:

This acrylic painting is one I did while I was in high school art class. The subject is the farm that was across the field from our home in the country. I paired this with Jeremiah 29:5


Next is also an acrylic painting from the late 1970s. I painted this for my boyfriend (now husband) as he attended WAS, the home of the Cougars. Genesis 1:25 is its scripture.


Psalm 3:4 goes with this watercolor of Mt. Hood I painted in the 1980s.


and finally is this pen drawing of a church in Balderson, Ontario, Canada. I used Distress Inks with stencil brushes to add colors very lightly. Psalm 122:1 suited this perfectly.


I will continue to add photos of old works as I come across them again.

Ddd


Posted by studio3d@ccgmail.net at 12:01 AM PST
Updated: Monday, 7 February 2022 7:15 PM PST
Tuesday, 25 January 2022
Colored Pencils on Vellum
Topic: Bible Journaling

The last class in Colored Pencil Jumpstart ended with us back in our bibles.

We stamped an image on vellum then colored white and other light colors from the back followed by brighter colors on the front, leaving the back colors showing through for highlights.

I did not have any stamps like what the instructor was showing so I elected to stamp with a wood-mounted maple leaf image. I made a border down the right side of the page with them.

Oh how I love the blended colors in these leaves.


I trimmed the page to size and lettered the scripture before using tape runner to tip it into the gutter.

Ddd


Posted by studio3d@ccgmail.net at 12:01 AM PST
Monday, 24 January 2022
Vellum with colored pencil

The last class in the Colored Pencil Jumpstart taught how to use white colored pencil on the back of an image stamped onto vellum before adding color to the front.

I did not have any images similar to the ones the instructor was using so I just went with ones I had that I thought would benefit from some bright white highlights.


I made cards out of both images.


Really pleased with both of these projects.

Ddd


Posted by studio3d@ccgmail.net at 12:01 AM PST
Thursday, 20 January 2022
Birds of the Air
Topic: Bible Journaling

For the Colored Pencil Jumpstart class the assignment was to use powdered lead from the pencils with blending solution to create a page in our bible.

I didn't want to work directly on the page in case it did not work like I wanted so I worked on a piece of Tomoe River Paper which is about the same weight/translucense as bible paper. I stamped an image on plain paper and placed it behind this blank sheet then dipped a cotton swab in the blending solution and into the ground colored pencil powder before coloring in the image I could see showing through.

When I was done I cut the page to size and lettered the scriptures (paraphrased) before tipping in the page using tape runner.


This was a great solution to having already journaled other scriptures on both facing pages where this passage was contained.

Ddd


Posted by studio3d@ccgmail.net at 12:01 AM PST
Saturday, 8 January 2022
Powdered Color
Topic: Online Class

The Colored Pencil Class lesson done today is with powdered color.

In order to get the powdered color the pencil is scribbled over the inside of a fine-weave tea strainer. This scrapes off the color from the lead in very fine colored dust. The color is then spread onto the paper with a cotton ball.

Multiple colors can be blended and the color can be erased away if you have too heavy of application.

My homework piece is a full sheet in my sketchbook - a field of wildflowers. 


On this piece the cloudy sky and the basecoat for the field were done with the powdered color technique.

Direct application of colored pencils was used for the trees, grasses and flowers.

I used the information from the class on using lighter and duller colors in the distance and brighter colors in the foreground.

I wish I had used a duller color for the trees as they seem to stand out too much.

Ddd


Posted by studio3d@ccgmail.net at 5:30 PM PST
Thursday, 6 January 2022
That Old Black Magic
Topic: Online Class

Today I started working again on online classes I have registered for, some started, but had gotten sidetracked on. I decided to jump into the one I was farthest along in.

This class is Colored Pencil Jumpstart from art-classes.com and the lesson (#6) is called Black Magic.

It uses transparent colored pencils applied over white colored pencil on black cardstock. Instead of coloring in darker on the shadows you apply white heavier where you want the brightest highlights and lesser where the shadows would be. Then the colored pencil goes on over top of it using an even pressure.

Magically, you get gradations of color on your black paper.

The first I did was this pear which was first stamped in Studio G white pigment ink.


Then I colored this hummingbird with flowers.


The black cardstock I used kicked back a lot of light reflection so you lose some of the effect. But it turned out nice enough that I used this second one in my devotional book for today.

Ddd


Posted by studio3d@ccgmail.net at 9:34 PM PST
Wednesday, 5 January 2022
A Clean Heart
Topic: Bible Journaling

TWO pages in one week? Astounding!

I have journaled this verse once before but it was done in my interleaved Bible a couple of years ago. For this page I scrolled through Pinterest for ideas and combined several to get a layout for my page.

The bubbles are one design, the heart design from another with coloring from yet another, a wooden washtub was refashioned into a metal bucket.

This is all done with Prismacolor colored pencils.


The lettering is freehand in a semi-script style using Prismacolor marker.

Ddd


Posted by studio3d@ccgmail.net at 12:01 AM PST
Monday, 3 January 2022
A New Thing
Topic: Bible Journaling

Loooonnnnggg time since I have done a bible journaling page! Last year I focused on a devotional book (100 Days of Bible Promises), on scripture writing using the names and attributes of God, and on verse mapping, also on names of God. That didn't make for good blog posting material, though.

I plan to do at least one bible page a week this year and started with Isaiah 43:18-19: "Forget the former things. Do not dwell on the past. See, I am doing a new thing! Now it springs up; do you not perceive it?"

This seems like a good focus for the new year after the world-wide trials of the past two years. Keep looking forward - God has good things planned for us!


I incorporated fireworks to celebrate New Year's because the neighbors always keep us awake half the night on New Year's Eve with the noise (all illegl, of course). I found a simple set of drawing instructions for these three styles of explosions. Then I used colored pencils over the black ink.

The lettering is a very casual style that I taught online a few years ago to a small Facebook group.

Ddd


Posted by studio3d@ccgmail.net at 6:09 PM PST
Friday, 31 December 2021
Blackjack Finale
Topic: Quilting

OK, that's a strange name for a quilt, right? I tried all sorts of 'star' related phrases and couldn't find nything that appealed to me. But, I worked hard on this for the past two days in order to get it completed before the end of the year.

So it turns out this was the very last quilt of 2021. Blackjack is the game of 21 so I put the two together and came up with Blackjack Finale!


The pattern for this is called Daybreak by Cozy Quilt Designs. The pattern calls for the two strips that make up each right angle to be matching but I wanted to use up scraps of leftover 2.5" strips in my stash so I made all the cuts totally scrappy.

This will go to the hospital for the Passages program.

Ddd


Posted by studio3d@ccgmail.net at 5:19 PM PST
Friday, 26 November 2021
Re-Gifted
Topic: Quilting

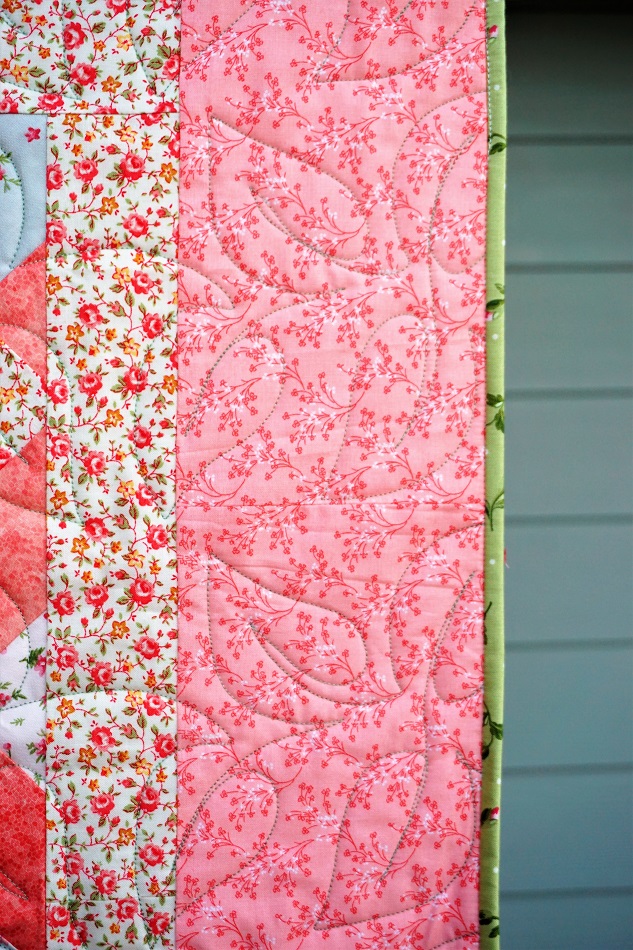
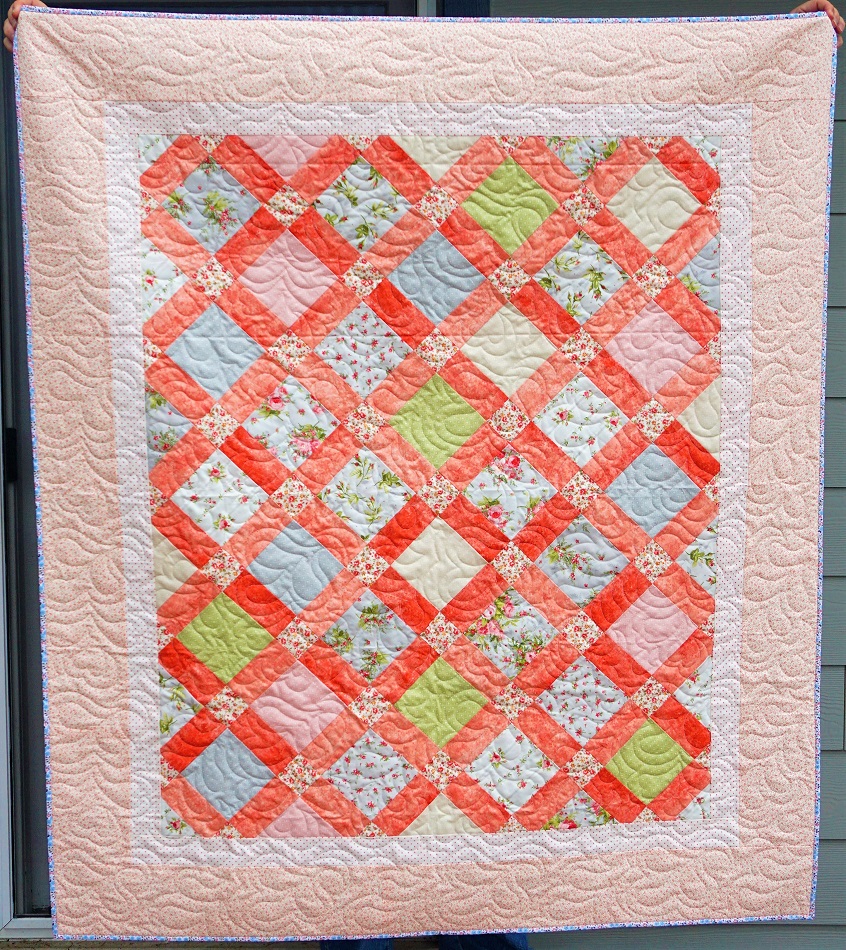
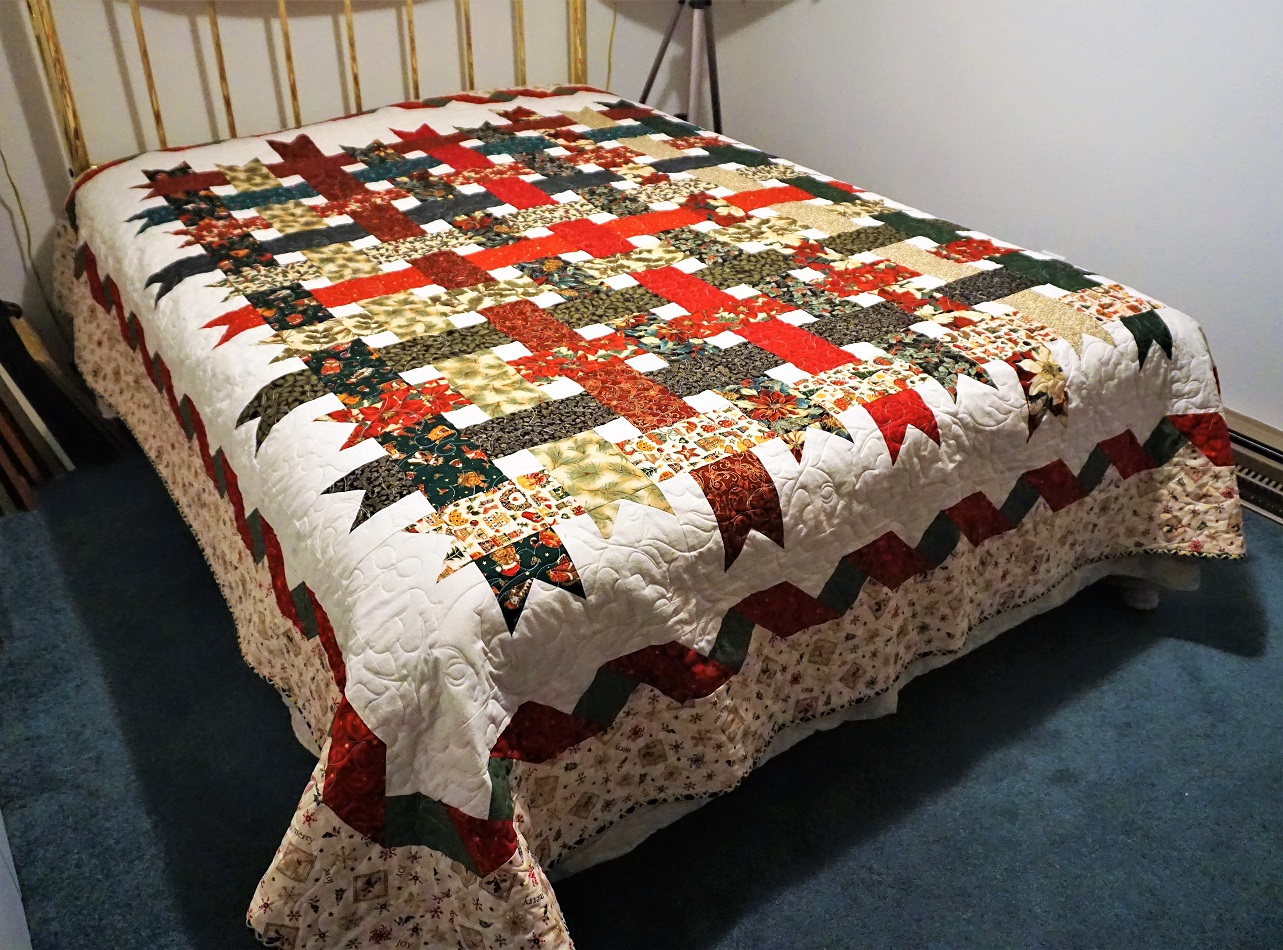
RE-GIFTED is the name of this Christmas quilt made from a fat-quarter pack gifted from my sister to our brother and sister-in-law. I added more Christmas fabric from yardage left to me from her stash (for background and borders) and gifted the completed quilt back to the couple.


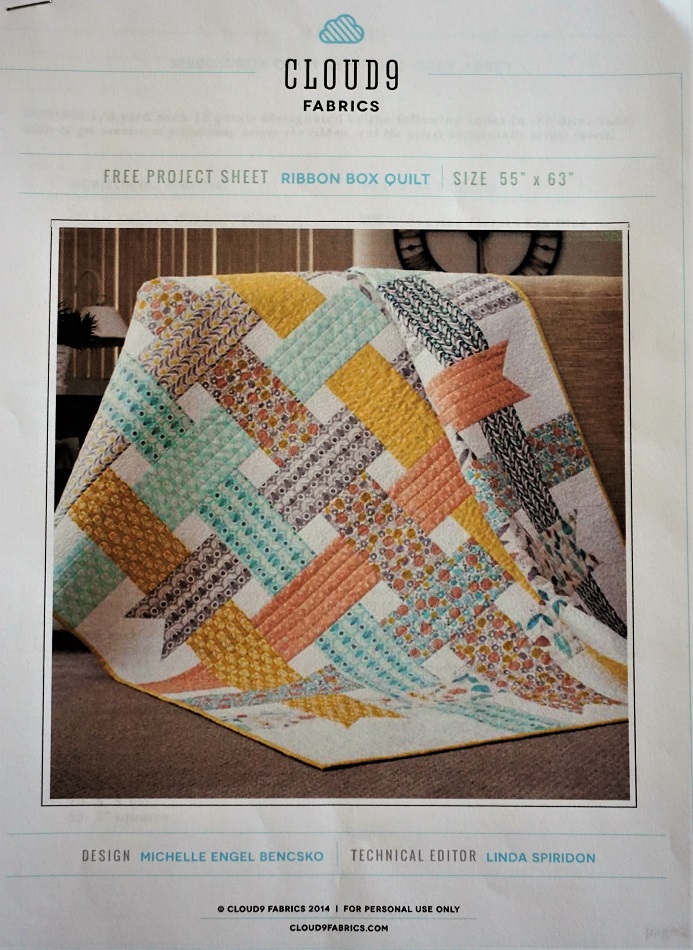
I was inspired by a free pattern from Cloud9 Fabrics called Ribbon Box Quilt ©2014 . It is for a 55 x 63 throw.


The challenge came when I was asked to make a Queen Size quilt and was provided with 20 fat quarters of Christmas fabrics. In order to have enough of each individual fabric to complete each ribbon span I had to adjust the width of the ribbons in the pattern by 1 inch.

I also changed the layout so all of the ribbons would have tails instead of butting some against the border.

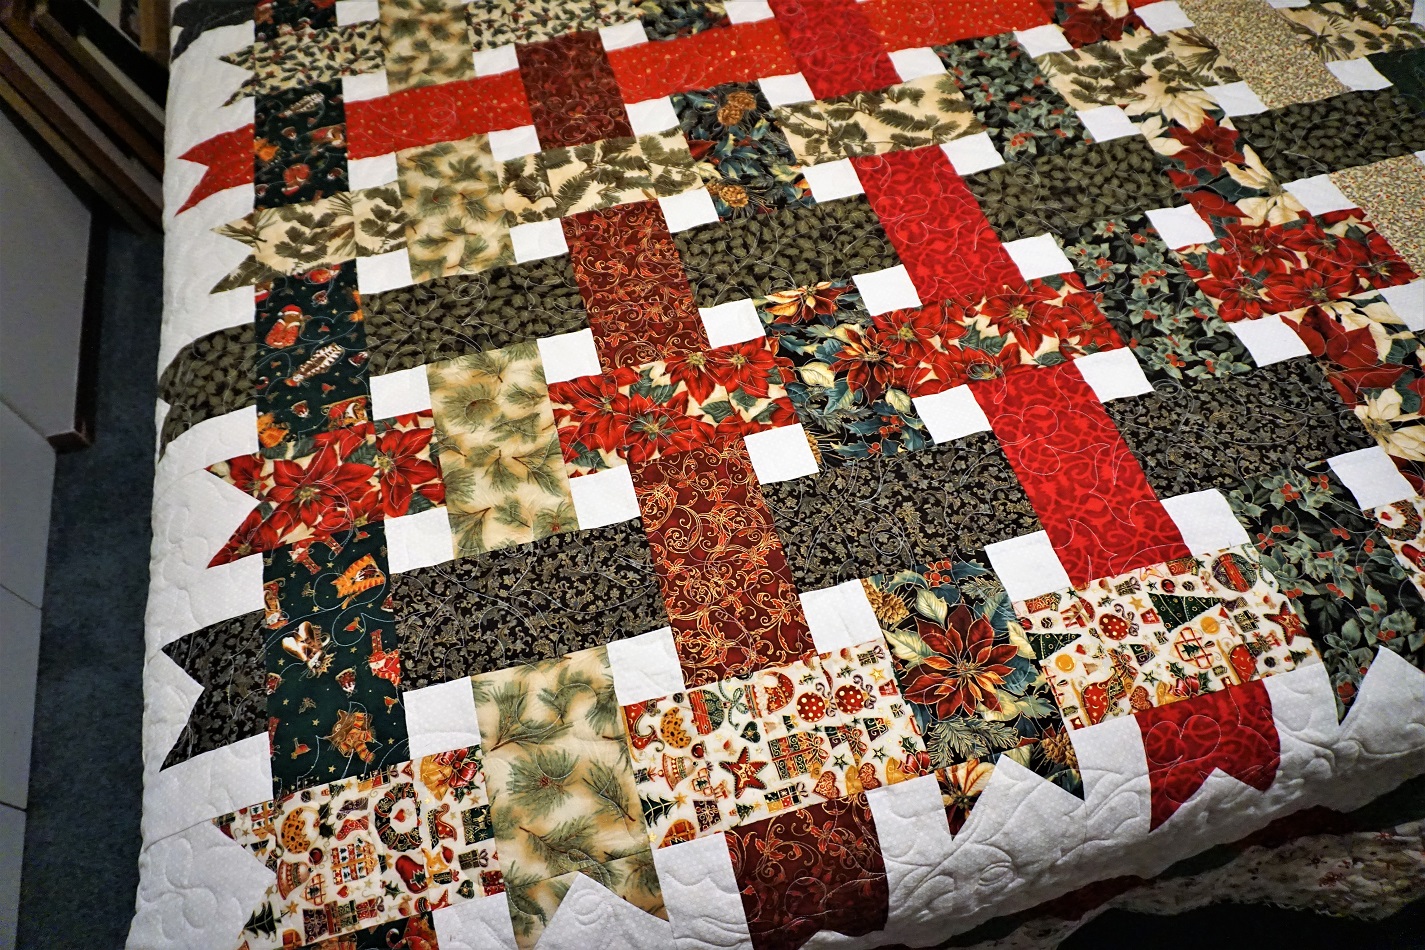
I used 9 ribbons vertically and 11 ribbons horizontally and all of them are 4 inches wide (finished). With every end having a tail section 6 inches to the inner border the center section of the quilt is 64.5 x 76.5 unfinished. This is followed by a 2 inch finished background border then a twisted ribbon border 4 inches wide (finished) and a 7 inch outer border. On the twisted ribbon, the inner edge matches the background and the outer edge matches the outer border. The quilt finishes at 90 x 102.

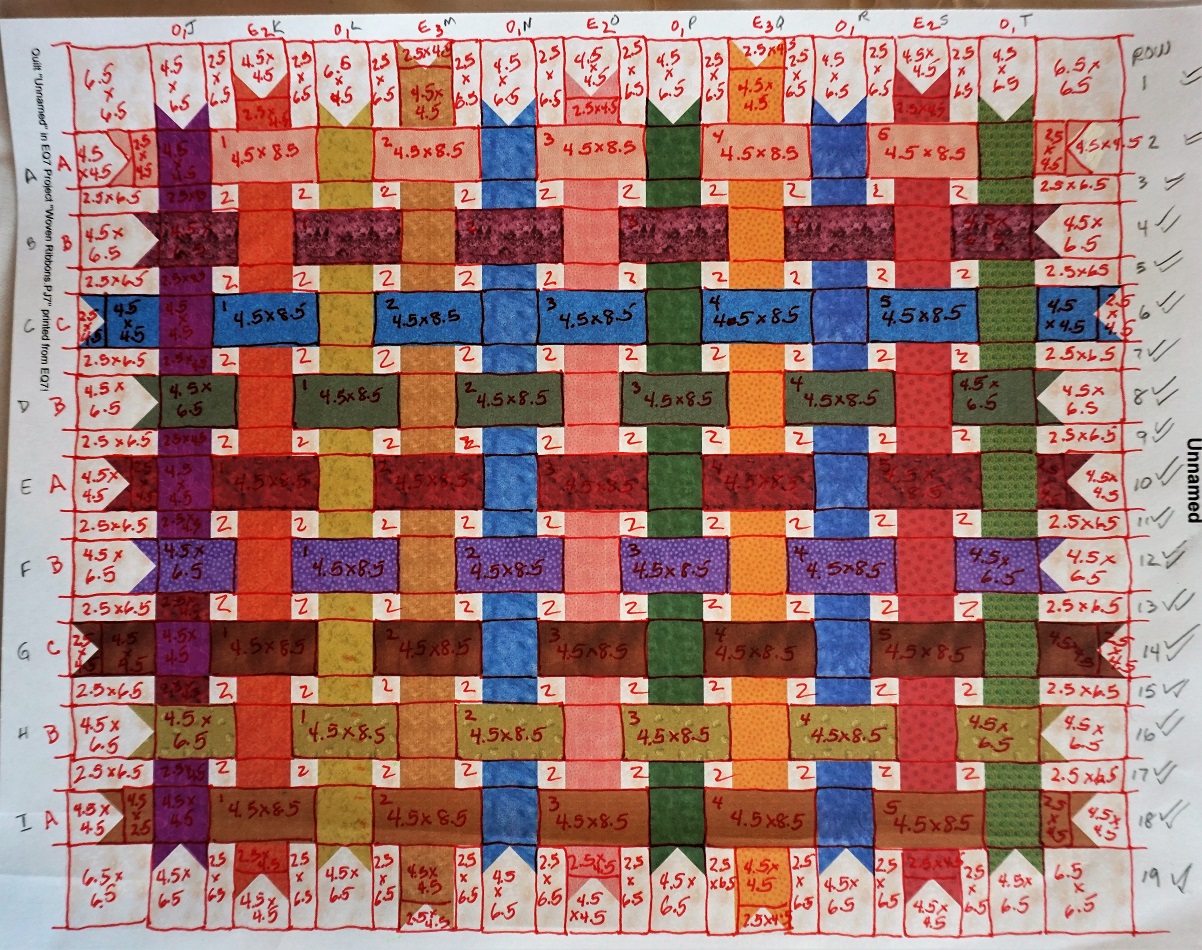
Here are my notes (to myself). First, note a section of assembly from the Ribbon Box Quilt. The quilt is assembled row by row rather than block by block in order to create the woven effect.


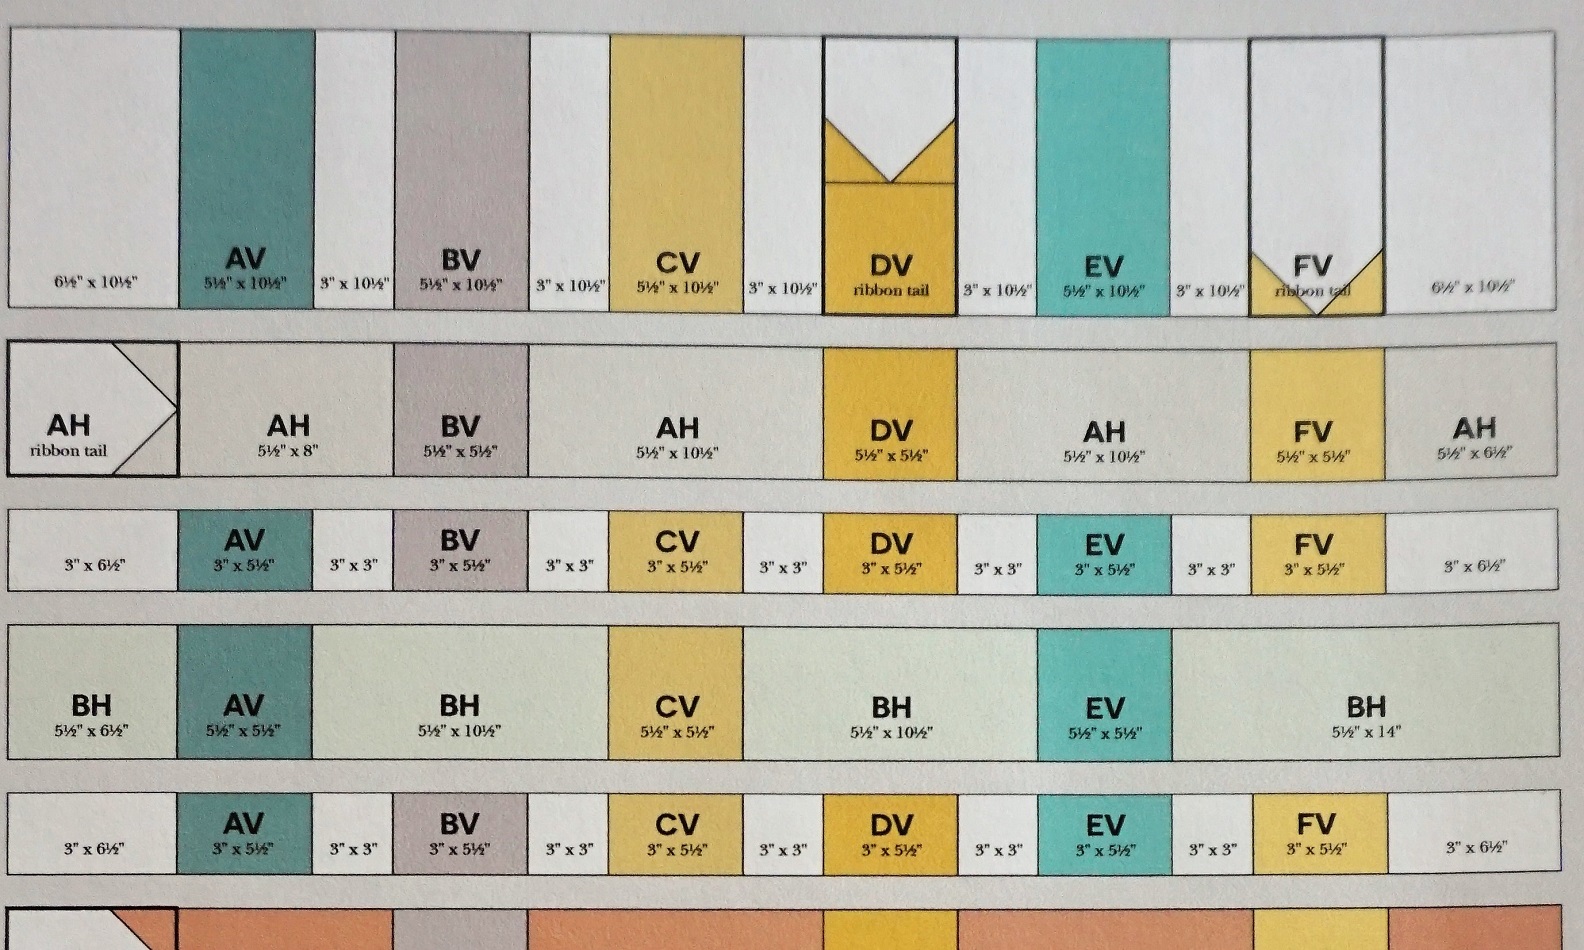
I created my desired layout in ElectricQuilt7 and then did all the piece divisions and measurement notations in red ink before making my list of fabric cuts. Note that I constructed my quilt as a horizontal layout so I would have less rows to assemble.

The PENCILED letters in the border denote the FABRIC (A – I horizontally and J-T vertically) The RED letters in the margin denote the ribbon tail style that will be on each end (A, B, C in the horizontal and O1, E2 and E3 in the vertical). The penciled numbers in the right margin are the row numbers used in assembly.

Note that there are three styles of ribbon ends. Style A (also used as E2) is a 4.5 background with 2.5 ribbon color used to snowball two corners. This is attached to a 2.5 x 4.5 ribbon color. Style B (also used as O) is a 6.5 x 4.5 background snowballed on two corners with ribbon color. Style C (also used as E1) is a 4.5 x 2.5 (unfinished) flying geese unit with background as the large triangle and ribbon color as the two corners. This is attached to a 4.5 x 4.5 ribbon color.

In short, row 1 and 19 are 6 inches wide (finished). Ribbon rows (even numbers) are 4 inches (finished) and intervening odd rows are 2 inches (finished). These intervening rows are the background areas that allow the ribbons to cross with space between them.


Here is the plan with all of my notes:


This plan told me how many cuts of which size I would need for each specific fabric.


This is my cut sheet:


Try to match these cuts to the previous diagram before YOU do any cutting.


ASSEMBLY:

Assemble in long horizontal rows, then stitch rows together to form the quilt center. You could stop here and have a 64.5 x 76.5 throw or add a single border to match the background for a little bigger.

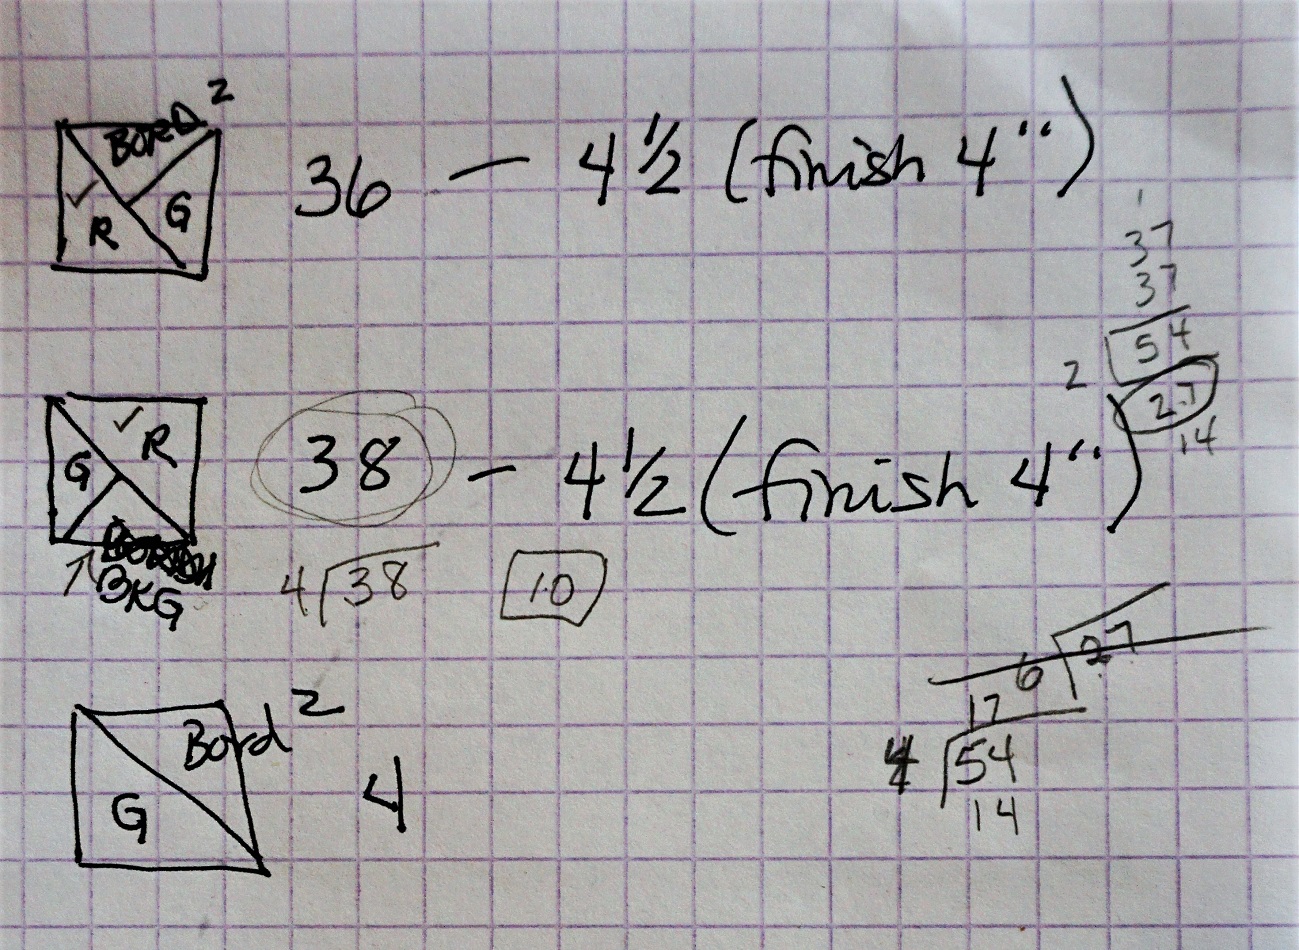
I added a 2” (finished) border similar to background all the way around. This allowed me to create the twisted ribbon border in 4 inches and come out even at the corners. To do this, you need 36 ‘outward facing’ units in which the red is the half-square triangle, the green is a quarter-square triangle and the last quarter-square triangle matches the outer border. You will need 38 ‘inward facing’ units with the same red and green parts but the last quarter-square triangle matches the inner border. There will be 4 corner units of half-square triangles of green and the outer border material. The following illustration shows the assembly of these: (ignore my scribbles where I checked my math!!)


Here is my final working diagram and illustrates the layout of the ribbon border blocks so the corners come out right:


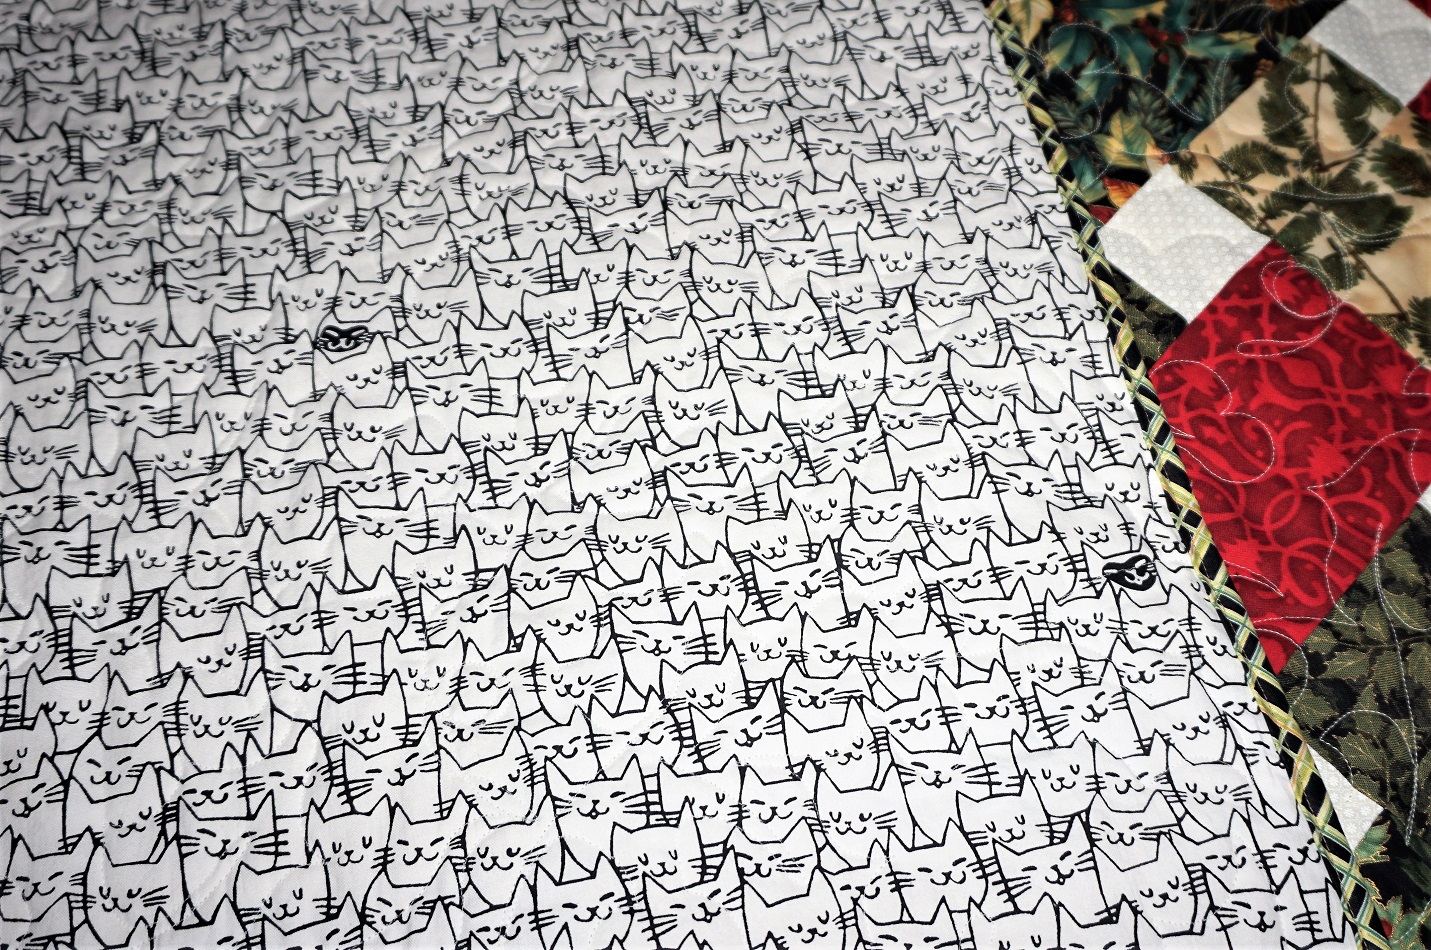
I added a cute cat background for the kitty-lovers who received this quilt. The binding is a diagonal plaid.


Final notes:

  • ·         Center section uses 20 fat quarters plus background (I don’t know yardage for background)
  • ·         2 inch border used same as background as well (or something very similar). Will need some of same for insets in twisted ribbon border.
  • ·         No estimate of yardage needed for red and green units in twisted ribbon border.
  • ·         No estimate for yardage needed for 7 inch outer border (plus insets into the twisted ribbon border)
  • ·         Don’t forget yardage for binding

eH


I WILL NOT BE ADDING INFO, DIRECTIONS, MEASUREMENTS, TO THIS. BASICALLY, I MADE THESE NOTES TO MYSELF ON A ‘WHAT DO I NEED NEXT’ BASIS AND THEY ARE WHAT THEY ARE. SINCE I WORKED FROM A PUBLISHED (ALL-BE-IT FREE) COPYRIGHTED PATTERN, I AM HESITANT TO BE MORE SPECIFIC.

THANK YOU FOR UNDERSTANDING!


Posted by studio3d@ccgmail.net at 1:04 PM PST
Tuesday, 28 September 2021
Better Call Orkin
Topic: Quilting

A couple of years ago I did not own an Accuquilt fabric cutter but a friend did. I asked to borrow it for a bit and she agreed (she's a VERY good friend). While I had the use of her Log Cabin die I cut two full sets of the strips needed to make 12 block quilts. I set aside one set to make the prescribed 12" blocks but divided the other set to make two other quilts.

The first one included some 6" fussy-cut centers around which I built the log cabin out to the 12" size. The rest of the log cabin strips went into this quilt in which I built the scrappy 6" block center and then used a 3" wide frame to complete the blocks up to 12".

I sashed the blocks with bright red and added bright yellow cornerstones.


So how did the quilt get such an unusual name? Well, I looked and looked for a great backing for this quilt and found a bunch of yardage in my late sister's stash: black with ladybugs all over it. I thought it was cute but my mom thought it would be creepy to have bugs crawling all over a quilt. The thought of little log cabins intested with bugs made me laugh and led me to the quilt name: Better Call Orkin.

I quilted this with Bountiful Feathers pantograph in gray thread and added a lighthearted red striped binding.


Ddd


Posted by studio3d@ccgmail.net at 7:50 PM PDT
Monday, 27 September 2021
Patriot's Trail
Topic: Quilting

Finally! It's something totally different!

I borrowed a couple of Accuquilt dies from a friend and cut all the parts for two quilts. One of those was the Drunkard's Path die I used for the Nebraska, In Plane View quilt.

The other die was for the Snail's Trail block with which I cut all the parts for a very scrappy red, white and blue layout. Many of the fabrics were from my sister's stash. She had quite a collection of red-and-white and blue-and-white prints.

I used three borders - red, blue and white with gold stars.


I quilted with a pantograph of swirls and stars using a verigated blue thread.


Because of the colors used and the block name I am calling this quilt Patriot's Trail.

Ddd


Posted by studio3d@ccgmail.net at 8:36 PM PDT
Friday, 24 September 2021
GreensLeaves
Topic: Quilting

The finale of the Magical Squares quilts brings us to this one that has some distinguishing features.

First of all, by the time I got to the laying out of this one, I was pretty tired of the same old thing so I rotated some of the blocks in the initial layout but did all the other steps the same. This resulted in some diagonal lines in the final arrangement.

I used up a lot of the greens from the charm square packs and got so wrapped up in the twists and turns that I missed the fact that some of the greens were clumping up until I was ready for the borders.


When I got ready to quilt it I decided to enhance the greens so I used a green thread with a pantograph of leafy vines.


As a final touch I pulled a green floral for the binding.

All this together led to the naming of the quilt "GreensLeaves".

Ddd


Posted by studio3d@ccgmail.net at 7:53 PM PDT
Wednesday, 22 September 2021
Peaches and Cream
Topic: Quilting

I realize these Magical Squares quilts are probably seeming to be a little repetitious, but after this there is only one more and it has a real twist to it.

Today's quilt (Peaches and Cream) is most like Rosy Posies but, from the charm squares I used only florals with colored backgrounds and some prints with solid colors that incorporated dots. The sashings and cornerstones are the same on both but the inner border on this one is a polkadot where the other was a busy floral.


Here is a view of the charm squares


The other project had quilting with a floral pantograph while this uses one called "Maidenhair" which is an open style of echoed feather.


I used that small floral again for the binding.

Ddd


Posted by studio3d@ccgmail.net at 5:40 PM PDT
Tuesday, 21 September 2021
All Sorts
Topic: Quilting

Hello Friends!

I’m back with the next installment of my quilt saga. This is another of the Magical Squares pattern with a totally different look to it.

I used different selections from the charm packs, including more of the blues and greens as well as pinks rather than the apricots. There are also more checkered prints instead of all florals and I went with black sashings (with rosebuds) for a greater contrast.


This really reminded me of a mix of licorice candies called All Sorts, so that became the name.


I used the Bountiful Feathers pantograph and pink thread for the quilting. It also got a tiny floral print for the binding which matches the pinks, blues and white in the quilt.


Ddd


Posted by studio3d@ccgmail.net at 11:00 PM PDT
Friday, 17 September 2021
Rosy Posies
Topic: Quilting

Did I mention before that during the February ice storm and power outage I cut out all the parts for SEVEN of the Magical Squares quilts? Not only that, but when I started piecing them I worked on them in lock-step - finishing step one on all of them, then step two on all of them, and so on. So all of the seven tops were finished at the same time. This kept me from having to figure out each step over and over again as I would if I had done each top all the way through and then started the next one from the beginning.

I made 5 other quilt top designs as well and then went out and bought all the backings for all 12 quilts. This explains how I am coming up with so many new quilts all in a row. All of them were ready to be longarmed and I just had to measure out the batting, trim the backing, and load 'em up.

With that said, today I have complered another of these. When a fabric store was closing out I found a set of floral charm squares I liked. I bought 4 sets exactly alike. So the next few quilts have a similar look as far as the block centers. I changed out sashing, cornerstones, borders, etc so they are not identical. I guess you could say they are 'cousins'.

Today's quilt is called Rosy Posies because of all the focus on flowers that are pinks and apricot - many of them roses.


I used a large flower pantograph and pink threads to quilt it. I ended up needing just a smidgen more pink bobbin thread. I use pre-wound bobbins so I couldn't just wind a new bobbin. What to do? What to do?

I suddenly remembered some of my craft supplies in the other room and found a bottle of alcohol ink in the right shade. I dropped ink onto a partial bobbin of white thread and had an instant match! (not shown in the photo).


I just eeked out enough of the border fabric to make the binding (with about 18 inches left over). I should have named this quilt 'By the Skin Of My Teeth' !

Ddd


Posted by studio3d@ccgmail.net at 5:41 PM PDT

Newer | Latest | Older