Now Playing: 3D squared
Topic: New Work
Yep, it's another square card! These dragonflies come with the full background printed out and then the individual bugs are mounted on top. I love the collage effect of it.
« | November 2007 | » | ||||
S | M | T | W | T | F | S |
1 | 2 | 3 | ||||
4 | 5 | 6 | 7 | 8 | 9 | 10 |
11 | 12 | 13 | 14 | 15 | 16 | 17 |
18 | 19 | 20 | 21 | 22 | 23 | 24 |
25 | 26 | 27 | 28 | 29 | 30 |
Yep, it's another square card! These dragonflies come with the full background printed out and then the individual bugs are mounted on top. I love the collage effect of it.
I made a pair of these ornaments using shiny rayon embroidery thread. The also have gold hangers and I've added sequins by stitching through beads.
This is one of my favorite 3D cards made recently. I mounted it on two layers of scrapbook paper and used gold paint marker to draw vines around the corners as borders. The text sticker is from a sheet of dollar store finds.
Whether you are new to polymer clay or just want to try a new technique, you will find Polymer Clay Central to be a valuable resource. Your visit to http://www.polymerclaycentral.com/masterindex.html#lessonsprojects will take you to their master index of lessons and projects. Categorized by Beginners; Canework; Holiday Ideas; Mixed Media; Faux Techniques; Projects; Sculpture; and Techniques - there is something for everyone.
Above the lessons you will find Articles, book and dvd reviews. If you scroll past these categories and the lessons you will find links to guest chats and interviews with top polymer clay artists. Scrolling WAY down will bring you to Tips and Tricks followed by the results of the monthly polymer clay challenge. You can see some great work here.
Here is another project we will be making at craft night (tonight!)
This kitchen angel is made from One Kitchen Towel, One Dish Cloth, and One Potholder. It is held together with rubber bands and pipe cleaners before decorating with ribbon.
No photo today! I'm sharing a website with you that will kick inspiration into high gear.
Click on http://www.making-greeting-cards.com/ to get started on exploring a site with Lessons, Tips, Supplies, Examples, Versus, Recipes (for art), Printables, Templates, Calendars, and Links: all aimed at helping you make homemade cards.
Warning: don't click until you have a few HOURS to explore. You will get so many ideas you won't be getting anything else done! LOL!
For our Women's Ministries Craft Night I designed this bracelet to be taught to the ladies. It is based on one I saw made commercially but their storyline has been ammended and I chose all new beads.
Each bracelet kit comes with a card to tell the story using the beads: "One night a bright star appeared to shepherds tending sheep in the fields. Three wise men followed it to the birthplace of Jesus, bringing gifts of gold, frankincense and myrrh. Jesus worked as a carpenter and fished for the souls of mankind. 12 men followed him as disciples, learning and spreading the word of Christ. He was nailed to a cross, where He shed his blood for us to cleanse us from our sins. After three days of darkness He arose from the dead and is now in heaven seated with the Father. But He sent his Holy Spirit to be with us. All this he did because of his great love for us."
The yellow roses on this card are 3D and have been layered onto a paint chip sample, then a collage paper, and an embossed gold foil. All of these are mounted on a green cardstock for an all-occasion card.
Not all works of art are created of paper. As evidence of this I present to you this tasteful trio from Saturday's kitchen.
These three handsome pies will make their public appearance on Sunday evening at the pie auction sponsored by Women's Ministries.
Not that he does not appreciate my cooking, but none of these flavors are favored by my hubby, who asks that I bid on and return home with a pumpkin pie - or perhaps an apple crumb.
Here is another of those rare square cards. The stitching pattern is from the book "Classic Cards: 60 Projects for the Discriminating Crafter" (Marrian Piers) and is worked in metallic gold thread on black cardstock.
I used the frame to show off a Christmas carrousel horse and ribbon, both stickers, from the dollar store.
This is such a cute image I had a lot of fun cutting it out. I set it on this scrapbook paper with swirls. I think it looks like swirling snow so I added silver peel-off snowflakes.
The snow on the ground is a torn piece of handmade paper.
Only a few days till Ladies' Fall Craft Night at church. Here is one of the projects I am teaching.
To make this you need: A large pillar candle in a very light color (white or cream), a napkin with an overall pattern, a sheet of waxed paper, a heat gun.
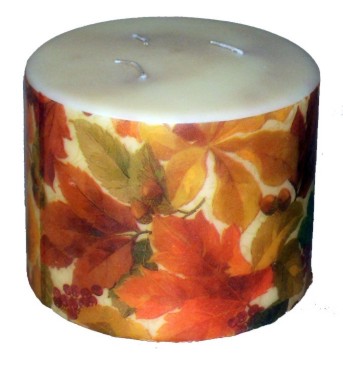
Separate the napkin so you have only the very thin top printed layer. Measure the height of your candle and cut a strip from the napkin the same size. If your piece does not go all the way around the candle, cut another piece (you may have to use a second napkin) to finish encircling it.
Lay the first piece of napkin on the candle, smoothing it to remove any creases and so the top and bottom lay along the edges of the candle. Lay a length of waxed paper over it and pull waxed paper around to the back of the candle holding both ends together so it lays smoothly over the napkin.
Beginning at one end of the napkin use your heat gun to warm the waxed paper. You will see the wax from the paper and the candle melt together and the napkin print will darken. Move on around the candle, melting as you go until you are 'almost' to the end of the napkin.
Wait for the wax to cool and carefully peel away the waxed paper. Lay the other strip of napkin into the blank space, align a NEW piece of waxed paper and complete the melting process. Again, wait for it to cool and remove the waxed paper.
Set aside to cool completely. Then take the leftover napkin (that you peeled away in the beginning) and use it to buff the surface of your candle.
Some rubber stamps just call out to you in the store. This is one I got from the sale bin at a JoAnns a couple of years ago.
I have used it in collage, as a chalked image, colored with markers (here) and colored pencils. I could even use it as a 3D by stamping more than once and using the postage as raised elements. Hmmm, I had better go try that!
These 3D poinsettias work up so nicely - and I love them because they are quick to cut out, without lots of fussy intricate snipping!
This time I used a plaid scrapbook paper for background. Thank goodness for peel-offs. It allows me to put a greeting on a finished card without fear of 'ruining it'!
Oh I love the sites that make 3D images for us to download and print for free! From one I made up this lovely geisha. She prints out with her own background which makes for a nice card without searching for all the accompaniments necessary.
Gold Krylon paint pen is used to border the illustration. I did add a Japanese text print paper as a border and gold peel-off corners.
I pulled out another stamped image sent by a friend and colored it with markers. This one is of a couple of adorable farm kids. I tore out the image after coloring an mounted on green paper to match the green checkerboard sticker strip I chose for the border.
I attended a ladies tea last night. The invitations said "hats encouraged." Not being a 'hat person' I did not have one to wear so earlier in the week I made my own.
The brim is constructed of 300 lb watercolor paper. I made the crown of suede covered paper and shaped it by creating darts with my sewing machine. A lace overlay on the crown is from a drapery sample book. The brim was trimmed out with a 2" lace and then the entire brim was covered with the blue suede paper.
I finished it all off with some silk flowers and a triple bow of blue organza ribbon. Everything is held together with Crafter's Pick The Ultimate glue. (I ended up lining the inside edge of the crown with more lace so I could use it to pin the hat to my hair and hold it on securely)
Here is me modeling it before going to the event.
Here's another good card for that guy you know. From my favorite 3D site comes this stack of fishing equipment. I mounted it on cardstock with a wood print and added the forest treeline with rub-ons.
The text sticker is from a sheet I had on hand and really sums it up.
This 3D of a can full of poppies always makes me smile. I think it is nice that it is designed with the little banner at the top to hold a greeting as well.
There are LOTS of frilly little edges to cut on this piece, for every layer, but the end result is worth it.
I'm attending a ladies tea this week so this card just seemed to fit.
The tea set is a 3D from one of my favorite websites for them. I had some rainbow paper and covered the lower portion with a scrapbook paper in lace print.
The text block is a vellum sticker (from the dollar store, again). After applying it I colored a line with watercolor pencil - one color above the lace and another on the lace.
The last step was to use a watercolor brush with just a hint of water to bleed out the colored pencil.