« July 2024 »
S M T W T F S
1 2 3 4 5 6
7 8 9 10 11 12 13
14 15 16 17 18 19 20
21 22 23 24 25 26 27
28 29 30 31
You are not logged in. Log in
Entries by Topic
All topics
3D paperwork
A - Z challenge 5
A - Z challenge 7
A - Z challenge round 4
A to Z challenge round 3
A to Z round 2
A to Z round 6
A-Z round 1
Around the House
Art Challenges
Artist Trading Cards
Backgrounds
Beads
Bible Journaling
Books
Boxes
Collage
Color Challenge
Coloring
cookbook
Die Cuts
Digital Projects
Digital Stamps
Drawing
Dry Embossing
Fabric Stuff
Fantastic Folds
Field Trip
Home Decor
How Does Your Garden Grow?
Hymnal Art
In The Kitchen
In the studio
Jewelry
Lettering
Links
Multi-Technique
Music to Work By
Musings
Nail Art
New Work
Online Class
Other Hobbies
Other Projects
Painting
Paper Embroidery  «
Paper Piecing
Photo
Pretty Paper
Quilting
Random
reading
Scrap Recovery
scrapbooking
Sewing
Sketch Challenge
Some Backlog
Stamping
Stencils
Stickers
Supplies
Teabag Folding
Techniques
Testing
tips and tricks
Tutorial
Web resources
Welcome to my Blog
Work By My Friends
workflow
Writing
Blog Tools
Edit your Blog
Build a Blog
RSS Feed
View Profile
Group One
In & Out of Studio 3D
Monday, 21 November 2016
Simple Celebration
Topic: Paper Embroidery

Many times the concept is more attractive than the execution... I think that is true of the card being shared today.

I had a butterfly to embroider and blank area on a floral card. I chose colors to complement the floral and stitched by the directions.

I ended up with a flat, lifeless piece.

I tried to rescue it with the use of a bright stamped greeting bordered in the same color as the butterfly.


I pulled in more of the yellow by using it for the card base and allowing a border to show all around the card.

Ddd


Posted by studio3d@ccgmail.net at 12:01 AM PST
Sunday, 20 November 2016
Blessing of the Trees
Topic: Paper Embroidery

When I pricked out this embroidery pattern of trees I had every intention of making this a Christmas card. I would have done this by decorating a single tree with beads.

However, after I got all the trees stitched - each in a different shade of green - I liked the effect of having a simple grove of trees. I decided to leave them plain.

The background is a subtle woodgrain.

The addition of a bordered sentiment in dark yellow calls attention to the single star.


I used a dark green patterned paper for the borders.

Ddd


Posted by studio3d@ccgmail.net at 12:01 AM PST
Saturday, 19 November 2016
Let Your Light Shine
Topic: Paper Embroidery

I haven't joined any paper embroidery swaps or challenges for a while now so those arts were set aside while I persued other things. While on vacation recently, I took along my paper embroidery kit with some cards to work on. It makes a nice activity that allows for watching the scenery, chatting with others and/or watching lectures and concerts (when they don't lower the lights).

I finished up three stitchings which I could turn into cards when I got home.

This card was pricked out in a floral/swag on a two-toned houndstooth paper. I had included a red/pink/teal funky floral so stitched the flowers and swag to match.

After cutting the pieces to size I found the floral too bright so I layered a quote on vellum over the top and wrapped the edges to the back.


I mounted the decorated panel to a soft blue card base.

Ddd


Posted by studio3d@ccgmail.net at 12:01 AM PST
Tuesday, 23 August 2016
V is for Vintage
Topic: Paper Embroidery

Wow! It's REALLY close to the end of the alphabet on this series of paper embroidery swaps.

We are up to 'V' and the assignment was to make something vintage. I chose a pattern for an antique carriage and actually stitched it using the proscribed threads! That's a rarity.


Because there was so much gold in it I made the first border of gold and then matched the base card to the seat cushion and hood.

The greeting is a gold peel-off sticker.

Ddd


Posted by studio3d@ccgmail.net at 12:01 AM PDT
Wednesday, 13 July 2016
U is for United States
Topic: Paper Embroidery

It's been a while since I did a paper embroidery project - in fact, the last one was for this same alphabet challenge! It won't be long until the alphabet will be used up and I don't know what the host has in mind to do after that happens.

In the meantime, today we are up to 'U' and the theme 'United States'.

Since I was choosing my pattern at about the same time as Independence Day the natural tendency was to lean toward using a flag, fireworks or some other 'holiday' imagery.

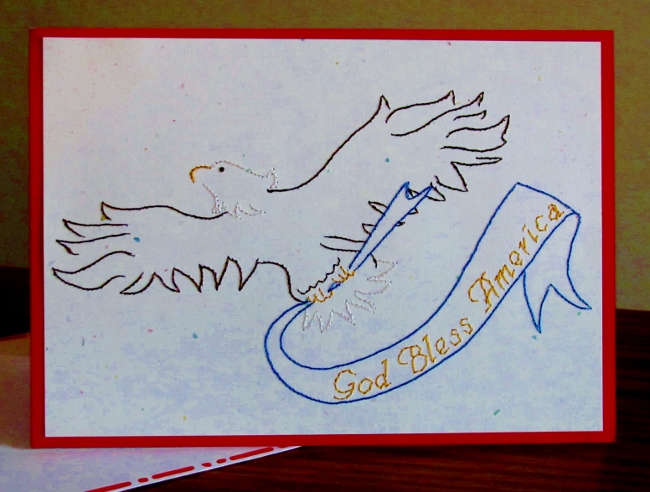
But I got over that thought as soon as I ran across my pattern of the flying bald eagle with its patriotic banner.

I pricked it out on a flecked white cardstock and stitched with realistic coloring.

Other than trimming, I did not do anything else (stamping etc) that might compete with the image.

I did mount it on the card with a red border which gives it a more patriotic punch with the red, white and blue combination.


You can see in the photo that I decorated the envelope, too. Those dots and dashes continue all around the face of it. A simplified flag was drawn on the flap (one blue star and four red stripes). I hand wrote "God Bless America" in the white spaces between the red stripes.

Ddd


Posted by studio3d@ccgmail.net at 9:48 AM PDT
Thursday, 2 June 2016
T Is For Trees
Topic: Paper Embroidery

When the challenge came up to make a papeer embroidery card with 'trees' I was finding most of my patterns were for Christmas trees. It seemed a bit too early to go down that route.

I did have this pattern that I have stitched up for Christmas before but changed it up by using different papers and threads.

I went with forest green threas for the trees and grass green for the ground, stitching onto a big dot paper and backing that with small dots.

A dark green paper serves as a background over a golden base card.


I used a couple of word stickers that match the card colors.

Ddd


Posted by studio3d@ccgmail.net at 12:01 AM PDT
Wednesday, 6 April 2016
S Is For Swirls
Topic: Paper Embroidery

The paper embroidery alphabet swaps are marching right along. The current one assigned us to do Swirls for the letter S.

I flipped through a lot of borders and frames for one that I liked, thinking I would add some 3D florals to it.

But then I ran across this cupcake with swirled icing and I knew that was what I wanted to stitch.

I picked an embossed white cardstock with more swirls and pricked out the pattern on that.

I chose a bright verigated thread for stitching and then used a lighter thread for the candle plus light yellow for the flame.

I mounted the stitched panel on a bright floral over a white base card.


I used a colored flower with a rhinestone center and a silver peel-off for embellishment.

Ddd


Posted by studio3d@ccgmail.net at 12:01 AM PDT
Saturday, 30 January 2016
Heart Strings
Topic: Paper Embroidery

The pattern I chose for a Valentine swap is one that fascinates me. A simple circle of evenly spaced holes is turned into a heart by stitching two layers with different combinations of using the holes in singles and pairs.

Hard to describe but effective when executed.

I stitched with red thread over a chocolate brown paper printed with music notes.

I trimmed this and added it to a cardstock printed with lace. To this main layer I added a thin satin ribbon at each end and then a red heart ribbon just inside this.


I used a grey base card that matched that in the lace layer.

Ddd


Posted by studio3d@ccgmail.net at 12:01 AM PST
Friday, 29 January 2016
What's That?
Topic: Paper Embroidery

The assignment for this swap was 'abstract'. Generic enough?

I pulled out a pattern I created years ago and pricked it out on a subrle dotted cardstock.

I started at the outer edge and stitched the first row with red thread. The next row uses orange thread and the inner row is yellow.

In mounting I used a large scallop border punch at the bottom edge. Then I added a scalloped yellow layer and a scalloped orange layer underneath.

The base card is red so there is a replication of the color layers in the stitching.


I placed a thick acrylic heart sticker in the center of the stitched motif as a finishing element.

Ddd


Posted by studio3d@ccgmail.net at 12:01 AM PST
Thursday, 28 January 2016
Easter Cross
Topic: Paper Embroidery

Getting ahead on my swaps again. This time it is for an Easter card in paper embroidery.

I decided to combine my own cross pattern (designed in 2003) and the flowers from a free pattern I had in my files.

I picked a patterned paper with some scrollwork and a floral on it. I pricked out the floral over the printed ones and decided to stitch them in similar colors.

This was only mildly successful as they blended in a little too well. To recover them I did an outline of the elements in metallic gold thread.


I had planned all along to work the cross in the metallic gold thread and it was pricked out in the open space on the paper.


I bordered the card with shiny gold and used a green base card that matches the stitched leaves in the floral.

Ddd


Posted by studio3d@ccgmail.net at 12:01 AM PST
Monday, 18 January 2016
Bug-Eyed
Topic: Paper Embroidery

Next up in the series of paper embroidery cards I got done was one for a swap on Owls. I found a free pattern of an owl that I had never done up before. Just ugly enough to be cute.

I selected a patterned orange and cream background cardstock and stitched with various shades of orange and brown.

I added white gel pen to the center of the eyes as the placement on the cardstock had them coming out with two different colors.

I selected a matching leafy background for an additional layer and bordered both layers with chocolate brown.


This turned out to be a fall card even though it will be swapped out in February.

Ddd


Posted by studio3d@ccgmail.net at 12:01 AM PST
Sunday, 17 January 2016
R Is For Roses
Topic: Paper Embroidery

Seems that, between all the groups I belong to, there are several swaps or challenges every year with the theme 'roses'. But it is a topic I like so I do most every one.

I do own several patterns where the embroidery itself forms the roses. But I had a great diecut foil 3D picture and decided to use that in a frame.

I used a verigated pink thread for one series of scrolls and a burgundy for the other, matching the colors in the flowers. I did the stitching on a cardstock with extremely small chevrons in gray and white.

When I got to the steps of mounting I cut off the ends of the cardstock and turned them over to show a two-toned pink houndstooth.


The photo shows this with too much blue. The burgundy layering matches the thread in the darker scrolls.

Ddd


Posted by studio3d@ccgmail.net at 12:01 AM PST
Saturday, 16 January 2016
That Is So Slick
Topic: Paper Embroidery

I got new swap assignments for the new year so I set about selecting patterns for them, choosing cardstock to stitch on and filing them in monthly order to work on.

I got the first three done in pretty good order.

The first of these is for a swap called Winter Sports. I chose a pattern with an ice skating snowman. 

The cardstock has cute banners hanging at the top and it makes it look like he/she is on a rink.

I chose threads to go with the banner colors, using various pinks. The blades of the skates are silver metallic thread.

I added three word stickers (colored with pink marker), added tiny button brads and mounted it on cardstock with a shiny silver border showing.

Ddd


Posted by studio3d@ccgmail.net at 12:01 AM PST
Thursday, 26 November 2015
Q Is For Quaint
Topic: Paper Embroidery

When I looked in the online dictionary for the definition of 'quaint' I found this:

quaint [kwÄ nt] - Adjective. attractively unusual or old-fashioned: "quaint country cottages". Synonyms: picturesque, charming, sweet, attractive.

Well, I think that definitely describes the pattern I chose to stitch up for this swap. I designed this pattern years ago but haven't stitched it too many times.

Information on the net indicates that Oregon has the most covered bridges of all the western states. At one time there were 700 (they counted only those built for vehicle traffic) but now we are down to 51.

I just love the look of them.

One time I painted one in watercolor, my sister did one in crossstitch and our brother did a lovely photograph - all for our parents - each of use working in our specialty medium. Such fun!

Anyway, I stitched this with appropriate colors - most of the bridges are either red or white.

I mounted it on a grey background along with a couple of borders of lacy printed paper and one of thin red.


A bordered flag sentiment echoes the water color and I added a bronze square sticky-backed 'nail head' set on point.

Ddd


Posted by studio3d@ccgmail.net at 12:01 AM PST
Sunday, 22 November 2015
Bring On the Bubbly
Topic: Paper Embroidery

WOW! If you thought I was rushing Christmas, get a load of the New Year's card I did!

To be fair, the swap this is for is due December 1 so I am not that early.

The first question was "what color of thread do you use to represent a clear liquid and clear glass?" It's not an easy choice. In the end, I chose silver for the background card and decided to use a very pale verigated thread with a little yellow, blue, green and pink.

The pattern included the stars above the glasses. Not sure why but I decided to leave them in.

I added some irridescent rhinestones in the liquid and as bubbles above the glasses and they pick up the same colors as the thread.

I mounted the card on some shimmery purple over shimmery white.


I used a rubon for the text.

Ddd


Posted by studio3d@ccgmail.net at 12:01 AM PST
Saturday, 21 November 2015
Rudolph In Stitches
Topic: Paper Embroidery

Next swap card ready... assignment: reindeer.

I had some 12x12 printed cardstock that I picked up a few years ago and cut it up into pieces suitable for card fronts. I chose one with a deer in a circle element with other decorative patterns in the background.

Since the requirement was to include paper embroidery, I pulled out the circle frame I've used several times and arranged it to lay along the left border of the feature circle. I pricked it into the cardstock and then free-handed a few extra scrolls.

The swirls of this mimic the big bow on the reindeer's neck and the color echoes a portion of the plaid.

I mounted the piece on a bordering burgundy then on a dusky green card base.


I used a rubon for the text and added a sticky-back red pearl to decorate the nose. Hello Rudolph!

Ddd


Posted by studio3d@ccgmail.net at 12:01 AM PST
Friday, 20 November 2015
White on White
Topic: Paper Embroidery

I have been bemoaning the lack of quality in the photos my camera takes but today is a whole nother level. But, then again, trying to photograph white on white is difficult with any camera out there.

That was the assignment: paper embroidery using only white.

I chose a rose pattern and then edited, adjusted and did my own thing with it before stitching it with white thread on white cardstock.

I used the Cuttlebug to diecut some lettering from the panel but then left it in place instead of popping it out.

It needed a bit more interest so I added a scalloped edge to the bottom.


The stitched panel is mounted on a white card base using foam tape.

Ddd


Posted by studio3d@ccgmail.net at 12:01 AM PST
Thursday, 19 November 2015
Round and Round
Topic: Paper Embroidery

Yeah, it's another Christmas card - in paper embroidery. But very soon I will be caught up with these assignments and we can continue with other things for awhile. 

On the other hand, the holidays WILL come in a few weeks time and more cards are still needed. Expect to see them here...

In the meantime, here is the latest. Since the assignment was very generic "make a PE Christmas card" I went with an iconic image, stitching a wreath.

This pattern was stitched in metallic gold and metallic green and then red beads were added for berries.

After it was stitched, I decided I wanted it to be cut into a circle. Well, those beads do not play nicely with the diecutter. I do have a 'B plate' thickness plate with a round aperture in it. It is designed to use with the Cuttlebug folders so only the outer area will make the impression, leaving a blank space in the middle. But I used it to surround the beads while using a scalloped circle die.

I mounted the resulting piece over a red cardstock, then over a green cardstock base.


I added the greeting with a rubon.

Ddd


Posted by studio3d@ccgmail.net at 12:01 AM PST
Wednesday, 18 November 2015
A Little Early
Topic: Paper Embroidery

I know it seems a little early to be posting Christmas stuff, but If swaps are going to be done on time to send to a partner overseas in time for them to use it as one of their personal greeting cards, then I has to be early.

I actually completed this back in October but that WAS to early for me to post it.

The assignment was to make a paper embroidery card with a poinsettia. This pattern is a freebie from so many years ago I don't have any clue who designed it. In fact there are no stitching directions so I just winged it. I stitched with red, green and yellow threads on black cardstock for the contrast.

I mounted the stitched panel on bright yellow cardstock and added the text with rubons.

Ddd


Posted by studio3d@ccgmail.net at 12:01 AM PST
Tuesday, 17 November 2015
Bundled Up
Topic: Paper Embroidery

Next up in the paper embroidery assignment lineup was the theme 'Hats and Scarves'. How fortunate to already have a pattern on hand that incorporates these, plus mittens... on a penguin!

I like penguins anyway so this just called out to me.

I chose a patterned cardstock in blue with white dots as it looked to me like snow falling.

I stitched everything in outlines with the exception of the pompom on the hat (with a poof) and the eyes (french knots). The panel was mounted on a bright pink card base.


I added a prestamped greeting.

Ddd


Posted by studio3d@ccgmail.net at 12:01 AM PST

Newer | Latest | Older