« January 2010 »
S M T W T F S
1 2
3 4 5 6 7 8 9
10 11 12 13 14 15 16
17 18 19 20 21 22 23
24 25 26 27 28 29 30
31
You are not logged in. Log in
Entries by Topic
All topics  «
3D paperwork
A - Z challenge 5
A - Z challenge 7
A - Z challenge round 4
A to Z challenge round 3
A to Z round 2
A to Z round 6
A-Z round 1
Around the House
Art Challenges
Artist Trading Cards
Backgrounds
Beads
Bible Journaling
Books
Boxes
Collage
Color Challenge
Coloring
cookbook
Die Cuts
Digital Projects
Digital Stamps
Drawing
Dry Embossing
Fabric Stuff
Fantastic Folds
Field Trip
Home Decor
How Does Your Garden Grow?
Hymnal Art
In The Kitchen
In the studio
Jewelry
Lettering
Links
Multi-Technique
Music to Work By
Musings
Nail Art
New Work
Online Class
Other Hobbies
Other Projects
Painting
Paper Embroidery
Paper Piecing
Photo
Pretty Paper
Quilting
Random
reading
Scrap Recovery
scrapbooking
Sewing
Sketch Challenge
Some Backlog
Stamping
Stencils
Stickers
Supplies
Teabag Folding
Techniques
Testing
tips and tricks
Tutorial
Web resources
Welcome to my Blog
Work By My Friends
workflow
Writing
Blog Tools
Edit your Blog
Build a Blog
RSS Feed
View Profile
Group One
In & Out of Studio 3D
Saturday, 16 January 2010
Open & Shut Case
Topic: Boxes

I found this project at http://qbeesquest.blogspot.com/2009/10/darling-drawers.html and could not wait to make one of my own. I used printed cardstock for the cabinet and solid cardstock for the drawers. 

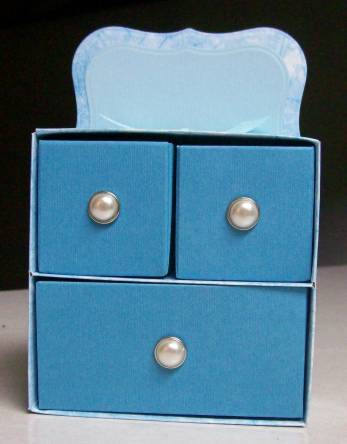
 A Nestabilities labels die was used for the 'mirror' element using some of the printed card scraps and a bit of light blue solid card.

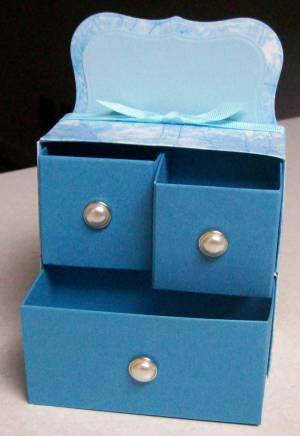
I added pearl-faced brads for drawer pulls and tied a grosgrain ribbon at the back of the cabinet.

This makes a pretty and solid little dresser using 5 sheets of cardstock.

Ddd


Posted by studio3d@ccgmail.net at 6:00 AM PST
Friday, 15 January 2010
Tree Tree
Topic: Collage

As I sat doodling in my sketchbook one day I tried to think up unique ways to make Christmas trees. One of the successes was those stamped and covered with snowflakes and this was another of those ideas.

My very generous sister-in-law saves her paper scraps from projects and sometimes gifts me with a grocery bag of them. I have so much fun sorting out all the bits and pieces! These trees were the leftovers after she had punched out trees for her own project YEARS AGO! I have been holding onto them forever and finally had the right project to use them!

I glued them to a printed scrapbook paper and added a glittered puched star to the to pf each one. Then I used more of the glittered cardstock to cut photo corners for framing on the green folded card base.

Trash to treasure!

Ddd

I have finally exhaused my supply of Cristmas cards made this year. If I feel the temptation to make any more I promise to save them for posting next holiday season... or maybe intersperced throughout the year.


Posted by studio3d@ccgmail.net at 6:00 AM PST
Thursday, 14 January 2010
Glitter Rimmed Tree
Topic: Collage

Seems like a stretch to call this 'collage' but maybe 'mixed media' would work.

What media? Old card illustration, green cardstock and Stickles. 

The illustration already had red and silver foiling and the foil greeting as well. Nothing left for me to do but cut it out with a Nestabilities die, glue it on, and trim it up with a bead of that fantastic glitter glue.

Ddd


Posted by studio3d@ccgmail.net at 6:00 AM PST
Wednesday, 13 January 2010
Front Door
Topic: Collage

Sometimes I wonder if I ever send a Christmas card with salvaged parts back to the person who sent the original to me? If so, I hope they enjoy the transformation!

I bet by now you could recite the steps and parts that make up this card. Try it and test yourself. The answers are below:

1) green folded cardstock base 2) holly printed paper salvaged from inside an ole envelope 3) red paper 4) forest green cardstock with rounded corners using a punch 5) illustration from an old Christmas card cut with Nestabilities die 6) thick acrylic sticker mounted on green cardstock and trimmed before application to the card.

How did you do? I bet NOBODY got the printed paper from the envelope, though!

Ddd


Posted by studio3d@ccgmail.net at 6:00 AM PST
Tuesday, 12 January 2010
Plaid Church
Topic: Collage

I'm not calling this a 3D card even though it is, because the 3D was already done on the Christmas card I got and all I did was cut the whole thing with Nestabilities and set on the plaid background with foam tape. 

I used tan cardstock for the base and added a round adrylic sticker over the star.

Ddd


Posted by studio3d@ccgmail.net at 6:00 AM PST
Monday, 11 January 2010
Tall Holly
Topic: Collage

Simple setup - old card front cut with Nestability die, red paper, Tan cardstock base. 

Oh, yeah... glue and a gold peel-off.

Ddd


Posted by studio3d@ccgmail.net at 6:00 AM PST
Sunday, 10 January 2010
Snow Tree
Topic: Collage

To whoever sent me this Christmas card LAST year, I thank you. It made up my favorite from all of these I made. You don't get the full effect of the glitter that covers this piece so you'll have to trust me - it is gorgeous. I did discover that with these thickly glittered papers you have to run through the Cuttlebug with the Nestabilities die about three times to get a complete cut. 

I layered with forest green and medium blue to create this card and added a clear sticker for the text.

Ddd


Posted by studio3d@ccgmail.net at 6:00 AM PST
Saturday, 9 January 2010
Plaid Poinsettia
Topic: Collage

I promise I will NOT be showing Christmas cards ALL year long. But I'n not done yet...

I used a scalloped Nestability die to cut this poinsettia from an old Christmas card and mounted on plaid scrapbook paper. Did I mention this paper has a shimmer to the surface? NO? Okay now you know. 

The greeting is a thich acrylic sticker.

Ddd


Posted by studio3d@ccgmail.net at 6:00 AM PST
Friday, 8 January 2010
Teal Tree
Topic: Collage

One panel from an old Christmas card was cut with a shaped rectangle Nestabilities die and a sticker star was added to the top. Simply mounted on silver cardstock and trimmed with silver peel-off borders. 

To echo the white trunk I mounted on glossy white folded cardstock.

No greeting - keeping the look clean.

Ddd


Posted by studio3d@ccgmail.net at 6:00 AM PST
Thursday, 7 January 2010
Santa Mail
Topic: Collage

You probably saw this ad for a famous large department store chain in one of YOUR magazines but I bet nobody else tore it out to make a Christmas card! I covered their logo with the acrylic sticker sporting the red stripes and reindeer and cut out the illustration using a Nestabilities label die. 

I used layers of black and red and added a gold peel-off greeting.

Ddd


Posted by studio3d@ccgmail.net at 6:00 AM PST
Wednesday, 6 January 2010
Plaid Tree
Topic: Collage

This tree was harvested from an old Christmas card and mounted on this yummy plaid paper. A burgundy folded cardstock creates the base. 

Three printed acrylic stickers were applied for a greeting.

Ddd


Posted by studio3d@ccgmail.net at 6:00 AM PST
Tuesday, 5 January 2010
Joy Peace Love
Topic: Collage

Scraps from an old Christmas card are mounted on red, cream, and blue layers. Not much to add to that! 

Ddd


Posted by studio3d@ccgmail.net at 6:00 AM PST
Monday, 4 January 2010
Noel
Topic: Collage

The centerpieces of these tags are photographs of collaged tags. I added a real tag behond each and tied on real strings. On the red folded card base I arranged the tags and added three silk flowers and gave them button centers. 

Ddd


Posted by studio3d@ccgmail.net at 6:00 AM PST
Sunday, 3 January 2010
Cozy Ornaments
Topic: Collage

This plaid background makes for a cozy setting for three ornaments and branches from old Christmas cards. The ornaments were cut with a Cuttlebug die tag shape and the top colored with a gold metallic marker. Little loops of gold cord connect them to their branches and they are raised on foam tape. 

The clear acrylic sticker greeting was applied to cream cardstock to match the folded card base.

Ddd


Posted by studio3d@ccgmail.net at 6:00 AM PST
Saturday, 2 January 2010
Ten Wreaths
Topic: Dry Embossing

For these ten wreath cards I used the shaped embossing technique, the brocade folder and a donut shaped chipboard. I also did not do any direct-to-paper coloring but only used the shaving brush and applied Whispers ink in a circular motion. 

Each has five red rhinestones, a red bow and a clear acrylic sticker. Here's a close-up of one of them.

Aren't these elegant?

Ddd


Posted by studio3d@ccgmail.net at 6:00 AM PST
Friday, 1 January 2010
Golden Tree
Topic: Dry Embossing

Before I figured out the shaped embossing I did a standard one onto this ridged gold cardstock and cut out the tree. The rhinestones in a single size makes this a little more formal than the others, too. 

This is mounted on a irridescent green cardstock and I added gold and silver peel-off packages, topper, and greeting.

Ddd

Yes, yes I know it's the new year - but I'm NOT done showing Christmas cards yet. Think of them as imspiration for NEXT year!


Posted by studio3d@ccgmail.net at 6:00 AM PST
Thursday, 31 December 2009
Brocade Trees
Topic: Dry Embossing

Oooooh! I LOVE this technique! For these four I switched to the brocade folder but kept the same triangle cutout. The coloring is done exactly the same way and I switched out the colors of the rhinestones and backing cardstocks. 

Here's a closeup of the one I like best.


Ddd


Posted by studio3d@ccgmail.net at 6:00 AM PST
Wednesday, 30 December 2009
Rhinestone Tree
Topic: Dry Embossing

OK, moving along... Oh, we're still on Christmas cards - just moving on to different techniques!

I saw on a cuople of blogs that I could change the shape of the impression of a plate in the Cuttlebug by cutting that shape from thisk chipboard and using it on top of the folder instead of the B plate. SO COOL!

I cut a tall triangle and made the 'sandwich' of (bottom up) A plate, folder with cardstock inside, cut chipboard, C plate. This is run through the Cuttlebug and this is the result! 

I used a Whispers ink pad direct-to-paper to color the raised portions. Then I used a 'shaving brush' style tool to apply a shading of a slightly different green.

The last step was to adhere red rhinestones to the swirls in two different sizes.

Ddd


Posted by studio3d@ccgmail.net at 6:00 AM PST
Tuesday, 29 December 2009
Big Glitter Flakes
Topic: Backgrounds

One more of the alcohol ink backgrounds. These flakes were cut from glittery bits of old Christmas cards using the MS punch and a Cuttlebug die. The large flakes are mounted with snowflake brads and the smaller ones with gold star brads. 

Silver folded cardstock is the base and a clear acrylic sticker with a blue backing.

Ddd


Posted by studio3d@ccgmail.net at 6:00 AM PST
Monday, 28 December 2009
Triple Glitter
Topic: Backgrounds

I made this background by cleaning off an alcohol ink application pad with three tones of blue and silver mixatives.

These snowflakes were punched out from glossy cardstock, stuck to a transparency and colored with alcohol inks. When dry I applied Glossy Accents and sprinkled with Martha Stewart tinsel glitter. I added one teal rhinestone to the center of each. 

The folded cardstock for this card is silver and I added a clear acrylic sticker greeting with a blue background.

Ddd


Posted by studio3d@ccgmail.net at 6:00 AM PST

Newer | Latest | Older