« September 2010 »
S M T W T F S
1 2 3 4
5 6 7 8 9 10 11
12 13 14 15 16 17 18
19 20 21 22 23 24 25
26 27 28 29 30
You are not logged in. Log in
Entries by Topic
All topics  «
3D paperwork
A - Z challenge 5
A - Z challenge 7
A - Z challenge round 4
A to Z challenge round 3
A to Z round 2
A to Z round 6
A-Z round 1
Around the House
Art Challenges
Artist Trading Cards
Backgrounds
Beads
Bible Journaling
Books
Boxes
Collage
Color Challenge
Coloring
cookbook
Die Cuts
Digital Projects
Digital Stamps
Drawing
Dry Embossing
Fabric Stuff
Fantastic Folds
Field Trip
Home Decor
How Does Your Garden Grow?
Hymnal Art
In The Kitchen
In the studio
Jewelry
Lettering
Links
Multi-Technique
Music to Work By
Musings
Nail Art
New Work
Online Class
Other Hobbies
Other Projects
Painting
Paper Embroidery
Paper Piecing
Photo
Pretty Paper
Quilting
Random
reading
Scrap Recovery
scrapbooking
Sewing
Sketch Challenge
Some Backlog
Stamping
Stencils
Stickers
Supplies
Teabag Folding
Techniques
Testing
tips and tricks
Tutorial
Web resources
Welcome to my Blog
Work By My Friends
workflow
Writing
Blog Tools
Edit your Blog
Build a Blog
RSS Feed
View Profile
Group One
In & Out of Studio 3D
Wednesday, 8 September 2010
New Window On The World
Topic: Around the House

And finally.....

... the end of the remodel project was to replace an ugly wall-mounted air conditioner with a fabulous new 4-foot round window. That was accomplished and the wall repainted to match the rest of the room (very light blue).

Here is the diningroom before the window (the air conditioner is behind the painting):

and here is the final result:

Brilliant!

Ddd


Posted by studio3d@ccgmail.net at 6:00 AM PDT
Tuesday, 7 September 2010
Daisy Foil
Topic: 3D paperwork

And the foil is back! I used gold outline stickers of daisies and leaves to create this feature and raised the center on foam dots. A blue rhinestone in the center echoes the shimmery blue cardstock base.

The white layer is mulberry paper and over this is layered a textured cardstock with swirls. The text is a gold peel-off sticker to match the focal image.

Ddd


Posted by studio3d@ccgmail.net at 6:00 AM PDT
Monday, 6 September 2010
Love, Love, Love
Topic: Stamping

One of the groups I am on issued a sketch challenge. This is my entry. 

I used more of the stamped hearts but this time they are on a floral paper in 4 colors. The sketch called for the item in the 3rd position to be the front layer of the 4 so I added a border to it and raised it on foam dots.

The background is a printed scrapbook paper (isn't this beautiful?). I added a piece of organza ribbon and tied metal letter tags on with 1/8" ribbon. The text block is a clear thick acrylic sticker which I placed on cardstock to match the background and the border on the heart.

As a final touch I added a doodle border in green Sharpie around the card and dots around the feature heart.

Ddd


Posted by studio3d@ccgmail.net at 6:00 AM PDT
Sunday, 5 September 2010
Heart Petals
Topic: Stamping

I have been trying to decide how to use this heart stamp filled with text. I finally stamped it 4 times on pink plaid and 4 times on blue plaid and cut each of them out.

The pink were aranged with the rounded tops interlinked. I put a bit of wadded up glue dot under the bumps to raise them up. Then I cut a scalloped square of the same paper with the Cuttlebug and a Nestability die. On the square I arranged the blue hearts with the tops facing out.

Now the layering starts... blue folded cardstock base with rounded corners, black cardstock square with rounded corners, scalloped pink square, blue hearts, pink hearts, flower, brad.

Thats it!

Ddd


Posted by studio3d@ccgmail.net at 6:00 AM PDT
Saturday, 4 September 2010
Where's Kermit
Topic: Around the House

Sometimes, when I would unreel the hose to water the garden barrels, a little green frog would exit the reel housing and hop away for a bit. We never got to see where he would go, though.

Then when we were painting the house we spied his hiding place. Can you see him?

This is under the deck, looking up from the patio (top of a window is at the bottom of the photo). Find him? No?

OK, how about I zooooo-o-o-o-m-m-m  in real close?

There's his little face! When we would get too close, and he realized he had been found out, he would ease out and walk across the wall to hang out in the climbing vines for a while. After a bit we'd find him back in place - not quite as invisible as he imagined.

Ddd


Posted by studio3d@ccgmail.net at 6:00 AM PDT
Friday, 3 September 2010
First Fruits
Topic: How Does Your Garden Grow?

Through the magic of technology this entry has delayed posting of a full month. The photos below were actually taken August 3.

The garden this year met with limited success. Some things did very well (carrots, beans, beets) some did just OK (onions, lettuce, radishes) and some did horribly (tomatoes, spinach, cucumbers). Here are some photos of the successes:

24 Carrot (or more)

So, How 'Ya Bean?


You Can't Beet That

Don't Cry For Me

Someday My Tomatoes Will Come

(yes, August 3rd and the tomatoes are just now blooming)

Ddd


Posted by studio3d@ccgmail.net at 6:00 AM PDT
Thursday, 2 September 2010
Best Wishes Butterfly
Topic: Techniques

More of the foil with gold outline stickers...

For this one I used 4 butterfly stickers and mounted on navy shimmer cardstock along with a strip of holographic crinkled paper and a sheer ribbon, knotted.


The greeting text is written with white gel pen.

Ddd


Posted by studio3d@ccgmail.net at 6:00 AM PDT
Wednesday, 1 September 2010
Take a Break!
Topic: Paper Embroidery

Challenge from the group - a paper embroidery card with the theme 'hats'. Well, we brainstormed a bit over this and wanted to do something original - so here you go...

This is the outside of the card: (black cardstock, white gel pen)

and this is the inside: (paper embroidery on white cardstock, white gel pen.)

Original, at least!

Ddd


Posted by studio3d@ccgmail.net at 6:00 AM PDT
Tuesday, 31 August 2010
Studio Storage
Topic: In the studio

Another posted entry gone who-knows-where? Annoying!

I have been 'tweaking' the storage in the studio to make things more handy, organized, attractive, and versatile. So with those goals in mind, these are the changes I have made:

Added two wire racks on top of a cabinet to sort out printed cardstock by color groups. The left rack has full sheets and the right rack has cuts and pieces. I use the top of the rack for boxes that have collage elements separated by colors and/or themes. I had room in the bottom of the rack for some colored paper and some equipment.

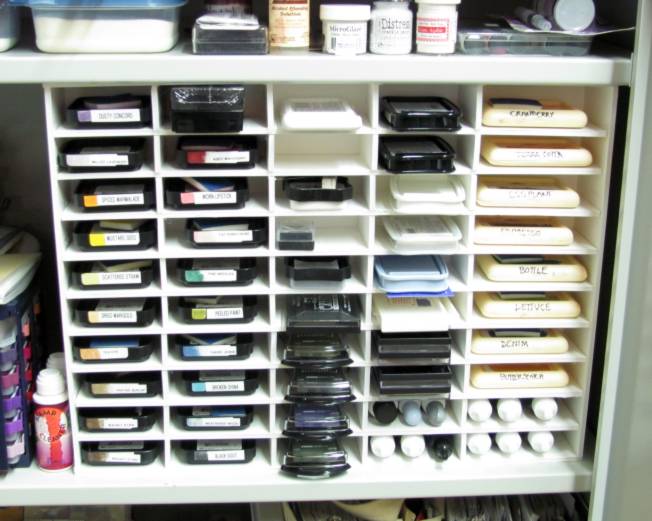
Inside the cabinet I built this stamp pad storage unit out of foamcore board and hot glue. The wells were designed specifically for the distress ink pads. They are stored upside-down and their blending pads sit in with them. Each has the color name on the side along with a smear of the ink for easy selection. I had room left over for my other ink pads which are all stored and marked in the same manner. There was even room for re-inkers!

To the right of the cabinet I have a CD holder in which I store empty cd cases repurposed as acrylic stamp holders. Acrylic blocks fit in here as well.

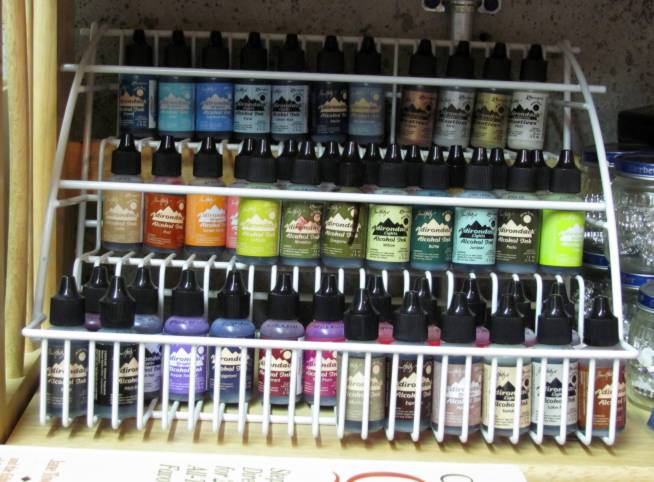
Then to the right again, there is a tiered spice rack that I used to store/display bottles of alcohol inks. Each shelf will hold two rows (front and back). They are shelved in color groups.

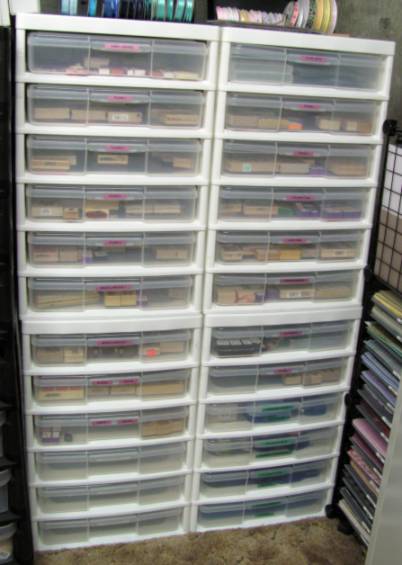
Over on the other side of those wire racks storing printed cardstock are 4 'iris' cabinets that each have 6 slots. These hold boxes instead of open drawers and I am using them for rubber stamps. They are separated by 'theme' so I have drawers with Flowers, Trees, Animals, Ethnic, Greetings, Hand-Carved, etc. Some themes require more than one bin. Down at the bottom I have 4 bins with punches.

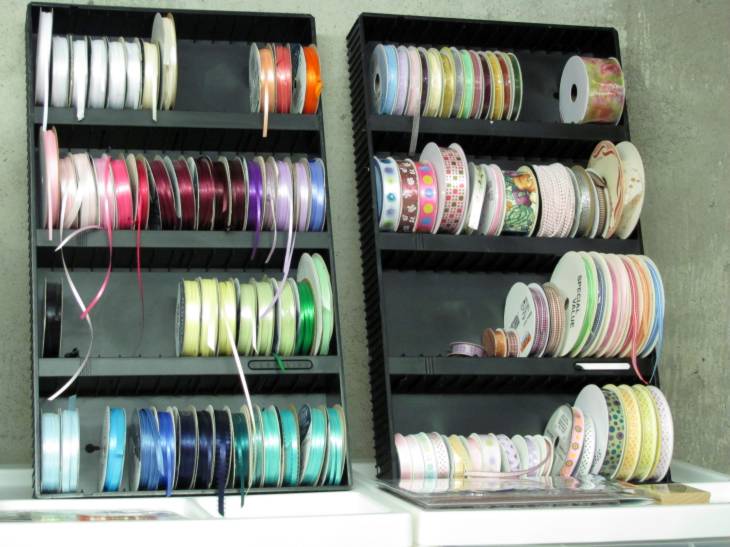
On top of these I have the two cassette storage racks that I turned on their ends and use for ribbon storage. Guess what? They are arranged in color groups and by special types. Sheers are together, plaids are together, satins are together, colors are together within a type. (I can't help myself!)


So, there you go - all the new, repurposed and improved storage/display solutions I've added to the studio. These help me work more efficiently (more crafts in less time).

Ddd


Posted by studio3d@ccgmail.net at 10:35 AM PDT
Monday, 30 August 2010
When Nature Takes Over
Topic: Photo

Sometimes a thing gets set down for a minute and nature just takes over! We took this bird feeder down to paint the eves of the house and a couple of weeks later the vines from the lower deck had begun to surround it. Fortunately it did so in a most attractive manner.

Not that it got to stay here, though. After taking the photo the vines were uprooted and the feeder moved out of the way of painting this side of the house.

Ddd


Posted by studio3d@ccgmail.net at 6:00 AM PDT
Sunday, 29 August 2010
Three Fat Cats
Topic: Stamping

I ran across this stamp while looking for a text block on an acrylic stamp set. I had no idea what I would do with it when I stamped it three times on yellow plaid paper and cut close around them.

I selected a yellow background cardstock and stamped the cats three times on it. Then I tore the pink card to create 'grounding' for them. When the plaid cats were glued over the ones stamped on the yellow it gave them back the whiskers and topknots that were originally cut off.

Some acrylic stamp stems were stamped repeatedly in the foreground and then I found the awesome text sticker. I mounted it on some of the pink and cut with a very thin border.

I think this cat is so funny looking!

Ddd


Posted by studio3d@ccgmail.net at 6:00 AM PDT
Saturday, 28 August 2010
Blocked Poppy
Topic: Stamping

A stamped image and some scraps came together for this bright card. Not very often will I make a card using so much orange, but I think it works for this one - makes it cheery.

I used a scroll stamp on a strip of cardstock to create a border and added some ribbon to the center.

The sticker in the lower right is stamped.

Ddd


Posted by studio3d@ccgmail.net at 6:00 AM PDT
Friday, 27 August 2010
How Do I Think Of Thee? With Love.
Topic: Stamping

I cut close around the stamped focal image after coloring then I used a bit of distress ink on the edges. I used the same distress ink on the definition print paper and the checked background paper. The image got a bow tied around the stem via slits cut in the cardstock. After layering (with the focal on 3D dots) I added a block stamp, a scroll stamp and a text border embosses with the cuttlebug.

A nice little greeting with a casual feel.

Ddd


Posted by studio3d@ccgmail.net at 6:00 AM PDT
Thursday, 26 August 2010
Foil Trio
Topic: Stickers

More use of the foil and gold outline stickers. Same background paper used, same ribbon, also used Cuttlebug embossing.

I used three rhinestones as enhancements.

Ddd


Posted by studio3d@ccgmail.net at 6:00 AM PDT
Wednesday, 25 August 2010
3D Foil
Topic: 3D paperwork

 With a supply of foil from another project, I used gold stacking Dazzles stickers to create this 3D rose. I used a shimmery lavender pape, run through the Cuttlebug and wrapped with sheer lavender ribbon. I placed this on white folded cardstock and added gold corner stickers.

Ddd


Posted by studio3d@ccgmail.net at 6:00 AM PDT
Tuesday, 24 August 2010
Blow Me Away
Topic: Stamping

Another repeat appearance of a stamp. I tore the right edge and then tore a similar edge from a printed paper with definitions and bands of color. I used a distressor to rough up these torn edges.

The yellow layer was run through the Cuttlebug for texture and I wrapped and tied a Martha Stewart ribbon around it. Not fond of this ribbon - too stiff.

All layers are stacked on a folded lavender base.

Ddd


Posted by studio3d@ccgmail.net at 6:00 AM PDT
Monday, 23 August 2010
Floral Note
Topic: Stamping

This is a repeat performance of the wheelbarrow of flowers. The image and a backing piece were cut and embossed with nestabilities die. I used the printed paper to bring out more of the colors from the stamped image and rounded the corners of this layer as well as the white card base.

As a last step I stamped a greeting on the image panel.

Ddd


Posted by studio3d@ccgmail.net at 6:00 AM PDT
Sunday, 22 August 2010
Bouquet of Praise
Topic: Stamping

The center image for this card was stamped, painted and cut out and then combined with a plethora of table scraps. I do love this pierced paper - and almost out of it! I had already cut out the scalloped center for another project so I backed it with a square of teal scrap.

Those rows of holes just call out for ribbon weaving so I added the teal ribbon and tied a couple of bows.

I used a folded card base in lavender to pick out yet another color from the image and then dropped on some lavender rhinestones over 6 of the punched holes.

In the empty space at the bottom I used an acrylic stamp for the text.

Ddd


Posted by studio3d@ccgmail.net at 6:00 AM PDT
Saturday, 21 August 2010
Sign of the Times
Topic: Other Projects

When you have hay for sale but don't live nearby a road sign seems like a good idea. This way buyers can call to make purchase arrangements.

I made this with scrap plywood and an extra sawhorse we had. I painted it with leftover house trim paint and some black glossy paint left over from painting the wrought iron stair railings. I made a stencil on the computer, printed it out, cut by hand with a craft knife and then traced it on the sign before painting.

First sale came withing 45 minutes of posting the sign!

Ddd


Posted by studio3d@ccgmail.net at 6:00 AM PDT

Newer | Latest | Older