« May 2011 »
S M T W T F S
1 2 3 4 5 6 7
8 9 10 11 12 13 14
15 16 17 18 19 20 21
22 23 24 25 26 27 28
29 30 31
You are not logged in. Log in
Entries by Topic
All topics  «
3D paperwork
A - Z challenge 5
A - Z challenge 7
A - Z challenge round 4
A to Z challenge round 3
A to Z round 2
A to Z round 6
A-Z round 1
Around the House
Art Challenges
Artist Trading Cards
Backgrounds
Beads
Bible Journaling
Books
Boxes
Collage
Color Challenge
Coloring
cookbook
Die Cuts
Digital Projects
Digital Stamps
Drawing
Dry Embossing
Fabric Stuff
Fantastic Folds
Field Trip
Home Decor
How Does Your Garden Grow?
Hymnal Art
In The Kitchen
In the studio
Jewelry
Lettering
Links
Multi-Technique
Music to Work By
Musings
Nail Art
New Work
Online Class
Other Hobbies
Other Projects
Painting
Paper Embroidery
Paper Piecing
Photo
Pretty Paper
Quilting
Random
reading
Scrap Recovery
scrapbooking
Sewing
Sketch Challenge
Some Backlog
Stamping
Stencils
Stickers
Supplies
Teabag Folding
Techniques
Testing
tips and tricks
Tutorial
Web resources
Welcome to my Blog
Work By My Friends
workflow
Writing
Blog Tools
Edit your Blog
Build a Blog
RSS Feed
View Profile
Group One
In & Out of Studio 3D
Sunday, 22 May 2011
HAPPY LIFE Sketch
Topic: Scrap Recovery

ASSIGNMENT: Still with the same sketch

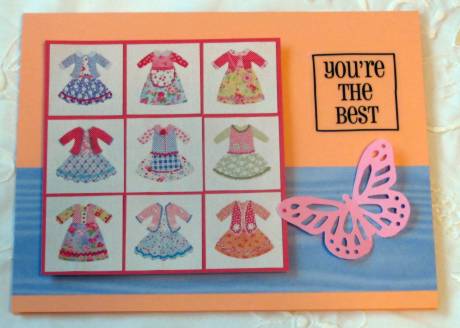
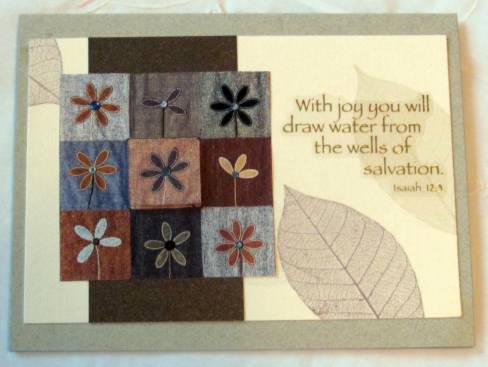
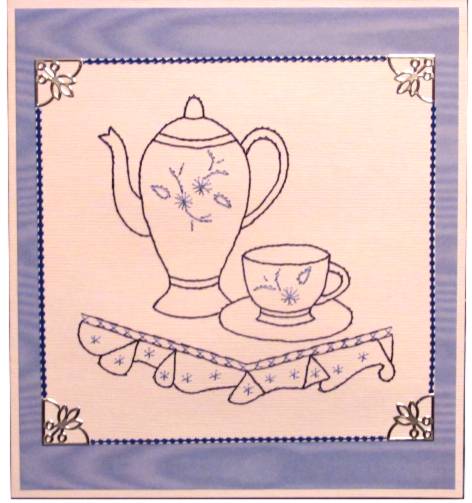
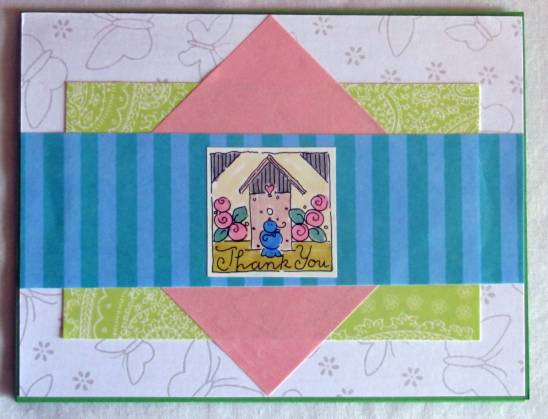
I started with a set of quilt blocks, cutting them out of a larger quilt and trimming them down to 1 inch. I mounted these up on a blue background and overlaid with a vellum text panel, attaching the layers with red heart brads. These are mounted over the base layers with foam dots.

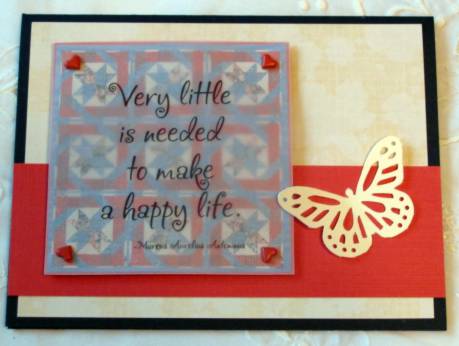
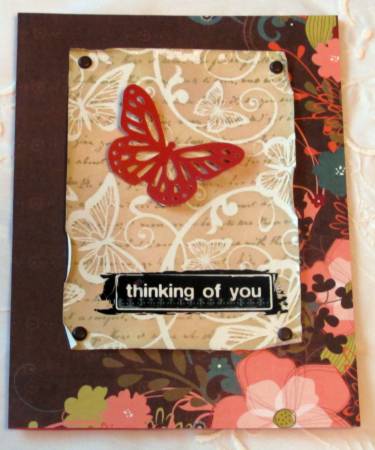
The base layers are made up of a navy folded base, a tone-on-tone cream scrapbook paper and a coral cardstock strip. The punched butterfly is mounted 3D by gluing down only the body and folding up the wings.

Ddd


Posted by studio3d@ccgmail.net at 6:00 AM PDT
Saturday, 21 May 2011
DRESSED to Sketch
Topic: Scrap Recovery

ASSIGNMENT: More of the sketch

These squares are cut from another quilt photograph. Love these little dresses which I mounted together on a coral square of cardstock. This is popped up on foam over a block of blue scrapbook paper and a cantaloupe folded base.

I added a punched butterfly and a clear text sticker.

Ddd


Posted by studio3d@ccgmail.net at 6:00 AM PDT
Friday, 20 May 2011
Faith in the Sketch
Topic: Scrap Recovery

ASSIGNMENT: Still doing the same sketch

For the background I used a different print from the Color Me papers and used a Tim Holtz distressing technique with three colors of distress inks. I cut the birds off of an old calendar and then filled in with yellow blocks from a paint chip and the brown blocks from table scraps. These are each individually popped up on foam dots.

The text is a clear sticker.

Ddd


Posted by studio3d@ccgmail.net at 6:00 AM PDT
Thursday, 19 May 2011
HELLO to the Sketch
Topic: Scrap Recovery

ASSIGNMENT: Same sketch as yesterday

I used more of the flower quilt and more of the old leaf greeting card. Also used table scraps of the polkadot paper. This is all arranged over brown folded card base.

I added pen 'stitching' around the dotted paper and placed the text rubon in the open space.

Ddd


Posted by studio3d@ccgmail.net at 6:00 AM PDT
Wednesday, 18 May 2011
LOVE that Sketch
Topic: Scrap Recovery

ASSIGNMENT: Sketch Challenge

The assignment was to create a 4.25 x 5.5 card with a 1.75 x 5.5 panel across the lower portion and a grid of 9 one inch squares off to the left. I used more of the floral quilt blocks, mounted on a green backing and popped up on foam.


I pulled together some prints from a mini-pad and layered them over coral cardstock. The sketch did not have an assigned place for text so I added a word 'ticket' from Tim Holtz.

Ddd


Posted by studio3d@ccgmail.net at 12:01 AM PDT
Updated: Wednesday, 18 May 2011 11:55 AM PDT
Tuesday, 17 May 2011
Distressed Panel
Topic: Supplies

The focal element on this card is a new product I picked up from www.paperwishes.com called Color Me Papers. They have clear embossed images all over the surface that allow one to color in multiple ways and leave the pattern in stark white relief.

For this one I used Ranger Distress Inks with a foam applicator, using two colors for a little variety. I stamped with a text stamp over the top with Old Paper distress ink. After roughing the edges I attached brads for decoration only, then used adhesive to attach it to the floral panel.

A rubon provides the text and a punched butterfly is glued at the body only with wings bent up.

Ddd


Posted by studio3d@ccgmail.net at 6:00 AM PDT
Monday, 16 May 2011
Pussywillows
Topic: Scrap Recovery

Actually only the image of pussywillows is scrap - from junk mail. The background is music printed on heavy tissue paper. Over the pussywillows I attached a text block printed on vellum. This was done with copper brads.


This pictorial panel is mounted over the music with foam dots.

Ddd


Posted by studio3d@ccgmail.net at 6:00 AM PDT
Sunday, 15 May 2011
With Joy
Topic: Scrap Recovery

What do you get when you cut up a quilt magazine, an old greeting card, and a scrap of glittery paper from your desktop?


The old greeting card is the cream background with the leaf print. It suited perfectly for the 3x3 block of quilt blocks. This was a large quilt so I was able to get 4 of these units from it and still have extra blocks so the center one could be popped up on foam. The brown shimmery paper was hanging around on the desk top and matched both other pieces well.

I selected a greenish folded card base to pull out color from one of the leaves. The text is a clear sticker.

Ddd


Posted by studio3d@ccgmail.net at 6:00 AM PDT
Saturday, 14 May 2011
Spring Nest
Topic: Collage

Last of my little button nests. I went with natural tones on this one, using yarn and stitching on the buttons which are three different styles. I chose a beige folded card base and stamped just the tips of a flowering branch along the top to create a frame.

I laid in a huge vellum sticker across the bottom edge and glued on the nest.

Ddd


Posted by studio3d@ccgmail.net at 6:00 AM PDT
Friday, 13 May 2011
Soar
Topic: Collage

For the nest on today's card I used raffia instead of yarn. I rubbed the top and edges with a black ink ink pad for dimension. I stitched on three bright blue buttons and filled the indented centers with Glossy Accents.

On a coral folded card base I added a strip of printed cardstock. Then on the bottom of the card I stamped a flowering branch three times and added the bird stamp. I used white gel pen on the flower centers and colored them with copic markers to match the printed cardstock.

I used gel pen and copics on the bird since it was mostly solid and I wanted to impart color to it.

I finished this off with a text ticket and a strip of sticker.

Ddd


Posted by studio3d@ccgmail.net at 6:00 AM PDT
Thursday, 12 May 2011
Miracle Nest
Topic: Collage

More of the nests made of yarn and buttons. In this case I had three white buttons of different materials, all with shanks on the back. I colored all of them with a copic marker and, because of the materials, each took the color a little differently. I actually like the effect. They were stitched to the nest.

I created the background by stamping the flowering branch on green woodgrain paper, added a strip of striped paper to bring out the color of the 'eggs' and overlaid them with a clear text sticker. After layering on light blue folded card base I stamped the bird on the left side over the three layers.

Ddd


Posted by studio3d@ccgmail.net at 6:00 AM PDT
Updated: Thursday, 12 May 2011 10:29 AM PDT
Wednesday, 11 May 2011
Love Nest
Topic: Collage

I have been seeing these twisted paper and twisted ribbon flowers on lots of blogs and suddenly had a brainstorm - Start with an oval instead of a circle of sticky paper and wind on yarn instead of paper or ribbon. Voila! A little nest. I had no beads to use for eggs so I chose to use buttons and actually stitched them on.

For a backdrop I wanted to make it look like the nest was resting in a branch so I stamped a flowering branch twice on the selected paper. OOPS, the paper was so dark the branch blended in too much. My solution? Color it in with gel pens. The pink worked OK, the yellow flower centers worked OK, the branches - not so much. So I used white gel pen on the branches, let them dry and colored over the gel pen with copic marker. That worked so well I did the same with white gel pen and green copic for the bud bases.

I used the green patterned paper as a background over a coral card base and added a printed ticket and a clear text sticker.

Ddd


Posted by studio3d@ccgmail.net at 6:00 AM PDT
Tuesday, 10 May 2011
Japanese Lanterns
Topic: Paper Embroidery

Assignment: Make a paper embroidery card with an oriental theme

I pulled out an acrylic stamp and stamped it twice - end to end. Then I stitched over the lines, tassels and wire with various threads. The tassels and wire are stitched with gold metallic.

I added three little Kanji stamps and mounted this over GREEN paper. (There is a sheen to it that the camera freaks out over and turns it to brown.) A red card is the base and I added gold peel-off borders to the top and bottom of the green paper.

Ddd


Posted by studio3d@ccgmail.net at 6:00 AM PDT
Monday, 9 May 2011
Frog Pond
Topic: Paper Embroidery

Assignment: Make a paper embroidery card with the theme "Pond Life".

This is one of my own patterns. I stitched in coral and olive threads on light blue cardstock. These are backed with a green woodgrain print and a coral folded card base.

The text and the frog are both stickers.

Ddd


Posted by studio3d@ccgmail.net at 6:00 AM PDT
Sunday, 8 May 2011
We've Got the Blues
Topic: Paper Embroidery

Assignment: Make a paper embroidery card with only blue and white

When I got this assignment I immediately thought of blue delft plates. But I couldn't find a stitching pattern for one and then I ran across this coffee set in a paper embroidery book I have. Perfect! It was even stitched in blue in the sample.

This is stitched in two blues and I placed it on a blue paper that has the imprint of water taffeta as I thought it looked like a tablecloth fabric. The corners got silver peel-off stickers and they are connedted by blue peel-off borders.

Ddd


Posted by studio3d@ccgmail.net at 6:00 AM PDT
Saturday, 7 May 2011
Dreams of Easter
Topic: Stamping

I had a dream... well actually I woke up one morning and this card was already created in my head - completely. I sketched it out while I ate breakfast and later in the day went off to the studio to see how it would work out. Result? No changes needed from the dream to the reality! Here's how it all went together:

I folded up light blue cardstock and used a yellow chalk ink pad direct-to-paper to make some 'rays' on the top of the left side. I stamped the cross on yellow card and colored it in with copic markers. It was then cut and the edge embossed with a round nestabilities die. I wanted to use a shimmery white card for the foreground elements but had none. So I mixed some hairspray and 'pearl' Pearl-Ex powder in a misting sprayer and spritzed it over plain white cardstock. From this I cut the cloud shapes and ran them through the 'd'vine' Cuttlebug folder.Then I used more of it to stamp the text and cut these out with a scalloped nestabilities die. Three tiny flower rubons were applied to this piece (two at the bottom and one in the middle of the 'O') and then it was popped up on foam dots.

And there it is - a dream come true! Here's something you WON'T see much, though - I set up an assembly line and made 8 of these while I had the supplies out.

Tah Dah!

Ddd


Posted by studio3d@ccgmail.net at 6:00 AM PDT
Friday, 6 May 2011
Three Inches of Broken Glass
Topic: Stamping

Assignment: make a card using inchies

For those who may not know, inchies are one inch square pieces of art. In this case, I had just purchased a little set of one inch acrylic stamps so I chose to try one of them out. I stamped it three times and colored with copic markers. I color-blocked the backgrounds - using the same colors but in blocked areas rather than doing the whole background one color. I rotated the color areas for each inchie.

I wanted to make the inchies look like they were glassy so I covered them entirely with a thick layer of Glossy Accents and left them to dry overnight. Unfortunately, they were slightly curled then they dried. Sometimes they can be flattened out but the studio was cold so they started cracking when I bent them. Solution? Make them crack a LOT and then rub walnut ink into the cracks. This gives the evvect of broken glass. 

I chose some table scraps to layer on a yellow folded card base and glued the inchies on with more Glossy Accents. I drew some pen 'stitching' around the top panel and added a gold peel-off greeting.

Ddd


Posted by studio3d@ccgmail.net at 6:00 AM PDT
Thursday, 5 May 2011
For Father
Topic: Stickers

More from the sticker stash. I layered with green cardstock over a red and yellow check. I tied a yellow ribbon around the focal image and stamped the text on shimmery yellow paper. This was then cut into a tab shape and mounted adjacent to the green frame.

After adding layers of yellow and a green folded card base I pulled out some clear stickers and found the little ladybug I added to the bottom. Cute!

Ddd


Posted by studio3d@ccgmail.net at 6:00 AM PDT
Wednesday, 4 May 2011
Simple Thanks
Topic: Scrap Recovery

I wanted to feature the small image from the stamp catalog so just added multiple layers in coordinating colors pulled from the watercolor markers I had used.

The layers are all made from table scraps mounted on a green folded card base.

Ddd


Posted by studio3d@ccgmail.net at 6:00 AM PDT
Tuesday, 3 May 2011
Too Cute Tutu
Topic: Scrap Recovery

This tutu image is from the stamp catalog, colored with watercolor markers. I framed it out with a scrap of white from which I had previously cut a scalloped circle. The folded card base shows through as the cream background. I drew the hanger in with flack fine-line marker.

The scalloped paper was backed with rose print scrapbook paper from an old page-a-day calendar. It matched the rosebud on the tutu neckline.

I used silver peel-off sticker to create the frame on the white layer and then used silver sticker 'waste' to make the little hash marks around the scallops.

Ddd


Posted by studio3d@ccgmail.net at 6:00 AM PDT

Newer | Latest | Older