« June 2015 »
S M T W T F S
1 2 3 4 5 6
7 8 9 10 11 12 13
14 15 16 17 18 19 20
21 22 23 24 25 26 27
28 29 30
You are not logged in. Log in
Entries by Topic
All topics
3D paperwork
A - Z challenge 5
A - Z challenge 7
A - Z challenge round 4
A to Z challenge round 3
A to Z round 2
A to Z round 6
A-Z round 1
Around the House
Art Challenges
Artist Trading Cards
Backgrounds
Beads
Bible Journaling
Books
Boxes
Collage
Color Challenge
Coloring
cookbook
Die Cuts
Digital Projects
Digital Stamps
Drawing
Dry Embossing
Fabric Stuff
Fantastic Folds
Field Trip
Home Decor
How Does Your Garden Grow?
Hymnal Art
In The Kitchen
In the studio
Jewelry
Lettering
Links
Multi-Technique
Music to Work By
Musings
Nail Art
New Work
Online Class
Other Hobbies
Other Projects
Painting
Paper Embroidery
Paper Piecing
Photo
Pretty Paper
Quilting
Random
reading
Scrap Recovery
scrapbooking
Sewing
Sketch Challenge  «
Some Backlog
Stamping
Stencils
Stickers
Supplies
Teabag Folding
Techniques
Testing
tips and tricks
Tutorial
Web resources
Welcome to my Blog
Work By My Friends
workflow
Writing
Blog Tools
Edit your Blog
Build a Blog
RSS Feed
View Profile
Group One
In & Out of Studio 3D
Sunday, 28 June 2015
Operation Write Home - sketch 251
Topic: Sketch Challenge

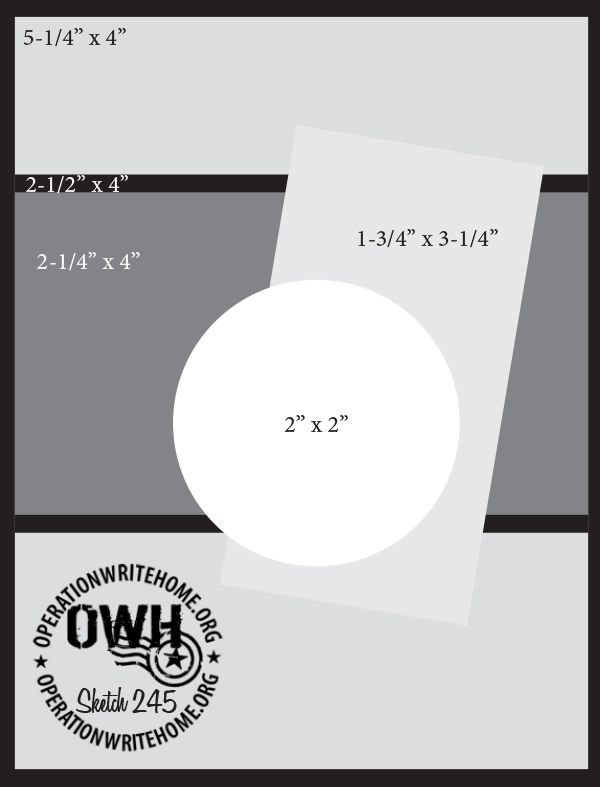
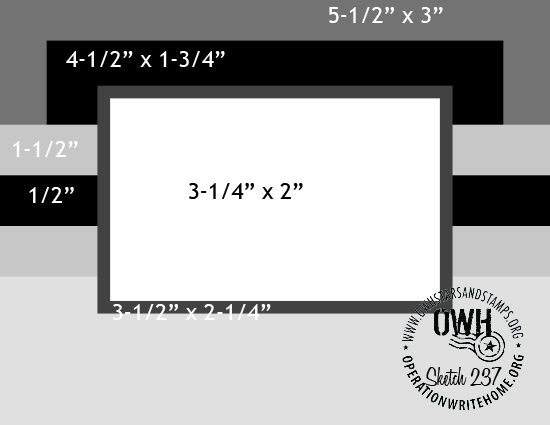
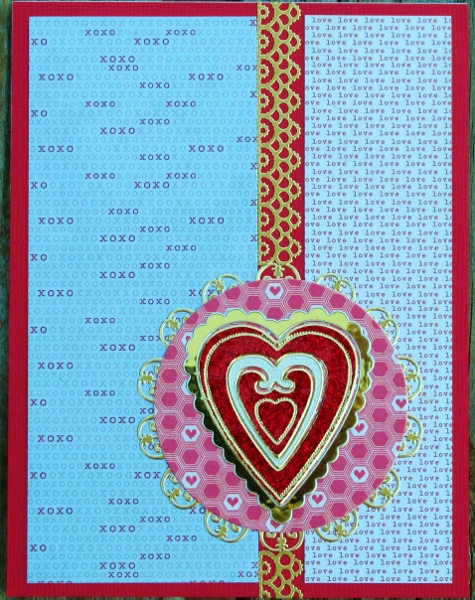
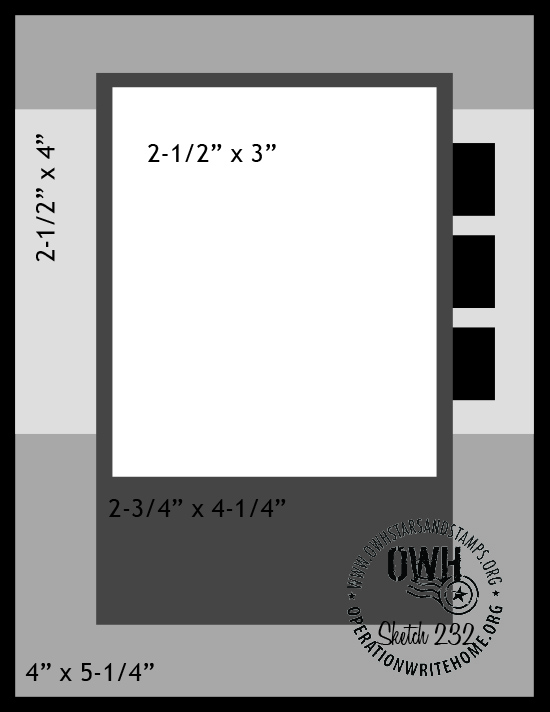
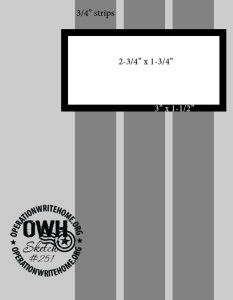
This is a sketch that told me right away what IT wanted and I just jumped on the bus and followed along. Here is OWH sketch 251:


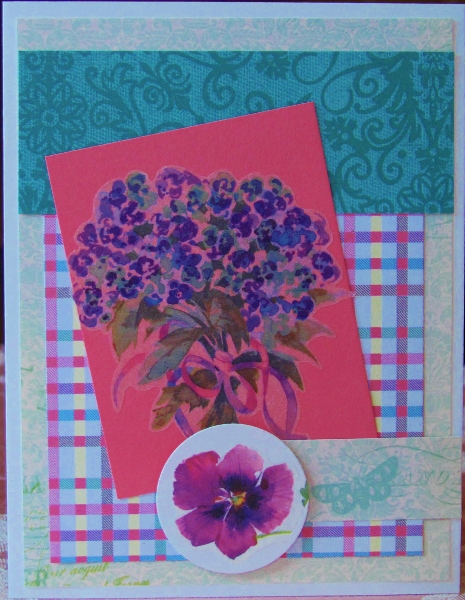
I had a cardstock stitcker from a recenty used sheet laying in the scrap pile and agreed that it could be the focal piece. It requested all the stripes to be an ombre of browns and I complied, making the 'behind' pieces a part of the blend.

Then the sticker said "look at my little strip of decorative trim. Let's add some gold like this to the stripes". Who am I to argue with a good design idea? Gold filligree trim coming right up!

The sticker wanted rounded corners which I supplied with the corner chomper and I gave the same to the right side of the card.


The focal sticker got popped up on foam tape - my version of a 'stage' and became the star of the show.

Ddd


Posted by studio3d@ccgmail.net at 12:10 AM PDT
Friday, 26 June 2015
Operation Write Home - sketch 250
Topic: Sketch Challenge

Let's go back to 'simple' with OWH sketch 250:


I had another of those large vellum heart stickers that I wanted to use in place of the large circle. So as to not be too bold with the background I chose a grey with script.

The gold in the heart sticker led to gold vellum hearts and the black circle backing on the largest led to a black border all around the card.


I chose a pre-stamped sentiment for the crosspiece to reflect one of the colors in the large heart sticker.

Ddd


Posted by studio3d@ccgmail.net at 12:01 AM PDT
Thursday, 25 June 2015
Operation Write Home - sketch 249
Topic: Sketch Challenge

"But, I dont WANT to do it that way!" is my response to OWH sketch 249:


I was not impressed with those 'flags, tabs, strips, blocks' or whatever down the left side. So I turned them into a strip of striped paper.

I chose a purble paper for the main block and found I had a floral sticker to go with it.

A yellow border to pull color from the flower centers and a green background to reflect the leaves got me on the way. I added a strip of pink for the blossom color and mounted it all on a white card base with a border.


Another wierd little square at the bottom of the main block was replaced by a tab made of a pre-stamped sentiment.

Ddd


Posted by studio3d@ccgmail.net at 12:01 AM PDT
Wednesday, 24 June 2015
Operation Write Home - sketch 248
Topic: Sketch Challenge

WOW, that looks complicated! That was my first response to OWH sketch 248:


I thought I could relieve some of the clutter by using papers that are similar in color and pattern. This helps them to blend together.

I wanted to use 3D gold heart stickers so chose larger ones for the larger circles and then used small ones scattered about as shown on the sketch.

By careful placement of the smaller hearts I was able to integrate them with the background, lessening their impact.

I had one paper more than what I needed for the circles so I used that to cut the horizontal strip. In tied it into the rest of the layout by bordering it with gold metallic pen.


When mounting the sentiment strip I popped one end up on foam tape for dimension. This echoes the raised layers of the heart stickers.


Ddd


Posted by studio3d@ccgmail.net at 12:01 AM PDT
Tuesday, 23 June 2015
Operation Write Home - sketch 247
Topic: Sketch Challenge

In comparison to yesterday's card this sketch is a real mind-twister. On its own, though, it is very straightforward. Here is OWH sketch 247:


I started this one out with a floral sticker I had that was already an oval shape. The colors in the striped paper were perfect with the illustration and tied it in to the background purple.

I wanted the orange flower centers to be picked up elsewhere wo I used orange as the lower crosspiece. The pre-stamped sentiment was not long enough so I allowed for bordering.


I used a round punch on a pre-stamped sentiment for the upper right element. It needed a bit of emphasis so I bordered it in white and popped it up on foam tape.

Ddd


Posted by studio3d@ccgmail.net at 12:01 AM PDT
Monday, 22 June 2015
Operation Write Home - sketch 246
Topic: Sketch Challenge

S-I-M-P-L-E

That is the most that can be said for OWH sketch 246:


I can honestly say this is the simplest card I have ever made, short of those grade school things where we just folded a piece of paper in half and wrote 'MOM' on the outside in crayon!

Because the sketch was so clean I did not want to use busy papers and illustrations with it. I chose a rub-on for the artwork and mounted it on shimmery cream paper. This was trimmed to size and bordered with dark green to match the leaves.

This was mounted to a low-key green mesh background with no border.


Two small rub-ons from the same sheet stand in for the two round elements on the sketch.

Ddd


Posted by studio3d@ccgmail.net at 12:01 AM PDT
Sunday, 21 June 2015
Operation Write Home - sketch 245
Topic: Sketch Challenge

I'm closing in on the end of the tunnel! After this sketch I will only have 10 more to catch up wth the end of the regular sketches. There are still 27 bonus sketches left as well, but I really AM near the end!

Here is OWH sketch 245:


Yeah, that's an odd one.

First off, that diagonal piece looked rather haphazard so I chose to extend it all the way to the top and bottom. That helped right off the bat. 

I chose a rose sticker for the circle area and then realized that the round needed to be larger. No problem.

I chose a floral and a stripe for the background to reinforce the colors in the sticker. This gave me the colors to use for the round and diagonal bar.


I left a white border around the card and also at the top and bottom of the striped paper. This keeps the palette from being too dark.

No sentiment to make it more versitile.

Ddd


Posted by studio3d@ccgmail.net at 12:01 AM PDT
Saturday, 20 June 2015
Operation Write Home - sketch 244
Topic: Sketch Challenge

Ooooh, this is a cute little sketch! I was very happy to catch up to OWH sketch 244.


I was especially glad when I found the bird sticker in my stash. It is a clear vinyl sticker so would not separate from a background well. I chose to apply the bird sticker to white cardstock and then fussy-cut it with a fine white border.

As usual, I keyed the card parts to colors found in the illustration. The best was coming across the block of multicolored patterned stripes. It played well with a strip of dark green on the left and a big banner of orange.

I kept up with the 'theme' of diagonal patterns by using a neutral gray background with white diamonds.


I found a stamped sentiment in my binthat was in just the right color.

Ddd


Posted by studio3d@ccgmail.net at 12:01 AM PDT
Friday, 19 June 2015
Operation Write Home - sketch 243
Topic: Sketch Challenge

I think sketches like OWH 243 are really 'back to basics'. The centered elements kind of hold everything together while the off center ones add interest.


The key for me was noting where the bordering elements were, setting the stage for the coordination of layers within them.

My starting point, as usual, was the two rose stickers. I chose a coordinating color for their background and an accent strip that mimicked the shapes and color in that background paper.

For the next layer down I chose a lighter version of the orange, in a solid, and a green printed stripe - low key but still pulling color from the stickers.

The final layer, the background, echoes the color and, a little bit, the shape in the most forward layer. This paper has roses in it as well, like the stickers.


I used blaks as the bordering throughout and reinforced this with the stamped sentiment across the blank space of the center layer.

Ddd


Posted by studio3d@ccgmail.net at 12:01 AM PDT
Thursday, 18 June 2015
Operation Write Home - sketch 242
Topic: Sketch Challenge

Here's another sketch from OWH, number 242. This one is a bit more original than many which do seem to get repetitive.


With those interesting stripes I kept thinking of a sticker sheet of holographic dragonflies in my stash. Once I pulled those out I decided to go with ALL shiny papers in all the layers.

I started by putting a thin washi tape around the 4 sides of the card base which is the zig-zag border shown.

Then I simply cut all the pieces and put the whole thing together as shown in the sketch.

I added all the dragonflies that I had and needed more. I had some little butterflies on the sheet so I added some of those and used a gold gel pen to add antennae and tails to them.


This was enough to bring it all together. No sentiment makes this versitile enough to use for any occasion.

Ddd


Posted by studio3d@ccgmail.net at 12:01 AM PDT
Wednesday, 17 June 2015
Operation Write Home - sketch 241
Topic: Sketch Challenge

A few simple changes actually makes this sketch look more complicated. Here is OWH sketch 241:


I started the changes by deciding to use the same background over the whole card and eliminating the border all around. Then, instead of the three stripes at the top and bottom I chose to do a wide and a skinny where the wide one was border punched with a scallop.

The sticker circle (vellum over a printed background) was backed by a diecut scalloped circle. The colors tie all of the scallops and circles together.

I decided to mount the illustration off center rather than like the sketch and then added a coordinating sticker to the background.


The main illustration is mounted on foam tape.

Ddd


Posted by studio3d@ccgmail.net at 12:01 AM PDT
Tuesday, 16 June 2015
Operation Write Home - sketch 240
Topic: Sketch Challenge

Pick a sketch, pick a sticker. Everything else just follows those two decisions.

Here is OWH sketch 240:


So I started my selections with the birdhouse and bird stickers. The text backgrounds came next as I thought they made a good foil for the stickers.

I pulled green from the birdhouse for the borders on the text blocks and purple from the birdhouse for the overall card background.

The horizontal band made sense in a different shade of green, still from the birdhouse sticker, and I stamped it with a long sentiment.


I flag-cut the ends of the sentiment and popped the bord block up on foam tape.

Ddd


Posted by studio3d@ccgmail.net at 12:01 AM PDT
Monday, 15 June 2015
Operation Write Home - sketch 239
Topic: Sketch Challenge

Well, not only is the countdown on for completing all these sketches, but now word has been released that OWH will stop accepting card donations on August 1, 2015 and will close operations by the end of the year as they get the last of the cards out to their contacts.

I guess that means I won't have sketches to 'keep up with' after August 1, so it will truly be a closure of this whole project.

But that's a ways down the road so here is OWH sketch 239:


I started with a sticker on white cardstock one of a set of Spellbinders Nestabilities dies that was rectangular in shape and approximately the specified size.

I selected colors from the sticker for all the added pieces and let the white base card show around the edges to tie in with the sticker.

When it came time to add the oval element I could not find anything that really worked. So I replaced that with a diecut word that I had in the scrap bin.


The larger border around the sticker was created by using a craft knife around the outside rim of the die. It gives just about 1/8 inch over the size that it cut by the die itself.

Ddd


Posted by studio3d@ccgmail.net at 12:01 AM PDT
Sunday, 14 June 2015
Operation Write Home - sketch 238
Topic: Sketch Challenge

Time for another marathon session of cardmaking on my quest to make a card from every one of the Operation Write Home sketches, in order. With that in mind, here is OWH sketch 238:


I started with the floral bouquet (a vellum sticker) and then picked up the plaid. I tied these two together by placing the floral on a pink background.

Other papers were selected from the scrap bin to carry out the color theme and I even already had a round white bit with a single vellum sticker bloom on it. This matched the other floral element which brought it all together.


The round bloom is popped up on foam tape for emphasis.

Ddd 


Posted by studio3d@ccgmail.net at 12:01 AM PDT
Friday, 5 June 2015
Operation Write Home - sketch 237
Topic: Sketch Challenge

The last in this marathon session is OWH sketch 237:

I actually had a smaller sticker that I wanted to use so I backed it with a neutral gray cardstock. I bordered this in red to call attention to her hair bow. This panel is popped up on foam tape.

I pulled colors from the sticker illustration inbl ues and golden browns for the various panels and strips.


The lower panel seemed to create too much open space so I filled it with a red diecut word.

Ddd


Posted by studio3d@ccgmail.net at 12:01 AM PDT
Updated: Friday, 29 May 2015 4:40 PM PDT
Friday, 29 May 2015
Operation Write Home - sketch 236
Topic: Sketch Challenge

Rectangle, circle, banner...Yep, we're all here. Here is OWH sketch 236:

A rose sticker gave over the color palette for this card. I followed the sketch almost exactly and kept the smaller elements very plain so as to not compete with the green patterned paper.

The green backing paper is much lighter than the other greens but draws attention to the highlights on the leaves around the rose.

The bottom was a little vacant so I cut a pre-stamped sentiment into a tab shape and attached it there.

Ddd


Posted by studio3d@ccgmail.net at 12:01 AM PDT
Thursday, 28 May 2015
Operation Write Home - sketch 235
Topic: Sketch Challenge

I decided to take something simple and really elevate it. This is OWH sketch 235:

I knew immediately that I wanted to use a heart sticker set that comes in three finishes and can be nested. The finishes are red glitter, silver hammered and gold glossy. This particular heart has 4 nesting parts. I mounted it on a heart-printed background circle and backed that with ag old peel-off medallion.

Two papers with a love theme form the background but a cutting error left too wide of a gap between them. I filled this in with some gold filigree border and I loved it.


At this point I auditioned some gold hearts in the place of those dots in the sketch but really, the card was better without them.

Ddd


Posted by studio3d@ccgmail.net at 12:01 AM PDT
Wednesday, 27 May 2015
Operation Write Home - sketch 234
Topic: Sketch Challenge

Sometimes you have to use some imagination to make a sketch work. Here is OWH sketch 234:

This looked a little busy to me and that circle element seems not to fit in.

I loved the floral papers I used for yesterday's card so cut up more of them to use today. I used the floral colors to select the other papers and layers.

I For the focal I pulled out a silver peel-off sticker and colored it with alcohol markers to match the papers.


For the circle element I used a 'round-ish' silver peel-off and colored it as well.

Colors in the photo are not as bright and intense as the card.

Ddd


Posted by studio3d@ccgmail.net at 12:01 AM PDT
Tuesday, 26 May 2015
Operation Write Home - sketch 233
Topic: Sketch Challenge

Oh I am SO happy I had one last hedgehog! Here is OWH sketch 233:

I saved this little guy from the sheet for last because I couldn't imagine how I would use it and make it look planned. Well I was so excited to run across this piece from a 6x6 pad that had the soft lavender background and the spray of flowers across the border. I trimmed it down and, when I put on the hedgehog, she looked like she was really jump-roping through the garden. SWEET!

I pulled colors from the sticker and garden to select papers for the backgrounds and borders. The main panel is popped up on foam tape.


The cloors in the photo are NOT right.

Instead of the three dots used on the right in the sketch, I used a rhinestone corner piece.

Ddd


Posted by studio3d@ccgmail.net at 12:01 AM PDT
Monday, 25 May 2015
Operation Write Home - sketch 232
Topic: Sketch Challenge

Can the sketch itself be called elegant? Or is is only elegant in the execution? Here is OWH sketch 232:


I think in this case, the formality of the layout and the classy papers provide the elegance in combination.

The pink main piece is topped with vellum stickers. More garden papers and a latice frame it out.


From just the tiny bit of golden yellow in the flower centers I was inspired to use it for the bordering. A softer yellow ribbon was folded into three tabs for the right side.

Ddd


Posted by studio3d@ccgmail.net at 12:01 AM PDT

Newer | Latest | Older