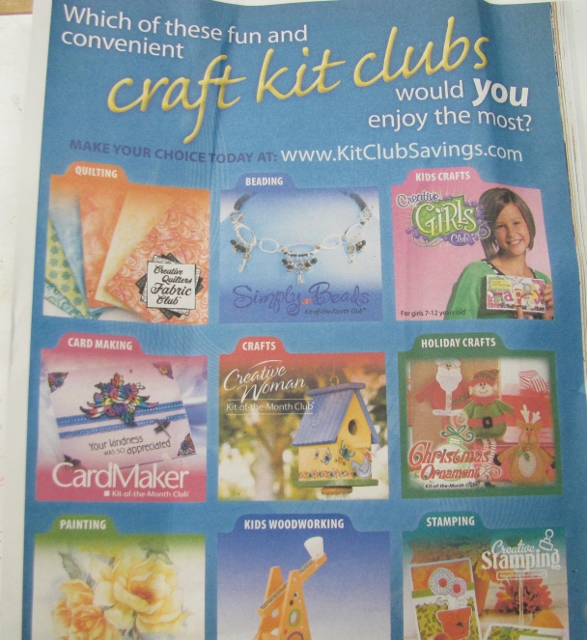
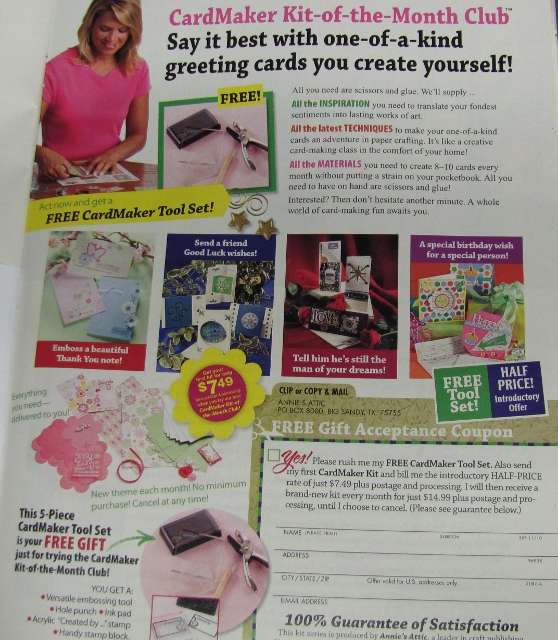
« December 2014 »
S M T W T F S
1 2 3 4 5 6
7 8 9 10 11 12 13
14 15 16 17 18 19 20
21 22 23 24 25 26 27
28 29 30 31
You are not logged in. Log in
Entries by Topic
All topics
3D paperwork
A - Z challenge 5
A - Z challenge 7
A - Z challenge round 4
A to Z challenge round 3
A to Z round 2
A to Z round 6
A-Z round 1
Around the House
Art Challenges
Artist Trading Cards
Backgrounds
Beads
Bible Journaling
Books
Boxes
Collage
Color Challenge
Coloring
cookbook
Die Cuts
Digital Projects
Digital Stamps
Drawing
Dry Embossing
Fabric Stuff
Fantastic Folds
Field Trip
Home Decor
How Does Your Garden Grow?
Hymnal Art
In The Kitchen
In the studio
Jewelry
Lettering
Links
Multi-Technique
Music to Work By
Musings
Nail Art
New Work
Online Class
Other Hobbies
Other Projects
Painting
Paper Embroidery
Paper Piecing
Photo
Pretty Paper
Quilting
Random
reading
Scrap Recovery
scrapbooking
Sewing
Sketch Challenge
Some Backlog  «
Stamping
Stencils
Stickers
Supplies
Teabag Folding
Techniques
Testing
tips and tricks
Tutorial
Web resources
Welcome to my Blog
Work By My Friends
workflow
Writing
Blog Tools
Edit your Blog
Build a Blog
RSS Feed
View Profile
Group One
In & Out of Studio 3D
Tuesday, 2 December 2014
Teabag Fold Published
Topic: Some Backlog

Waaaaaay back in 2003 I was contacted by someone at the Origami Societeit Nederland to see if I would allow one of my original teabag folding designs to be published in their journal "Minori". Of course, I said 'yes' and they promised to credit me with the design and to send a copy of the issue.

Here is the cover of that issue:


And here is the two page spread, pages 20 and 21. You can read my by-line on the left page.

I have looked on a translator to see what a 'sterbloem' is but it does not translate it for me.

Ddd


Posted by studio3d@ccgmail.net at 12:01 AM PST
Monday, 1 December 2014
Kit Design Work - 7
Topic: Some Backlog

The theme of this last kit I worked on was 'thank you' and the technique was decorating envelope cards. The kit included the envelope cards in white and dove grey, decorative papers, diecuts, brads, ribbons, metal flower charms, fabric flowers, sticky-back pearls, and rubber stamps.  


I did not get the published booklet for this kit either.

The envelope cards are decorated only on the outside.


This may be my least favorite of the kits I worked on. This is also the last kit that I was contracted to design for CardMaker Kit-Of-the-Month.

Ddd


Posted by studio3d@ccgmail.net at 12:01 AM PST
Updated: Friday, 17 October 2014 7:20 PM PDT
Sunday, 30 November 2014
Kit Design Work - 6
Topic: Some Backlog

This was one of the last two kits I worked on. The theme for this was Thank You and featured the technique of outline stickers with foil. The kit contained charms, ribbon, stamps, outline stickers, and diecuts.

I did not get the booklet from this kit after production.


I also did not get two of my sample cards returned but I still had the original scans that I had submitted so I will show those here:


The stickers came in a variety of sizes.


Love the pewter charms.


I used 'corners' to make some medallions for these decorations.


I love the dragonfly stamps included in this kit.


This was an entirely new technique for me so I had to learn to use the product before I could design with it and write directions.

Ddd


Posted by studio3d@ccgmail.net at 12:01 AM PST
Saturday, 29 November 2014
Kit Design Work - 5
Topic: Some Backlog

It's been a long time since I looked through these kits that I did design work for so it is fun to revisit them and reminisce.

This kit had a theme of "friendship" and featured the technique of "teabag folding". It included papers with designs in chocolate brown, light blue and a bright yellow-green. Stickers and diecuts along with chocolate brown rhinestones and some fancy ribbon rounded out the selection. I remember that I did the design work for this while on a cruise vacation!


The first card is the one featured on the booklet. It uses a teabag fold with one corner cut along the outline of the motif.


This card features a standard fold.


Some of the teabag papers were round instead of square. This card uses one of them.


This one also uses a edge motif trim:


This card uses a standard fold.


This one is a standard fold as well.


Another standard fold.


A standard with a rhinestone center.


This one uses the round teabag paper.


This is a more fancy fold for the round teabag paper.


Another standard fold.

The kit I was working from for the samples contained VERY stiff papers making it difficult to get sharp creases, but they turned out OK in spite of this.

Ddd


Posted by studio3d@ccgmail.net at 12:01 AM PST
Friday, 28 November 2014
Kit Design Work - 4
Topic: Some Backlog

Time for a little Christmas Magic! That's the theme of the fourth kit I did design work on. The kit contained glitzy blue papers in two tones and lots of neat stickers in white, clear, and gold. Rubber stamps, ribbon, and brads were also included.


Here is the booklet that was published for the subscribers:


There's not a lot to say about the individual cards:


Beautiful in real life but very hard to photograph because of the ultra-shiny coating on the cardstock.

Ddd


Posted by studio3d@ccgmail.net at 12:01 AM PST
Thursday, 27 November 2014
Kit Design Work - 3
Topic: Some Backlog

Flowers and Flourishes kit had a theme of 'Mothers' and featured the technique of 'Spirelli'. The kit contained glimmery papers in lavender and light blue, sheer ribbons, flowers, rhinestones, rubber stamps, decorative papers, floral stickers, and scalloped diecuts in a variety of sizes. 


 The kit also included three spools of metallic thread for winding on the scalloped pieces.


My plan in designing these cards was to cut the scalloped circles or find other ways to turn them into something else for the sake of the design.  This card is a pretty straightforward design:


This card uses the spirelli as a clock face:


This one cuts away parts and uses them a sea shells:


This cut and reassembly makes the spirelli into a butterfly:


this card layers three sizes of cut spirelli to create a peacock:


These flowers were designed with unwound scallops and many stickers:


This uses the spirelli as the wheel on a wheelborrow:


This one becomes a teapot:


And this one uses two spirelli posing as an old-fashioned bicycle:


This is the kit that I have seen in the advertising most often.

Ddd


Posted by studio3d@ccgmail.net at 12:01 AM PST
Updated: Friday, 17 October 2014 5:29 PM PDT
Wednesday, 26 November 2014
Kit Design Work - 2
Topic: Some Backlog

The second kit I designed for included bright papers in plain and patterns, a rubber stamp set, stickers, rub-ons, ribbons, brads, puffy balloons, rhinestones and glitter.


The theme for the kit was Children's Birthdays and the technique to use was Revolving View Cards (think of the ViewMaster from your childhood). 


In all of these cards there is a round aperture in to front and a cutout along the edge. Inset into the cutout is a white circle of cardstock with knotches in the edge. Designs are placed on this circle that can be rotated into place in the aperture.

This card rotates a message through the opening:


This card rotates a variety of facial expressions into place on the clown:


This card rotates different toppers for the candle:


This rotates a birthday message:


This tops the cake with different candles:


This card has no aperture or wheel:


This card tops the hat with different patterns:


This card makes the juggler an action figure:

I hope these were fun cards for some children to recieve from the kit subscribers.

Ddd


Posted by studio3d@ccgmail.net at 12:01 AM PST
Tuesday, 25 November 2014
Kit Designer Work - 1
Topic: Some Backlog

Following up on introducing the kit designer work I did several years ago, today I will begin sharing the kits one by one.

For the first kit, the theme was 'good luck' and featured paper embroidery. The supplies I was sent included blue, green and cream cardstock and papers, stitching stickers, blue and green holographic stickers, and blue and green metallic threads. There was also a rubber stamp set on the 'good luck' theme.

The rules were that I could add glue, scissors, pencil, etc. but could not add any supplies to the designs not included in the kit.

I did cards with interesting folds, some with original embroidery patterns, and some with the stickers and stitching. For all original patterns I had to supply the artwork for publication so the customers could duplicate my work. Here are the cards I created (these are ALL of my samples - some were not selected for publication).


You can see there was also some fluffy yarn in the kit.

Ddd


Posted by studio3d@ccgmail.net at 12:01 AM PST
Monday, 24 November 2014
As Advertised
Topic: Some Backlog

There's nothing like the feeling I get when I open an advertising flyer or a magazine and find some of my own work as part of the promotion! I did some contract work 2008 to 2010 for CardMaker Kit-of-the-Month and still occasionally find one of my designs in the advertising.

Here are some of the ads that show cards I designed:


So, how did all of this work?

I was contacted by one of the staff to see if I was interested in designing for them. When I said 'yes' they sent me a kit of supplies from one of their recent releases. I used these supplies to make a range of cards along their theme and submitted them to see if they thought my work was acceptable.

When it was my 'turn' to design a kit they would send two full kits of the supplies that the customers would be getting. I designed ten to twelve cards and sent scans of them. The coordinator would tell me if there were any changes they wanted (use more ribbon, change the audience to children, etc.) and designate which eight they wanted to purchase.

I would then white up complete and detailed directions for those cards and send them in along with the original cards.

The company then printed the directions, patterns, and photos of the cards in a booklet which was then distributed with the supply kits to their subscribers.

Over the next few days I will be showing the kits that I designed for. In the meantime, here are the cards I made as the initial samples by which my work was judged.


Ddd


Posted by studio3d@ccgmail.net at 12:01 AM PST
Wednesday, 9 June 2010
Mail Train
Topic: Some Backlog

Now THIS is really backlog! I made this train mailbox about 25 years ago as a gift for my parents. They no longer have a place to use it so I've got it back - decorating my front porch.

I designed this around an actual mailbox and added the coupula and cow catcher using sheet metal (a friend with a riveter helped with assembly). The funnel is actually a funnel from the hardware store and is screwed on. The bracket for the bell is a curtain rod bracket and it is supposed to have a little bell tied on that is the kind you buy for your birdcage (for the bird to play with). It also used to have a little convex mirror on the handle to represent the headlight.

I used large spaghetti sauce cans for the back wheels and tuna cans for the front. Then I masked off the flag and spray painted it with glossy black paint.

She's all pretty tired looking now after many years in the weather, but I kinda like that look with the wrought iron railings of the porch.

Ddd


Posted by studio3d@ccgmail.net at 6:00 AM PDT
Tuesday, 2 December 2008
Date Book
Topic: Some Backlog

These were the last of the kits I had left - 11 meander books. The 8 1/2 x 11 page that this begins with is printed with the days of the year - one month per page - where the owner can write in birthdays and anniversaries. The last three pages list birthstones, birth flowers, and traditional and modern gifts for anniversaries. I made these with covers of mat board and spines of scrapbook paper. These are the simple books I taught my grandkids to make. 

Ddd


Posted by studio3d@ccgmail.net at 6:00 AM PST
Monday, 1 December 2008
Round and Round
Topic: Some Backlog

I had more of these kits left than any other. I sat down and made 16 bracelets in one day. These are the 'Christ's Story' bracelet and will be boxed along with a card that tells the story with the beads. 

Ddd


Posted by studio3d@ccgmail.net at 6:00 AM PST
Sunday, 30 November 2008
Scrappy Scraps
Topic: Some Backlog

I used to have al lot more of these leftover kits. Then my darling grandkids came to visit this summer and we used up 5 of them. So this week I finished up the last 3. 

Ddd


Posted by studio3d@ccgmail.net at 6:00 AM PST
Saturday, 29 November 2008
In Stitches, Again
Topic: Some Backlog

 Next in my kit-finishing spree I make up these 11 stitched pamphlets. They are designed after a card I was taught and I added a fancy liner paper and more pages. There is a metallic card insert in the folded point and it tucks into a double slit in the square cover.

Ddd


Posted by studio3d@ccgmail.net at 6:00 AM PST
Friday, 28 November 2008
Such an Angel
Topic: Some Backlog

Well, this isn't REALLY backlog. Let me explain. I cleaned my studio and pulled out all the unused kits leftover from all the classes and workshops I had done. I decided, instead of re-storing them, to just make them all up and THEN put them aside together. Then when a bazaar table opens up, a donation is needed, or I want a quick gift - I'll be ready!

The first to be done were the stitched and beaded Christmas cards I finished on my vacation.

Next up were these 11 kitchen angels made of a hand towel, a dish cloth, a pot holder, ribbon, chenille wire, and rubber bands. I have 6 Fall and 5 Christmas designs.

Ddd


Posted by studio3d@ccgmail.net at 6:00 AM PST
Wednesday, 19 December 2007
Deck the Halls
Topic: Some Backlog

When we were first married (almost 34 years ago) there wasn't a lot of money for things like Christmas ornaments. So I strung popcorn and made cookies to hang on the tree and made some paper decorations. That first year I made the woven birds that I have instructions for on my website.

For several years I made an additional set of a different style of ornament every year. I stopped when my tree got too full! Over the years some have been lost to attrition (the blown eggs, for instance) and some just did not last at all (dough ornaments tend to MOLD in Oregon).

But I do still have most of them left. Here are some of the handmade ornaments off my Christmas tree:

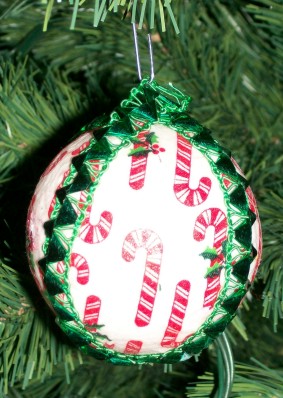
These are styrofoam balls with 4 pieces of Christmas fabric attached using Mod-Podge. Fancy trim covers the seams and is held on with sewing pins. I made three different styles using different patterns of fabric.

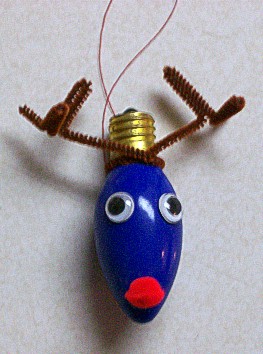
Christmas light bulbs are given antlers with pipe cleaner, a nose of pom-pon and two google eyes. A thread is used for a hanger. All assembly is done with a heat gun.

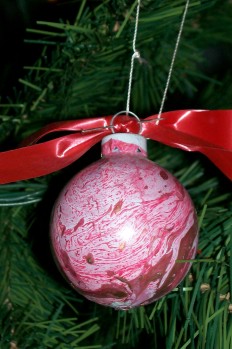
For these I started with standard glass balls (red and green). On the surface of water in a plastic tub I sprayed acrylic paint, first white, then red, then gold. With a skewer I made patterns in the paint and then dipped the balls down into it and hung them to dry. I added ribbon bows to the top.

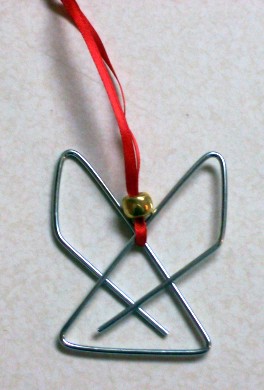
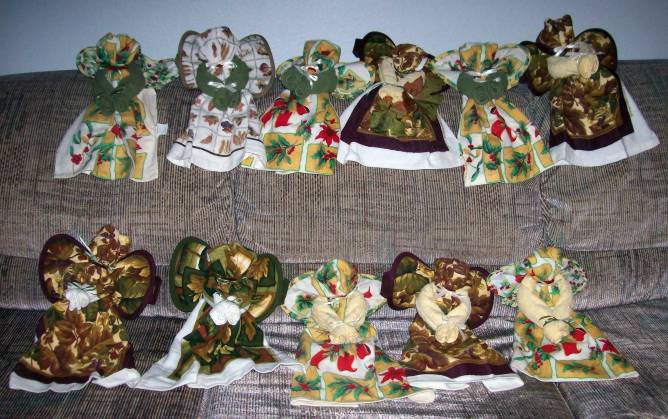
These very simple angels are made with a length of ribbon, a binder clip from the office supply store, and a pony bead. Easy-Peasy!

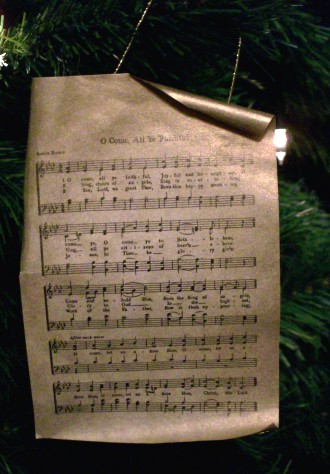
These musical scrolls are Christmas hymns reduced to fit on a 1/4 sheet of buff colored paper. Then I lightly sprayed with gold paint and curled the corners. Gold metallic cord is hot-glued to the back for hanging.

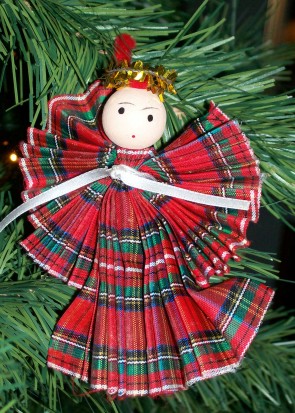
These are from the VERY early days! I don't have instructions for these anymore but they use 3 inch ribbon, pipe cleaner, a bead, tinsel and a bit of narrow ribbon.

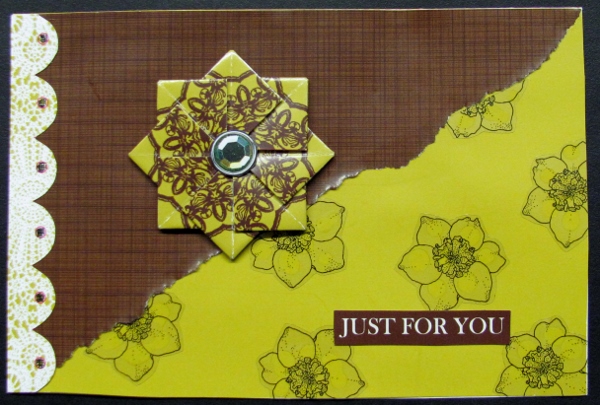
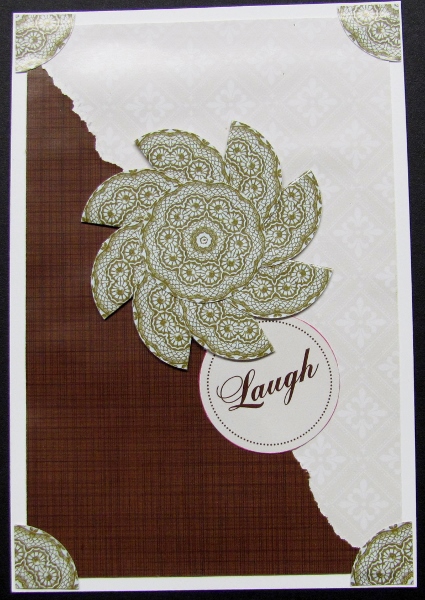
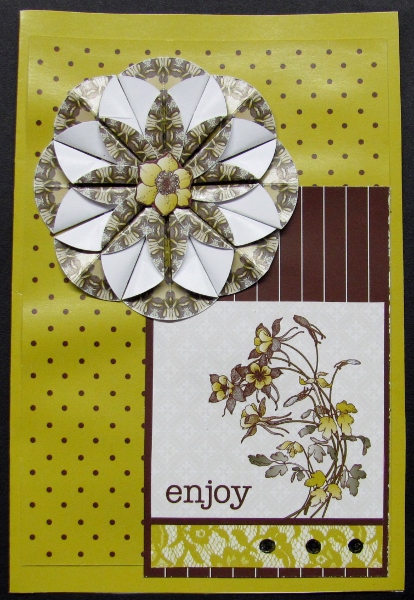
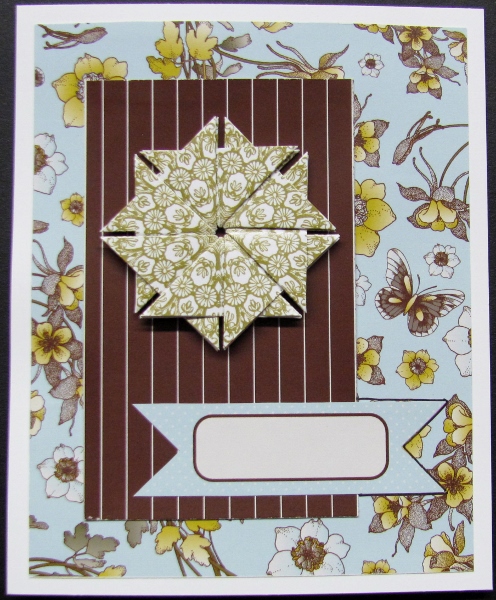
This is probably the most recent set made. They are teabag folding using black and copper printed wrapping paper. I made the folds on both sides of the ornament so they are reversible. They hang with a loop of narrow black ribbon.

I seem have misplaced a box of ornaments as I cannot find my drums made from cut-down frozen juice cans, velvet ribbon, pony beads, toothpicks and gold spray paint. I can't remember what else is in that box besides the wreaths crocheted on milk jug rings that my mom made for me and some ornaments from swaps. Hmmmm.....

Ddd studio3d@ccwebster.net


Posted by studio3d@ccgmail.net at 6:00 AM PST
Updated: Wednesday, 19 December 2007 6:54 AM PST
Sunday, 21 October 2007
Kitty Bling
Now Playing: using up the scraps
Topic: Some Backlog

Here's another card I made using a jewelry catalog illustration. With great lighting their photograph makes this piece look very 3-dimensional. I did the embossing using Fiskars Shape-Boss.


Ddd studio3d@ccwebster.net


Posted by studio3d@ccgmail.net at 6:00 AM PDT
Thursday, 4 October 2007
On Edge
Now Playing: ...she said in a husking voice...
Topic: Some Backlog

Related to quilling, husking is a technique that creates images with strips of paper mounted on edge. The major difference is that quilling features rolling the paper into a coil and then shaping it.

Husking, on the other hand, uses a board with pins in it and the strip of paper is wound out around a far pin and back, then glued to the point of origination.

At our retreat in Pittsburgh, J'Lu taught us to do both quilling (which I do not like doing) and husking (which I do like doing).


The most frustrating thing is that it is difficult to find patterns for husking. I would like to find lots of patterns and do more husking.

Ddd studio3d@ccwebster.net


Posted by studio3d@ccgmail.net at 6:00 AM PDT
Wednesday, 3 October 2007
Brass Stencil Embossing
Now Playing: when you don't find what you want
Topic: Some Backlog

Several years ago I took a jewelery and metalsmithing class - several times. One of the techniques we had to work on was called metal piercing. Essentially, this is sawing shapes out of sheet metal.

I chose to make some brass stencils of shapes and/or sizes that I could not find elsewhere. These two leaf stencils are about the size of a penny. The Japanese character for happiness is avout 2 inches tall.

I've not done any more stencil cutting since leaving the class but I now have the skills and the tools to do so if I wish.

Ddd studio3d@ccwebster.net


Posted by studio3d@ccgmail.net at 6:00 AM PDT
Tuesday, 2 October 2007
Stretching it a Little More
Now Playing: from my scrap drawer
Topic: Some Backlog

This flower illustration was much more square but I wanted to fill a longer card. So I laid a matte over it and cut behind. This allowed me to move the right and the left sides outward creating an elongated illustration.

The jeweled hummingbird is a jewelry catalog illustration that I cut out for use.

Ddd studio3d@ccwebster.net


Posted by studio3d@ccgmail.net at 6:00 AM PDT

Newer | Latest | Older