Topic: Stamping
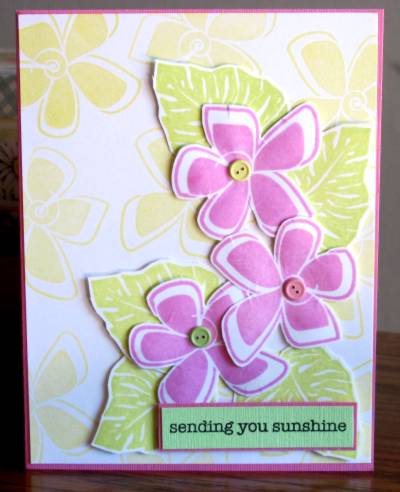
The stamp style for day 4 of the class was 'graphic'. I have several in this style so it was easier to come up with ideas for following the lessons. The first one is very simple. The flower was stamped with yellow chalk ink to create a background on white cardstock. On separate white cardstock I stamped three of the flowers in pink and 5 green leaves. These were all trimmed with a thin white border. I mounted the leaves and then the flowers with a combination of ATG tape and foam tape for dimension. Then I pierced holes in the centers of the flowers and added button brads. The panel was then trimmed to size and added to a colored card base and a sentiment was bordered and popped up on foam.
I used a graphic wheel set to stamp over 4 colors of cardstock with different colors of chalk ink. Then I cut all the pieces into 1 inch squares and reassembled them on cardstock with Xyron adhesive. I trimmed to even edges and tied some scrappers floss on. Then I cut and applied a sentiment strip. This first one on a green background got a border around the sentiment and multiple strands of floss.

This one on a burgundy background got only a single strand of floss but I added a button.

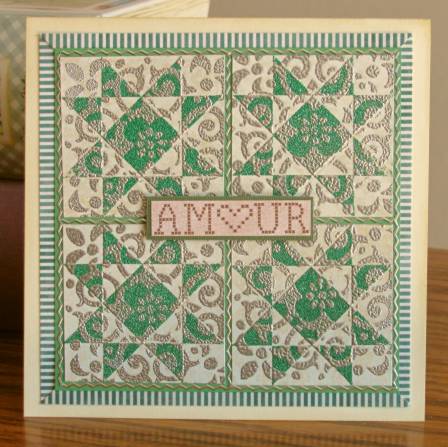
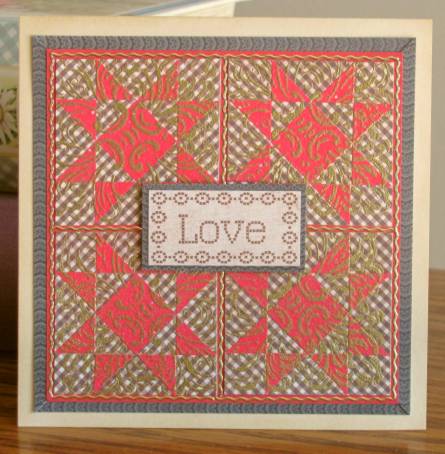
The next technique is double embossing. I started with patterned paper and stamped four impressions with a quilt block image using Versamark ink. This was embossed with colored powder. Then I used Versamark ink again with a graphic pattern block and embossed with metallic powder. These four blocks were then cut out and mounted with a little interior space on a coordinating color cardstock. I added matching metallic sticker trim and framed with a coordinating color border. A sentiment was cut from a designer paper and bordered before mounting with foam tape. The panel was then added to a square card base.
This first one is done with green and silver on a very light greenish designer paper.
The next uses red and gold on a brown patterned paper.
Then I went on to stamping on transparencies with white Staz-on ink. I first used a set of three clear stamps of graphic patterned hearts. I stamped repeatedly over a full sheet of transparency so I would have multiple pieces to play with. For the first one I layered with designer paper and pierced holes in the heart centers. The holes were used to mount heart brads to hold the two pieces of material together. I used a gold foil rubon on the right side of the card and applied a fold greeting sticker on the lower left. This is mounted on a barely pink card base.
![]()
The second of these got a chocolate toned music print background. I added a strip of tissue tape and two silver borders along with a silver sticker greeting. The two pieces of material are held together this time with four copper corner brads and I placed it on a tan card base.
![]()
BRACE YOURSELF --- I Finished off the day with Christmas Cards!
I had a great graphic stamp of an ornament and used it on transparency with white Staz-on ink. I cut my transparency in to 5 pieces of varying sizes and got out some green Christmas papers and some metallic red stickers that I just picked up on sale. For all of these cards I used mini glue dots behind the ornaments to adhere the transparency to the backing paper.
The first uses a full panel of the transparency, silver peel-off border stickers and the red foil greeting. I added a red 'nail head' sticker to dot the 'i'.
![]()
The next smaller piece of transparency makes a nice breaking point to mount the large text. I used two 'nail heads' to reinforce adhesion on the two sides.
![]()
An even shorter piece fit perfectly above the border print on this designer paper. I used the foil word sticker on the edges of the border and added a 'nail head' for the red nose.
![]()
The next two scraps were formatted so the cards had to be horizontal. I used the bigger piece as a border and tacked the edges down with gold sticker trim. red foil text in script fit this format perfectly.
![]()
This one uses up the scraps of the transparency, the nail heads, and the stickers. Not my favorite layout of the bunch, but acceptable.
![]()
WOW, 12 cards for this lesson and 5 cards added to the Christmas stash!
Ddd
