« December 2015 »
S M T W T F S
1 2 3 4 5
6 7 8 9 10 11 12
13 14 15 16 17 18 19
20 21 22 23 24 25 26
27 28 29 30 31
You are not logged in. Log in
Entries by Topic
All topics  «
3D paperwork
A - Z challenge 5
A - Z challenge 7
A - Z challenge round 4
A to Z challenge round 3
A to Z round 2
A to Z round 6
A-Z round 1
Around the House
Art Challenges
Artist Trading Cards
Backgrounds
Beads
Bible Journaling
Books
Boxes
Collage
Color Challenge
Coloring
cookbook
Die Cuts
Digital Projects
Digital Stamps
Drawing
Dry Embossing
Fabric Stuff
Fantastic Folds
Field Trip
Home Decor
How Does Your Garden Grow?
Hymnal Art
In The Kitchen
In the studio
Jewelry
Lettering
Links
Multi-Technique
Music to Work By
Musings
Nail Art
New Work
Online Class
Other Hobbies
Other Projects
Painting
Paper Embroidery
Paper Piecing
Photo
Pretty Paper
Quilting
Random
reading
Scrap Recovery
scrapbooking
Sewing
Sketch Challenge
Some Backlog
Stamping
Stencils
Stickers
Supplies
Teabag Folding
Techniques
Testing
tips and tricks
Tutorial
Web resources
Welcome to my Blog
Work By My Friends
workflow
Writing
Blog Tools
Edit your Blog
Build a Blog
RSS Feed
View Profile
Group One
In & Out of Studio 3D
Thursday, 17 December 2015
Snowy Silver City
Topic: Dry Embossing

The sanding of shiny embossing has worked so well I used it again for the card today.

This one was a snowy village embossed on silver. There was so much open space I knew I couldn't restrict the sanding to the raised areas so I intentially went into the background with the tool. I sanded on both the vertical and the horizontal to create a crosshatched look.

I colored in the houses and trees with pastel alcohol markers for a low-key look.


I left the chimney smoke and the snow plain and added just a hint of color as a shadow on the roofs so they would look snow-covered.


This may get a sentiment stamped in Staz-On on the snowy ground.

Ddd


Posted by studio3d@ccgmail.net at 12:01 AM PST
Wednesday, 16 December 2015
Shiny Red Tree
Topic: Dry Embossing

For the treatment of a Christmas tree embossed on shiny red cardstock I combined a technique  I used before with a new treatment.

First, I used a sanding block to remove most of the red shine. Then I used alcohol markers to color the raised elements.


I cut out around the tree and mounted it over a shiny gold panel that I had embossed with stripes of holly.

I used a white card base and no sentiment.

Ddd


Posted by studio3d@ccgmail.net at 12:01 AM PST
Tuesday, 15 December 2015
Glossy, Glittery Wreath
Topic: Dry Embossing

I'm back to using some of the dry embossed panels I got in a swap. One of these was a wreath (shown before on shiny gold) that was on green cardstock.

I started out by using Distress markers to color in the raised areas with various colors. It was too plain so I added Glossy Accents to the holly leaves and berries.

The rest of the wreath looked plain in comparison so I added two different Stickles. One on the evergreen sprigs and one on the sage-colored filler.


The raised shine on the raised leaves looks particularly nice.

I added this panel to a white base card and added a strip of gold peel-off border at the top and bottom.


I just realized that a LOT of my cards this Christmas are going out without a greeting on the front.

Ddd


Posted by studio3d@ccgmail.net at 12:01 AM PST
Monday, 14 December 2015
Tree Lot
Topic: Techniques

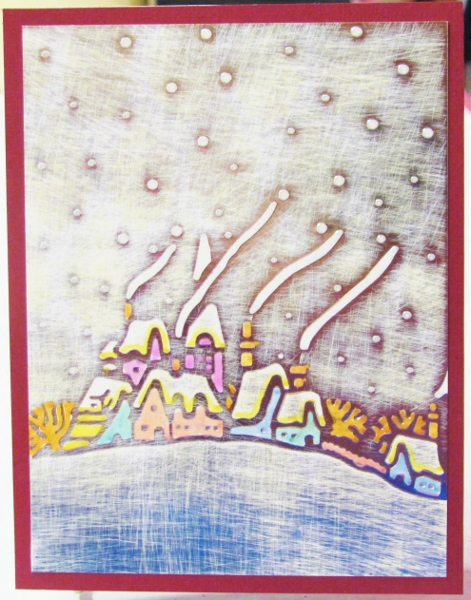
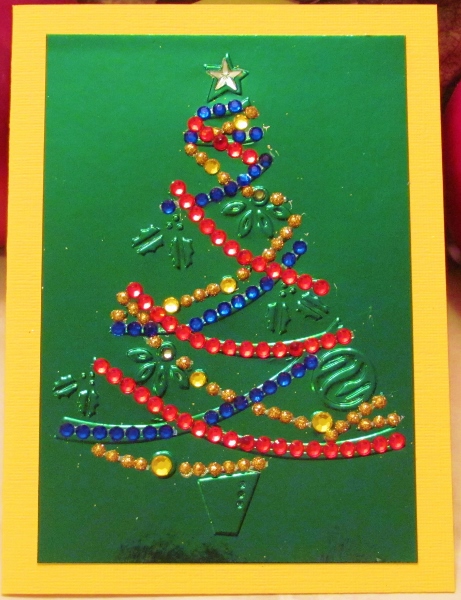
A couple of weeks ago I saw Kristina Werner make a Christmas card with some simple watercolor triangles and a black pen. I made a note to try this myself - with a few changes.

Kristina used narrow painters tape to mask of triangles to paint her shapes in. I just free-handed my triangles.

Kristina used watercolors. I used the ink from Distress Markers in seven varieties of green.

Kristina left the foreground white. I used the markers like watercolor to create snowbanks.

We both used fine line marker to draw decorations on the trees and stamped a greeting in black.

Kristina used some metallic markers to color in her ornaments. I used a distress tool to rough up the edges. On some I used distress ink to color the rough edges. 
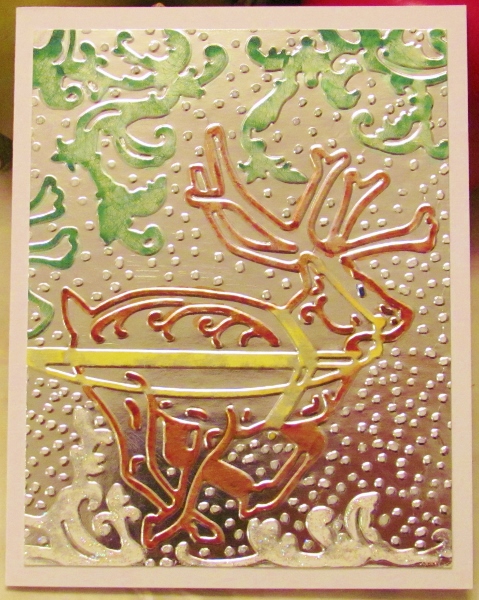
Here is my lineup:

The first has no inking of the edges - 

On this one I just inked the edges -


This one got the corners of the page inked as well as the rough edges -


For this one I inked the corners BEFORE roughing the edges and then inked the edges by dragging directly on the ink pad. I also inked the edges of the base card -


This last one I accidently spattered it with ink while doing the watercoloring on another one. I LIKE that effect. I distressed the edges less on this than on the others.


Look at the cool spatter effect -


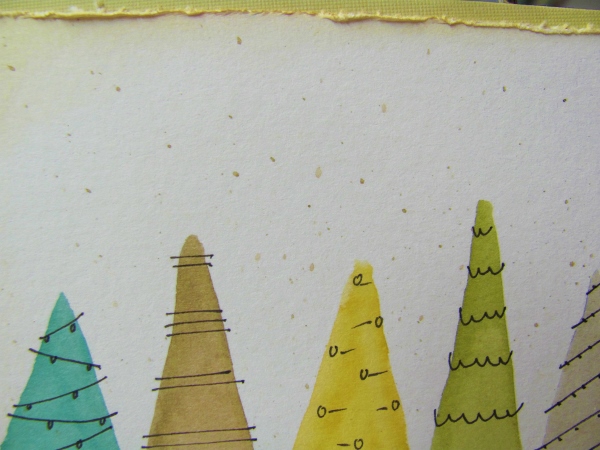
As it happens I like the tree decorations best on this one, too.

All 5 of them were mounted to a light moss card base.

Ddd


Posted by studio3d@ccgmail.net at 12:01 AM PST
Sunday, 13 December 2015
Got My Eye On You
Topic: Collage

When we were at the beach this summer we saw a cute sign in the window of a shop. I changed the text slightly and customized it to make a gift for friends.

First, I collected a lot of woodgrain photos from the internet and printed them out in 1.5 inch strips across the length of paper. Some were dark, some light, some yellowish and some brownish. Then I printed one pattern to fill a page.

I cut strips of each at 1 inch high.

I pulled out my letter stickers and sorted through to find the ones that I had enough of to make up the words I wanted to use. These were spelled out on the various strips.

I ran the strips through the Xyron to apply adhesive.

The strips were then cut into individual words and arranged on the full sheet of woodgrain that I had set aside.

I printed out the side view of the dog I wanted to use and cut it out. This, too, was given adhesive in the Xyron and adhered to the page of words.

I added a couple of paw-print stickers and then glued the whole thing to a distressed cardstock backing cut to 8.5 x 11.


As soon as I put it in a document frame it will be ready for gifting.

Ddd


Posted by studio3d@ccgmail.net at 12:01 AM PST
Saturday, 12 December 2015
Owl Love Your Forever
Topic: Quilting

Today I'm showing the 21st baby quilt top - the second of the owl fabric used in a disappearing 9-patch.

This looks a lot like yesterday's quilt but the owls are those that were on the outer edges of the cut fabric. The layout was constructed so the cutting of the 9-patch would slice down the center between the owls.

Because the yellow is the large block it makes that the dominant color in the quilt.


I was careful to arrange the owl fabric in the original block so that the finished pieces would face in all directions.

This is number 21 in the project.

Ddd


Posted by studio3d@ccgmail.net at 12:01 AM PST
Friday, 11 December 2015
Owl Always Love You
Topic: Quilting

And Sew on, and Sew forth.... I'm back at the baby quilt tops again.

Remember back to the frog quilt with the yellow star fabric and the bright coral? Well, when I bought those three fabrics, I also bought a cute owl fabric what had the same colors in it. This allowed me to use the same yellow star fabric and the coral.

I also used the same layout and construction.

Today's quilt top uses the owl fabric in the big squares. I didn't fussy-cut the fabric so after I cut it up I divided it into two groups - those with an image near the center of the block (which I used for this quilt) and those with parts of the image off to the sides (which will be used on tomorrow's quilt).

The fabric has three main owl images:


The disappearing 9-patch construction was laid out so tha, when the blocks were quartered the owls would face in every direction.

Here is the finished quilt top.


I used the coral fabric for a 3-inch border.

This is number 20.

Ddd


Posted by studio3d@ccgmail.net at 12:01 AM PST
Thursday, 10 December 2015
You Said a Mouthful
Topic: Dry Embossing

I have a couple of these embossing folders (Happy Birthday and Thank You) but not one for Christmas. I was delighted to get this impression on shiny silver cardstock.

So, what to do with it?

I decided to just use alcohol markers to color the individual phrases so they would be distinguished from one another.

There were some stars and a sprig of holly to color in as well.

I mounted the panel on a shimmery blue card base.

Ddd


Posted by studio3d@ccgmail.net at 12:01 AM PST
Wednesday, 9 December 2015
Noel, Framed
Topic: Dry Embossing

This overly intricate embossed frame was pressed out on shiny gold cardstock. I trimmed smaller to fit on an A2 card.

It certainly did not need more color, texture or... anything really.

I decided to go with a gold peel-off sentiment (NOEL) in the only open place on the panel.


After mounting the panel on a dark pink folded card base, I had room to add gold peel-off borders to all 4 edges.

Ddd


Posted by studio3d@ccgmail.net at 12:01 AM PST
Tuesday, 8 December 2015
Golden Holiday Dots
Topic: Dry Embossing

While I had the yummy pearlized cream cardstock out I decided to use it as the card base and sentiment strip for this second gold embossing.

This card was not specifically Christmas but just looked festive anyway. 

I added a simple strip of the cream cardstock, framed it out with gold peel-off borders and added a peel-off gold sentiment.


This card, though smaller than the last, is still larger than my usual. 

Ddd


Posted by studio3d@ccgmail.net at 12:01 AM PST
Monday, 7 December 2015
Golden Wreath
Topic: Dry Embossing

Oh. My. Yes.

From a shiny gold oversized dry embossing I cut down right to the edges of the wreath. 

I mounted this on a pearlized cream cardstock base and trimmed it with three strips of gold peel-off borders.


I added a peel-off greeting inside the lower panel.

This card i much larger than my usual at 5 x 7 inches.

Ddd


Posted by studio3d@ccgmail.net at 12:01 AM PST
Sunday, 6 December 2015
All That Glitters
Topic: Dry Embossing

Like the candles yesterday, the embossing used today was also on the super-shiny green cardstock. In fact, they were on opposite end so the same page before I cut them apart.

The tree, however, was not so plain as it was of a decorated tree. I started adding rhinestones over top of the embossed garlands and before I knew it I was in a bling frenzy.


I even added a sticky-back rhinestone star on the top.

Ddd


Posted by studio3d@ccgmail.net at 12:01 AM PST
Saturday, 5 December 2015
Simply Shiny Green
Topic: Dry Embossing

If this dry embossed image had been on white it could have been colored in a veritable rainbow. But, instead, it was embossed on super-shiny dark green. Any color added would be invisible.

So I simply trimmed it, mounted it on a yellow card base and that is all.


I will probably add a sentiment block to this one after I determine the recipient. It is just too plain like this.

Ddd


Posted by studio3d@ccgmail.net at 12:01 AM PST
Friday, 4 December 2015
Silver Reindeer
Topic: Dry Embossing

When I received this dry-embossed image it was HUGE! Like, 8 1/2 x 5 1/2 huge. I couldn't image using it at that size so I trimmed a main image down to the size that would fit on a card front.

The super-shiny silver was a bit confusing with all that was going on. So I used a sanding block to rough up the raised areas. Then I used alcohol markers to color in the branches, reindeer and harness.

I left the snow white.


I added Stickles to the snowbanks but left the falling snow plain.

Ddd


Posted by studio3d@ccgmail.net at 12:01 AM PST
Thursday, 3 December 2015
Sculpted Snowflakes
Topic: Dry Embossing

Just in time for holiday card making a swap partner included lots of Christmas-themed pages in the embossed papers she sent. YAY!

Not only that, many of them are embossed on super-shiny metallic cardstock. YAY YAY!

I didn't choose one of the shiny ones today, though. Even though it was buttery yellow and mostly just scrolls, this impression reminded me of snowflakes. As it happens, I had some white diecut snowflakes already on hand so I cut them into pieces and glued them on top.


I added two different Stickles as outlines on the snowflakes.


I am undecided on whether to include a sentiment.

Ddd


Posted by studio3d@ccgmail.net at 12:01 AM PST
Wednesday, 2 December 2015
Sunset on the Frog Pond
Topic: Quilting

I put the odd fabric versions together first and have finally come to the version that I bought the fabric for in the first place.

THIS version of the disappearing 9-patch appears just as I designed it in my head when I first saw these three fabrics: the blue with frogs, the yellow with stars and the bright orange. The orange matches some of the stars and some of the frogs. Some of the stars also match the blue in the water.


This is the 19th quilt top for the baby donation project.

Ddd


Posted by studio3d@ccgmail.net at 12:01 AM PST
Tuesday, 1 December 2015
Spring at the Frog Pond
Topic: Quilting

I combined the frog print fabric with some yellow star yardage and some green from the stash. I didn't have enough of the frogs for all the blocks so I used another blue for the blocks in the center.

The center was not quite big enough so I added an inner border of striped fabric.

The outer border is more of the green used in the smaller blocks.

The construction is a disappearing 9-patch which is so easy and quick to put together.


The frog print and yellow with stars were bought together for this project.

Ddd


Posted by studio3d@ccgmail.net at 12:01 AM PST
Monday, 30 November 2015
Shadows On the Wall
Topic: Around the House

I noticed the other day how, when the sun shone in the window at a certain time of day, the shadows created by one of my decorating vignettes made a little artwork of its own.

The trick is catching it at the perfect time - we're not always looking at that wall when it happens.

I tried to get a good photo of it, but it does not come out as neat as just gazing at it in real life.

I did get a couple that are passable. The 'live' version has a yellow cast to it, but the photos come out with a blue tint. I adjusted that to make it look more vintage with a color correction to sepia tones.


Now I might have to start decorating with an eye to what kind of silhouette they will make!

Ddd


Posted by studio3d@ccgmail.net at 12:01 AM PST
Sunday, 29 November 2015
Orange Frog Pond
Topic: Quilting

Here is number 17 in my series of tops for baby quilts.

The blue fabric is covered with yellow and orange frogs along with some sort of bugs. I used a dark coral patterned fabric and some brighter marbled fabric.

This is constructed as a disappearing 9 patch.

When I got the center done I discovered I had been a little enthusiastic with the trimming in squaring up and was goung to be short one inch of the desired 40 for the quilt top. So I added a striped 1/2 inch inner border before the patterned coral outer border which had already been cut.


Yes, it really IS this bright!

Ddd


Posted by studio3d@ccgmail.net at 12:01 AM PST
Saturday, 28 November 2015
I'll Put a Hexie On You
Topic: Sewing

My sister and I have had a long-standing bond over how much we dislike hexagons in quilting and sewing. I think it harkens back to grandmother's day when they were all the rage, then they became popular during our teen years, and now they are back AGAIN!

We whine and moan about being exposed to them (and those annoying yo-yos, too) and have sworn to not use them.

... then I went on a quilting cruise and our welcome bag had a kit in it for making little one-inch hexagons (hand stitched, no less) - calling them addictive and contagious.

The provided fabric was even ghastly, so I took some left over from one of the classes and, while we were going through the locks in the Panama Canal, I cut and stitched together 7 in one color and 7 in another and then stitched them back to back.

Now what? I have a lame coaster.

I took it to the next 'Open Sew' time and used the decorative stitches in the sewing machine to 'draw' radiating lines until it looked like a snowflake. I can almost pretend it doesn't look like hexagons anymore.


I've already determined how I'm going to get it out of my house... with a ribbon loop it will become an ornament and end up in the Christmas stocking of someone special.

Hope her sense of humor is intact! Hi Sis Laughing

Ddd


Posted by studio3d@ccgmail.net at 12:01 AM PST

Newer | Latest | Older