« May 2022 »
S M T W T F S
1 2 3 4 5 6 7
8 9 10 11 12 13 14
15 16 17 18 19 20 21
22 23 24 25 26 27 28
29 30 31
You are not logged in. Log in
Entries by Topic
All topics  «
3D paperwork
A - Z challenge 5
A - Z challenge 7
A - Z challenge round 4
A to Z challenge round 3
A to Z round 2
A to Z round 6
A-Z round 1
Around the House
Art Challenges
Artist Trading Cards
Backgrounds
Beads
Bible Journaling
Books
Boxes
Collage
Color Challenge
Coloring
cookbook
Die Cuts
Digital Projects
Digital Stamps
Drawing
Dry Embossing
Fabric Stuff
Fantastic Folds
Field Trip
Home Decor
How Does Your Garden Grow?
Hymnal Art
In The Kitchen
In the studio
Jewelry
Lettering
Links
Multi-Technique
Music to Work By
Musings
Nail Art
New Work
Online Class
Other Hobbies
Other Projects
Painting
Paper Embroidery
Paper Piecing
Photo
Pretty Paper
Quilting
Random
reading
Scrap Recovery
scrapbooking
Sewing
Sketch Challenge
Some Backlog
Stamping
Stencils
Stickers
Supplies
Teabag Folding
Techniques
Testing
tips and tricks
Tutorial
Web resources
Welcome to my Blog
Work By My Friends
workflow
Writing
Blog Tools
Edit your Blog
Build a Blog
RSS Feed
View Profile
Group One
In & Out of Studio 3D
Thursday, 19 May 2022
Locked Boxes
Topic: Quilting

Finally, another quilt done. I HAVE been working on quilting a lot but this is the first in a while to come to completion.

I got on a kick of cutting and creating kits for patterns from some borrowed books from Fabric Cafe. The series is 3-yard quilts and in all of these patterns a lap quilt is made using one yard eash of three different fabrics. I cut and kitted TWELVE quilt tops and pieced four of them - all from my stash.

Then, one pattern struck me a being just right for patriotic colors but I wanted a larger size. So I actually needed to purchase fabric so I could 'double the recipe' and use TWO yards of each color.

The pattern I used is from the book 'Quick As a Wink' and is called 'Entwined'. 


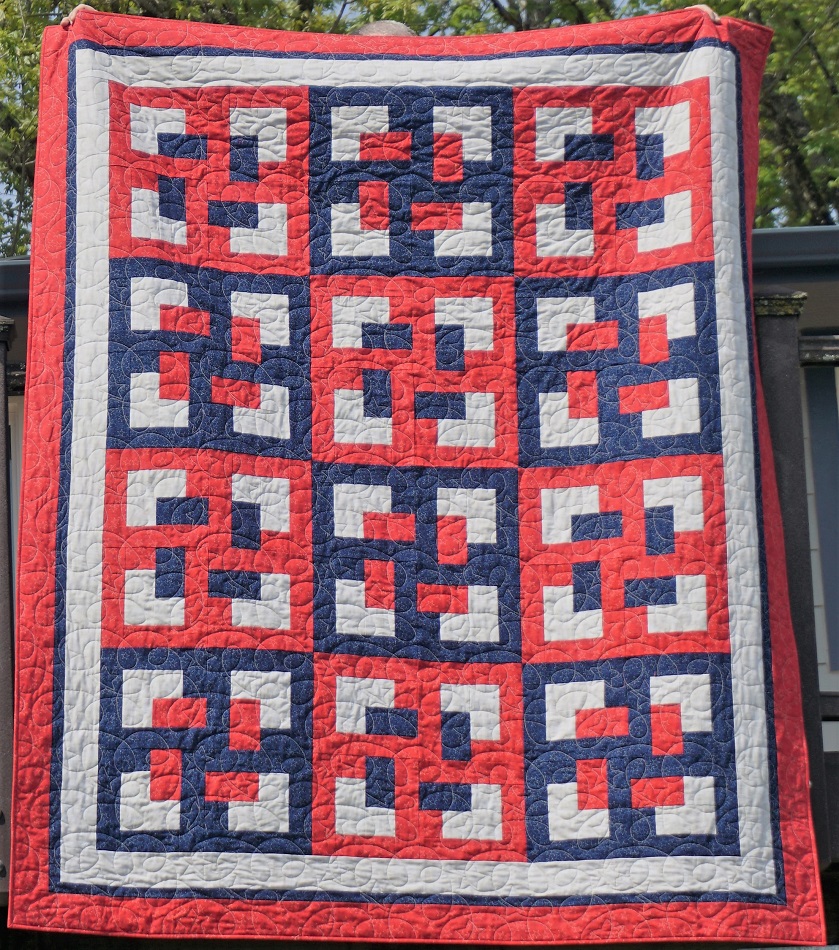
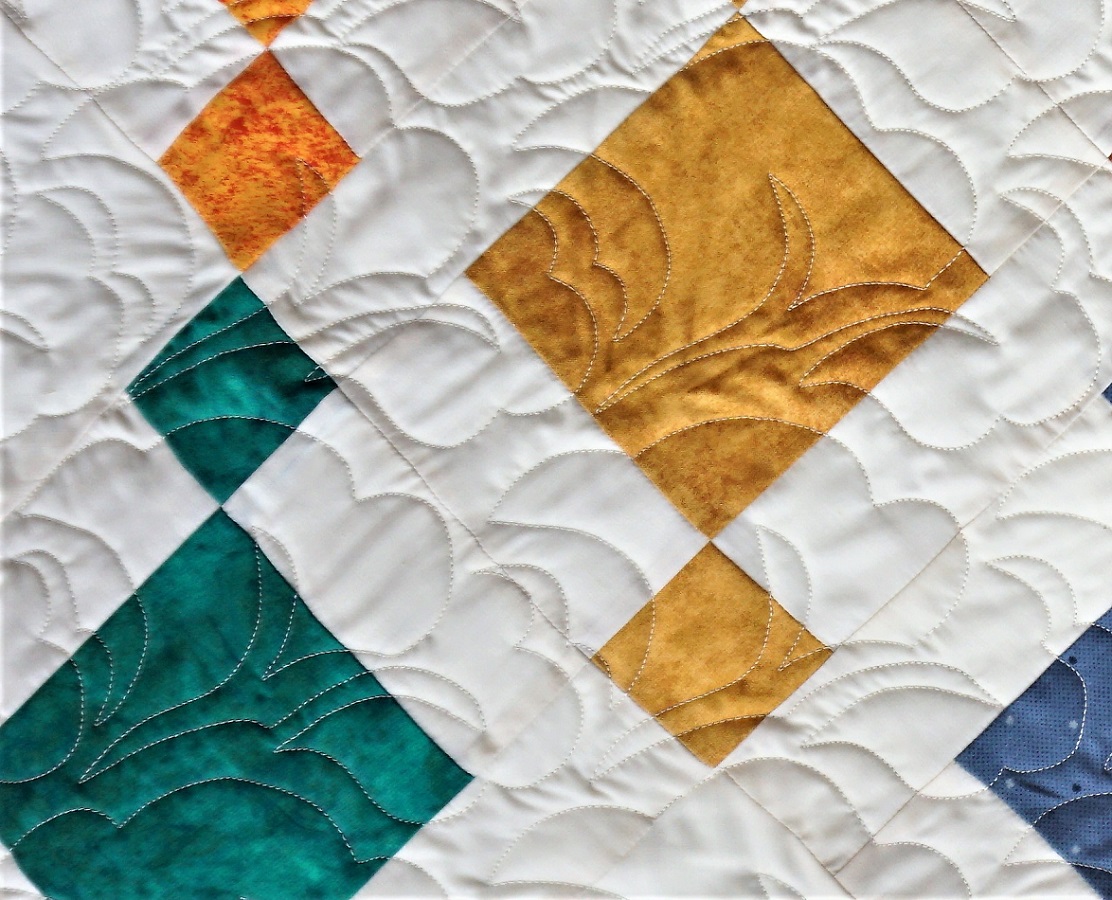
I called this 'Locked Boxes'.

I didn't buy enough of this flag print for the backing so I added in strips of red, white and blue to stretch it out.


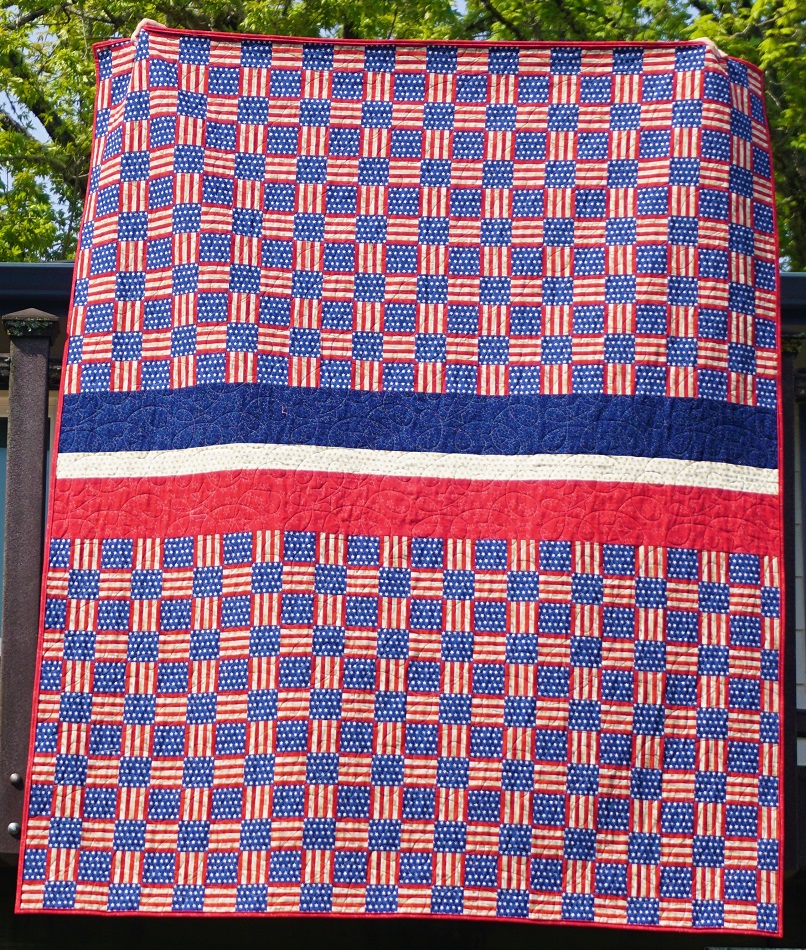
This oversized throw was made as a Quilt of Valor and awarded to a family friend who served as a Marine in Vietnam and beyond. He was very appreciative.

Ddd


Posted by studio3d@ccgmail.net at 12:01 AM PDT
Saturday, 12 March 2022
Sketching Class
Topic: Drawing

Some time back I took a class called Whimsical Sketching. Then I took one called Drawing 101. Just this week I completed one titled 30 Days to More Confident Sketching. All sound similar but are completely different in scope and intention.

Whimsical sketching was pen and ink used to draw allover themed cartoony pages. Those included random flowers on one, birds on branches for another, stacks of packages, a tower of cupcakes and an underwater scene. 

Drawing 101 taught a lot of perspective lessons to make boxes, buildings, spheres, cylinders and natural objects fit properly into their environment with scale, angles and details looking correct.

This latest, More Confident Sketching, covered a wide range of themes using only graphite pencils in a variety of hardnesses to achieve highlights and shadows. The point was not to create finished detailed drawings but to learn to create sketches that could be used as a map for finished pieces in other mediums. There were first some pages where we learned about our materials and then we worked through different themes. Most of the 30 days had exercises that covered more than one page in the sketchbook.

The instructor provided the photographs for the drawings she did in the exercises. In most cases, I searched out my own photos to use as references as I wanted to be sure I was applying the principles being taught and not just copying her sketches.

Without comment, these are the pages I did as homework for this class.


I hated this exercise!


Water is HARD!


Clouds are hard, too!


When I was done with the class, I took my final sketch and used it as the basis for a page in a devotional book I am working through.

I used one of the bird sketching lessons for another devotional book page.

I gathered together all of my reference photos and the instructor's samples and bound them into a class notebook.


Somewhere along the way I bought a pencil roll to hold all my pencils and tools (eraser, sharpener, sanding stick).

30 days of anything is quite a discipline but I made it through and will definitely return to these lessons when planning future projects.

Ddd


Posted by studio3d@ccgmail.net at 12:01 AM PST
Class Homework: Sketching
Topic: Drawing

Over at www.art-classes.com I took a class called 30 Days To More Confident Sketching.

One day at a time we watched videos and learned to sketch with only graphite pencils in a varying selection of hard/soft leads. This gives the range of lights/darks for highlights and shadows. 

For some lessons there were photos provided to draw from but in most cases I researched to find similar subjects with different layouts so I could practice what I had learned rather than just copying the instructor stroke for stroke.

These are the pages in my sketchbook:


Posted by studio3d@ccgmail.net at 12:01 AM PST
Sunday, 27 February 2022
Heart Strings
Topic: Quilting

Here is one that is WAY out of my color comfort zone! But when I chose to do big hearts I decoded that it was time to use up some of those red and white prints from my sister's stash. She must have loved red because there are a LOT of these and I only needed 1 strip each of 12 fabrics for the hearts.

The pattern is from Missouri Star Quilt Company and was one of the alternate methods for making a heart quilt shown on Valentine's Day. I scaled back on their design and made only 12 hearts. With the sashing and borders it came up to roughly 50 x 60.


Red thread and white thread were both too stark for quilting so I selected coral. The thread on the back IS bright red and is over a medium grey print.

I did the quilting on the longarm with a pantograph called 'affection' which is continuous hearts.


This will go to Passages at the hospital.

Ddd


Posted by studio3d@ccgmail.net at 12:01 AM PST
Wednesday, 16 February 2022
A Little Sleight of Wrist
Topic: Beads

Today I finished up a project from the 'long overdue' category!

Two years ago, at the end of February, I attended the Sew and Stitchery Expo in Puyallup Washington and one of the classes I took was  a beading workshop. The project was a bracelet called Anastasia and it was taught by the designer, Amy Loh-Kupser of i-bead.com. She had lots of kits so we got to choose the colorway we wanted.

In the time we had in the workshop I got three units of the beading done. When I came home I put all the supplies away and didn't think about picking it up again until I consolidated about a dozen to-do lists and noticed a note on one of them for 'beading'.

Today was the day! It did take several hours but I got it all done and I love it!

Then I decided to play a bit more and take some 'beauty shots' of it using my photography light box.


Because the connectors between the units are centered itallows a lot of drape to the piece.


As complicated as it looks this only uses no 11 seed beads, no 5 seed beads and two tones of two-hole beads.


I used a loosely rolled scrapbook paper to hold the bracelet for pictures.


Here is a view of the clasp which was provided in the kit.

So, now my new bracelet is ready to wear!

And when I pulled this out of the to-do pile I realized that I had bought another bracelet kit (different pattern) and a necklace kit. More beading in my future.

Ddd


Posted by studio3d@ccgmail.net at 9:57 PM PST
Wednesday, 9 February 2022
A Pair of Bunnies
Topic: Bible Journaling

A few days ago, online instructor Sandy Allnock gave a little tutorial on drawing bunnies using a grid to establish the correct size relationships of the parts. She did one pair of bunnies facing backward and another pair facing forward.

I redrew the tutorial for myself with notes in my sketchbook for future reference.

Then I sketched out a pair of bunnies with one facing each way in my bible.

I used a very light hand with the pencil and after coloring with Prismacolor pencils I erased any graphite pencil lines that still showed.


I used 2 Peter 3:14 as my reference verse.

Here is a closeup of the drawing.


Now I want to snuggle with some rabbits!


Ddd


Posted by studio3d@ccgmail.net at 4:00 PM PST
Monday, 7 February 2022
Provided By the Shepherd
Topic: Bible Journaling

I did another page using the online class Seeing the Scriptures - Psalm 23:1-3.

For the artwork I found a drawing on Pinterest and used a grid method to redraw it for myself. That was only for the sleeping woman, though, and I did my own freehand drawings of the blanket, water bottle and picnic basket.

My illustration was too large so I reduced it on my personal copier before tracing it onto Tomoe River paper (same weight and color as bible paper). I measured out and added the lettering before trimming the page to size and using a trimmer to round the corners.


This is a tip-in in my Journal the Word bible.

Ddd


Posted by studio3d@ccgmail.net at 7:08 PM PST
Sunday, 6 February 2022
Refined and Rewarded
Topic: Bible Journaling

 Scripture for today in the Seeing the Scriptures class was Job 23:10. God keeps watch on us and he knows our actions. Through his testing of us we are refined, burning out the impurities and emerging as pure as gold.

I represented the gold with the presentation of a medal with hanging bars to enumerate the virtues being rewarded.

I designed the medal and traced it in Micron pen.


The coloring was done with Prismacolorcolored pencils (some metallic) and there were highlights added with gold glitter gel pen on the metal areas. The 'diamonds' have silver glitter gel pen. I added shading around the left and bottom of the medal's parts to give it dimension.

I have now done 4 pages using this class and there are 8 more to go to complete it.

Ddd


Posted by studio3d@ccgmail.net at 2:28 PM PST
Saturday, 5 February 2022
On Bended Knee
Topic: Bible Journaling

 The next verse in the Seeing the Scriptures class was Exodus 14:14. It is about God fighting for us. I went with a quote instead of writing out scripture and illustrated with a drawing from an online tutorial.

All the pen work is done with a Micron pen and all coloring is Prismacolor Premier colored pencils.


This is in my NIV Journal the Word bible.

Ddd


Posted by studio3d@ccgmail.net at 12:01 AM PST
Friday, 4 February 2022
Doing What I Am Supposed To Do
Topic: Bible Journaling

 I'm finding that the scriptures selected for the class Seeing the Scriptures have often already been journaled in my bible. I have been working around this in three ways: 1) work in my interleaved bible 2) make a tip-in page for my most used bible 3) add more art to a page that has already been used.

For this page I used the third option. I only had fancy lettering of the scripture in the left margin. I added a simple illustration over the text to show how the scripture can be applied in my own life.


The illustration is done with Micron pen and I added just a bit of shading on the left bottom and around it with a regular graphite pencil. I smudged it a bit with my finger for blending.

Easy Peasy!

Ddd


Posted by studio3d@ccgmail.net at 12:01 AM PST
Thursday, 3 February 2022
Hope In Him
Topic: Bible Journaling

I started another online class called Seeing the Scriptures. It teaches a way of doing study on your selected verse, working through a process of 'headwork', 'heartwork' and 'artwork', to guide toward designing something that is an artistic representation of that verse.

It can be applied to any art venture - jewelry, painting, quilting, or bible journaling.

In the first homework lesson we did the study on Isaiah 40:31. In my prior work with this verse I did the 'expected' bald eagle flying through the mountains.

This time my study led me to focus on having HOPE in God and how that gives us strength.

I wanted to incorporate the word into an EKG strip so used a piece of graph paper printed with pink and added light brown very thin lines to make the grid smaller. After doing the heartbeat and lettering I cut the strip and tore off the ends like one would see in the doctor's office.

I glued this into the bible and added the rest of the phrase in black pen.


I did a little shading on the right and borrom edges to make the strip look more dimensional.

Ddd


Posted by studio3d@ccgmail.net at 1:54 PM PST
Wednesday, 2 February 2022
Let's Meet At the Cabin
Topic: Quilting

When you work on two quilts at a time the finish of the second one comes quickly on the heels of the first.

I actually cut the pieces for this quilt a couple of years ago when I had borrowed an Accuquilt cutter from a friend along with a few of her dies. I cut two full sets of Log Cabin strips then divided them up so I had one set of blocks with a 6 inch center wrapped with cabin strips. I made another quilt using 6 inch log cabins bordered with wide strips to make 12 inch blocks.

Then I had left this set of 12 inch log cabin blocks - enough for 12 blocks.

Although it made for a smaller quilt I decided to butt the blocks tight together rather than using sashing. Then I finished it off with a 3 inch border.


I didn't realize until I went to store it for later giving that all three of thelast quilts I've made have yellow borders!

Because this is a traditional pattern I gave it traditional quilting using a feathered pantograph.


The entire quilt is from scraps in the stash.

Ddd


Posted by studio3d@ccgmail.net at 3:32 PM PST
Tuesday, 1 February 2022
Crystal Doorway
Topic: Quilting

Are you old enough to remember those beaded burtains that were popular in the 1960s?

Missouri Star Quilt Company shared a tutorial on a quilt called Chandelier that certainly had that vibe for me. I pulled fabric scraps from my stash for this and used a cotton/poly blend in taupe for the background (left over from sister's stash passed down to me).

I was excited to be able to use my new Accuquilt setting triangle dies until I realized the quilt blocks were 8.5 inches. The setting triangles I have are for either 8 inch or 9 inch blocks. I just used the 9 inch set and trimmed the whole quilt edge before adding the border.


I used a semi-floral pantograph for the quilting.


This whole quilt has a fresh, modern vibe.

Ddd


Posted by studio3d@ccgmail.net at 12:01 AM PST
Monday, 31 January 2022
Revisiting Four Old Artworks
Topic: Bible Journaling

I have been gradually taking photos of my old artwork and adding it to my interleaved bible along with writing out scriptures to accompany them.

Today I have four to share:

This acrylic painting is one I did while I was in high school art class. The subject is the farm that was across the field from our home in the country. I paired this with Jeremiah 29:5


Next is also an acrylic painting from the late 1970s. I painted this for my boyfriend (now husband) as he attended WAS, the home of the Cougars. Genesis 1:25 is its scripture.


Psalm 3:4 goes with this watercolor of Mt. Hood I painted in the 1980s.


and finally is this pen drawing of a church in Balderson, Ontario, Canada. I used Distress Inks with stencil brushes to add colors very lightly. Psalm 122:1 suited this perfectly.


I will continue to add photos of old works as I come across them again.

Ddd


Posted by studio3d@ccgmail.net at 12:01 AM PST
Updated: Monday, 7 February 2022 7:15 PM PST
Tuesday, 25 January 2022
Colored Pencils on Vellum
Topic: Bible Journaling

The last class in Colored Pencil Jumpstart ended with us back in our bibles.

We stamped an image on vellum then colored white and other light colors from the back followed by brighter colors on the front, leaving the back colors showing through for highlights.

I did not have any stamps like what the instructor was showing so I elected to stamp with a wood-mounted maple leaf image. I made a border down the right side of the page with them.

Oh how I love the blended colors in these leaves.


I trimmed the page to size and lettered the scripture before using tape runner to tip it into the gutter.

Ddd


Posted by studio3d@ccgmail.net at 12:01 AM PST
Monday, 24 January 2022
Vellum with colored pencil

The last class in the Colored Pencil Jumpstart taught how to use white colored pencil on the back of an image stamped onto vellum before adding color to the front.

I did not have any images similar to the ones the instructor was using so I just went with ones I had that I thought would benefit from some bright white highlights.


I made cards out of both images.


Really pleased with both of these projects.

Ddd


Posted by studio3d@ccgmail.net at 12:01 AM PST
Thursday, 20 January 2022
Birds of the Air
Topic: Bible Journaling

For the Colored Pencil Jumpstart class the assignment was to use powdered lead from the pencils with blending solution to create a page in our bible.

I didn't want to work directly on the page in case it did not work like I wanted so I worked on a piece of Tomoe River Paper which is about the same weight/translucense as bible paper. I stamped an image on plain paper and placed it behind this blank sheet then dipped a cotton swab in the blending solution and into the ground colored pencil powder before coloring in the image I could see showing through.

When I was done I cut the page to size and lettered the scriptures (paraphrased) before tipping in the page using tape runner.


This was a great solution to having already journaled other scriptures on both facing pages where this passage was contained.

Ddd


Posted by studio3d@ccgmail.net at 12:01 AM PST
Saturday, 8 January 2022
Powdered Color
Topic: Online Class

The Colored Pencil Class lesson done today is with powdered color.

In order to get the powdered color the pencil is scribbled over the inside of a fine-weave tea strainer. This scrapes off the color from the lead in very fine colored dust. The color is then spread onto the paper with a cotton ball.

Multiple colors can be blended and the color can be erased away if you have too heavy of application.

My homework piece is a full sheet in my sketchbook - a field of wildflowers. 


On this piece the cloudy sky and the basecoat for the field were done with the powdered color technique.

Direct application of colored pencils was used for the trees, grasses and flowers.

I used the information from the class on using lighter and duller colors in the distance and brighter colors in the foreground.

I wish I had used a duller color for the trees as they seem to stand out too much.

Ddd


Posted by studio3d@ccgmail.net at 5:30 PM PST
Thursday, 6 January 2022
That Old Black Magic
Topic: Online Class

Today I started working again on online classes I have registered for, some started, but had gotten sidetracked on. I decided to jump into the one I was farthest along in.

This class is Colored Pencil Jumpstart from art-classes.com and the lesson (#6) is called Black Magic.

It uses transparent colored pencils applied over white colored pencil on black cardstock. Instead of coloring in darker on the shadows you apply white heavier where you want the brightest highlights and lesser where the shadows would be. Then the colored pencil goes on over top of it using an even pressure.

Magically, you get gradations of color on your black paper.

The first I did was this pear which was first stamped in Studio G white pigment ink.


Then I colored this hummingbird with flowers.


The black cardstock I used kicked back a lot of light reflection so you lose some of the effect. But it turned out nice enough that I used this second one in my devotional book for today.

Ddd


Posted by studio3d@ccgmail.net at 9:34 PM PST
Wednesday, 5 January 2022
A Clean Heart
Topic: Bible Journaling

TWO pages in one week? Astounding!

I have journaled this verse once before but it was done in my interleaved Bible a couple of years ago. For this page I scrolled through Pinterest for ideas and combined several to get a layout for my page.

The bubbles are one design, the heart design from another with coloring from yet another, a wooden washtub was refashioned into a metal bucket.

This is all done with Prismacolor colored pencils.


The lettering is freehand in a semi-script style using Prismacolor marker.

Ddd


Posted by studio3d@ccgmail.net at 12:01 AM PST

Newer | Latest | Older