Now Playing: another stitched house
Topic: New Work
Here is the second house converted from the 'string art' pamphlet I have. It is not my favorite so I only pricked out one to stitch. My least favorite I haven't even pricked out one!
« | August 2007 | » | ||||
S | M | T | W | T | F | S |
1 | 2 | 3 | 4 | |||
5 | 6 | 7 | 8 | 9 | 10 | 11 |
12 | 13 | 14 | 15 | 16 | 17 | 18 |
19 | 20 | 21 | 22 | 23 | 24 | 25 |
26 | 27 | 28 | 29 | 30 | 31 |
Here is the second house converted from the 'string art' pamphlet I have. It is not my favorite so I only pricked out one to stitch. My least favorite I haven't even pricked out one!
Off on another road trip yesterday, I stitched up a Christmas card. This is worked with metallic Sulky threads ondark red background. The corners were punched and embossed with a Fiskars 2-in-1 punch. I layered on green and gold metallics to reflect the stitching.
The center is a Christmas sticker with a peel-off greeting.
Here are two more stiched cards. These were designed by the same lady as the last geometrics that I showed.
The one on the left is stitched on irridescent cardstock and layered over a metallicized paper and some paste paper I made.
The one on the right is layered on a watercolored background and burgundy cardstock.
Here are a couple more cards made with the torn spotlight technique shared some time back. This hydrangea stamp was one I picked up for a dollar in a clearance.
An on-line group member translated an old string-art pattern to make this one for stitching. I stitched it three times, once with verigated thread, once with metallic, and one only stitching a portion of the pattern.
This stitching card is a re-design of a string-art pattern from the 70's. I picked up one of those old pamphlets, with three patterns in it, from a used book store. The pamphlet has odd paintings of historic houses over which one was supposed to stitch. They are all big enough to mount as 8 1/2 x 11 inch wall art.
Unfortunately, they are all designed with strings of bright blue, red, yellow, and green. YUK! So I reduced the pattern down to fit on cards and changed the colors to soft versions of the originals. I like to do them up on watercolor paper.
The pamphlet is still under copyright (more pity to the original artist) so I cannot share the patterns.
I finished this card last night. The threads are gold and green metallic Sulky. Cardstock is cream embossed mounted over blue over more cream embossed over metallic green. The bird is cut from a calendar page and given a branch made of the twisted paper handle of a shopping bag. A little dot of glitter glue gives him the sparkle in his eye.
While traveling recently I stitched up a couple of Christmas cards. These are from my own design. Both are stitched with a single strand of rayon embroidery thread. One uses red 'tinsel' and star sequins and green beads. The other uses gold metallic Sulky for the tinsel and finishes off with red beads.
Ddd studio3d@ccwebster.net
Here's a little scrapbook I made up but have not decorated or used yet. The instructions are from Craft TV Weekly (http://www.crafttvweekly.com/player.html?wid=94.) You finish with 18 surfaces on which to use decorations and photos (including front and back covers.)
Here it is closed and tied - front cover
Untie the ribbon and open out the left and right front flaps to get this
And the fully expanded scrapbook.
I think I'll be baking lots of these little books.
One more project from the Pittsburgh trip. This tag book is made from legal envelopes! There's LOTS of cutting and pasting which is why I only got a card made (a single panel) in class and brought the rest of the parts home to finish.
This is the extended view:
Here is a closeup of one spread:
I haven't decorated the tags yet as I'm not sure how I am going to finish it. It has a masculine feel so I may go with that or a 'homespun' theme. The tags will get punched and fibers added as pulls.
As promised, here are some of the projects we completed while in Pittsburgh at our papercrafts retreat.
Beaded Spirelli:
Floral Punch:
Folded Butterflies and Envelopes:
Origami Top:
Torn Spotlight Stamping (this was one class I taught):
Challenge Card (everyone started with the same 8 items - a quilled ducky, a square paper doily, a sheet of round silver stickers, a decorated button on a square card, a feather, a silk rose, a piece of floral ribbon, and two decorative paper clips. We had to use at least 5 on our card, plus anything else we had in our stash of supplies.):
I don't have photos of all the other stuff we made last week, but we were busy from 9:30 am to 10 pm as a group and then went to our rooms and kept playing! We took an hour for early dinner but the rest of the two days was class after class. We took one day for shopping (craft and stamp stores).
Group leader on one of my lists issued a challenge to make a card using: an A4 card, two 2 inch circles, patterned paper measuring 3 x 4.5 inches, a piece of paper 1 x 3 inches, a button, a peel-off sentiment, and either sewing, pop-dots, or sandpaper.
Here are my two cards.
We've been on a few cruises and lately have been cruising with a line that has 'Ceramics @ Sea'. They wheel out a trolly with blanks of plates, mugs, bowls, coasters, etc. and you choose an item to paint. They supply all the brushes, glazes, and some books that can be used for inspiration.
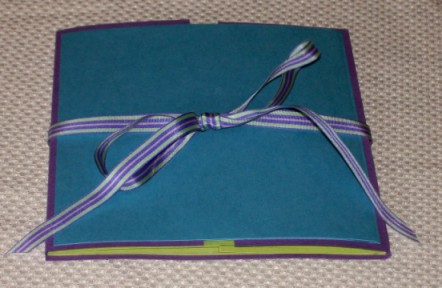
This is the box with lid that I painted last time out. It has a different aquatic scene on each side.
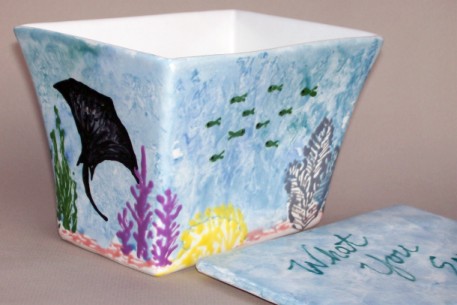
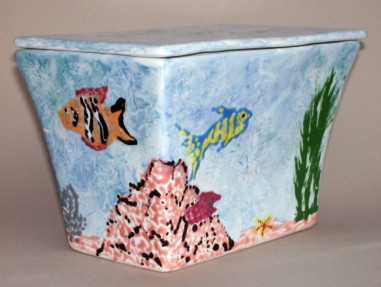
The crew takes them away for firing and there is a champagne reception on the last day of the cruise for the artists to meet and pick up their finished pieces.
Today we took a field trip in the car to have a look around about 50 miles south of us. As we drove the country roads, stopped to buy local strawberries, and did a bit of shopping, I took the time to do some card stitching. I finished these two up when I got home - making a polished stone background to enhance the thread and cardstock colors.
This is a pattern I got from a friend on the Paper Embroidery group.
One of the Yahoo groups I am on has a challenge this month to make an oriental card. I made two.
Both feature illustrations from a magazine called Taiwan Review. A variety of papers were used as backings and the 'grass cloth' is acutally from a wallpaper sample book.
People are always asking me if I have pictures of my grandkids. Sure, on the walls...on my desk...on my computer...but NOT in my purse. It's heavy enough as it is!
Well, enough of that! I made this little book out of plastic slide mounts. Each photo has a 'window' of transparency to protect it and the whole is bound with ribbons glued to the spine with The Ultimate glue.
It's a very lightweight album to show off pictures of my 5 beautiful grandchildren.
Here's a card I did yesterday just for fun. I had this great flower-print grosgrain ribbon so I cut out a pair of flip-flops from yellow cardstock, punched three holes, and threaded the ribbon. It is glued to the back with Crafter's Pick The Ultimate glue. I added pink punch-out flowers with floral brad centers to the toe area. The flip-flops are then glued to the front of a 5.5 x 7.5 pink card. I used pink gel pen to 'stitch' around the outline of the shoes and added some summer stickers.
I found these 2-inch ceramic boxes at www.orientaltrading.com for $14.95 per dozen (http://www.orientaltrading.com/application?namespace=search&origin=searchMain.jsp&event=button.search&Ntt=56%2F9206&Ntk=all&Ntx=mode%2Bmatchallpartial&N=0).
I used Ranger Industries alcohol inks...
...Alcohol, metallic marker, and a wood peg with velcro to hold a small felt pad.
With these supplies and tools I did the 'polished stone' technique (http://lumpystuff.com/article_ai2.htm) to end up with these finished products.
When the inks are fully dry I spray two coats of clear acrylic sealer to protect the artwork.
The new issue of Rubberstampmadness magazine had a neat topic in the Tips & Techniques column. I had to give it a shot!
The gist is to stamp a scenic or collage stamp with white ink on black cardstock and again with black ink on white cardstock. The white version is colored in and then torn top to bottom leaving a strip featuring the focal point.
The colored version is glued on the black and white version and the whole is trimmed and mounted on a card face. Here are three that I did.
For mine I used Staz-on inks on both versions. The white is glossy cardstock, the black is semi-gloss. I heatset the inks and used Marvy watercolor markers for the coloring.
Neat technique!
Today's entry will share some recent cards I have made.
This is the card DH will get for Father's day. I used wood grained cardstock as the base which is creased on the left face and split on the right face. Pictures of hinges were downloaded from the internet as well as the picture of the latch. I cut a hole in the latch and built a loop of cardstock underneath to slide into the hole. The lock is made of two ephemera stickers that I stuck back to back. I cut the loop at the side so it could be slipped on and off the latch allowing the card to open. Since the challenge was to make a card with brads or eyelets the latch and the hinges are attached with 'plus brads'. They were actually the inspiration for the entire card! The card is lined with the wood grained cardstock as well.
I made this card for a vellum challenge. I used two different colors of vellum in different widths and first punched a border along both edges of each. Then I ran them through the paper crimper. I mounted them on the card with foam tape under each layer and then added satin ribbon, also with foam tape. On the right I used vellum stickers to spell out LOVE and adhered silver peel-off stickers with hearts to link the letters together, Two hearts from the same sheet of peel-offs are added to the ribbon.
For a challenge to make a card with checks, I broke out lots of scrapbook scraps and made this little quilt card. The instructions for this card are on my website at http://mystudio3d.com/QuiltedCard.htm. I attached satin cord to the card and glued miniature closepins to the card as well. The quilt is held in the closepins and also glued to the card. Butterfly stickers were applied and flight-trails drawn in with Sharpie marker. The greeting is a silver peel-off colored with Sharpies to match the butterfly trails.
Finally, this paper embroidery card was made for a challenge to use this particular pattern (the pattern is actually just a single side border.) From the first time I saw the pattern it reminded me of bunting seen at a patriotic event so I broke out the red, white and blue. After pricking the borders on my red and blue cardstocks I glued down a length of white ribbon up the center of each border. Then I stitched over the top of it, blue and white on the red paper - red and white on the blue paper. After stitching I cut the blue to fit inside the borders on the red paper and designed the fireworks center. It is stitched in gold metallic thread and enhanced with gold round and star brads. After mounting on white cardstock I added gold star peel-off borders at the top and the bottom to tame the ends of the ribbons.
I hope you enjoyed the recent work coming out of my studio.