« December 2014 »
S M T W T F S
1 2 3 4 5 6
7 8 9 10 11 12 13
14 15 16 17 18 19 20
21 22 23 24 25 26 27
28 29 30 31
You are not logged in. Log in
Entries by Topic
All topics  «
3D paperwork
A - Z challenge 5
A - Z challenge 7
A - Z challenge round 4
A to Z challenge round 3
A to Z round 2
A to Z round 6
A-Z round 1
Around the House
Art Challenges
Artist Trading Cards
Backgrounds
Beads
Bible Journaling
Books
Boxes
Collage
Color Challenge
Coloring
cookbook
Die Cuts
Digital Projects
Digital Stamps
Drawing
Dry Embossing
Fabric Stuff
Fantastic Folds
Field Trip
Home Decor
How Does Your Garden Grow?
Hymnal Art
In The Kitchen
In the studio
Jewelry
Lettering
Links
Multi-Technique
Music to Work By
Musings
Nail Art
New Work
Online Class
Other Hobbies
Other Projects
Painting
Paper Embroidery
Paper Piecing
Photo
Pretty Paper
Quilting
Random
reading
Scrap Recovery
scrapbooking
Sewing
Sketch Challenge
Some Backlog
Stamping
Stencils
Stickers
Supplies
Teabag Folding
Techniques
Testing
tips and tricks
Tutorial
Web resources
Welcome to my Blog
Work By My Friends
workflow
Writing
Blog Tools
Edit your Blog
Build a Blog
RSS Feed
View Profile
Group One
In & Out of Studio 3D
Wednesday, 10 December 2014
What's My Point
Topic: Coloring

I was trolling through SplitCoastStampers for techniques and came across one on coloring with 'pointillism'. This uses dots of color - applied with alcohol markers - instead of the traditional blending.

I chose one of the new stamps from a Hot Off The Press set and used three greens, four pinks/reds and one gold for the flower and leaves. I used three blues for the background.

I selected many papers for the background, matching them to various parts of the illustration.

The sentiment was stamped on golden to go with the flower centers and bordered with maroon. The sentiment and illustration are popped up on foam tape.

I used a fine marker to add a double line border on the illustration.

Ddd


Posted by studio3d@ccgmail.net at 12:01 AM PST
Updated: Thursday, 23 October 2014 4:54 PM PDT
Tuesday, 9 December 2014
Operation Write Home - Sketch 157
Topic: Sketch Challenge

OWH 157 was such a complicated sketch that I had to simplify it to make sense of it.

I ended up going for the 'essence' of the sketch - a large bordered square center backed with a wide band bordered at least twice. I think I accomplished this.

I also included the leaves in the stamp etching and added black petal tips.

I went with a wider color palette by including teal, red and yellow as well as the black and white. By using all graphic papers they look like they belong together.

I added a double red pen border to the illustration and popped it up on foam tape.

Ddd


Posted by studio3d@ccgmail.net at 12:01 AM PST
Updated: Thursday, 23 October 2014 4:54 PM PDT
Monday, 8 December 2014
Operation Write Home - Sketch 156
Topic: Sketch Challenge

Sometimes a sketch just needs to be turned on its head. Such is the case with OWH sketch 156.


Notice that I did not 'rotate' the sketch to get it upsidedown but just 'flipped' it top to bottom. This is what keeps the illustration on the left side.

I went with a bold purple and white combo, using a chevron for the main background. Three purple brads are the enhancement to the black-bordered stamped sentiment.


On this illustration I carried the 'etching' into the leaves and added some black detailing to the petal tips.

Ddd


Posted by studio3d@ccgmail.net at 12:01 AM PST
Updated: Thursday, 23 October 2014 4:53 PM PDT
Sunday, 7 December 2014
Operation Write Home - Sketch 155
Topic: Sketch Challenge

Sketch 155 from OWH was more natural for the etched stamp illustration.

I went back to red / white / black for this card and moved the horizontal band behind the illustration. I'm not sure how effective this is though as you only see that little stub on the left.


I used a rub-on for the red dot feature.

Ddd


Posted by studio3d@ccgmail.net at 12:01 AM PST
Updated: Thursday, 23 October 2014 4:52 PM PDT
Saturday, 6 December 2014
Operation Write Home - Sketch 154
Topic: Sketch Challenge

OWH sketch 154 presented a challenge to using one of my etched stamp images.


I decided to go right ahead and cut it into 4 quadrants but NOT to put the circle element in the center as it covered too much of the flower. Instead, I used a heart sticker and moved it off-center.

I wanted a romantic feel to this one so I went with pink instead of the red used yesterday. Ooooh, I LIKE!

The large dot is playful.


I used white rub-on to create the sentiment on the band prescribed in the sketch.

Ddd


Posted by studio3d@ccgmail.net at 12:01 AM PST
Updated: Thursday, 23 October 2014 4:51 PM PDT
Friday, 5 December 2014
Operation Write Home - Sketch 153
Topic: Sketch Challenge

I did the next few sketches in a series, using a technique I found on Splitcoaststampers called Stamp Etching. There is a tutorial at http://www.splitcoaststampers.com/resources/tutorials/stampetching/

Basically, you start with an outline floral, stamped in black on white paper. Then a marker or fine pen is used to flick in parallel lines from the inside and the outside of the petals to make them look like a woodcut or etching.

OWH sketch 153 was the first one up to use one of these drawings on.


My first inclination with these graphics was to add red to the stark black and white. I selected a bold stripe, a solid red, and red and white lettered strips.

I had to work with the size of the die that I had so the panel is not exactly that prescribed, nor is the red border around it.


I wanted another touch of red so used a marker to color in some of the petal curls and stamens. I also used a black fine marker to add a little border around the illustration, but under the leaves.

Ddd


Posted by studio3d@ccgmail.net at 12:01 AM PST
Updated: Thursday, 23 October 2014 4:49 PM PDT
Thursday, 4 December 2014
Oeration Write Home - Sketch 152 (repeat)
Topic: Sketch Challenge

I first posted OWH sketch 152 on January 11, 2013.

I turned the sketch 90 degrees and used some bright, fun papers. I pulled a sticker to decorate the center of the circle element.

Since the little girl was painting I used a set of metal punches to hammer letters into scraps of cardstock, creating a suitable phrase. By coloring in the depressed letters with white gel pen I enhanced the sentiment.

I rounded two opposing corners for interest.

Ddd


Posted by studio3d@ccgmail.net at 12:01 AM PST
Updated: Thursday, 23 October 2014 4:49 PM PDT
Wednesday, 3 December 2014
Operation Write Home - sketch 151
Topic: Sketch Challenge

Wow! It's been a long time since I posted a sketch challenge. Here we have OWH sketch 151 which is very simple:


I rotated it 90 degrees counter-clockwise and adjusted the circle size just a smidge to use the size of diecut round that I had on hand.

I used a tone-on-tone dot for the smaller top area and a muted coral for the lower. I had vellum rose stickers that I wanted to use but they were a bit too pink. I solved that by mounting them on cream cardstock. That bit of yellowness showing through the pink makes them look more coral and they go very well with the paper.

I rounded the top corners and used a white gel pen for faux stitching around the coral paper.


I used several words from a sheet of white rub-ons to create a sentiment block.

Ddd


Posted by studio3d@ccgmail.net at 12:01 AM PST
Updated: Thursday, 23 October 2014 4:47 PM PDT
Tuesday, 2 December 2014
Teabag Fold Published
Topic: Some Backlog

Waaaaaay back in 2003 I was contacted by someone at the Origami Societeit Nederland to see if I would allow one of my original teabag folding designs to be published in their journal "Minori". Of course, I said 'yes' and they promised to credit me with the design and to send a copy of the issue.

Here is the cover of that issue:


And here is the two page spread, pages 20 and 21. You can read my by-line on the left page.

I have looked on a translator to see what a 'sterbloem' is but it does not translate it for me.

Ddd


Posted by studio3d@ccgmail.net at 12:01 AM PST
Monday, 1 December 2014
Kit Design Work - 7
Topic: Some Backlog

The theme of this last kit I worked on was 'thank you' and the technique was decorating envelope cards. The kit included the envelope cards in white and dove grey, decorative papers, diecuts, brads, ribbons, metal flower charms, fabric flowers, sticky-back pearls, and rubber stamps.  


I did not get the published booklet for this kit either.

The envelope cards are decorated only on the outside.


This may be my least favorite of the kits I worked on. This is also the last kit that I was contracted to design for CardMaker Kit-Of-the-Month.

Ddd


Posted by studio3d@ccgmail.net at 12:01 AM PST
Updated: Friday, 17 October 2014 7:20 PM PDT
Sunday, 30 November 2014
Kit Design Work - 6
Topic: Some Backlog

This was one of the last two kits I worked on. The theme for this was Thank You and featured the technique of outline stickers with foil. The kit contained charms, ribbon, stamps, outline stickers, and diecuts.

I did not get the booklet from this kit after production.


I also did not get two of my sample cards returned but I still had the original scans that I had submitted so I will show those here:


The stickers came in a variety of sizes.


Love the pewter charms.


I used 'corners' to make some medallions for these decorations.


I love the dragonfly stamps included in this kit.


This was an entirely new technique for me so I had to learn to use the product before I could design with it and write directions.

Ddd


Posted by studio3d@ccgmail.net at 12:01 AM PST
Saturday, 29 November 2014
Kit Design Work - 5
Topic: Some Backlog

It's been a long time since I looked through these kits that I did design work for so it is fun to revisit them and reminisce.

This kit had a theme of "friendship" and featured the technique of "teabag folding". It included papers with designs in chocolate brown, light blue and a bright yellow-green. Stickers and diecuts along with chocolate brown rhinestones and some fancy ribbon rounded out the selection. I remember that I did the design work for this while on a cruise vacation!


The first card is the one featured on the booklet. It uses a teabag fold with one corner cut along the outline of the motif.


This card features a standard fold.


Some of the teabag papers were round instead of square. This card uses one of them.


This one also uses a edge motif trim:


This card uses a standard fold.


This one is a standard fold as well.


Another standard fold.


A standard with a rhinestone center.


This one uses the round teabag paper.


This is a more fancy fold for the round teabag paper.


Another standard fold.

The kit I was working from for the samples contained VERY stiff papers making it difficult to get sharp creases, but they turned out OK in spite of this.

Ddd


Posted by studio3d@ccgmail.net at 12:01 AM PST
Friday, 28 November 2014
Kit Design Work - 4
Topic: Some Backlog

Time for a little Christmas Magic! That's the theme of the fourth kit I did design work on. The kit contained glitzy blue papers in two tones and lots of neat stickers in white, clear, and gold. Rubber stamps, ribbon, and brads were also included.


Here is the booklet that was published for the subscribers:


There's not a lot to say about the individual cards:


Beautiful in real life but very hard to photograph because of the ultra-shiny coating on the cardstock.

Ddd


Posted by studio3d@ccgmail.net at 12:01 AM PST
Thursday, 27 November 2014
Kit Design Work - 3
Topic: Some Backlog

Flowers and Flourishes kit had a theme of 'Mothers' and featured the technique of 'Spirelli'. The kit contained glimmery papers in lavender and light blue, sheer ribbons, flowers, rhinestones, rubber stamps, decorative papers, floral stickers, and scalloped diecuts in a variety of sizes. 


 The kit also included three spools of metallic thread for winding on the scalloped pieces.


My plan in designing these cards was to cut the scalloped circles or find other ways to turn them into something else for the sake of the design.  This card is a pretty straightforward design:


This card uses the spirelli as a clock face:


This one cuts away parts and uses them a sea shells:


This cut and reassembly makes the spirelli into a butterfly:


this card layers three sizes of cut spirelli to create a peacock:


These flowers were designed with unwound scallops and many stickers:


This uses the spirelli as the wheel on a wheelborrow:


This one becomes a teapot:


And this one uses two spirelli posing as an old-fashioned bicycle:


This is the kit that I have seen in the advertising most often.

Ddd


Posted by studio3d@ccgmail.net at 12:01 AM PST
Updated: Friday, 17 October 2014 5:29 PM PDT
Wednesday, 26 November 2014
Kit Design Work - 2
Topic: Some Backlog

The second kit I designed for included bright papers in plain and patterns, a rubber stamp set, stickers, rub-ons, ribbons, brads, puffy balloons, rhinestones and glitter.


The theme for the kit was Children's Birthdays and the technique to use was Revolving View Cards (think of the ViewMaster from your childhood). 


In all of these cards there is a round aperture in to front and a cutout along the edge. Inset into the cutout is a white circle of cardstock with knotches in the edge. Designs are placed on this circle that can be rotated into place in the aperture.

This card rotates a message through the opening:


This card rotates a variety of facial expressions into place on the clown:


This card rotates different toppers for the candle:


This rotates a birthday message:


This tops the cake with different candles:


This card has no aperture or wheel:


This card tops the hat with different patterns:


This card makes the juggler an action figure:

I hope these were fun cards for some children to recieve from the kit subscribers.

Ddd


Posted by studio3d@ccgmail.net at 12:01 AM PST
Tuesday, 25 November 2014
Kit Designer Work - 1
Topic: Some Backlog

Following up on introducing the kit designer work I did several years ago, today I will begin sharing the kits one by one.

For the first kit, the theme was 'good luck' and featured paper embroidery. The supplies I was sent included blue, green and cream cardstock and papers, stitching stickers, blue and green holographic stickers, and blue and green metallic threads. There was also a rubber stamp set on the 'good luck' theme.

The rules were that I could add glue, scissors, pencil, etc. but could not add any supplies to the designs not included in the kit.

I did cards with interesting folds, some with original embroidery patterns, and some with the stickers and stitching. For all original patterns I had to supply the artwork for publication so the customers could duplicate my work. Here are the cards I created (these are ALL of my samples - some were not selected for publication).


You can see there was also some fluffy yarn in the kit.

Ddd


Posted by studio3d@ccgmail.net at 12:01 AM PST
Monday, 24 November 2014
As Advertised
Topic: Some Backlog

There's nothing like the feeling I get when I open an advertising flyer or a magazine and find some of my own work as part of the promotion! I did some contract work 2008 to 2010 for CardMaker Kit-of-the-Month and still occasionally find one of my designs in the advertising.

Here are some of the ads that show cards I designed:


So, how did all of this work?

I was contacted by one of the staff to see if I was interested in designing for them. When I said 'yes' they sent me a kit of supplies from one of their recent releases. I used these supplies to make a range of cards along their theme and submitted them to see if they thought my work was acceptable.

When it was my 'turn' to design a kit they would send two full kits of the supplies that the customers would be getting. I designed ten to twelve cards and sent scans of them. The coordinator would tell me if there were any changes they wanted (use more ribbon, change the audience to children, etc.) and designate which eight they wanted to purchase.

I would then white up complete and detailed directions for those cards and send them in along with the original cards.

The company then printed the directions, patterns, and photos of the cards in a booklet which was then distributed with the supply kits to their subscribers.

Over the next few days I will be showing the kits that I designed for. In the meantime, here are the cards I made as the initial samples by which my work was judged.


Ddd


Posted by studio3d@ccgmail.net at 12:01 AM PST
Sunday, 23 November 2014
Itty Bitty Loaves
Topic: In The Kitchen

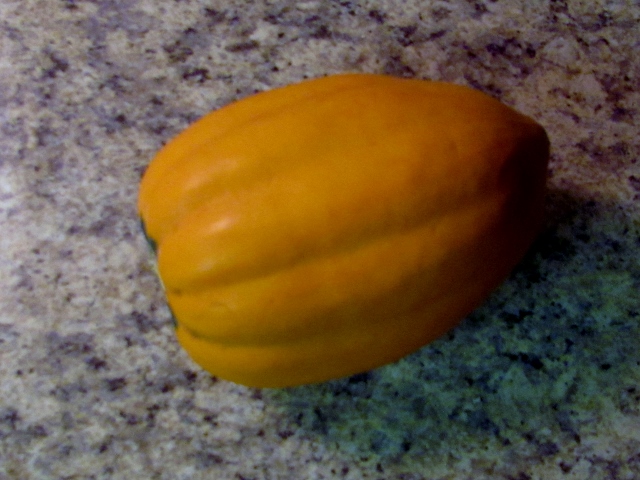
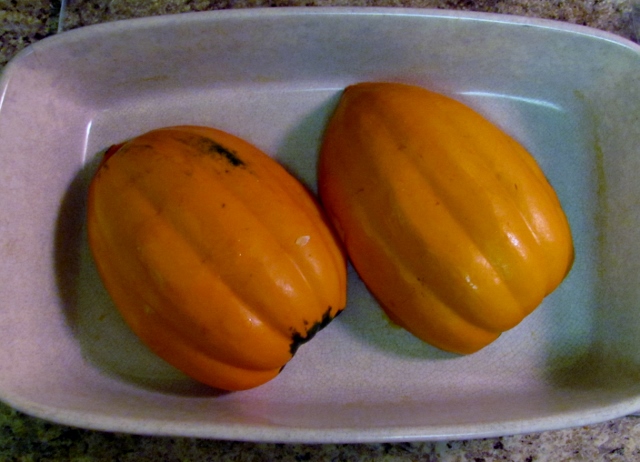
This year my garden yielded a HUGE crop of squash. The crooknecks were shared but they still produced a bumper crop that had me roasting it in chunks for freezer storage. I also got an incredible yield from delicata squash and we're still enjoying that. The third squash was yellow acorn which I've been investigating new ways to use.

I found a reciebe for Acorn Squash Bread and had to give that a try! I adjusted the recipe in some ways so here is my version:

Cut the squash in half and scoop out the seeds and stringy bits. Place both pieces, cut side down, in a microwave dish. Add 1/2 inch of water and nuke for 15 minutes.

Turn cut side up and allow to cool completely.

Preheat oven to 350 degrees fahrenheit.

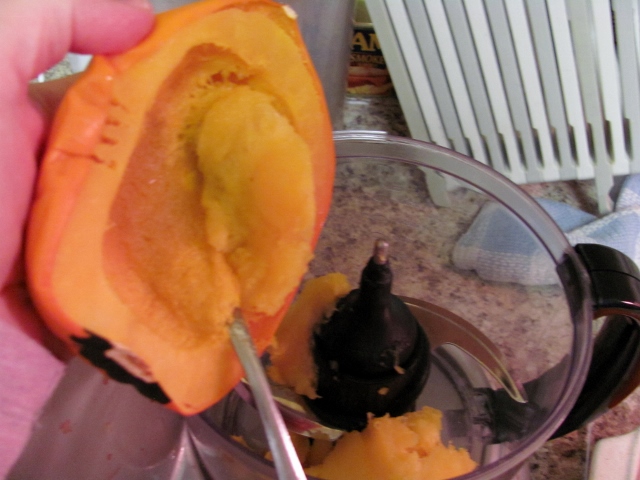
Scoop the soft squash into a blender and puree.

Measure out 1 cup of the squash puree, 1 cup of granulated sugar, 1/2 cup of packed brown sugar, 1/2 cup of applesauce, and 1/2 cup of egg substitute (Egg Beaters, for instance). Can use 2 eggs instead, if you wish.

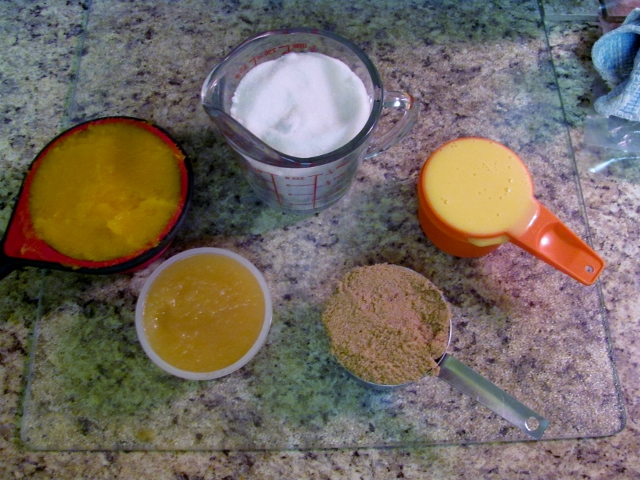
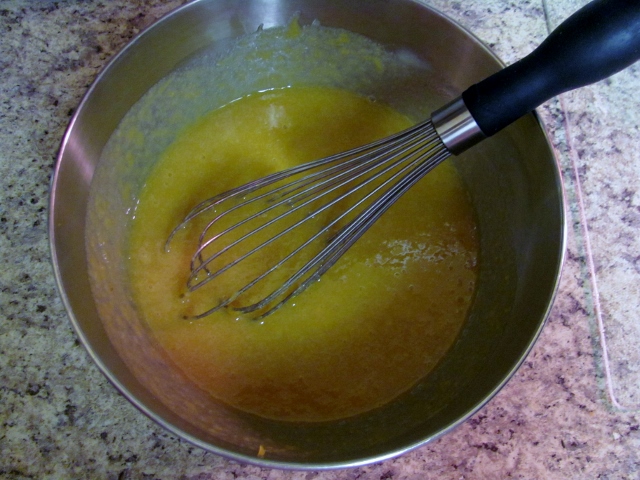
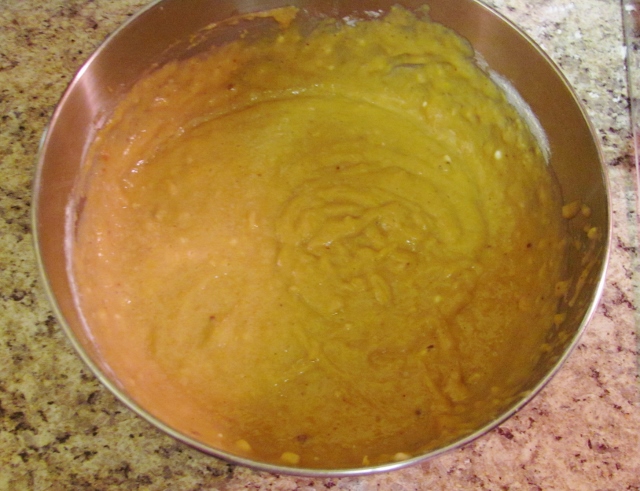
Combine these ingredients in a bowl.

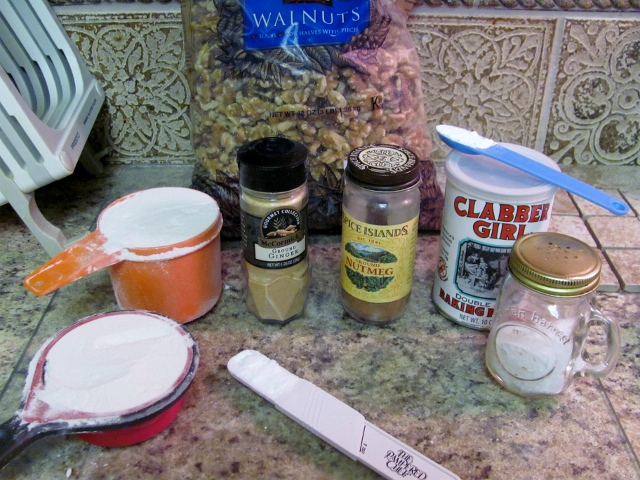
Measure out 1 1/2 cups white flour, 1 tsp ground cinnamon, 1/2 tsp ground ginger, 1/2 tsp ground ginger, 1 tsp baking soda, 1/2 tsp baking powder. You may elect to add 1/4 tsp salt but I leave it out.

Add these dry ingredients to the wet slowly while stirring.

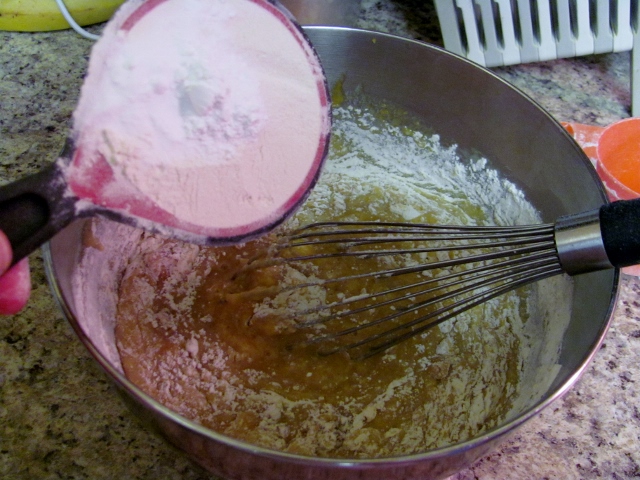
Stir until no lumps remain.

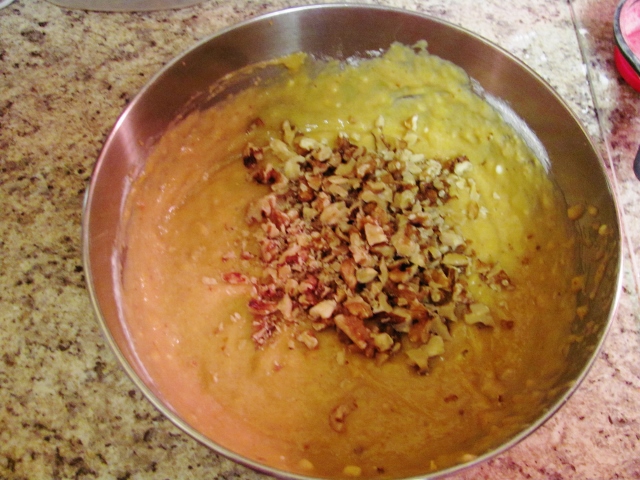
Add 1/2 cup chopped nuts and fold into batter. I used walnuts but it would be good with pecans as well.

Use baking spray to prepare mini-loaf pans.

Divide batter between four pans and bake for 45-50 minutes.


Turn out loaves onto a wire rack to cool.
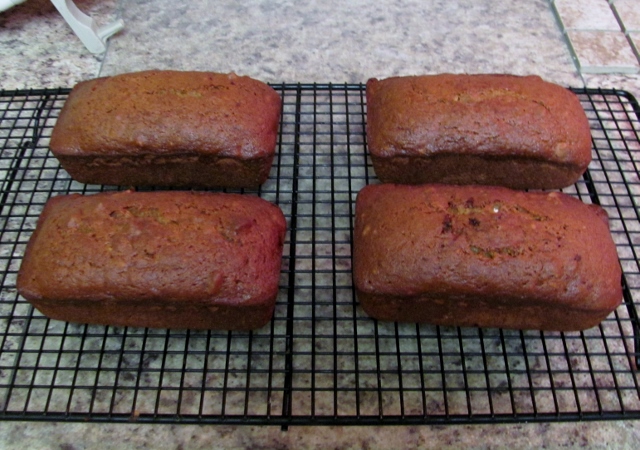
Success!

The first time I made this recipe I used a single full-size loaf pan and baked it for 60 minutes.

Many more squash left - will be making more of this bread.

Ddd


Posted by studio3d@ccgmail.net at 12:01 AM PST
Saturday, 22 November 2014
Cabin In the Corner
Topic: Quilting

THIS IS THE 60th QUILT I HAVE MADE!

With the full set of 12 building blocks and 4 corner trees left from the shop hop kits I put together version 2.0.

The center of this one are orphan blocks from the recent 'This and That' quilt which is a half log cabin block. I added sashing between the blocks and then used some fabric from my stash to create an inner and an outer border.


You can see the quilting I did through all of the sashing and borders is what I call loopy stippling. I also used this quilting in the sky on the building blocks.


I used a woodgrain for the binding as it adds to the rustic feel of the quilt.


The woodgrain is carried over to the outer 5 inches of the back and a center panel of fabric left over from the lanterns finishes it off.


Both of these quilts of the buildings will go to the Passages program at the local Hospital.

Ddd


Posted by studio3d@ccgmail.net at 12:01 AM PST
Friday, 21 November 2014
Town Square
Topic: Quilting

A friend who is no longer able to quilt had attended a shop hop several years ago and collected kits at each shop for blocks designed like little buildings. She had made a few of the blocks from the kits (each kit made two identical blocks) but never finished.

When the finished blocks and remaining kits were given to our quilt group I became the designated finisher.

I made the rest of the blocks - except for a few that did not match the character of these (a Sunbonnet Sue, a Moose, and a Birdhouse). This left me with 11 building blocks and I wanted 12 for the layout I had in mind. So I designed a new block and made it out of a combination of my stash and leftovers from the kits.

I created a center from some orphan blocks left over from the Celtic Dreams quilt. To this I added the 12 blocks of buildings and then I needed something for the corners. A paper-pieced pine tree was just the ticket.

I did some of the quilting using decorative stitches on my new sewing machine. I started with some pine trees on the outer border.

Then the inner border got a line of houses.

And then each building got a cat - in the window or on the doorstep.


I had another set of the building blocks left so I will feature that quilt tomorrow.

Ddd


Posted by studio3d@ccgmail.net at 12:01 AM PST

Newer | Latest | Older