« July 2016 »
S M T W T F S
1 2
3 4 5 6 7 8 9
10 11 12 13 14 15 16
17 18 19 20 21 22 23
24 25 26 27 28 29 30
31
You are not logged in. Log in
Entries by Topic
All topics
3D paperwork  «
A - Z challenge 5
A - Z challenge 7
A - Z challenge round 4
A to Z challenge round 3
A to Z round 2
A to Z round 6
A-Z round 1
Around the House
Art Challenges
Artist Trading Cards
Backgrounds
Beads
Bible Journaling
Books
Boxes
Collage
Color Challenge
Coloring
cookbook
Die Cuts
Digital Projects
Digital Stamps
Drawing
Dry Embossing
Fabric Stuff
Fantastic Folds
Field Trip
Home Decor
How Does Your Garden Grow?
Hymnal Art
In The Kitchen
In the studio
Jewelry
Lettering
Links
Multi-Technique
Music to Work By
Musings
Nail Art
New Work
Online Class
Other Hobbies
Other Projects
Painting
Paper Embroidery
Paper Piecing
Photo
Pretty Paper
Quilting
Random
reading
Scrap Recovery
scrapbooking
Sewing
Sketch Challenge
Some Backlog
Stamping
Stencils
Stickers
Supplies
Teabag Folding
Techniques
Testing
tips and tricks
Tutorial
Web resources
Welcome to my Blog
Work By My Friends
workflow
Writing
Blog Tools
Edit your Blog
Build a Blog
RSS Feed
View Profile
Group One
In & Out of Studio 3D
Monday, 4 July 2016
3rd Quarter Bingo Challenge
Topic: 3D paperwork

It being the beginning of the 3rd quarter of the year, the papercrafts group was issued a new challenge with a tic-tac-toe board. We were to make a card using the three items from any single line in any direction.

This is the board:

Wood       Punch      3D

Dots        Autumn     Cork

Sequins    Animal      Brown


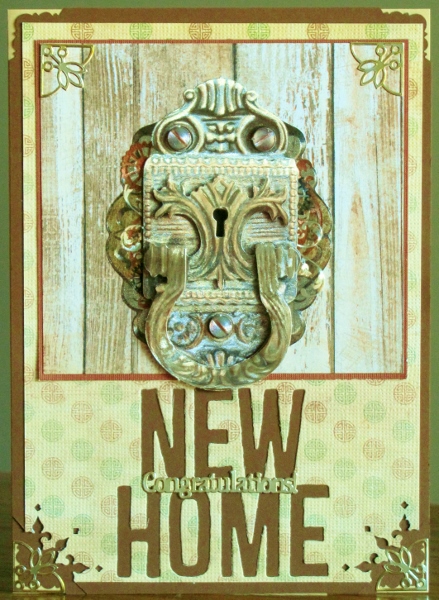
I chose the top row: Wood, Punch, 3D and set to work.

For the wood I used a cardstock printed with boards. I used corner punches and a foil finish 3D image of a door knocker.

I mounted the door knocker on the wood printed piece and bordered this in brown. In the background (with subtle dots) I used individual letter dies to spell out 'new home' which I backed with more brown which also borders the entire piece.

I used corner punches all around and topped them with silver peel-off corner stickers that I had tinted with alcohol markers.

I used a double layer of peel-off text sticker in the space between the diecut words. This word was also tinted with alcohol markers.


Perfect timing for sending to someone whose new home purchase closes this week.

Ddd


Posted by studio3d@ccgmail.net at 5:31 PM PDT
Friday, 1 February 2013
Gracious Get Well
Topic: 3D paperwork

The card that started this whole 3D marathon was this one for the challenge ("make a card using 3D sheets"). This is another of the images that looks like a woodcut and includes the strip of lace with 'woven' ribbon. I placed this over a lattice background and added two butterflies from elsewhere on the 3D sheet.

The text is silver peel-off sticker.

Ddd


Posted by studio3d@ccgmail.net at 12:01 AM PST
Thursday, 31 January 2013
Chocolate and Peppermint
Topic: 3D paperwork

We had a challenge to make a card with brown and pink. This is one of my personal favorite color combinations so I had fun with this challenge.

I used 3D roses from the same sheet as yesterday and placed it on a tone on tone brown dot cardstock ofer a pink folded card base.


The text is a silver peel-off script. I used a butterfly from a set of 3D stickers rather than from the 3D image sheets.

Ddd


Posted by studio3d@ccgmail.net at 12:01 AM PST
Wednesday, 30 January 2013
A Bouquet of Thanks
Topic: 3D paperwork

Well, with these diecut 3D images that just get popped out (no cutting!) a complementary patterned background and a colored card base for framing these cards have really been coming together fast.

Today I selected a lacy diamond background in gray over a pink card base.

The butterfly was the only thing with a touch of blue so I used Copics to color a silver text peel-off before putting it on the card.

Ddd


Posted by studio3d@ccgmail.net at 12:01 AM PST
Tuesday, 29 January 2013
An Elegant Thank You
Topic: 3D paperwork

I pulled out a second sheet of 3D images to work with. These are more photographic than the last ones. I built today's white roses on a patterned aqua background and mounted that on a yellow card base to match the butterfly image.


The text is a silver peel-off greeting that I colored with Copic marker (yellow) before adhering.

Ddd


Posted by studio3d@ccgmail.net at 12:01 AM PST
Monday, 28 January 2013
Congrats, Congrats, Congrats
Topic: 3D paperwork

This rose spray is from the same 3D sticker sheet as yesterday. they have a woodcut feel to them and look very old fashioned. I tried to reinforde that by using more of the cardstock sticker trim, this time on  apricot card base.

The text is diecut from irridescent cardstock that matches the sticker trim borders.

Ddd


Posted by studio3d@ccgmail.net at 12:01 AM PST
Sunday, 27 January 2013
Merci
Topic: 3D paperwork

I pulled out some 3D sheets for a challenge and ended up making more than I needed to for fulfilling the assignment. So that gives me some shares for the next 6 days! Enjoy...

This one is built upon a diecut medallion in 3D. I used a clear sticker to place the text and added the butterfly from another part of the 3D sheet. The background is the front of the lavender folded card base. to this I added three rows of cardstock border trim.

I added some pink 'dew drop' stickers in the trim and also added a couple to the centers of the roses.

Ddd


Posted by studio3d@ccgmail.net at 12:01 AM PST
Thursday, 19 July 2012
Blue on Blue
Topic: 3D paperwork

I used up more of the blue Hobby Dots as designed. This one makes a round frame which I had pricked out on a pink cardstock with doily print. I filled it with a dark blue floral 3D image and added a dark blue double-loop satin bow to the bottom. This is backed with a dark blue folded card base.


This is also a 5 x 6.5 card, like yesterday's.

Ddd


Posted by studio3d@ccgmail.net at 12:01 AM PDT
Wednesday, 18 July 2012
As Designed
Topic: 3D paperwork

The blue sheet of Hobby Dots is actually the one the book is designed for. So I tried a pattern using the dots as they were meant to be used. This one is two side borders and I filled the center with a frame-style foil 3D image. I love the effect of these. For the base card I used a brushed gold metallic so it would fit with the foil 3D.


I added a shimmery gold ribbon at the bottom and a prestamped sentiment at the top. The pattern makes a larger card than most I make but I trimmed it to fit envelopes I keep on hand. It is 5 x 6.5 inches.

Ddd


Posted by studio3d@ccgmail.net at 12:01 AM PDT
Tuesday, 17 July 2012
Hobby Dot to Dot
Topic: 3D paperwork

I had another run at doing a project from the Hobby Dots book my friend gave me. This, again, had to be done with a different page of dot shapes than those the pattern was designed for. I had a sheet of metallic finish pink shapes and I had already pricked out the design on pink... voila! Then I added some from the red sheet and went looking for a 3D element that would go along with these colors.

Only one really worked which made the 'decision' easy. I chose a dotted green cardstock to fill the other half of the page, coordinating it with the green of the leaves.


Crazy camera ... there is much more pink in the left side and the shine on the rose is because of the glossy finish.

I used one of the pre-stamped sentiments and backed it with a thin pink border.

Ddd


Posted by studio3d@ccgmail.net at 12:01 AM PDT
Saturday, 7 April 2012
The Thinker
Topic: 3D paperwork

I made up this little 3D image at least a year ago and kept setting it aside over and over. I finally decided to MAKE myself use it.

I first cut it out using a scalloped die and in the process flattened all the self-stick pearls I had placed on it. Now they are little colored disks, but it will mail better (LOL). I used fine line marker to doodle the scallops as they did not stand out enough from the background.

Speaking of the background, this is make up of strips of table scraps.

I stamped the greeting onto the background and used a soft golden folded card base.

Ddd


Posted by studio3d@ccgmail.net at 12:01 AM PDT
Friday, 9 September 2011
Blue Jeans Baby
Topic: 3D paperwork

Well, this is a bit different interpretation of the topic 3D paperwork, but it applies in an oblique sort of way.

I started with a piece of printed scrapbook paper that looks like denim. Then I used copic markers to add shading that would create seams, folds, and top-stitching. Voila! A jeans pocket! I added three antique silver brads to serve as rivets and then sliced along the top edge of the large pocket. By placing a lining paper behind and raising the two side edges on foam squared the pocket actually stands out from the jeans (actual 3D).

I had a sticker that matched the color and look of leather so I placed that on the 'waistband' to serve as both text and the jeans label. The jeans are mounted on a printed cardstock with antique script and this is what appears on the back of the card as well. The inside of the card matches the inside of the pocket lining.

I created a tag out of mulberry paper to look like a hankie in the pocket.

However, it is reversible and has some of the text cardstock on the back so it can also look like there is a note in the pocket.

This was actually used for a Father's Day card and a gift card was tucked into the pocket behind the tag.

Ddd


Posted by studio3d@ccgmail.net at 6:00 AM PDT
Updated: Friday, 9 September 2011 9:07 AM PDT
Monday, 25 July 2011
No Words to Say
Topic: 3D paperwork

Well, this is the final 3D of the diecuts I bought. I had no words to say goodbye so there is no greeting on this card.

The background is one of the Color Me papers that I blended with distress inks and stamped with a text pattern.

I chose a folded cardstock base to match the flowers and gave this a simple centered framing.

Ddd


Posted by studio3d@ccgmail.net at 6:00 AM PDT
Sunday, 24 July 2011
Blessed
Topic: 3D paperwork

This cream cardstock was run through the Cuttlebug to create an elegant background for the roses. I also rounded tow opposing corners to enhance the framing on the burgundy folded card base.

A clear sticker provides the black text word.

Ddd


Posted by studio3d@ccgmail.net at 6:00 AM PDT
Saturday, 23 July 2011
God Bless
Topic: 3D paperwork

Another simple layout that really delivers, thanks to the materials selection. The green printed panel is shimmery paper and I added it to a celery folded card base.

The text is a clear sticker with silver print.

Ddd


Posted by studio3d@ccgmail.net at 6:00 AM PDT
Friday, 22 July 2011
Pink Stripe Day
Topic: 3D paperwork

The combination of the pastel floral and the pink striped cardstock make this a very feminine card. I selected a pastel blue for the folded card base to keep it simple and added a clear ssticker with silver text.

I am very near the end of these 3D floral sheets. I will be sad to move on from these.

Ddd


Posted by studio3d@ccgmail.net at 6:00 AM PDT
Thursday, 14 July 2011
Eyes Can't See It
Topic: 3D paperwork

Despite the flowers, this card could be used for a masculine card because of the colors and dark tones. The center panel is printed cardstock with a grid and tone-on-tone floral corner.


The folded card base was chosen to echo the leaves and I used a clear sticker with silver text.

Ddd


Posted by studio3d@ccgmail.net at 6:00 AM PDT
Tuesday, 12 July 2011
Guidance
Topic: 3D paperwork

Note to salf: don't stick the 3D image on the dotted paper and THEN try to round the corners. Check!

I started out with square corners but they just didn't feel right. I do like the way the flower escapes the bounds of its mounting. I gave it a cream card base to keep the look simple.

That's another clear text sticker, in case you hadn't figured it out.

Ddd


Posted by studio3d@ccgmail.net at 6:00 AM PDT
Sunday, 10 July 2011
Happy Dance of Color
Topic: 3D paperwork

These sunflowers just called out for a cheery background so I used this orange with a Cuttlebug texture folder. The organza ribbon is tied through slits in the paper around the stems.

I used folds of the same ribbon to create 'photo corners' and added a clear text sticker at the bottom.

Ddd


Posted by studio3d@ccgmail.net at 6:00 AM PDT
Thursday, 7 July 2011
Name That Flower
Topic: 3D paperwork

I've used this flower before and, just like before, I have no idea what it is. But I like it!

I had a booklet of scriptures on vellum and decided to pull some of them out for use. This one got glue dots under the circle elements and was laid over the background paper (shimmery green print). Then the un-named flower was mounted to the background with bits of leaves and flowers allowed to drift into the text area.

I used a yellow folded card base to echo the color in the flowers.

Ddd


Posted by studio3d@ccgmail.net at 6:00 AM PDT

Newer | Latest | Older