« September 2011 »
S M T W T F S
1 2 3
4 5 6 7 8 9 10
11 12 13 14 15 16 17
18 19 20 21 22 23 24
25 26 27 28 29 30
You are not logged in. Log in
Entries by Topic
All topics  «
3D paperwork
A - Z challenge 5
A - Z challenge 7
A - Z challenge round 4
A to Z challenge round 3
A to Z round 2
A to Z round 6
A-Z round 1
Around the House
Art Challenges
Artist Trading Cards
Backgrounds
Beads
Bible Journaling
Books
Boxes
Collage
Color Challenge
Coloring
cookbook
Die Cuts
Digital Projects
Digital Stamps
Drawing
Dry Embossing
Fabric Stuff
Fantastic Folds
Field Trip
Home Decor
How Does Your Garden Grow?
Hymnal Art
In The Kitchen
In the studio
Jewelry
Lettering
Links
Multi-Technique
Music to Work By
Musings
Nail Art
New Work
Online Class
Other Hobbies
Other Projects
Painting
Paper Embroidery
Paper Piecing
Photo
Pretty Paper
Quilting
Random
reading
Scrap Recovery
scrapbooking
Sewing
Sketch Challenge
Some Backlog
Stamping
Stencils
Stickers
Supplies
Teabag Folding
Techniques
Testing
tips and tricks
Tutorial
Web resources
Welcome to my Blog
Work By My Friends
workflow
Writing
Blog Tools
Edit your Blog
Build a Blog
RSS Feed
View Profile
Group One
In & Out of Studio 3D
Sunday, 18 September 2011
Paper Pin
Topic: Fantastic Folds

Sometimes an idea just pops in my head and I have to go try it right away. Such is the case with today's project.

Question to myself: I see everyone making those cool pleated rosette flowers. I wonder if it would work to cut a strip of cardstock and punch it with edge trimmer, pleat on the bumps and valleys.

Answer: Yes it does work to some extent. The issue is really the 'spread' of the design in the border punch. The one I had at hand folded at just under 1/2 inch making for a very tall bloom.

Solution: Find another use for it instead of a card. So I added a rhinestone on a stem to the center, mounted the pleated flower on a big glue dot. To this was added three gold paper leaves (left over from cake decorating days), and two strips of ribbon. I backed this with another glue dot and backed it with a punched circle. Another punched circle got slots cut into it and a pin back fed through. Then glue dots hold whis circle to the rest of the pin.

Here is the result:

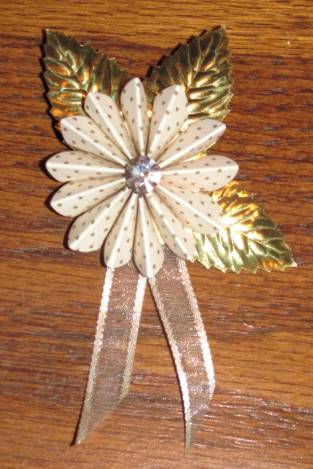
Cute, eh? But being paper it won't be durable. I wore it once and it looks nice, though. If I were to do another I might leave off the pin back and use it to decorate a gift box as a permanent 'bow'.

Ddd


Posted by studio3d@ccgmail.net at 6:00 AM PDT

View Latest Entries