Topic: Techniques
Back in September 2008 the people at www.vervestamp.com put up a challenge. They gave a cutting sketch along with four card layouts to make from the resulting paper snips. Here is the page they issued:

One does the same cuttings with two patterned papers, arranges the snips according to the sketches and adds (according to them) a stamped image block to finish it off. Working with two papers in the 6 x 6 papers they specify you would have 8 cards when done, as the blocks are reversed on the second card made from each sketch.
Well, at that time (yes, September 2008) I used 12 x 12 papers to make four 6 x 6 sheets of each color (I used red and black/white). Since I had four times the papers I ended up with supplies to make 32 cards. . . . I made 5 then got bored with it and put the rest of the supplies away. I just ran across them again and decided to do a marathon session to finish them all off.
This is the first of the sketches I used:

Throughout this whole project I used white folded card bases and attached all the red and the black/white pieces. Then I set about looking for stamped images and/or stickers that I could color red with watercolor markers to decorate the cards.
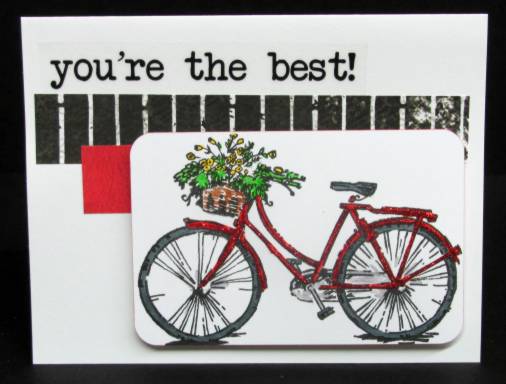
For this one I used a bicycle image on white cardstock. I colored the backet and flowers with green/brown/yellow to add another pop of color to the card. I rounded the corners and ran a red marker around the edge of the image and popped it up on foam tape. Then I added red Stickles to the bicycle. The text is a clear sticker:
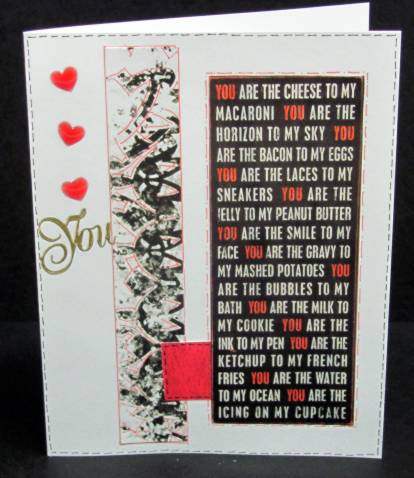
For this one I used a black/white text image from a catalog. I added red marker to the word 'you' throughout the text. Fine-line markers were used to doodle lines throughout the card and I placed three red acrylic heart stickers on the left border. A gold peel-off word 'you' sets the tone for the card:
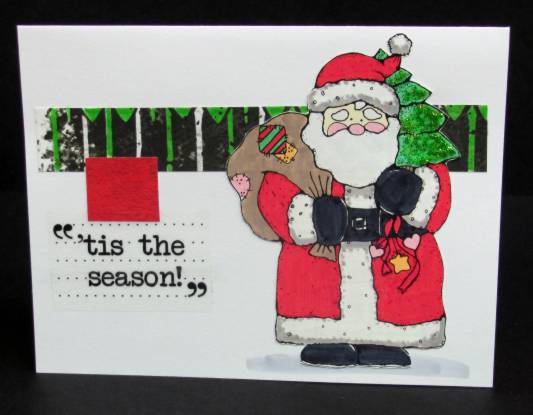
Next up is this Santa image. I colored some of the white areas of the b/w border with green to match the Christmas tree. I added green Stickles to the tree and a clear sticker for text:
This stamped image was colored in red and grey and red Stickles line the stripes on her jacket. I colored the edge of the image with red marker to separate it from the background card. Two clear stickers were combined for the text and a rub-on heart plus a red rhinestone decorate the small red block:

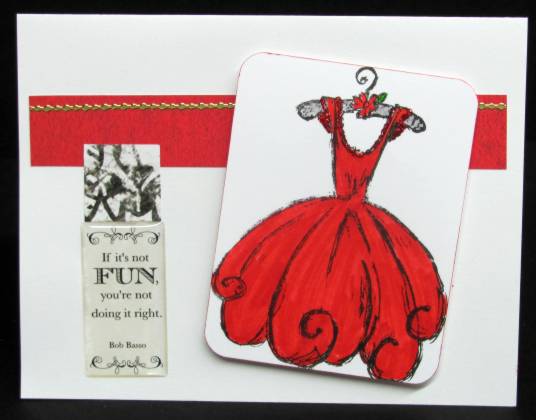
Then I started on the cards with the color blocks swapped. This flirty little dress was colored in red and Stickles were used to trim the neck and sleeves. I added a thick clear acrylic sticker for the text block:
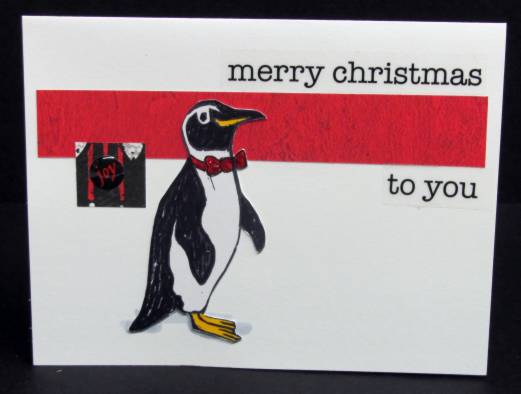
I pulled out this penguin I had stamped up a long time ago (handcarved by me) and drew in a red bow tie. This I glittered with red Stickles. I split a long text clear sticker to mount over and under the red bar. A bit of red marker and a round acrylic sticker were added to the little black block:
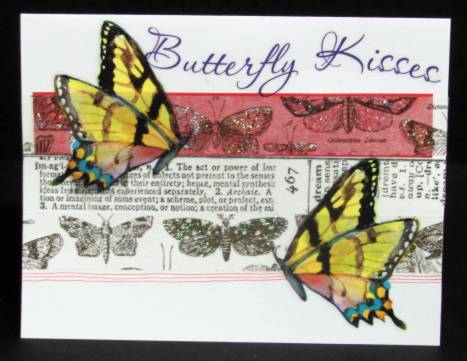
Finally, I placed strips of tissue tape over the color bar and then added vinyl butterfly stickers on top. I filled in the tissue tape butterfly wings with Stickles and added a clear script text sticker at the top:
So that's it for the first sketch - more tomorrow.
Ddd
