« March 2018 »
S M T W T F S
1 2 3
4 5 6 7 8 9 10
11 12 13 14 15 16 17
18 19 20 21 22 23 24
25 26 27 28 29 30 31
You are not logged in. Log in
Entries by Topic
All topics  «
3D paperwork
A - Z challenge 5
A - Z challenge 7
A - Z challenge round 4
A to Z challenge round 3
A to Z round 2
A to Z round 6
A-Z round 1
Around the House
Art Challenges
Artist Trading Cards
Backgrounds
Beads
Bible Journaling
Books
Boxes
Collage
Color Challenge
Coloring
cookbook
Die Cuts
Digital Projects
Digital Stamps
Drawing
Dry Embossing
Fabric Stuff
Fantastic Folds
Field Trip
Home Decor
How Does Your Garden Grow?
Hymnal Art
In The Kitchen
In the studio
Jewelry
Lettering
Links
Multi-Technique
Music to Work By
Musings
Nail Art
New Work
Online Class
Other Hobbies
Other Projects
Painting
Paper Embroidery
Paper Piecing
Photo
Pretty Paper
Quilting
Random
reading
Scrap Recovery
scrapbooking
Sewing
Sketch Challenge
Some Backlog
Stamping
Stencils
Stickers
Supplies
Teabag Folding
Techniques
Testing
tips and tricks
Tutorial
Web resources
Welcome to my Blog
Work By My Friends
workflow
Writing
Blog Tools
Edit your Blog
Build a Blog
RSS Feed
View Profile
Group One
In & Out of Studio 3D
Saturday, 24 March 2018
How To Save a Quilt Top
Topic: Quilting

I had made available to me a partially finished quilt top with six diagonally pieced string blocks. They had been arranged strangely and bordered several times. The top was not large enough and the 'design' was not something I wanted to just add more borders around.

I thought to spread out the string piecing a bit so I used a square ruler to 'extract' the pieced blocks, cut them on the diagonal across the strings and added a triangle of patterned fabric to bring it back square again. This gave me 12 blocks.

That activity shrank the overall size of the blocks and they weren't going to be enough. So I made 4 more string blocks in the same style as the originals, cut those diagonally and attahed the patterned fabric as with the first set. This gave me 8 more blocks for a total of 20.

I used sashing between and arranged them to create chevrons across with a 4 x 5 layout.


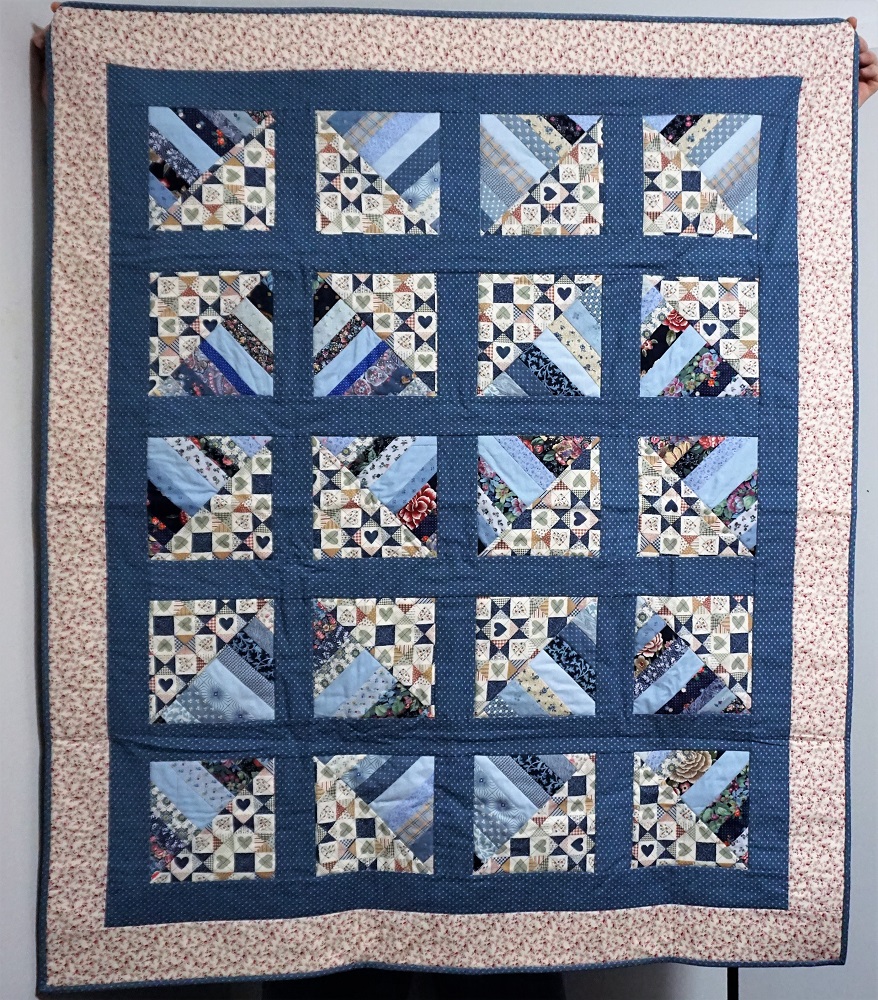
I added a border all around and quilted it with stitch-in-the-ditch around each block and on its diagonal.

The bonding matches the sashing on this lap quilt for Passages.

Ddd


Posted by studio3d@ccgmail.net at 11:16 PM PDT

View Latest Entries