« May 2013 »
S M T W T F S
1 2 3 4
5 6 7 8 9 10 11
12 13 14 15 16 17 18
19 20 21 22 23 24 25
26 27 28 29 30 31
You are not logged in. Log in
Entries by Topic
All topics  «
3D paperwork
A - Z challenge 5
A - Z challenge 7
A - Z challenge round 4
A to Z challenge round 3
A to Z round 2
A to Z round 6
A-Z round 1
Around the House
Art Challenges
Artist Trading Cards
Backgrounds
Beads
Bible Journaling
Books
Boxes
Collage
Color Challenge
Coloring
cookbook
Die Cuts
Digital Projects
Digital Stamps
Drawing
Dry Embossing
Fabric Stuff
Fantastic Folds
Field Trip
Home Decor
How Does Your Garden Grow?
Hymnal Art
In The Kitchen
In the studio
Jewelry
Lettering
Links
Multi-Technique
Music to Work By
Musings
Nail Art
New Work
Online Class
Other Hobbies
Other Projects
Painting
Paper Embroidery
Paper Piecing
Photo
Pretty Paper
Quilting
Random
reading
Scrap Recovery
scrapbooking
Sewing
Sketch Challenge
Some Backlog
Stamping
Stencils
Stickers
Supplies
Teabag Folding
Techniques
Testing
tips and tricks
Tutorial
Web resources
Welcome to my Blog
Work By My Friends
workflow
Writing
Blog Tools
Edit your Blog
Build a Blog
RSS Feed
View Profile
Group One
In & Out of Studio 3D
Friday, 31 May 2013
Decorated Journal
Topic: Field Trip

On a recent vacation I took an offered workshop for a decorated journal. Calling it a 'workshop' was stretching it a lot as we bought a blank journal with a packet of supplies and were given a tape runner, glue dots, and scissors to use.

I made mine with big pockets on the front and back and used their stickers and diecuts to add details.

This is the front:

And this is the back:

Lots of supplies left over to use on other projects at home.

Ddd


Posted by studio3d@ccgmail.net at 12:01 AM PDT
Thursday, 30 May 2013
Holly Jolly
Topic: Paper Embroidery

So little stitching on these elements it hardly seems fair to classify this as paper embroidery! The canes each have 7 lines and the holly each have 3 french knots.

I trimmed all these elements and mounted them to a patterned cardstock over a cream decorated paper. The holly is popped up on foam tape.

The greeting is a red foil sticker.

Ddd


Posted by studio3d@ccgmail.net at 12:01 AM PDT
Wednesday, 29 May 2013
Tall Trees
Topic: Paper Embroidery

Here's a different format... a tall card for a change.

I mounted three tree stickers and a star to emerald green dotted cardstock. All the stitching was done in red and the panel was bordered in red as well. I added to a speckled card base.


The text is a sticker.

Ddd


Posted by studio3d@ccgmail.net at 12:01 AM PDT
Tuesday, 28 May 2013
Christmas Bauble
Topic: Paper Embroidery

Now I'm actually working ahead on Christmas cards - this one is for June.

Three stickers make up this arrangement - the bauble and a chain on purple and the bow on red. They are stitched with metallic threads in opposing colors. The bow was trimmed out and mounted on foam tape.

I mounted the panel on a red card base and added red faux stitching up the sides.

The sentiment is a clear sticker.

Ddd


Posted by studio3d@ccgmail.net at 12:01 AM PDT
Monday, 27 May 2013
Yummy Cardstock
Topic: Paper Embroidery

Cute gingerbread stickers were placed ton ginger-colored dotted cardstock and stitched in different colors before trimming them out. I used two types of shiny silver paper to create a littel cookie sheet and glued the cookies onto it. More silver and a little black became a spatula and is popped up on foam tape.

I added the whole to a yellow card base and added a clear sticker greeting. This card makes me smile.

Ddd


Posted by studio3d@ccgmail.net at 12:01 AM PDT
Sunday, 26 May 2013
Potted Plant
Topic: Paper Embroidery

This was such a pretty tree I decided to let it stand on its own. I placed the sticker on emerald green dotted paper and stitched all in red.

On a red card base I mounted two shiny gold strips and popped up the image with foam tape.

Ddd


Posted by studio3d@ccgmail.net at 12:01 AM PDT
Saturday, 25 May 2013
Season For Presents
Topic: Paper Embroidery

Second card for April is made up of 9 separate stickers on random cardstock colors, stitched with random colors and trimmed to size.

I made a light 'floor' with lines of marker and stacked the presents - some on foam tape.

The greeting is a vinyl sticker.

Ddd


Posted by studio3d@ccgmail.net at 12:01 AM PDT
Friday, 24 May 2013
Peaceful Tree-O
Topic: Paper Embroidery

Now catching up to the April Christmas cards... Three separate tree stickers were placed on green dotted cardstock. I stitched all in red and added a red border behind. The greeting is a clear sticker.

I used a woodgrain background and popped the iage panel up on foam tape.

Ddd


Posted by studio3d@ccgmail.net at 12:01 AM PDT
Thursday, 23 May 2013
Gingerbread House
Topic: Paper Embroidery

This Christmas card was scheduled for March! Finally, I got it done.

The gingerbread house sticker was mounted on toasty brown dotted paper. The suckers and candy canes were stuck to pink and red paper and stitched before trimming out. I bordered the house with red to pick up the stitching and placed on woodgrain paper for a background.


The greeting is a clear sticker.

Ddd


Posted by studio3d@ccgmail.net at 12:01 AM PDT
Wednesday, 22 May 2013
Twinkle Toes
Topic: Paper Embroidery

I am catching up with the 'two Christmas cards per month' plan. I am still working with the stitching stickers and for this card combined two elements.

First I stitched french knots in the centers of the string of lights. Then I placed the stocking stickers on red and stitched the heels and toes before trimming out. These are mounted with foam tape to 'hang' from the light string.


Over a green card base I added a chevron strip and a thick acrylic greeting sticker. The bordered feature panel was then attached.

Ddd


Posted by studio3d@ccgmail.net at 12:01 AM PDT
Tuesday, 21 May 2013
Blow Hard
Topic: Paper Embroidery

Another swap I missed participating in was the one on 'weather'. This pattern is from the one book I own on paper embroidery. I selected a greyed blue for the sky and stitched up the clouds with white.

I mounted on a white card base and added a mix of leaf stickers and swirls.

Ddd


Posted by studio3d@ccgmail.net at 12:01 AM PDT
Monday, 20 May 2013
Red, Red Rose
Topic: Paper Embroidery

Another June swap for 'roses' will find me sending this one out in the mail. This i my own pattern stitched in two tones of red over a two-toned pink paper.

I stamped the sentiment on breen to match the leaves and popped it up on foam tape.

Ddd


Posted by studio3d@ccgmail.net at 12:01 AM PDT
Sunday, 19 May 2013
All In
Topic: How Does Your Garden Grow?

The 2013 garden is IN! (OK, two small exceptions I'll expound on later).

Here is the main garden with the barrels up on the patio and the raised bed extension we built last year.

LEFT TO RIGHT the barrels are planted with: Turnips, Carrots, Beets, Radish, Green Beans, Cherry Tomatoes, Spinach, Peas, Lettuce, Cucumber, Green Onions, Sweet Banana Peppers. This is the first time I have tried Turnips and Peppers.

IN THE RAISED BED LEFT TO RIGHT: Strawberries, Blueberries, Grape Tomatoes, Slicing Tomatoes, Sweet Onions, Yukon Gold Potatoes, Red Potatoes, Russet Potatoes. There are also sweet onions in a border around the back and left of the bed.

The single strawberry plant and single blueberry bush are all that survived of last year's attack of the deer grazers. Neither of the raspberry bushes made it through that. This is the first time I've tried the grape tomatoes and it was an accident. I went by the picture on the package and thought I was getting Roma tomatoes. Only the lower left cage is grapes, the other three are slicing tomatoes. In the tires there are three each of each potato type and each tire has three plants (9 total of each variety). I have additional tires to tower these when the plants get tall enough.

The entire raised bed will get tall fence posts and netting to try to keep the deer from grazing. It worked when we just had the barrels and hung the netting from the deck above. We're keeping our fingers crossed for adding it around the outside. (If all else fails, we DO like watching the deer and are not adverse to sharing).

This is the new plot that is not planted yet:

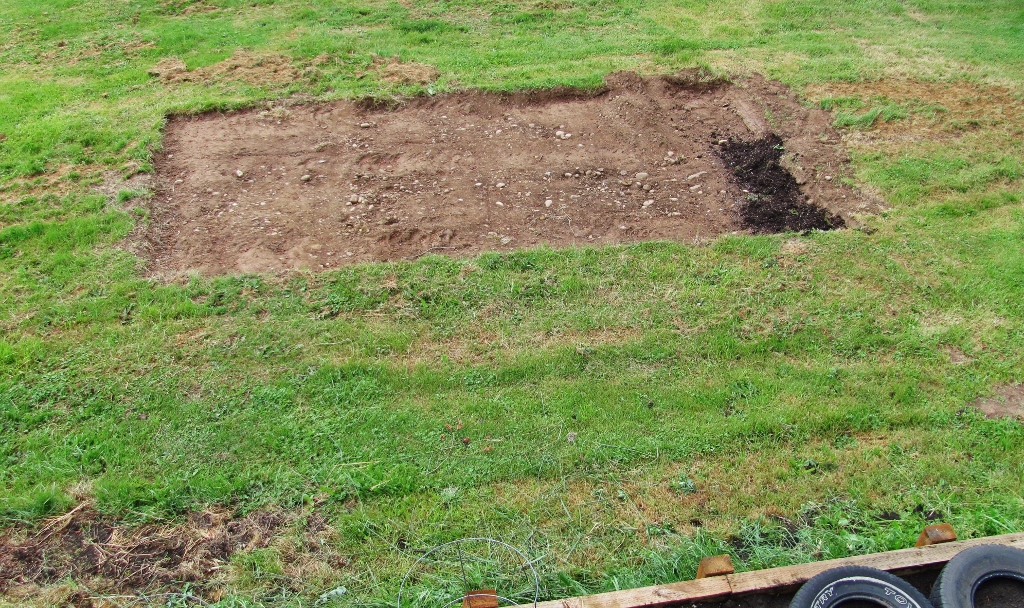
We used the tractor bucket to scrape off the sod and will be tilling this and adding topsoil. The left end will be a small plot of sunflowers to grow seed for the squirrels. The bulk of the plot will be Sweet Corn.

I always have such hope the day I plant the garden!

Ddd


Posted by studio3d@ccgmail.net at 12:01 AM PDT
Saturday, 18 May 2013
Flowers All Around
Topic: Paper Embroidery

Another free pattern but I've lost the bit that says where it is from.

I had it pricked out on the black dotted paper when I decided to go with bold colors all around for the stitching. There are actually interlocking green stems in the center but I liked the greeting block mounted there which covers the stems.


The greeting panel got some faux stitching and is popped up on foam tape. I rounded the corners and backed this with a bright yellow card base.

Ddd


Posted by studio3d@ccgmail.net at 12:01 AM PDT
Friday, 17 May 2013
In the Surf
Topic: Paper Embroidery

I'm ready for a July swap on the theme Summer Vacation with the card for today. This is my own pattern stitched onto sand-colored cardstock with a bit of shimmer. The panel was mounted over woodgrain and I added two diecut swooshes for the 'waves'.

The greeting is stamped on a piece of shimmery white cardstock and popped up on foam tape.

Ddd


Posted by studio3d@ccgmail.net at 12:01 AM PDT
Thursday, 16 May 2013
What a Stretch
Topic: Paper Embroidery

Another swap I missed signing up for was on the theme 'animals'. I had it ready to stitch so decided to do it and set it aside for another use.

This giraffe pattern was free on a blog I read. I stitshed it with verigated thread on butterscotch cardstock. I used watercolor pencils to color in the spots and washed over them with an aquabrushl.


I mounted over a black striped paper, added black dots to the eyes and stamped the sentiment.

Ddd


Posted by studio3d@ccgmail.net at 12:01 AM PDT
Wednesday, 15 May 2013
Good Luck Mandala
Topic: Paper Embroidery

One assigned swap theme was to stitch a mandala. I missed the swap but already had the pattern pricked out do went on with it. I used a woodgrain background and stitched with yellow, orange and copper threads.

This I mounted on a yellow card base to accent the center of the shape.

I used small gold peel-off stickers to add "Good Luck" repeatedly around the inside.

Ddd


Posted by studio3d@ccgmail.net at 12:01 AM PDT
Tuesday, 14 May 2013
Dragon's Breath
Topic: Paper Embroidery

On a recent vacation I had a LOT of down time to read and do paper embroidery. In two week's time I stitched enough elements for 18 cards! You only get to see them one-per-day though.

First one is for an upcoming swap on mythical creatures. I decided to use one of the dragon patterns I designed last year, that I had not stitched up yet. I used neon green over a two-toned green dot cardstock. This was trimmed and mounted on a light green card base.

I used a diecut swoosh and colored with alcohol markers for flames. Then I used orange and yellow Stickles on it. The eye also got a dot of black Stickles.

Ddd


Posted by studio3d@ccgmail.net at 12:01 AM PDT
Monday, 13 May 2013
Straw Travelers
Topic: Other Projects

As I was packing for a recent trip I remembered a tip I saw online about packing necklaces with straws to keep the chains from tangling. It was brilliant, I remembered thinking, so I proposed to give it a try.

The idea is that you unhook the fastener, pass one end of the chain through the length of a straw and then fasten it up at the other end. If you wish to use the same technique with a shorter chain or a bracelet you can easily snip the straw shorter with scissors.

See how nicely they lie? Here's a closer shot of it.

These can be laid in the bottom of a bag and cannot tangle around one another at all. What a great idea.

It would even work to store them like this in the jewelry box as I am always trying to untangle them to wear. It would make selecting one easier, too.

Ddd


Posted by studio3d@ccgmail.net at 12:01 AM PDT
Sunday, 12 May 2013
Yikes Stripes!
Topic: Collage

I realized the paper scraps were WAY out of control and decided to reduce the pile a little. I took out all the skinny strips and separated coordinating colors and patterns into piles. Then I ran 1/4 sheets of cardstock through the Xyron to apply adhesive to one side.

I used the strips to create striped background and trimmed them to fit card fronts. I used stickers and other handy embellishments to finish them off and ended up with 7 cards.


Why does my scrap bin not look any smaller?

Ddd


Posted by studio3d@ccgmail.net at 12:01 AM PDT

Newer | Latest | Older