« March 2020 »
S M T W T F S
1 2 3 4 5 6 7
8 9 10 11 12 13 14
15 16 17 18 19 20 21
22 23 24 25 26 27 28
29 30 31
You are not logged in. Log in
Entries by Topic
All topics
3D paperwork
A - Z challenge 5
A - Z challenge 7
A - Z challenge round 4
A to Z challenge round 3
A to Z round 2
A to Z round 6
A-Z round 1
Around the House
Art Challenges
Artist Trading Cards
Backgrounds
Beads
Bible Journaling
Books
Boxes
Collage
Color Challenge
Coloring
cookbook
Die Cuts
Digital Projects
Digital Stamps
Drawing
Dry Embossing
Fabric Stuff
Fantastic Folds
Field Trip
Home Decor
How Does Your Garden Grow?
Hymnal Art
In The Kitchen
In the studio
Jewelry
Lettering
Links
Multi-Technique
Music to Work By
Musings
Nail Art
New Work
Online Class
Other Hobbies
Other Projects
Painting
Paper Embroidery
Paper Piecing
Photo
Pretty Paper
Quilting  «
Random
reading
Scrap Recovery
scrapbooking
Sewing
Sketch Challenge
Some Backlog
Stamping
Stencils
Stickers
Supplies
Teabag Folding
Techniques
Testing
tips and tricks
Tutorial
Web resources
Welcome to my Blog
Work By My Friends
workflow
Writing
Blog Tools
Edit your Blog
Build a Blog
RSS Feed
View Profile
Group One
In & Out of Studio 3D
Tuesday, 3 March 2020
Fun New Quilt Plans
Topic: Quilting

The trip to the sewing and stitchery expo found me buying some cute quilt patterns/kits.

This first pattern I bought just for me and I got some inexpensive fat quarters to use on it. I will probably split up the blocks to make a wall hanging and a lap quilt. I just love bunnies and really fell for this patterin. SO CUTE!


I picked up this kit to makea wall hanging for hubby. We both miss our old black lab.


These two panels will make quilts for a couple of Navy Nukes I know.


Oh, my growing pile of projects!

Ddd


Posted by studio3d@ccgmail.net at 12:01 AM PST
Monday, 2 March 2020
That's Really Sharp!
Topic: Quilting

 I had an opportunity last September to borrow an Accuquilt GO machine and some dies to cut fabric. I cut lots of my scraps to create kits for quilts and I am still working my way through them.

However, when I had to return the machine I decided I wanted one of my own so I waited for a really good sale.

I bought a bundle whih included to machine, a die to cut 2 1/2 inch strips and a 'cube' which has eight mix and match dies to make 8" blocks. The dies include two sizes of squares, 2 sizes of half-square triangles, quarter-square triangle, and others.

Then, because I don't make 8" blocks a lot I bought the cubes in 10 inch and 12 inch. None of the cubes included a 5" square which one needs for patterns that call for 'charm squares'. So I added that.

At the sewing expo last week I picked up more strip cutters so can do 1 1/2, 2 1/2, 2 1/4 (what I used for binding), and 3 1/2.

I think I'm ready for most anything!

This is how I set up my station:

The cutter actually goes further to the left so there is room for the entrance and exit of the dies. On the right are the cubes and the extra small dies.

On the floor to the right of the cabinet are the 4 strip cutter dies and their cutting mat.

On the wall above is a chart of all the individual dies along with their locations. This way, if a pattern calls for a 2x4 flying geese block I know immediately where the dies are that will cut that.

Let's get whacking!

Ddd


Posted by studio3d@ccgmail.net at 12:01 AM PST
Wednesday, 26 February 2020
Quilt Sketching
Topic: Quilting

 As I go along day to day I sometimes see a quilt that I would like to recreate. I take a snap of it on my phone.

There are never any details and I don't make any notes.

When I was sketching in my notebook, I pulled out my phone and set to work figuring out the pieces needed and, sometimes, the steps required to make four of these quilts.

I added color with markers when I got home.

This first one is based on a quilt hanging in the library of a community college in Tennessee! I calculated the size it would be if constructed of various sizes of units. I'll decide later which I want it to be.


 I don't know the origin of this block. The focus in this casewas figuring out the steps to construction. I also wrote out all the pieces needed to finish it.


I think I took a photo of my computer screen when I saw a quilt make of this block in different values of gray.

The coloring I used in the sketch is just to show values, not real color.

Again, I listed unit sizes.

I din't add any color to this sketch as it is supposed to me made scrappy. You can faintly see where I darkened the blocks that would have prints or colors and left those that would be white background.


I filed these away for use someday. They may become charity quilts when I catch up with the other 30 I have in various stages.

Ddd


Posted by studio3d@ccgmail.net at 12:01 AM PST
Sunday, 19 January 2020
Mitered Mania
Topic: Quilting

I managed to squeeze out a little time for quilting in the midst of all this bible journaling! I actually cut out all the parts for this in September when I had a friend's AccuQuilt machine and dies on loan for a few weeks.

Actually, I cut a TON of fabric scraps and made kits for dozens of quilts which allows me to just pick up a bag of parts and go straight to sewing.

I had found the pattern for something along these same conceptual lines. They used strip sets of 6 2" strips and I used 5 of 2.5" strips. This made the measurements they had for the blocks totally wrong for me so I just followed the process while inserting my own data.

The finished quilt in the magazine was for a square baby quilt using only 4 of the big blocks. I added 2 of my bigger blocks (for a total of 6) and added wider borders to make a lap quilt.

All from scraps!

I quilted on the longarm machine with a pantograph called "Bountiful Feathers" - my favorite!

First quilt on Squatch with not a single thread break, too.

Ddd


Posted by studio3d@ccgmail.net at 9:58 PM PST
Monday, 30 December 2019
Quilt of Valor
Topic: Quilting

The Quilts of Valor program has been going on for quite some time but this is the first one I have made. 

According to the Foundation's website The mission of the Quilts of Valor Foundation is to cover service members and veterans touched by war with comforting and healing Quilts of Valor.

It also reports the following quilt counts:

Quilts Awarded This Month:

7575

Quilts Awarded 2019 YTD:

30,967

Total Quilts Awarded:

240,077

Now they can add ONE MORE to each of these totals!

My Quilt of Valor is being awarded to a friend of ours who served in the army during the Vietman era, though he was deployed in a different area.

I used fabrics with dulled colors to give the quilt an overall vintage look. The individual pieces largish (flying geese are 3x6) and blocks are 12x12. 

Here is an overview shot:


And a closeup that shows the quilting. Free-motioned zig-zags in the white chevron areas. The red and white diamond areas are outlined in long scallops as are the yellow and white pinwheels. Then the pinwheels got a star quilted into them.


For the backing I found this awesome vintage flag print.


This will be presented on January 1, 2020.

Ddd


Posted by studio3d@ccgmail.net at 4:04 PM PST
Sunday, 29 December 2019
Collaborative Quilting
Topic: Quilting

My sister had started a few quilting projects at the time of her passing. That was a girl with very few unfinished projects!

One was a SET that included a queen-sized bed quilt top (completely pieced), a matching wall hanging (laid out on the design wall) and a set of commercial pillowcases with extra blocks to decorate them with.

I took a lot of time practicing on her longarm machine with lap quilts until I was confident that I would not ruin the projects she had begun. The last week I got brave and loaded the two quilts one after the other and quilted both with a feather pattern from one of her pantograph rolls.

I was SO pleased that everything turned out perfectly!

I laid them out at Mom's house to photograph them:


She had designed this set of projects for her daughter's new house. They are boxed up and ready to mail tomorrow.

I hope I did her proud and that they will be used with loving memories!

Ddd


Posted by studio3d@ccgmail.net at 10:30 PM PST
Thursday, 12 December 2019
Bracketed
Topic: Quilting

18 months ago I went on a quilting retreat at the beach. My sister was with me when I bought two fat-quarter stacks of lovely teals and magentas. Without a specific plan for them, these fabrics were put away for a 'someday project'.

When my sister passed away, her stash of fabrics and patterns were given to me. I went through all her patterns and found one that she had pulled from a magazine in 2011. And there it was - In the same colors as I had bought with her! PERFECT!

I used the borrowed die-cutting machine to cut the required strips and this quilt came together quickly.


I used fabrics from her stash for the border, backing and binding and I did the quilting with the longarm machine I inherited from her estate.

I feel like this was kind of a joint project and I thought about her all the time while putting it together.

Ddd


Posted by studio3d@ccgmail.net at 10:27 AM PST
Monday, 9 December 2019
Square Knot
Topic: Quilting

Even with a huge stack of already-cut project kits I had compiled (over 30), I just HAD to gather scrap strips from my stash to make this quilt as soon as I saw the tutorial for it from Missouri Star Quilt Company.

For quite some time I had been just cramming leftovers of strips and other small cut leftovers into a bin. And I do mean CRAMMING. It had finally gotten out of control and I had separated out the 2 1/2 strips from the 2 1/4 strips and the 2 1/2 squares, etc. I had set aside to use a bunch of the small odd bits and cut others with a die-cutter on loan to me. 

Then this tutorial came out and I knew right away that this was the project I wanted to use for the 2 1/2" strips. I combined these with new strips I cut from some muslin yardage given to me this summer.

I finished with a wide border from other gifted yardage and put it on the longarm for quilting with a paper pantograph.


Isn't this fun? I can stroll through these square knot blocks and point out the history of the fabrics and what other quilts I had used them in.

This made a SMALL dent in the scrap bin - so much more to go!

Ddd


Posted by studio3d@ccgmail.net at 9:55 AM PST
Friday, 15 November 2019
Blooming Stars Quilt
Topic: Quilting

Last year I bought a couple of fat-quarter stacks that had a wide range of values of in a single colorway. Each stack had the same abstract prints with gold paint features - dots, swirls, circles, and more.There was a magenta stack and a teal stack.

I set these aside until I found a pattern using these same colors so I cut out the parts for that and set them aside to sew up later. The leftovers went into this quilt as those colors enhanced a floral print I had leftovers of.

I called this quilt Blooming Stars to describe the flowers coming in the center of the stars.

There are white background, floral cornerstones, and dotted sashing throughout.


Purple borders pull up color from the florals.

The quilting was done on the longarm using a paper pantograph.

Binding is a lighter shade of the teal and it also is of a shimmery nature.

Ddd


Posted by studio3d@ccgmail.net at 12:01 AM PST
Friday, 1 November 2019
That's A Big Plus
Topic: Quilting

I saw this quilt tutorial on Missouri Star Quilt Company and immediately thought of a couple of stacks of 'stone look' charm squares. Combined with while cotton for the background fabric and some tone-on-tone blacks for the trim this turned out exactly how I envisioned.


I also got a new paper pantograph for the longarm and I think this quilted up beautifully.

Ddd


Posted by studio3d@ccgmail.net at 12:01 AM PDT
Thursday, 26 September 2019
Blue Birds Converge
Topic: Quilting

From my stash of fat quarters I selected 4 that looked good together to create another Convergence quilt from the instructions created by Ricky Tims.  I truly love how these come together.

I wait until the center is constructed before selecting material for the borders as so much depends on the final layout.

For this one I chose a small border of tiny houndstooth followed by a dark teal print with browns and golds in it.


I used a paper pantograph and teal thread for the quilting.


The whole thing is brighter than this appears but I could not adjust the color intensity enough without totally skewing the look of the quilt. This will have to do.

Ddd


Posted by studio3d@ccgmail.net at 3:30 PM PDT
Thursday, 19 September 2019
Broken Bars
Topic: Quilting

I had a quest: 1) find a pattern for a set of fabric rolls I had acquired 2) find a use for a little scenery panel that came from someone's stash 3) make a quilt as a gift for a guy (no frou-frou!). When I came across this pattern in an old magazine I knew I had the solution.

Unfortunately the fabric rolls were not going to stretch to fit the layout so I set out searching my stash for coordinates and cutting more 2.5 inch strips from them.

The fabric panel was not quite large enough to equal one of the pieced blocks so I used a batik to frame it up to fit.


I used a different pantograph roll (with oak leaves and acorns) to quilt this, carefully working around the panel rather than over top of it. Then I did free-hand quilting on the scene - following along the outlines of hills, houses and fences.


The quilting was completed in dark green as it blended well with all of the colors in the piecing.


This will shortly be on its way to the new owner.

Ddd


Posted by studio3d@ccgmail.net at 12:01 AM PDT
Tuesday, 17 September 2019
Asian Dreams
Topic: Quilting

At a yard sale last year I picked up a variety of Asian fabrics. They were from a sample pack so the sizes varied. I set these aside while keeping an eye out for just the right pattern that would have a feel of asian design but would look good with the scrappy look of mixed fabrics.

When I saw this pattern in an advertisement for a fabric line in a magazine, I immediately knew that it was the one.

I cut it so that there are NO DUPLICATE fabrics in the whole thing. There are some with the same design but in a different colorway from the fabric line so they coordinate.

I made the top while on a quilting retreat in June and set it aside to do on the longarm machine. But I wanted to have lots of practice under my belt so I would not ruin it. I found a pantograph roll that was included in the things I got delivered with the longarm. Perfect!


Here is a closer photo of the quilting.


I found great prints to use for the borders, backing and binding - all having some gold pattern overlaying them. This coordinated with the golds featured on the prints.

Ddd


Posted by studio3d@ccgmail.net at 12:01 AM PDT
Friday, 13 September 2019
A Chain Of Diamonds
Topic: Quilting

I made this quilt top this summer and got it sandwiched back in June. I was prepared to do the quilting on my domestic machine but set it aside for other stuff. Then I got the longarm machine and figured I would do the quilting on that.

Well, two issues with that: 1) I had spray basted the three layers together so I wouldn't be able to do the standard loading of the machine and 2) I had wanted tonot have a lot of extraneous material beyond the top so I could fit it in my domestinc sewing machine. That left me no fabric to attach to the leaders on the longarm.

So I found some heavier fabric and sewed it on the two edges - about 7 inches of it. This was what I used to load the quilt onto the machine.

Then I just practiced making patterns on the quilt with free-hand stitching - different patterns in different decorative areas.


I had a lot of tension problems and thread breaks on this but I think it was due to the spray baste that was in the sandwich.

Ddd


Posted by studio3d@ccgmail.net at 12:01 AM PDT
Saturday, 7 September 2019
Wall To Wall
Topic: Quilting

I needed something to use for practice on my new longarm quilting machine I found a couple of printed panels in my stash and loaded one backing and batting to put both of them on.

The first is fall-themed illustrations set up in framed areas. I used these to practice echo quilting - steering around the outer edges of the decorative elements using the edge of the round foot as my distance guide. I had a bit of an issue with the tension of the quilt sandwich as some nuts on the collar of the back roller didn't get tightened. This allowed the quilt to sag whenit should have stayed taut resulting in some bubbling.

In any case...


The second panel is much narrower and has three gourds in framed sections. I used the gourgs to try some thread painting, tracing over the top of the decorative swirls on them. 

I then tried tracing along the edges of the frame lines to practice vertical and horizontal control.


I gave both of these hanging sleeves and bound them with the same print as the backing.

Ddd


Posted by studio3d@ccgmail.net at 12:01 AM PDT
Saturday, 17 August 2019
Milestone Moments
Topic: Quilting

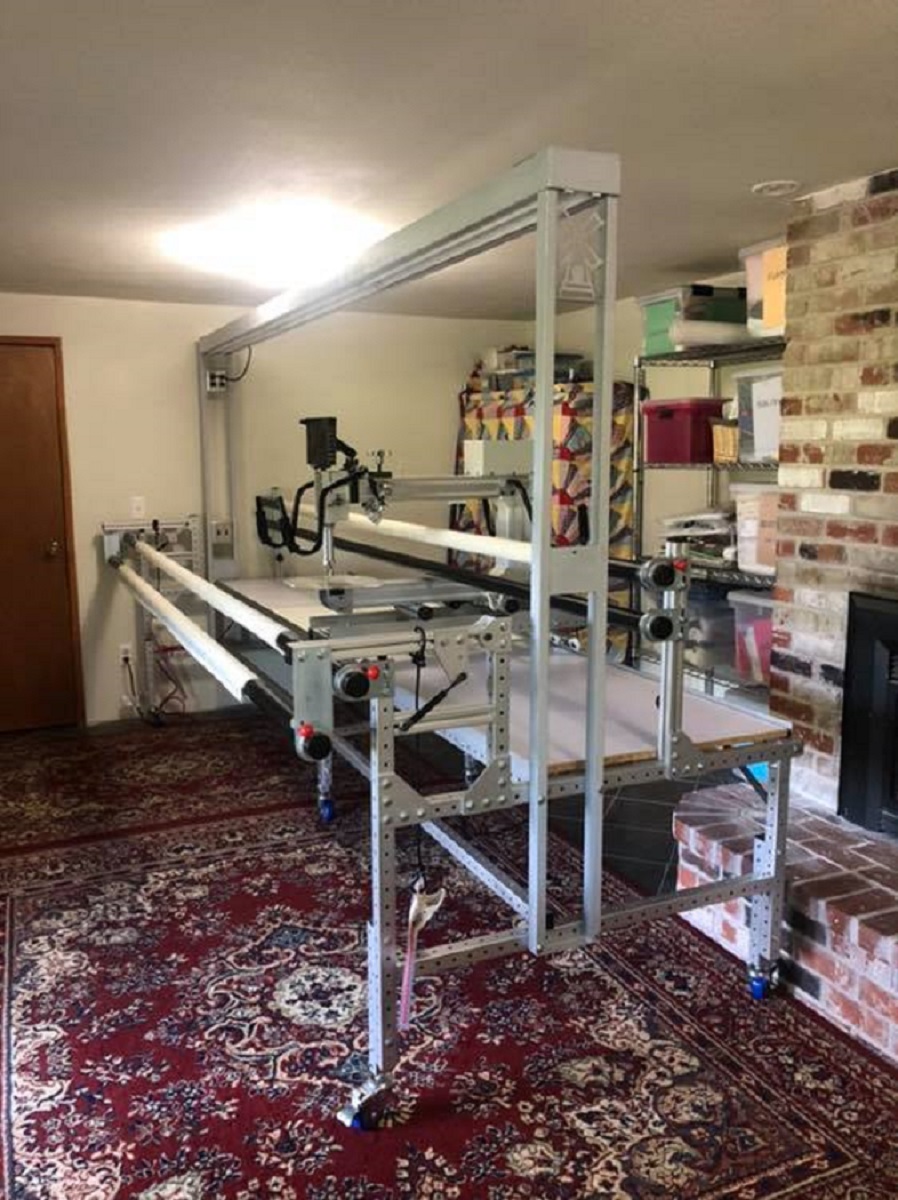
Thanks to YouTube I was able to figure out on my own how to load my first quilt onto the longarm machine. Yay Me!

Then, with YouTube I was able to figure out how to set the stitch regulator as I wanted and baste the first section of the quilt sandwich. Hooray For Me!

And finally, I went to my class on Thursday and had hands-on training on the whole enchilada. We used a sample sandwich of plain fabric to practice a wide variety of free-motion fill patterns plus how to thread, change bobbins, fix problems (most user error) and maintain our machines.

So today... two days later... I approached the already loaded lap quilt, fired up the machine, gave it a new bobbin and thread cone, cleaned the rails, and adjusted the stitch regulator for 'the real deal'.

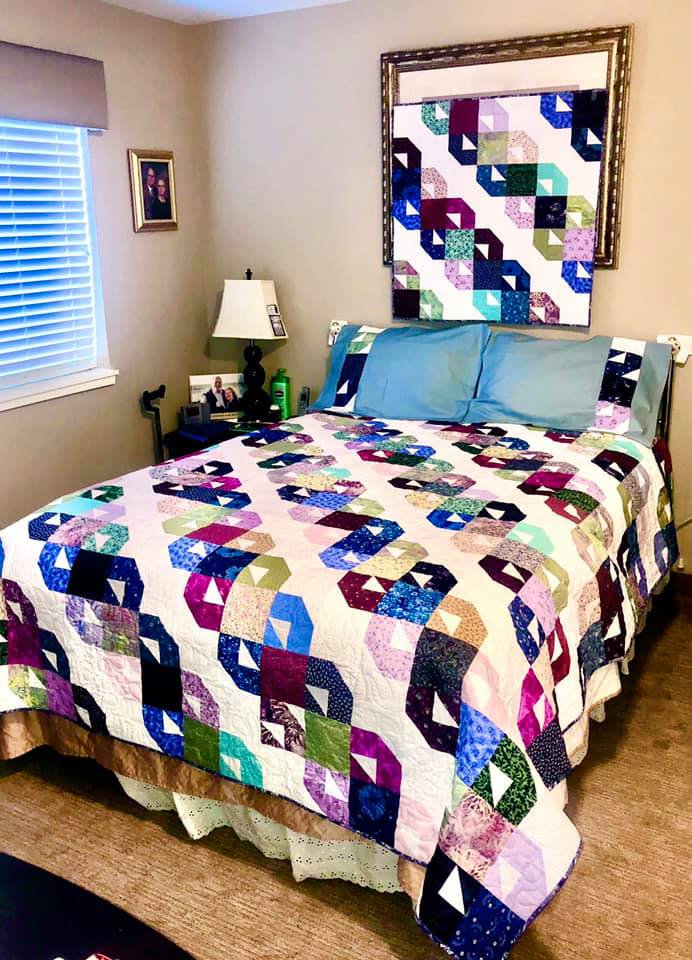
About an hour later, voila! It was fully quilted and ready to take off the machine. Another hour to trim it and bind it - label added - and DONE!


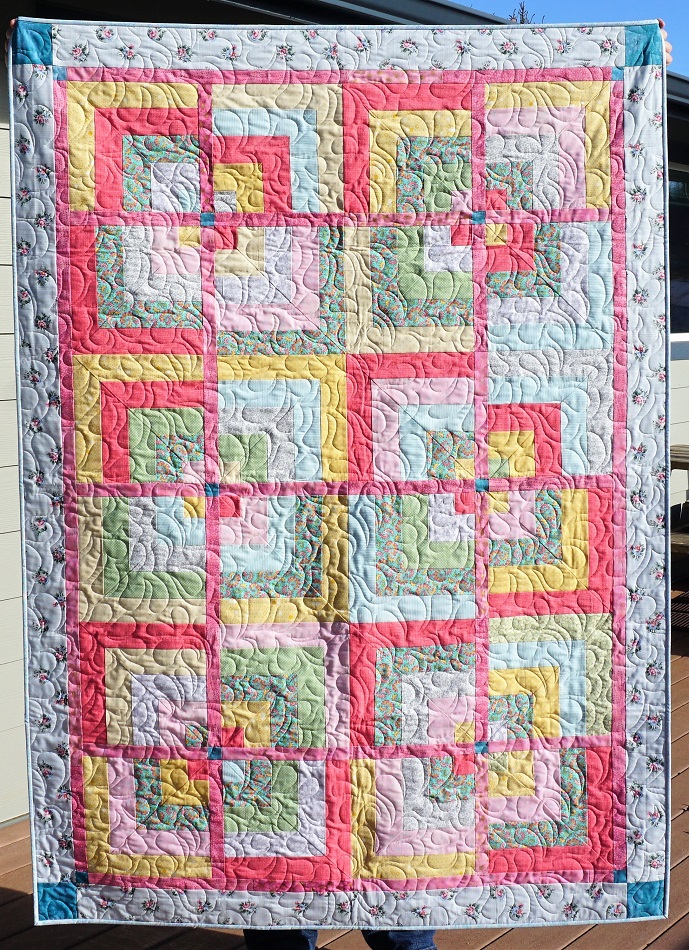
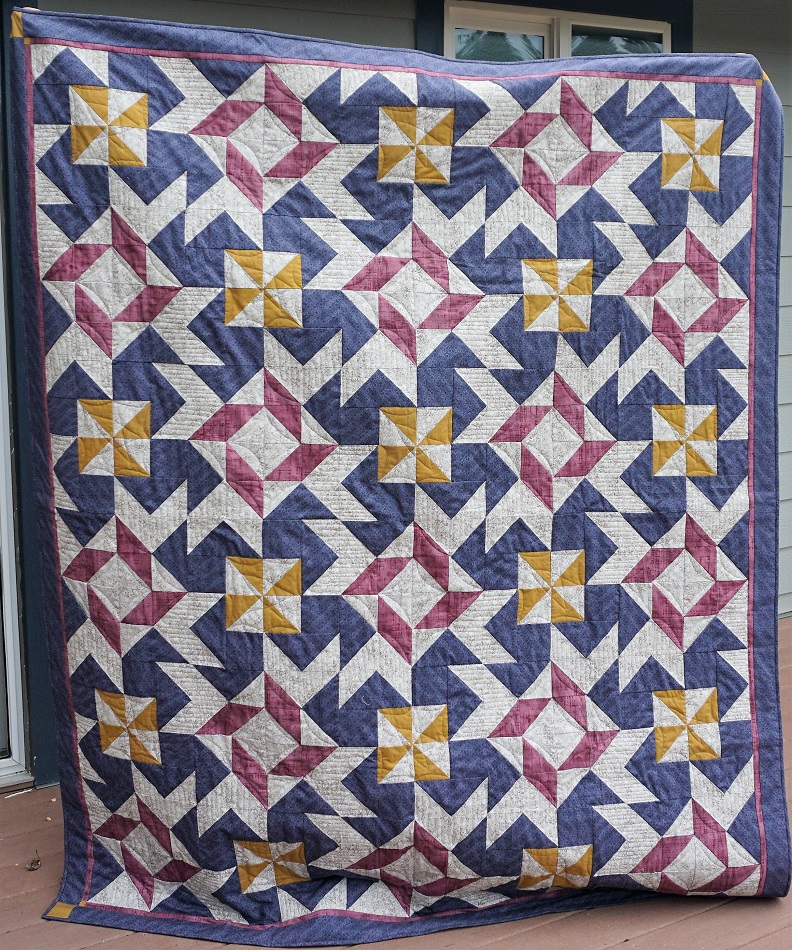
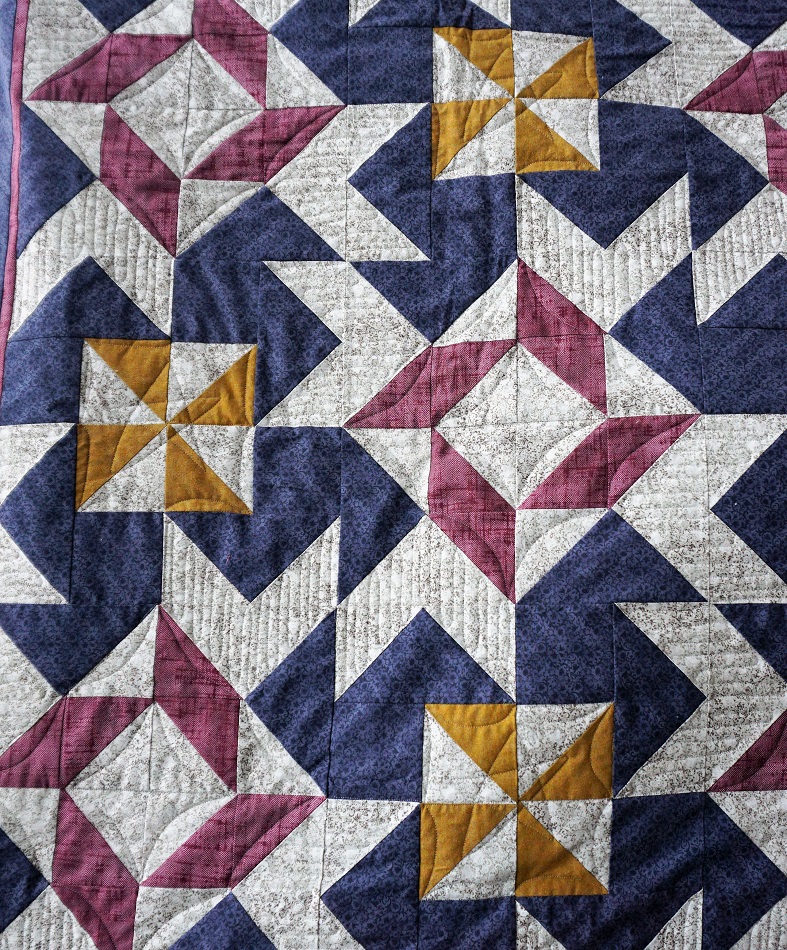
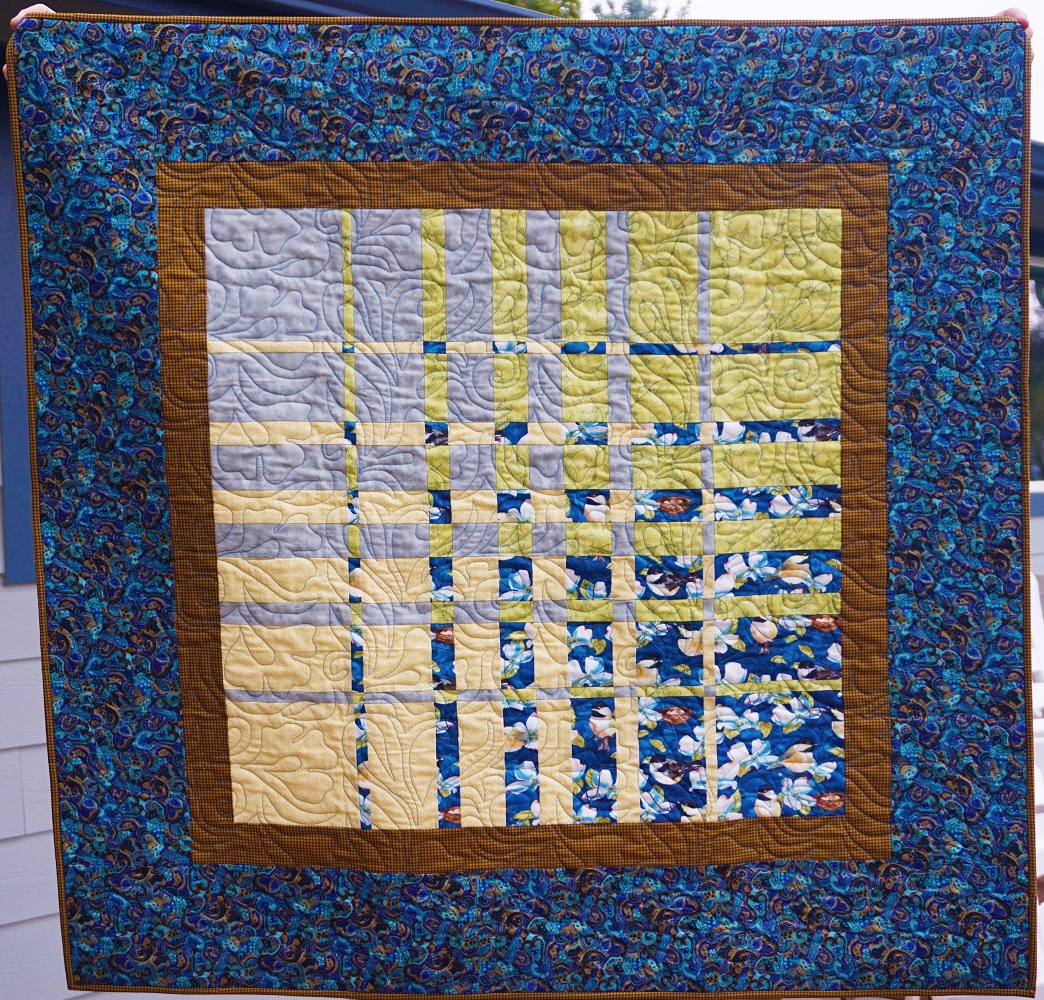
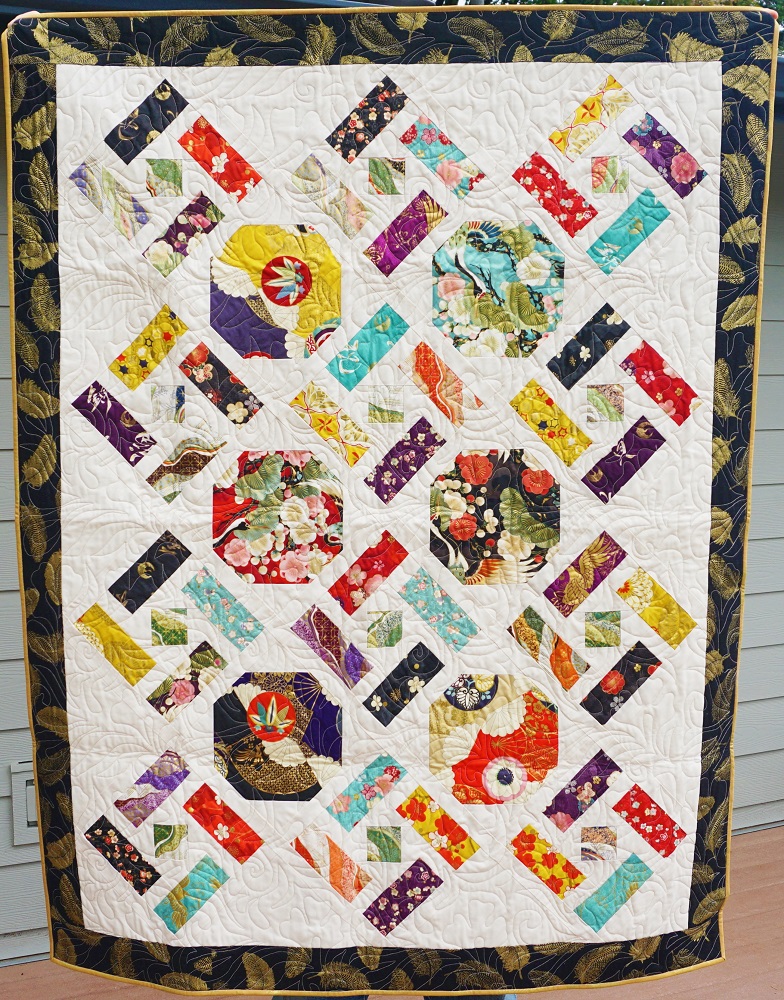
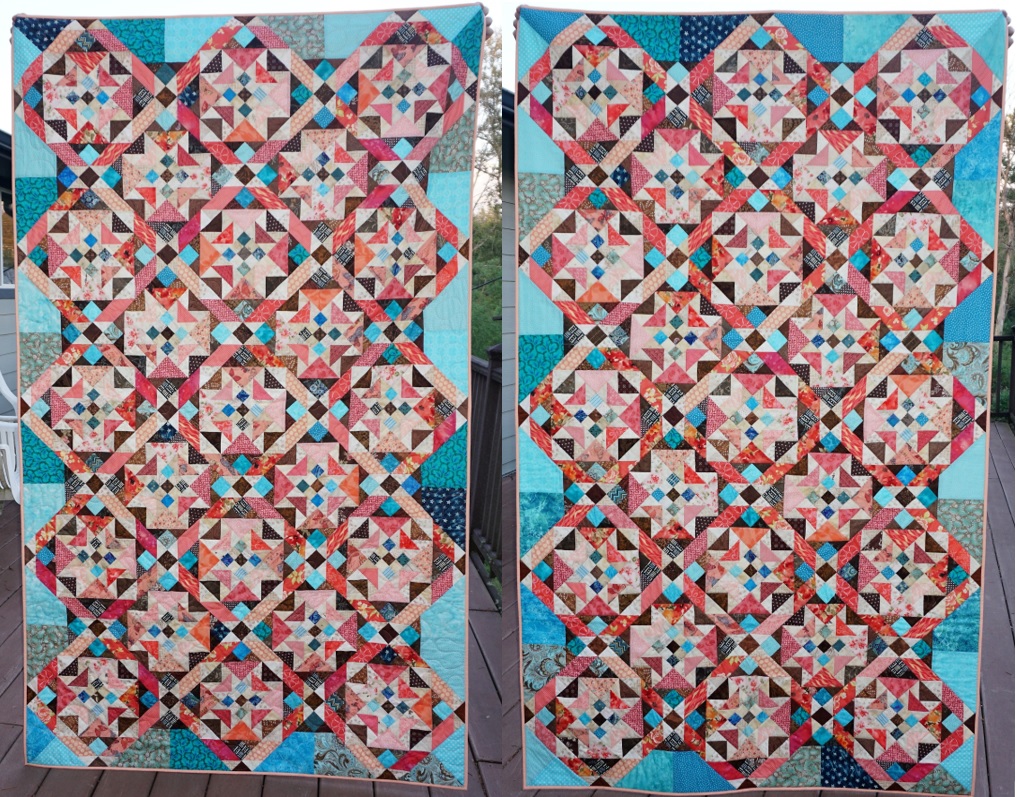
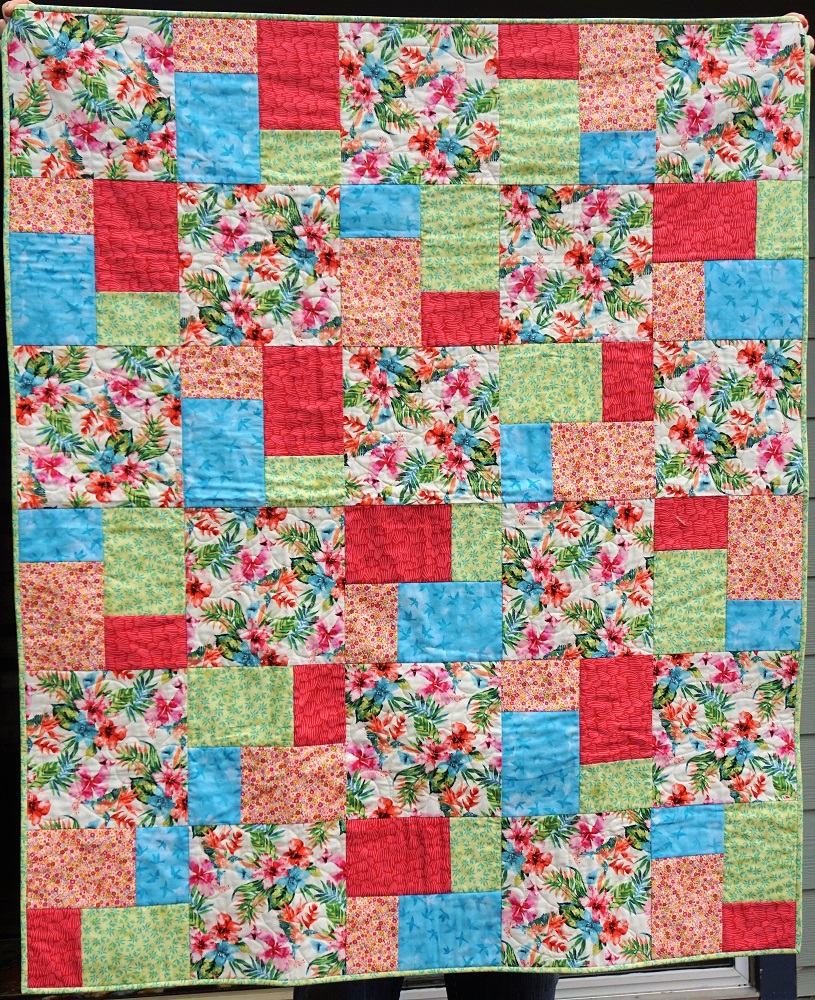
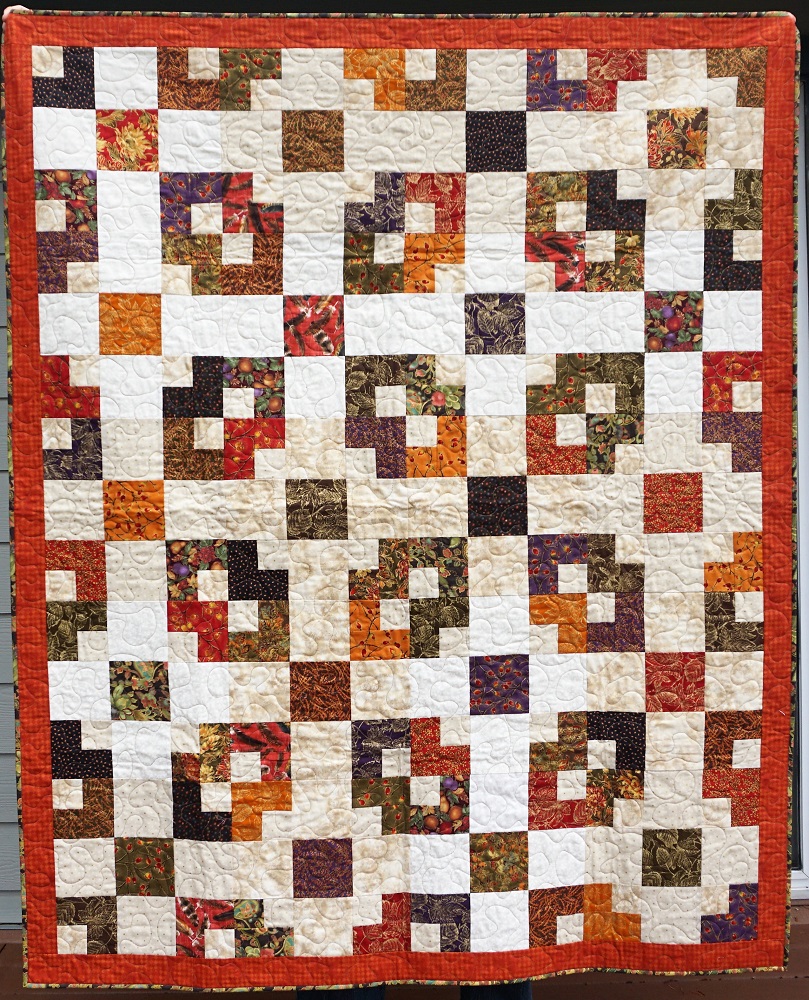
This quilt is from the book by Ricky Tims on Convergence Quilts which I had to order from a different library system. - Fascinating concept that had found me selecting about a dozen sets of fabric from my scores of fat quarters. I will be making MANY of these quilts. So easy with stunning results.


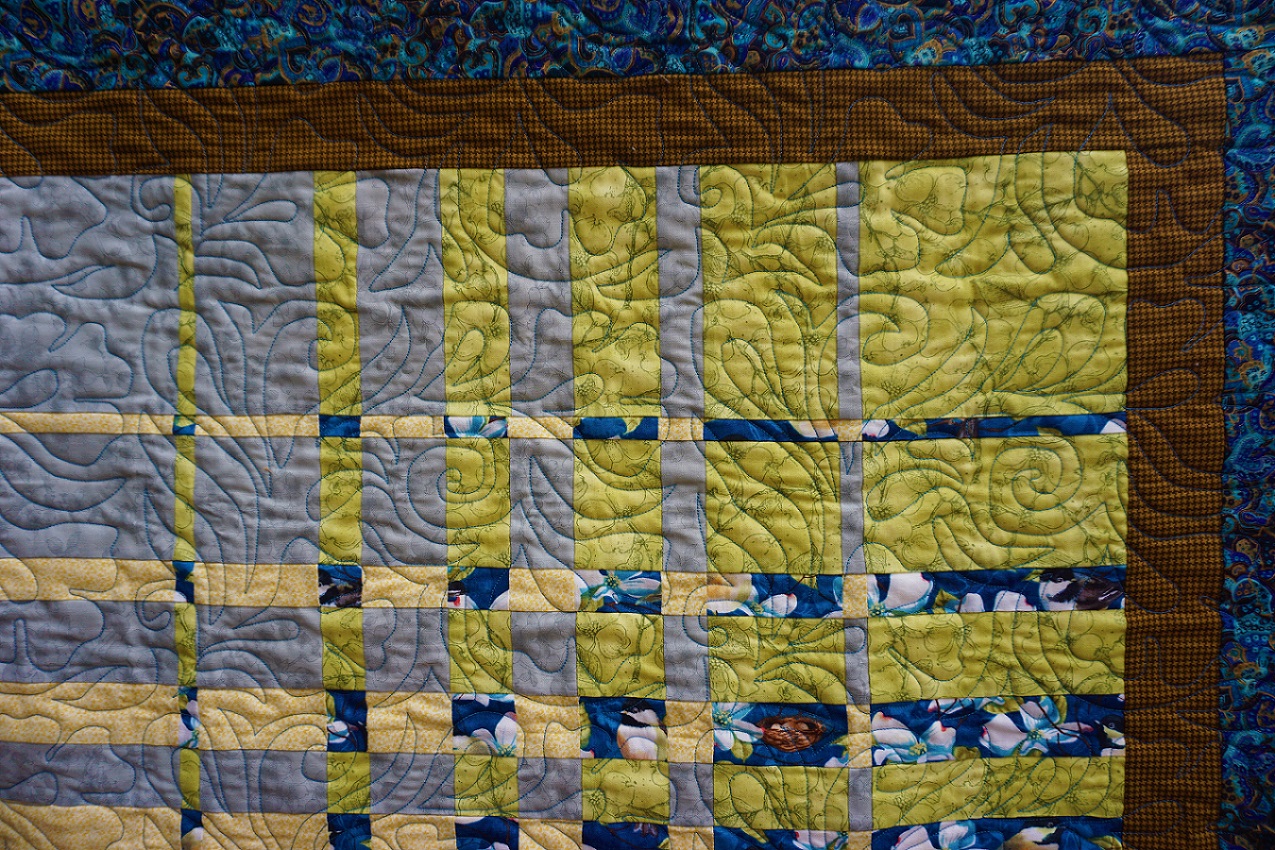
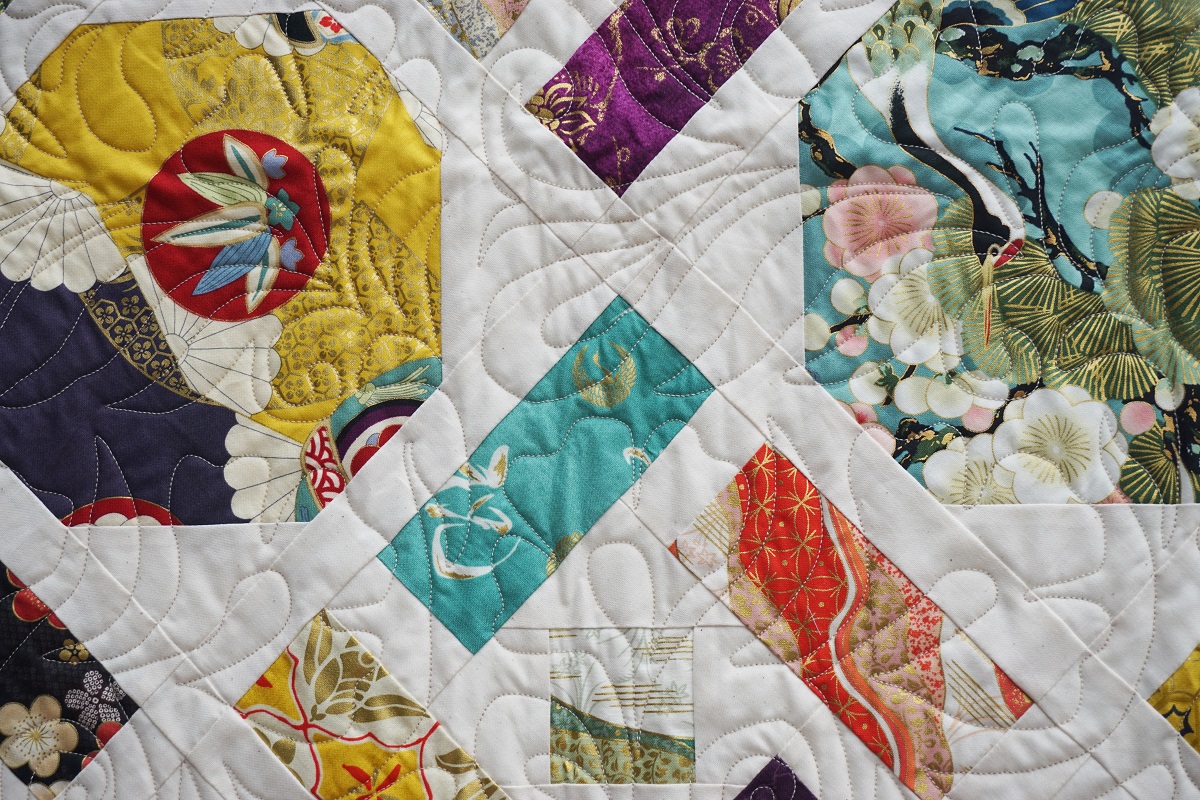
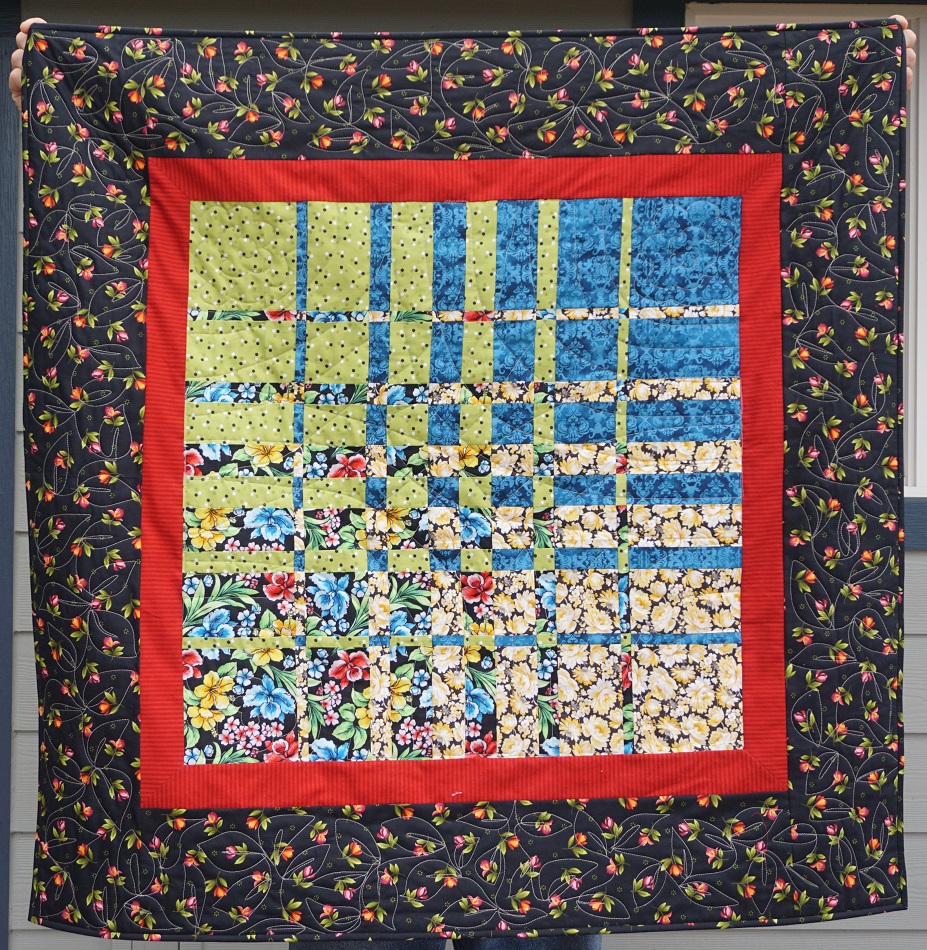
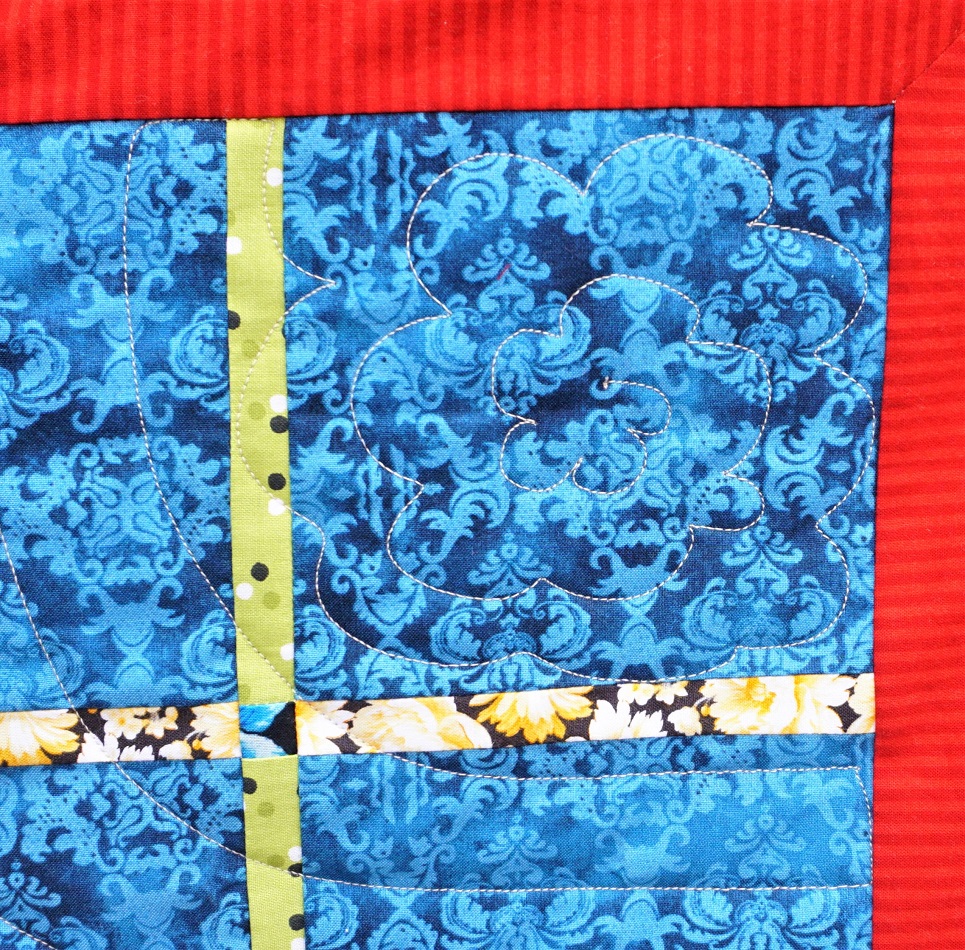
For the quilting, I did large rosettes in the four corners and then echoed ripples out about 3/4 of the way across the quilt in both directions. The ripples all cross one another and overlap at the center.


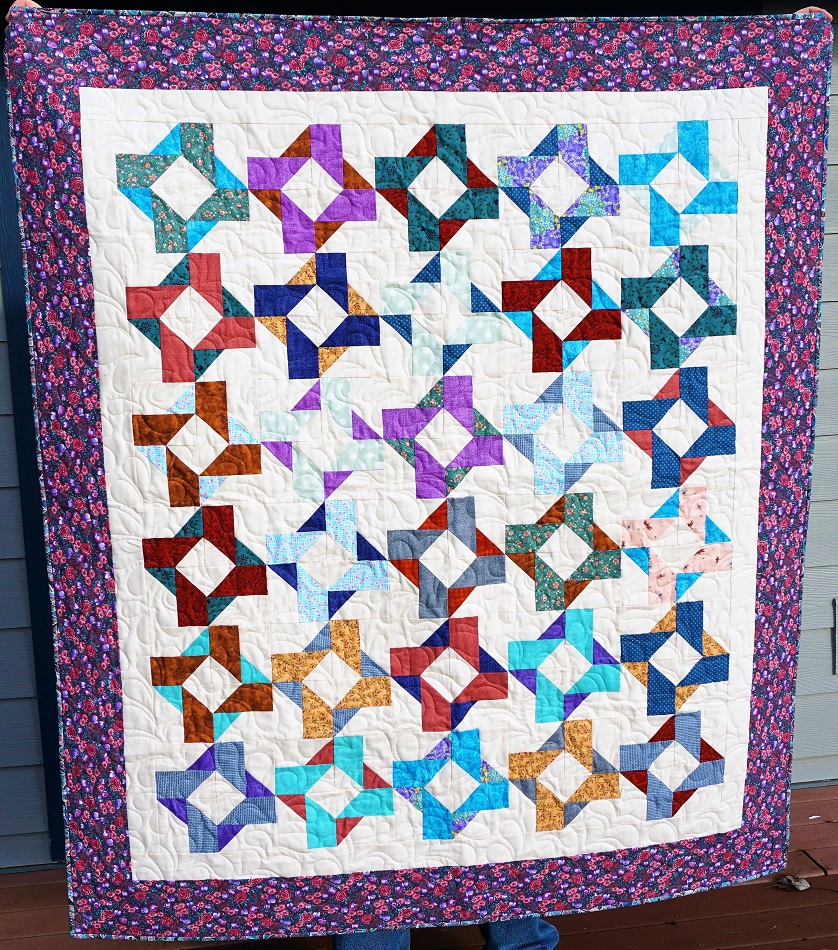
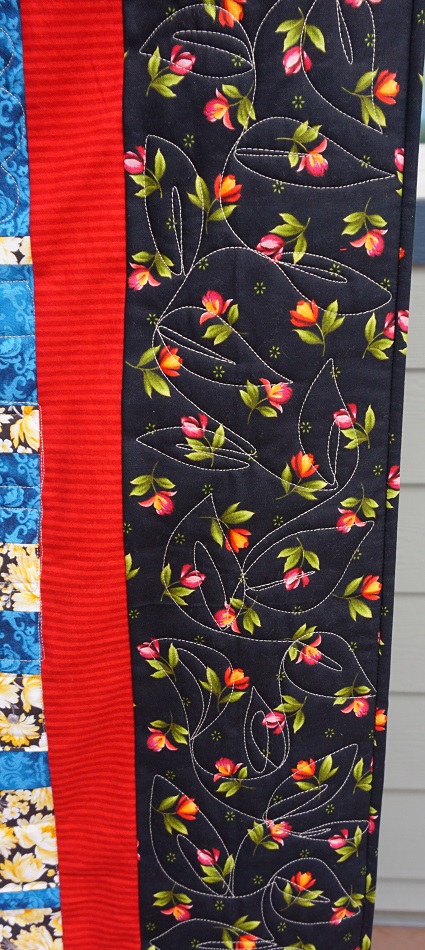
Theinner border was not quilted. The outer border got leaves and vines. I use this a lot on my domestic machine and I wanted to test with a pattern I was familiar with.


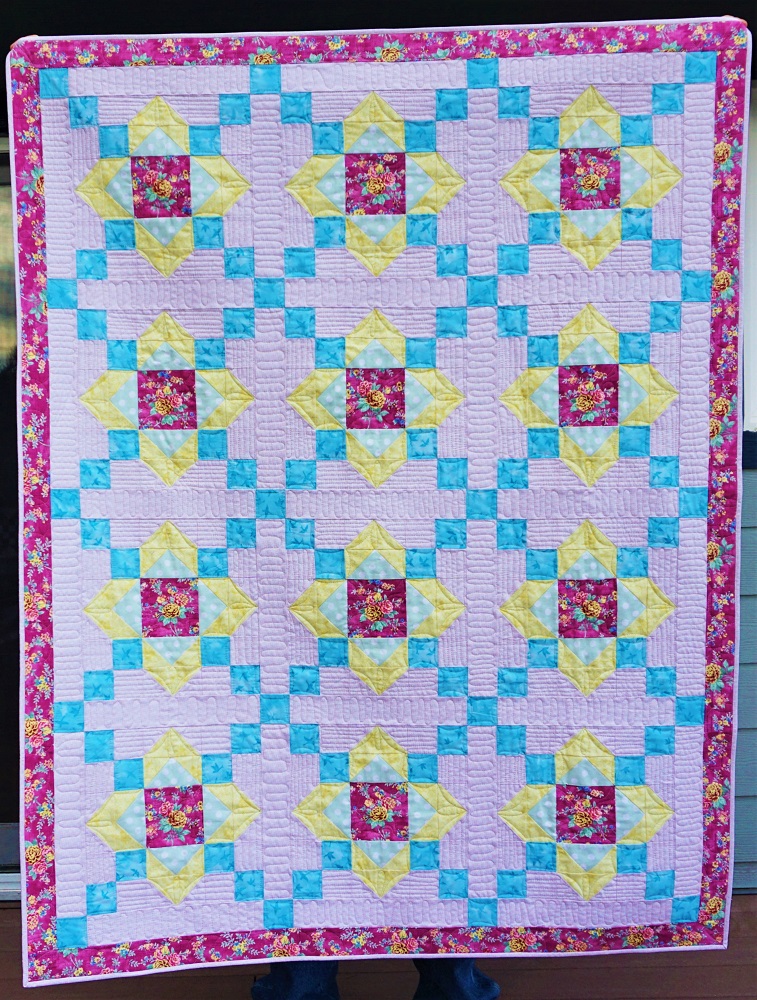
This quilt will go to the hospital's Passages program.

Ddd


Posted by studio3d@ccgmail.net at 11:11 PM PDT
Wednesday, 31 July 2019
Squatch Is In the House
Topic: Quilting

I have been gifted with a longarm quilting machine! We drove up to central Washington in the middle of July  to disassemble it and transport it back home. Then we had to wait until today for the service techs to do the reassembly and add a few features.

Now I have to wait for a new power cord for the computer and then for August 15 when I can take a class.

I have never laid hands on a longarm machine before and I don't want to break anything! I don't know how to load a bobbin, thread the machine, or anything.

I plan to spend a lot of time watching various YouTube videos to bring me up to speed.

I named it Sasquatch (Squatch for short) because it has a big footprint (bigfoot print)! The frame is 12 feet long and 4.5 feet deep. It has a 26" sewing head on it.


You'll no doubt be hearing a lot about this in the future - or at least seeing a lot of the resulting quilts!

Ddd


Posted by studio3d@ccgmail.net at 12:01 AM PDT
Thursday, 23 May 2019
The Echo On Ringo Lake
Topic: Quilting

On the Quiltville blog in November 2017, a new mystery quilt was started. Now, I have said to myself ('declared' is more accurate) several times that I would never do another mystery quilt, but I got sucked in by the inspiration photo, the name and the color palette (coral, teal, chocolate, cream).

While I worked off and on toward the goal what I didn't like was:

  1. I had too wide a range of values within each color reducing the continuity in the pattern.
  2. This designer works with REALLY small pieces.
  3. The pattern is for a queen sized quilt with no details on downsizing it. I didn't NEED a queen sized but had to make all the parts anyway becuse you don't know how they all go together until you have all the pieces in hand.
So, I made ALL the parts called for (grumping all the way, mind you) and came to the 'reveal' with a dissapointed "yikes"!
 
I decided to make enough extra of the side setting triangle units that I could break the pattern in half and finish off the edges where they split apart.
 
One is backed with a dirty coral print with small dragonflies. The other has a solid coral backing from the same fabric as the binding on both. One is quilted with stitch-in-the-ditch around major shapes in the blocks. The other is quilted with a large meander in coral.
 
The best thing I can say about these is "they are done". I am naming them Thing One and Thing Two.


Because of the split I ended up with 4 blocks left over. I told the ladies at my group that, if someone wouldn't take them I would rotary trim them into small pieces and toss them. One of the ladies took them to make a doll blanket for a niece. Nice save!

Now, I hereby declare, "I will never make another mystery quilt." And, this time, I mean it!

Ddd


Posted by studio3d@ccgmail.net at 11:16 AM PDT
Wednesday, 5 December 2018
Goal Fulfilled
Topic: Quilting

At the last posting of quilt finishes I indicated that I had three more to finish off to meet my goal of having six to donate to the hospital. Well, I have finished those three with a week and a half to spare!

I've shared before about the quilter whose children gave our group all her fabrics when she passed away. The last piece I had of those I took was a yardage with half-square-triangles printed on it. I found a tutorial on Missouri Star Quilt Company for a block called 'Royal Wedding', that used 4 blocks of 4 hst. I cut the yardage into groups of 4 units with a 1/4-inch border for the seam allowance. Other 'Betty' fabrics with coordinating colors went into the internal sashings. TOTALLY different measurements than MSQC pattern but I got the effect and I'm very happy with this result.


The next one was made from fabrics I got on deep discount. I selected the butterfly feature fabric and then chose several coordinates. The pattern was torn out from a very old magazine.

What looks like plain yellow is actually a gold imprinted over yellow.

When I was buying that discount fabric, I bought more of the gold and then added several tone-on-tone fabrics in jewel colors.

This is a pattern that I scratched out on paper and I have no idea what the source is!


So this wraps up the year with 15 quilts finished. I have two more in progress, one cut but not started and one ready to cut. I have no illusions about any of these being complete by the end of the year so I am closing off the count.

Of those, 14 went to charity (hospital or pregnancy center) and one to a lady who had just lost her companion dog.

Many plans for next year. After all, the BIG fabric store just went out of business and I have three large bags of brand new fabric from their final sale!

Ddd


Posted by studio3d@ccgmail.net at 2:25 PM PST
Wednesday, 28 November 2018
Warmth of Charity
Topic: Quilting
I am continuing to tackle the 'almost' quilts I started back in June.
 
I put the binding on two yesterday and have only one left that needs only this step. I have two more to quilt and bind and that will finish up the 6 that I want to donate to the hospital next month.
 
This one is called 'Sunblock'. It uses 5 fabrics that I bought to go together. The tone-on-tone prints coordinate with the tropical floral in the large squares.


This second one is called 'Doubly Charmed'. I started with two fall charm packs (same set) and chose a Missouri Star Quilt Company tutorial called Grand Square for block directions.

Their directions required more of each matching print than I had so I mixed and matched the blocks. The background creams are scrappy as well and I had to add more fabrics that coordinated with the charm squares to get a quilt large enough. Then, because they were already scrappy, I decided to twist and turn them away from the pattern layout and this is how it ended up.

Whew! I still have plenty of 'in progress' quilts but they are all still 'in pieces' so I will set them aside to work on in the new year.

Ddd

Posted by studio3d@ccgmail.net at 1:41 PM PST

Newer | Latest | Older