« February 2012 »
S M T W T F S
1 2 3 4
5 6 7 8 9 10 11
12 13 14 15 16 17 18
19 20 21 22 23 24 25
26 27 28 29
You are not logged in. Log in
Entries by Topic
All topics  «
3D paperwork
A - Z challenge 5
A - Z challenge 7
A - Z challenge round 4
A to Z challenge round 3
A to Z round 2
A to Z round 6
A-Z round 1
Around the House
Art Challenges
Artist Trading Cards
Backgrounds
Beads
Bible Journaling
Books
Boxes
Collage
Color Challenge
Coloring
cookbook
Die Cuts
Digital Projects
Digital Stamps
Drawing
Dry Embossing
Fabric Stuff
Fantastic Folds
Field Trip
Home Decor
How Does Your Garden Grow?
Hymnal Art
In The Kitchen
In the studio
Jewelry
Lettering
Links
Multi-Technique
Music to Work By
Musings
Nail Art
New Work
Online Class
Other Hobbies
Other Projects
Painting
Paper Embroidery
Paper Piecing
Photo
Pretty Paper
Quilting
Random
reading
Scrap Recovery
scrapbooking
Sewing
Sketch Challenge
Some Backlog
Stamping
Stencils
Stickers
Supplies
Teabag Folding
Techniques
Testing
tips and tricks
Tutorial
Web resources
Welcome to my Blog
Work By My Friends
workflow
Writing
Blog Tools
Edit your Blog
Build a Blog
RSS Feed
View Profile
Group One
In & Out of Studio 3D
Monday, 20 February 2012
Christmas Flake
Topic: Paper Embroidery

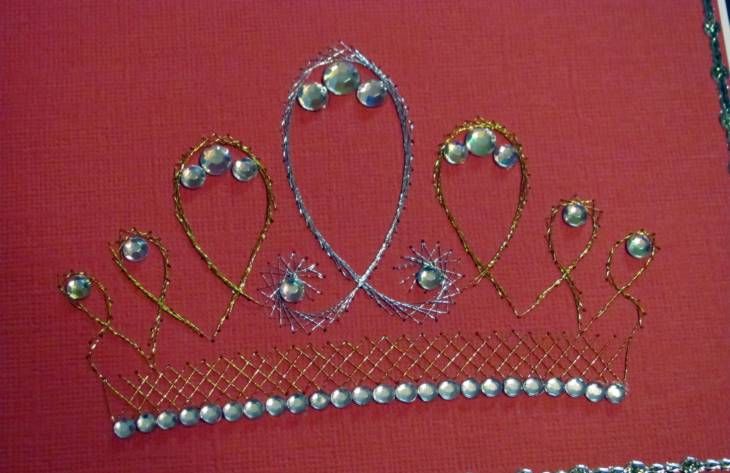
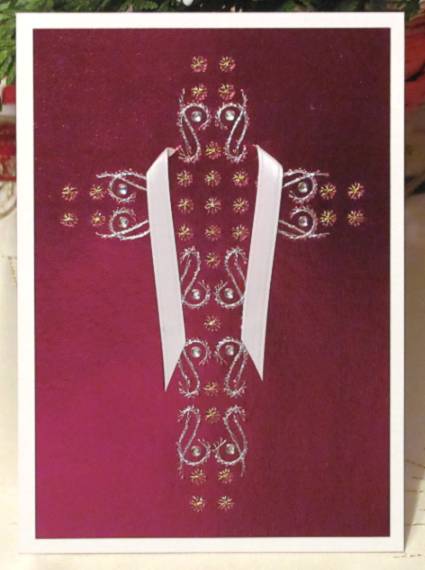
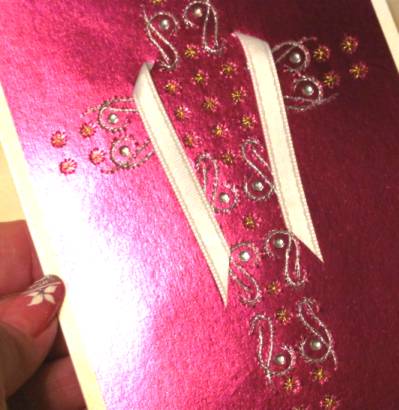
Another entry for the 2 Christmas cards a month challenge. This time I used a snowflake pattern pricked out on a shimmery teal paper. I found I had a spool of metallic thread in Christmas colors (red, green and gold) but was afraid it would be too bright on the pastel paper. Luckily, not so! The red comes off being more pink and the green is very soft as well.

I think the verigated thread adds more sparkle to the snowflake than a solid color would.


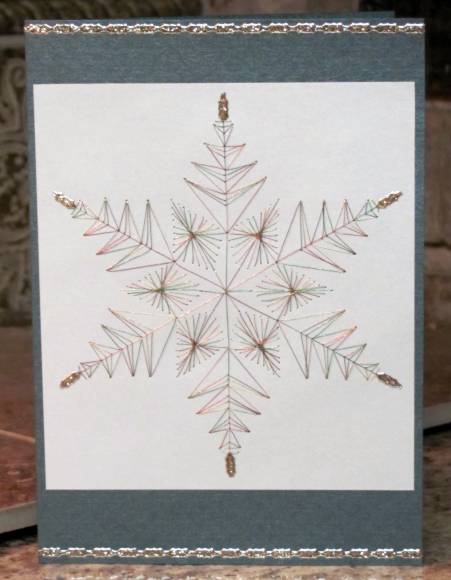
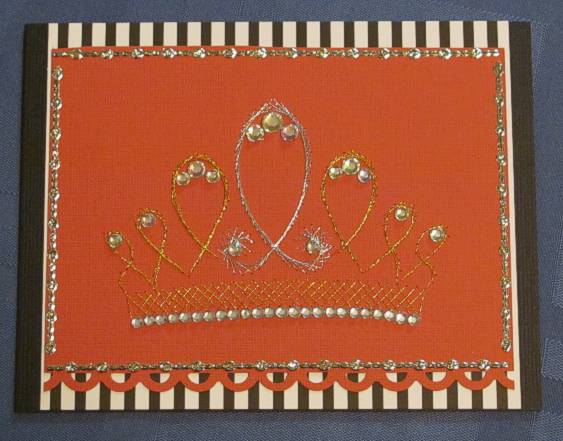
I mounted it on a green shimmer cardstock base and added 'diamond' peel-off borders to the top and bottom. Then, as a finishing touch, I snipped some of the border elements and added them as finials to the tips of the snowflake branches.

Ddd


Posted by studio3d@ccgmail.net at 12:01 AM PST
Sunday, 19 February 2012
Fancy Fingers
Topic: Other Projects

This is WAY off the normal project posting!

When I was on a recent cruise I treated myself to a manicure while in Costa Rica. I watched what products she was using and the techniques for painting fine details. It was a long-lasting product and I didn't need to re-do my nails for about 2 weeks. 

I have always done my own nails, one solid color. I decided to try to duplicate what she had done and was successful. Not only that but my manicure lasted another two weeks.

When It came time to do them again I remembered some nail painting I had seen on Dollar Store Crafts blog and decided to try out one of their projects. This is the result:

Yes, these are my own nails.


I used a clear base coat, a shimery bronze coat, a gold glitter coat, black with an ultra-fine brush, and a clear top coat.

Pretty bizarre, but OK for a short time.

Ddd


Posted by studio3d@ccgmail.net at 12:01 AM PST
Saturday, 18 February 2012
Itty-Bitty Ornaments
Topic: Paper Embroidery

One of the groups I belong to has challenged us to make two Christmas cards (paper embroidery) every month so by the holiday season we will have 24 cards done. I started with this one from one of my patterns. I stitched on tiny red beads at each of the thread intersections and added a star sticker to the top.


I added a thick acrylic clear sticker to the bottom, over the stitched trunk.

One down, 23 to go.

Ddd


Posted by studio3d@ccgmail.net at 12:01 AM PST
Friday, 17 February 2012
In Sympathy
Topic: Paper Embroidery

Challenge: Make a stitching to be used as a sympathy card.

What I don't like about making sympathy cards is that invariably I need one as soon as I make one. That was true of this one that went in the mail the day after I finished it. Sigh.

This is made from one of my own patterns and I added a large silver peel-off text sticker.

Ddd


Posted by studio3d@ccgmail.net at 12:01 AM PST
Thursday, 16 February 2012
Hummingbird Joy
Topic: Stamping

I had this hummingbird stamped and colored up for awhile and it had been set aside. I gathered up some pieces from table scraps and put black borders on all of the pieces.

The text is a couple of cardstock sticker from my stash.

Ddd


Posted by studio3d@ccgmail.net at 12:01 AM PST
Wednesday, 15 February 2012
Crowning Touch
Topic: Paper Embroidery

This challenge was to use a specific pattern - this crown.

I selected a coral cardstock and stitched with gold and silver metallic threads. The crown was then embellished with self-stick rhinestones in a variety of sizes. I used a scallop border punch along the bottom, added peel-off borders and mounted to black and white striped cardstock over a black card base.


As you can see, being metallic, it does not photograph well in a front view. It also throws the color off. In this close-up angle you get a better view of the stitching as well as a more realistic color rendition.


I like this pattern ans will probably use it again.

Ddd


Posted by studio3d@ccgmail.net at 12:01 AM PST
Tuesday, 14 February 2012
Going Round and Round
Topic: Fantastic Folds

Challenge: Make a Round Card

As soon as I read the challenge this idea popped into my head. I used a double-sided printed cardstock, multiple sizes of Spellbinders Nestabilities (round) and some images and gold peel-off stickers.

This is the front view with the card closed. The front is cut with an inner circle so the next layer shows through the aperture. I used a gold border around the outside edge and a tiny gold butterfly. It hinges on the left side.

When the first layer is opened this is the next view. This layer has a circle cut out and a rose-print mounted behind it. I added a gold medallion sticker as a border and two more tiny butterflies. This layer hinges on the right side.

When the second layer is opened this is the final view. I lined the back of the rose from view 2 and added a large gold butterfly. Then to the left side (which is actually the 'center' panel I added a gold border and a clear text sticker plus a final tiny gold butterfly.

Not sure whay I would use a card like this for but it does fulfill the requirements of the challenge.

Ddd


Posted by studio3d@ccgmail.net at 12:01 AM PST
Monday, 13 February 2012
Right There In Plain Black and White
Topic: Paper Embroidery

Challenge: paper embroidery in black and white

I wanted to do something that would logically be just black and white and decided on this bicycle from a book I own. I stitched with only black threads on white cardstock.


I used layers of black and white scrapbook papers and then added a single text word sticker in black and white.

Ddd


Posted by studio3d@ccgmail.net at 12:01 AM PST
Sunday, 12 February 2012
Operation Write Home sketch 101
Topic: Sketch Challenge

Another sketch challenge from Operation Write Home:


...and my card:


I used table scrapbook papers for the two background panels. The banner started as black and white stripe but I colored with Copics to match the bow on the bear. The triangle were cut and glued to scrappers floss. The bear is from the stamp catalog and colored with Copics. I used a peeloff greeting on the front panel and popped it up on foam tape. The whole thing is mounted to a kraft cardstock.

Ddd


Posted by studio3d@ccgmail.net at 12:01 AM PST
Saturday, 11 February 2012
Operation Write Home Sketch 100
Topic: Sketch Challenge

Here are a couple of cards I made for Operation Write Home from their 100th sketch. This is the sketch:


I used table scraps and cardstock stickers to create this one:


More table scraps, a stamped image and some rhinestone bling for this one:


The text is a peel-off sticker.

Ddd


Posted by studio3d@ccgmail.net at 12:01 AM PST
Friday, 10 February 2012
Easter Cross
Topic: Paper Embroidery

I started with a metallic finish purple cardstock and pricked out a cross pattern from a book I own. The scrolls are stitched in silver metallic thread and the stars are stitched in gold metallic. I added self-adhesive rhinestones in the scrolls and then made 45 degree cuts at the upper intersection and threaded white ribbon through as a drape.


The backing cardstock is shimmery silver/white. You get a little better view of all the shine here:


Ddd


Posted by studio3d@ccgmail.net at 12:01 AM PST
Thursday, 9 February 2012
Red Sails at Sunset
Topic: Paper Embroidery

Challenge:paper embroidery in red and white

This pattern is actually made for string art but was easily translated into paper embroidery.  It stitches up very quickly, too. You can just barely see the white threads of the water.

I used a border punch at the top and bottom and layered on a folded red card base. The text is created with 2 clear stickers.

Ddd


Posted by studio3d@ccgmail.net at 12:01 AM PST
Wednesday, 8 February 2012
A Flutter of Thanks
Topic: Paper Embroidery

Challenge: paper embroidery butterfly

I just recently aquired this free pattern and was anxious to give it a try. I like it stitched up in multiple colors and added layers and trims to complement them.


Signs of spring??

Ddd


Posted by studio3d@ccgmail.net at 12:01 AM PST
Tuesday, 7 February 2012
Oh, Hoppy Day
Topic: Paper Embroidery

Challenge: paper embroidery in yellow and green

I used three different green threads to stitch up this frog on yellow cardstock. Two more greens for the backing and base card and a twist on a common phrase. 


The text is provided with rub-on letters.

Ddd


Posted by studio3d@ccgmail.net at 12:01 AM PST
Monday, 6 February 2012
Year of the Dragon
Topic: Paper Embroidery

Challenge: paper embroidery card for Chinese New Year. I looked it up and this is the Year of the Dragon. I knew I did not have any dragon patterns since I had looked for one not too long ago. So I searched for clip art on Google Images and converted three of them to dotted line-art. This is the one I liked best.


I stitched it up with red and gold threads on black cardstock and then added borders of red and gold framing.

Ddd


Posted by studio3d@ccgmail.net at 12:01 AM PST
Sunday, 5 February 2012
T'was the Banner Before Christmas
Topic: Quilting

I finished this quilted banner 4 days before Christmas, hung it up and forgot to post for you all to admire see.

I made it entirely from scraps from three of the grandchild quilts and a quick look at a quilt in a shop I saw in October. I sketched out the block on my computer when I got home and did some adjustments to make the bow look more 'realistic'. Then I had to figure out how to construct the parts so the angle would be right and all the fabrics would remain on grain. I pieced the background from three similar fabrics to create a mosaic look.


This was hung on the end of the fireplace where the falling leaves banner had been previously. I like the idea of having banners there and may continue to make them for the various seasons/holidays.

Ddd


Posted by studio3d@ccgmail.net at 12:01 AM PST
Saturday, 4 February 2012
From the High Seas - 2
Topic: Field Trip

As promised, today I'm showing the second card made on the cruise.

Here is the sample sheet:


Not much you could do when the houndstooth was already printed on the cardstock, the aperture already cut out and the embellishments were sized to fit. However, I did cut their strip apart so it would fit lenthwise and did not insert the filigree panel in the aperture. Instead, I used their white rubon to put the greeting on the black interior of the card so it could be read through the hole. I added rhinestones above and below.

Here is my card:


Ddd


Posted by studio3d@ccgmail.net at 12:01 AM PST
Updated: Tuesday, 27 December 2011 10:29 AM PST
Friday, 3 February 2012
From the High Seas - 1
Topic: Field Trip

On a recent cruise one day's creative project was to make cards from kits that were provided to us. There were supplies for two cards in the kit - each with a couple of pictures of sample ideas.

This is the sample picture for the first card:


The scrolly thing was a frame to be mounted inside so a photo could be inserted. Not on MY card though! I cut it into four strips an layered them on the card front with the upper-most one up on foam dots. I used their doily diecut but not any of the pink plastic stickers they provided. Instead, I cut apart several of their rubons to create my own text boxes.

Here is my card:


The other card is for tomorrow...

Ddd


Posted by studio3d@ccgmail.net at 12:01 AM PST
Updated: Tuesday, 27 December 2011 10:28 AM PST
Thursday, 2 February 2012
All My Free Stitching Patterns
Topic: Paper Embroidery

Today I finally collected all of the patterns I have created in the last 3 years and added them to my website. You can see them all at http://mystudio3d.com/StitcheryDoDodd.htm

The new ones are at the bottom and include the Mardi Gras Mask, a Poinsettia,  three Dragons, a Maple Leaf, a Bookmark, Birdhouses, and more.

Grab whatever you want. THEY'RE FREE!

Ddd


Posted by studio3d@ccgmail.net at 1:05 PM PST
Updated: Thursday, 2 February 2012 3:08 PM PST
Vintage Rose
Topic: Scrap Recovery

This rose was 'clip art to use' from another salvage book. Again, I used Copic markers (and when I say 'copic' please understand that I use a combination of Bic and Copic selected by their range of colors. They are both alcohol markers and work perfectly well together.)


More table scraps were used for backing this, including the snippet of scroll diecut. Some black ink was used to define the edge of the feature panel, as well.

Ddd


Posted by studio3d@ccgmail.net at 12:01 AM PST

Newer | Latest | Older