« February 2012 »
S M T W T F S
1 2 3 4
5 6 7 8 9 10 11
12 13 14 15 16 17 18
19 20 21 22 23 24 25
26 27 28 29
You are not logged in. Log in
Entries by Topic
All topics  «
3D paperwork
A - Z challenge 5
A - Z challenge 7
A - Z challenge round 4
A to Z challenge round 3
A to Z round 2
A to Z round 6
A-Z round 1
Around the House
Art Challenges
Artist Trading Cards
Backgrounds
Beads
Bible Journaling
Books
Boxes
Collage
Color Challenge
Coloring
cookbook
Die Cuts
Digital Projects
Digital Stamps
Drawing
Dry Embossing
Fabric Stuff
Fantastic Folds
Field Trip
Home Decor
How Does Your Garden Grow?
Hymnal Art
In The Kitchen
In the studio
Jewelry
Lettering
Links
Multi-Technique
Music to Work By
Musings
Nail Art
New Work
Online Class
Other Hobbies
Other Projects
Painting
Paper Embroidery
Paper Piecing
Photo
Pretty Paper
Quilting
Random
reading
Scrap Recovery
scrapbooking
Sewing
Sketch Challenge
Some Backlog
Stamping
Stencils
Stickers
Supplies
Teabag Folding
Techniques
Testing
tips and tricks
Tutorial
Web resources
Welcome to my Blog
Work By My Friends
workflow
Writing
Blog Tools
Edit your Blog
Build a Blog
RSS Feed
View Profile
Group One
In & Out of Studio 3D
Monday, 13 February 2012
Right There In Plain Black and White
Topic: Paper Embroidery

Challenge: paper embroidery in black and white

I wanted to do something that would logically be just black and white and decided on this bicycle from a book I own. I stitched with only black threads on white cardstock.


I used layers of black and white scrapbook papers and then added a single text word sticker in black and white.

Ddd


Posted by studio3d@ccgmail.net at 12:01 AM PST
Sunday, 12 February 2012
Operation Write Home sketch 101
Topic: Sketch Challenge

Another sketch challenge from Operation Write Home:


...and my card:


I used table scrapbook papers for the two background panels. The banner started as black and white stripe but I colored with Copics to match the bow on the bear. The triangle were cut and glued to scrappers floss. The bear is from the stamp catalog and colored with Copics. I used a peeloff greeting on the front panel and popped it up on foam tape. The whole thing is mounted to a kraft cardstock.

Ddd


Posted by studio3d@ccgmail.net at 12:01 AM PST
Saturday, 11 February 2012
Operation Write Home Sketch 100
Topic: Sketch Challenge

Here are a couple of cards I made for Operation Write Home from their 100th sketch. This is the sketch:


I used table scraps and cardstock stickers to create this one:


More table scraps, a stamped image and some rhinestone bling for this one:


The text is a peel-off sticker.

Ddd


Posted by studio3d@ccgmail.net at 12:01 AM PST
Friday, 10 February 2012
Easter Cross
Topic: Paper Embroidery

I started with a metallic finish purple cardstock and pricked out a cross pattern from a book I own. The scrolls are stitched in silver metallic thread and the stars are stitched in gold metallic. I added self-adhesive rhinestones in the scrolls and then made 45 degree cuts at the upper intersection and threaded white ribbon through as a drape.


The backing cardstock is shimmery silver/white. You get a little better view of all the shine here:


Ddd


Posted by studio3d@ccgmail.net at 12:01 AM PST
Thursday, 9 February 2012
Red Sails at Sunset
Topic: Paper Embroidery

Challenge:paper embroidery in red and white

This pattern is actually made for string art but was easily translated into paper embroidery.  It stitches up very quickly, too. You can just barely see the white threads of the water.

I used a border punch at the top and bottom and layered on a folded red card base. The text is created with 2 clear stickers.

Ddd


Posted by studio3d@ccgmail.net at 12:01 AM PST
Wednesday, 8 February 2012
A Flutter of Thanks
Topic: Paper Embroidery

Challenge: paper embroidery butterfly

I just recently aquired this free pattern and was anxious to give it a try. I like it stitched up in multiple colors and added layers and trims to complement them.


Signs of spring??

Ddd


Posted by studio3d@ccgmail.net at 12:01 AM PST
Tuesday, 7 February 2012
Oh, Hoppy Day
Topic: Paper Embroidery

Challenge: paper embroidery in yellow and green

I used three different green threads to stitch up this frog on yellow cardstock. Two more greens for the backing and base card and a twist on a common phrase. 


The text is provided with rub-on letters.

Ddd


Posted by studio3d@ccgmail.net at 12:01 AM PST
Monday, 6 February 2012
Year of the Dragon
Topic: Paper Embroidery

Challenge: paper embroidery card for Chinese New Year. I looked it up and this is the Year of the Dragon. I knew I did not have any dragon patterns since I had looked for one not too long ago. So I searched for clip art on Google Images and converted three of them to dotted line-art. This is the one I liked best.


I stitched it up with red and gold threads on black cardstock and then added borders of red and gold framing.

Ddd


Posted by studio3d@ccgmail.net at 12:01 AM PST
Sunday, 5 February 2012
T'was the Banner Before Christmas
Topic: Quilting

I finished this quilted banner 4 days before Christmas, hung it up and forgot to post for you all to admire see.

I made it entirely from scraps from three of the grandchild quilts and a quick look at a quilt in a shop I saw in October. I sketched out the block on my computer when I got home and did some adjustments to make the bow look more 'realistic'. Then I had to figure out how to construct the parts so the angle would be right and all the fabrics would remain on grain. I pieced the background from three similar fabrics to create a mosaic look.


This was hung on the end of the fireplace where the falling leaves banner had been previously. I like the idea of having banners there and may continue to make them for the various seasons/holidays.

Ddd


Posted by studio3d@ccgmail.net at 12:01 AM PST
Saturday, 4 February 2012
From the High Seas - 2
Topic: Field Trip

As promised, today I'm showing the second card made on the cruise.

Here is the sample sheet:


Not much you could do when the houndstooth was already printed on the cardstock, the aperture already cut out and the embellishments were sized to fit. However, I did cut their strip apart so it would fit lenthwise and did not insert the filigree panel in the aperture. Instead, I used their white rubon to put the greeting on the black interior of the card so it could be read through the hole. I added rhinestones above and below.

Here is my card:


Ddd


Posted by studio3d@ccgmail.net at 12:01 AM PST
Updated: Tuesday, 27 December 2011 10:29 AM PST
Friday, 3 February 2012
From the High Seas - 1
Topic: Field Trip

On a recent cruise one day's creative project was to make cards from kits that were provided to us. There were supplies for two cards in the kit - each with a couple of pictures of sample ideas.

This is the sample picture for the first card:


The scrolly thing was a frame to be mounted inside so a photo could be inserted. Not on MY card though! I cut it into four strips an layered them on the card front with the upper-most one up on foam dots. I used their doily diecut but not any of the pink plastic stickers they provided. Instead, I cut apart several of their rubons to create my own text boxes.

Here is my card:


The other card is for tomorrow...

Ddd


Posted by studio3d@ccgmail.net at 12:01 AM PST
Updated: Tuesday, 27 December 2011 10:28 AM PST
Thursday, 2 February 2012
All My Free Stitching Patterns
Topic: Paper Embroidery

Today I finally collected all of the patterns I have created in the last 3 years and added them to my website. You can see them all at http://mystudio3d.com/StitcheryDoDodd.htm

The new ones are at the bottom and include the Mardi Gras Mask, a Poinsettia,  three Dragons, a Maple Leaf, a Bookmark, Birdhouses, and more.

Grab whatever you want. THEY'RE FREE!

Ddd


Posted by studio3d@ccgmail.net at 1:05 PM PST
Updated: Thursday, 2 February 2012 3:08 PM PST
Vintage Rose
Topic: Scrap Recovery

This rose was 'clip art to use' from another salvage book. Again, I used Copic markers (and when I say 'copic' please understand that I use a combination of Bic and Copic selected by their range of colors. They are both alcohol markers and work perfectly well together.)


More table scraps were used for backing this, including the snippet of scroll diecut. Some black ink was used to define the edge of the feature panel, as well.

Ddd


Posted by studio3d@ccgmail.net at 12:01 AM PST
Wednesday, 1 February 2012
Rose Bearer
Topic: Stamping

This is another image from a swap. I used Copic markers to color her, using lots of shading for dimension.

Layers of backing were selected from the table scraps based on the colors in the focal image. I love the dot textured purple cardstock. You will probably recognize the black scrap from recent days and the red rose paper was featured not too long ago, as well.

The card base is a red layer as well.

Ddd


Posted by studio3d@ccgmail.net at 12:01 AM PST
Tuesday, 31 January 2012
Love Birds
Topic: Scrap Recovery

Another image from the stamp catalog (did I get my money's worth from this $5 purchase, or what?). This was quite a small image that I colored with Copic markers, so I did some creative framing.


The card base is a blue marbled card topped with a pink layer then a blue layer of ColorMe paper. I used a square of pink, pierced around the edge and turned on point as a backing for the focal image.

Ddd


Posted by studio3d@ccgmail.net at 12:01 AM PST
Monday, 30 January 2012
My Heart Thinks of You
Topic: Scrap Recovery

This lovely, lacy heart is an image from that stamp catalog I scrapped out. I colored with Copic markers and stamped the sentiment in the center. Then I used Liquid Pearls to embellish the tiny teardrop marks around the edge.


I cut around with a craft knife and layered on black 'quilted' paper over a peach card base.

Ddd


Posted by studio3d@ccgmail.net at 12:01 AM PST
Sunday, 29 January 2012
Tree Huggers
Topic: Stamping

This image was stamped and sent to me in a swap. I used Copic markers to color it and there was a LOT of coloring in itty-bitty spaces. I wanted to play up the bright and cheery colors so I added multiplelayers of framing (black and white diamond, pink solid, red and white polkadot). I added these to a dark red card base to keep the Valentine theme.

The heart carving on the tree says 'you and me'.

Ddd


Posted by studio3d@ccgmail.net at 12:01 AM PST
Saturday, 28 January 2012
Love Letters
Topic: Stamping

We've moved on to Valentines! Actually, I made these for Operation Write Home and left off any sentiments to they can be used by the troops for generic 'love' cards if they wich, rather than Valentines specifically.

I made two of them with a collage stamp image that is NOT one of my favorites. I find that the only logical thing to color on this stamp is the spray of flowers so I think it looks a little drab when it is 'finished'. I used a very light gray marker to color in some shadows behind the flowers, though. I chose different color card bases, different background paper (though both are of lined notebook print) and cut the stamped panels with different margins.  I did use black ink on the edges of each panel to define them and used the same layout.


Ignore the white margins as I cropped out the distracting surface they were laying on when I took the photos.

Ddd


Posted by studio3d@ccgmail.net at 12:01 AM PST
Friday, 27 January 2012
Bead Bands
Topic: Beads

I put together another set of stretchy bands for medical ID bracelets. You can see on the right how they clip onto the metal information plate by using the lobster claw clasps on each end. This one as well as the blue ovals are polished stones that I bought for this project. The rest are put together from a mix of beads in my stash.


These are so easy to put together that you can have a whole wardrobe in no time at all. In fact, the most time-consuming part is deciding what beads to use!

Ddd


Posted by studio3d@ccgmail.net at 12:01 AM PST
Thursday, 26 January 2012
Two Brown Birds
Topic: Scrap Recovery

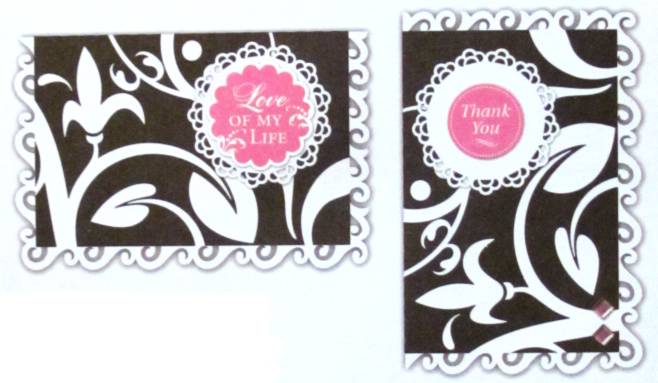
I had a couple of birds left over from a 2010 calendar that I decided to make use of. I cut both of them into simple rectangles and rounded the corners with a punch. I also selected the same brown cardstock for the base and decided to use embossing folders as the background for both.

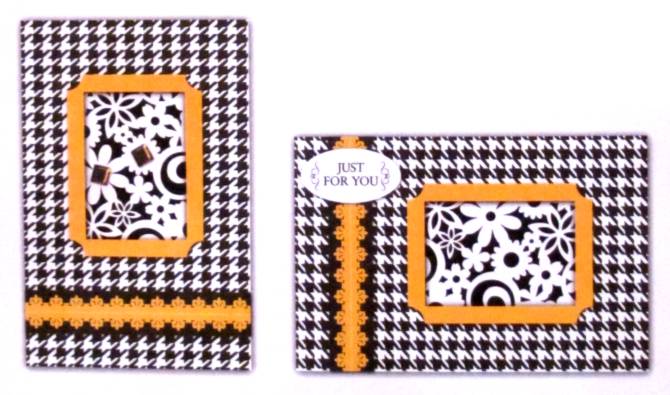
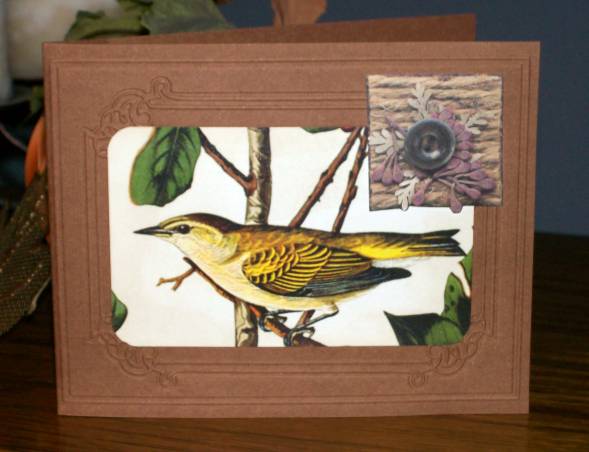
For this first one I embossed a simple frame and mounted the bird panel centered inside. I added a printed nature tag to the upper right corner.


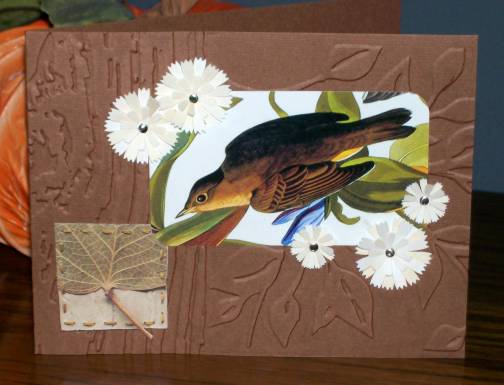
For this one I used two embossing folders. I embossed tree bark on the left 1/3 and leafy branches on the right 2/3. With the bird panel in the upper right I added layered punch flowers and dropped a gold 'nail head' sticky dot into each center. I placed a printed tag with a leaf on the lower left.


You'll notice these also hinge on the left side which is an unusual orientation but I was working with table scraps and they were already folded this way.

Ddd


Posted by studio3d@ccgmail.net at 12:01 AM PST

Newer | Latest | Older