« March 2012 »
S M T W T F S
1 2 3
4 5 6 7 8 9 10
11 12 13 14 15 16 17
18 19 20 21 22 23 24
25 26 27 28 29 30 31
You are not logged in. Log in
Entries by Topic
All topics  «
3D paperwork
A - Z challenge 5
A - Z challenge 7
A - Z challenge round 4
A to Z challenge round 3
A to Z round 2
A to Z round 6
A-Z round 1
Around the House
Art Challenges
Artist Trading Cards
Backgrounds
Beads
Bible Journaling
Books
Boxes
Collage
Color Challenge
Coloring
cookbook
Die Cuts
Digital Projects
Digital Stamps
Drawing
Dry Embossing
Fabric Stuff
Fantastic Folds
Field Trip
Home Decor
How Does Your Garden Grow?
Hymnal Art
In The Kitchen
In the studio
Jewelry
Lettering
Links
Multi-Technique
Music to Work By
Musings
Nail Art
New Work
Online Class
Other Hobbies
Other Projects
Painting
Paper Embroidery
Paper Piecing
Photo
Pretty Paper
Quilting
Random
reading
Scrap Recovery
scrapbooking
Sewing
Sketch Challenge
Some Backlog
Stamping
Stencils
Stickers
Supplies
Teabag Folding
Techniques
Testing
tips and tricks
Tutorial
Web resources
Welcome to my Blog
Work By My Friends
workflow
Writing
Blog Tools
Edit your Blog
Build a Blog
RSS Feed
View Profile
Group One
In & Out of Studio 3D
Monday, 12 March 2012
Birdhouse Row
Topic: Paper Embroidery

This was for a challenge to stitch up a card on friendship. I thought this 'neighborhood' of birdhouses would fir the topic nicely.


I stitched on a printed cardstock, layered on another printed cardstock and a plain green card base. Then I added two cardstock stickers for text. Love the little bird that came on the lower one.

Ddd


Posted by studio3d@ccgmail.net at 12:01 AM PST
Sunday, 11 March 2012
Version 2.0
Topic: Paper Embroidery

A couple of months ago I was looking at blogs or catalogs or something and saw a poinsettia I thought would make a great stitching pattern. I even took notes and made a sketch in a notebook. When I was at my computer a few weeks later I made a pattern off the top of my head and stitched it up.

My initial impression was "I'm not impressed." It wasn't nearly as neat as I had envisioned it.

Fast forward a few more weeks and I opened the sketch notebook for something and ran across the original notes. No wonder I wasn't impressed - it wasn't what I had sketched!

So I went back to the computer and reworked the pattern to match the sketch and - WOW - what a difference.


Now THIS was exactly what I had in mind. I would like to use burgundy for the lines in the petals but did not have any thread that color on hand. Maybe in version 3.0.

Ddd


Posted by studio3d@ccgmail.net at 12:01 AM PST
Updated: Sunday, 11 March 2012 8:15 AM PST
Saturday, 10 March 2012
Tall Tree
Topic: Paper Embroidery

Here is another card for the Christmas stash. I've made this pattern up before but never as a Christmas tree. LOVE the bumpy dot paper background.

I stitched with red, green and dark yellow threads and added 'nail head' dots to the tops of the sections. A star rhinestone went on the top of the tree and sheer ribbon was tied around the base of the panel.


A folded card base and a thick acrylic clear sticker finish it off.

Colors are WAY off on this photo. Card base is really burgundy, background and ribbon are moss green.

Ddd


Posted by studio3d@ccgmail.net at 12:01 AM PST
Friday, 9 March 2012
Heart and Hands
Topic: Paper Embroidery

Assignment: Make a paper embroidery valentine

Isn't this the perfect pattern for the assignment? I thought the swirly background looked romantic so started there. For the hands, I stitched one in red and the other in dark pink.


Many layers for framing were added plus a clear text sticker.

Ddd


Posted by studio3d@ccgmail.net at 12:01 AM PST
Thursday, 8 March 2012
Dove Grey
Topic: Paper Embroidery

Challenge: Make a paper embroidery card with the theme 'birds'

I chose to stitch this dove in grey so it would not be stark white. This made it a bood match for the silver peel-off greeting.


Layering with black-banded color blocks, I used an off-center alignment and rounded corners for interest.

Ddd


Posted by studio3d@ccgmail.net at 12:01 AM PST
Wednesday, 7 March 2012
Hanging Out
Topic: Paper Embroidery

Shimmery gold paper was the starting place for this card. I used a red/green/gold verigated thread for the ornament and afterward slipped in the round center design. Left and right borders were added from a striped Christmas paper.


I gathered tree, branch and leaf punchouts in a variety of greens and layered them to create a pine bough for the ornament to hang from.

The text is a thick acrylic sticker.

Ddd


Posted by studio3d@ccgmail.net at 12:01 AM PST
Tuesday, 6 March 2012
Santa Paws
Topic: Paper Embroidery

This is the latest project for the '2 Christmas cards a month' challenge

I fell in love with this little puppy pattern when I saw it. Unfortunately, the original did not have the back feet and he looked a little like a seal. So I added the back feet when stitching with verigated brown thread. After all the stitching I used watercolor pencils and an aqua-brush to color in the image. The fur trim on the hat and pom were added with Flower Soft. This is the first time I have used it.


The text and the greenery were added with stickers.

Ddd


Posted by studio3d@ccgmail.net at 12:01 AM PST
Monday, 5 March 2012
Snow and Ice
Topic: Dry Embossing

Assignment: Make a card about snow and ice

I pulled blue cardstock and used a border embossing folder and a snowflake one together. I used blue and white Liquid Pearls to enhance the embossing. I cut a label with a Spellbinders die and trimmed it out with the Liquid Pearls as well.


After mounting the background on a white folded card base I used foam tape to mount the label. The text is silver peel-off stickers.

Ddd


Posted by studio3d@ccgmail.net at 12:01 AM PST
Updated: Monday, 23 January 2012 10:15 PM PST
Sunday, 4 March 2012
Birch Trees
Topic: Techniques

Another brilliant plan comes together!

The idea was to mask off strips on white cardstock and drag the edge of an ink pad over them from both edges toward the middle. This was to create birch trees. I had some table scraps that were a close match to the ink and I cut thin strips and glued them on in the open spaces.

I used thin black marker to add some details to the tree edges for shading (both the ink ones and the paper ones) and then started drawing in a landscape, branches, and snow drifts around the trees. I colored the landscape with markers.

ISN'T THIS AWESOME?


As a last step I added a clear thick acrylic sticker to the center.

Ddd


Posted by studio3d@ccgmail.net at 12:01 AM PST
Saturday, 3 March 2012
Love Couple
Topic: Paper Embroidery

Assignment: Make a stitched card with the theme 'romance'.

This pattern was the first one I thought of with the announcement of the theme. Isn't it perfect?


After stitching the couple on pink cardstock with golden and brown threads I selected paper layers with those colors as well. I then added the circle graphic/text sticker and then found these awesome puffy heart stickers in my stash. They came in the perfect combination of colors!

Ddd


Posted by studio3d@ccgmail.net at 12:01 AM PST
Friday, 2 March 2012
Country Angel
Topic: Stamping

Here's another image from the stamp catalog, colored with Copics. I really like the shading I accomplished on this one. More layering with the table scraps and a black background for the image.


I added some silver peel-off stickers for the text.

Ddd


Posted by studio3d@ccgmail.net at 12:01 AM PST
Thursday, 1 March 2012
Dancing Diva
Topic: Stamping

This little girl is having SO much fun! Lots of layers of table scraps frame her up perfectly.


The text was stamped on some of my favorite 'dot' cardstock and the top corners rounded to go with the illustration. By making it flush with the bottom of the card it grounds the card.

Ddd


Posted by studio3d@ccgmail.net at 12:01 AM PST
Wednesday, 29 February 2012
Windy Girl
Topic: Stamping

This stamped image was a gift to me adn I colored it with Copic markers. Multiple layers to pick up colors from the image, banded in black to create definition.


I added those little banners to reinforce the impression of the wind blowing.

Ddd


Posted by studio3d@ccgmail.net at 12:01 AM PST
Tuesday, 28 February 2012
Diamond Girl
Topic: Stamping

More table scraps, another stamp catalog image, no text.

I like the graphical layout of this card. When combined with the linear papers it creates quite an impact.


Colors are actually brighter in real life.

Ddd


Posted by studio3d@ccgmail.net at 12:01 AM PST
Monday, 27 February 2012
Today Tomorrow Forever
Topic: Stamping

Another image from the stamp catalog colored with Copics. I love the shading I achieved on this one, don't you?

It is layered up with table scraps and black borders. By mounting it off center it allowed room for the 'beanstalk' clear sticker.


I used more of the cardstock stickers to create the phrase.

Ddd


Posted by studio3d@ccgmail.net at 12:01 AM PST
Sunday, 26 February 2012
Lucky Bear
Topic: Stamping

Lots of table scraps form a striped background for this bear from the stamp catalog. I colored him with Copics and cut with a narrow border.


The text is a combination of a cardstock sticker and some peel-offs.

Ddd


Posted by studio3d@ccgmail.net at 12:01 AM PST
Saturday, 25 February 2012
Threaded Frame
Topic: Paper Embroidery

I stitched up this border for a swap and then forgot to enter my name on the swap database! DUH! So now I get to keep it and add it to my collection of cards to use myself.

With a bonanza of new free pattern resources I collected from recommendations and internet searching I selected this one to create a border. I did NOT stitch it like the directions (as usual).

I decorated the border frame with three clear butterfly stickers and a couple of peel-off borders.


More of the peel-offs were added as the butterfly borders and a text greeting.

Ddd


Posted by studio3d@ccgmail.net at 12:01 AM PST
Friday, 24 February 2012
Step Into My House
Topic: Fantastic Folds

Challenge: Create a 'center step' card.

I have made these cards before and wanted this one to be something different. I started with rather plain cardstock with a rustic print, not too much detail. Then I went to town stamping elements for a scene I wanted to create. All the parts of the scene are stamped on the dot textured cardstock, colored and cut out for mounting.

For the front panel I stamped a rose-covered picket fence and grass on white and an evergreen tree on green.

For the center panel I stamped a cottage on blue and added some more details to the right and left with a marker to make the scene the full width of the area of mounting. It also got some grass stamped at the base. When I mounted it, I let it extend above the fold of the card.

For the back panel I stamped the trees on green and colored them with more green I trimmed out the top along the tree line and added a blue panel behind it, rounded the corners, and drew in some birds with a marker.


Back on the front of the card I finished off with a text sticker on the left and more of the mix-a-phrase stickers on the right. These words were tied together with lines of marker.

Ddd


Posted by studio3d@ccgmail.net at 12:01 AM PST
Thursday, 23 February 2012
There In the Background
Topic: Stamping

Challenge: Create a card with a stamped background.

I started with a piece of coral cardstock with micro-dots all over it. I stamped this with a flower and a branch in an over-all pattern and colored the stamping with Copic markers.

To this I added large gold peel-off stickers (these are 'Dazzles' I bought from Paper Wishes). I filled in the open areas of the stickers with Stickles.


After mounting to a blue dotted cardstock and a coral card base I added more peel-offs to the bottom to create a stem and leaf for the flower.

Ddd


Posted by studio3d@ccgmail.net at 12:01 AM PST
Wednesday, 22 February 2012
Lucky in Love
Topic: Fantastic Folds

Challenge: Create a Criss-Cross card

The whole design for this card popped right into my head so I just had to try and see if it would work like I imagined it. Success!

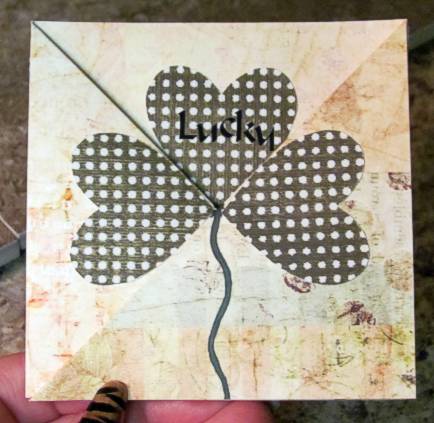
The goal was to create one view with the card closed that would magically transform when the card was opened. I started by folding a 12 x 4 strip of cardstock into thirds and then folding the two end panels on a 45 degree angle to create the criss-cross. Then I stamped and cut out three hearts in green and glued them each on a separate panel with the card closed to create a shamrock. The center one got a rub-on that says 'Lucky'. I also drew in a stem,refolded the card with the other panel on top and drew in a stem again. This way it is complete no matter which panel gets folded in first.

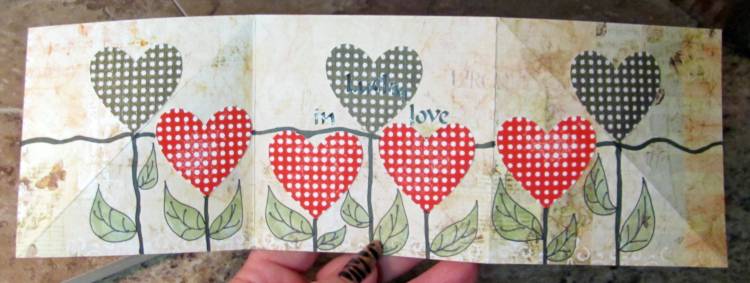
Here is where the magic happens... by pulling on those two angle folds the card opens to its original dimension and all three hearts are now upright! I stamped more of the same hearts, using red ink, making sure to keep them in the area that would be hidden when the card is closed.

I extended the 'stems' that appear on the front cover across the whole card so they now form a horizon line. Then I drew stems for all the hearts and drew and colored leaves as well. Finally, in the spaces around the center green heart I added rub-on words 'in' and 'love'.

So, with the card closed it is a shamrock that says 'Lucky' and when opened it is a garden of hearts that says 'Lucky in love'.


This was one of those stamps from the dollar bin at my local craft store.

Ddd


Posted by studio3d@ccgmail.net at 12:01 AM PST

Newer | Latest | Older