« December 2008 »
S M T W T F S
1 2 3 4 5 6
7 8 9 10 11 12 13
14 15 16 17 18 19 20
21 22 23 24 25 26 27
28 29 30 31
You are not logged in. Log in
Entries by Topic
All topics  «
3D paperwork
A - Z challenge 5
A - Z challenge 7
A - Z challenge round 4
A to Z challenge round 3
A to Z round 2
A to Z round 6
A-Z round 1
Around the House
Art Challenges
Artist Trading Cards
Backgrounds
Beads
Bible Journaling
Books
Boxes
Collage
Color Challenge
Coloring
cookbook
Die Cuts
Digital Projects
Digital Stamps
Drawing
Dry Embossing
Fabric Stuff
Fantastic Folds
Field Trip
Home Decor
How Does Your Garden Grow?
Hymnal Art
In The Kitchen
In the studio
Jewelry
Lettering
Links
Multi-Technique
Music to Work By
Musings
Nail Art
New Work
Online Class
Other Hobbies
Other Projects
Painting
Paper Embroidery
Paper Piecing
Photo
Pretty Paper
Quilting
Random
reading
Scrap Recovery
scrapbooking
Sewing
Sketch Challenge
Some Backlog
Stamping
Stencils
Stickers
Supplies
Teabag Folding
Techniques
Testing
tips and tricks
Tutorial
Web resources
Welcome to my Blog
Work By My Friends
workflow
Writing
Blog Tools
Edit your Blog
Build a Blog
RSS Feed
View Profile
Group One
In & Out of Studio 3D
Saturday, 20 December 2008
Winter Butterfly
Topic: New Work

Sometimes, when the snow is coming down and the ice is thick on the road, what you really need is to get a little floral and butterfly mojo goin' on! Such was the case today.

I used the dotted Cuttlebug folder to impress a large card base of golden sunshine yellow. I used a scalloped oval template with my Coluzzle to open an aperture and then lined the entire inside of the front panel with this batik print floral.  I attached a buterfly cut from a magazine advertisement - just gluing down the body and tipping up the wings.

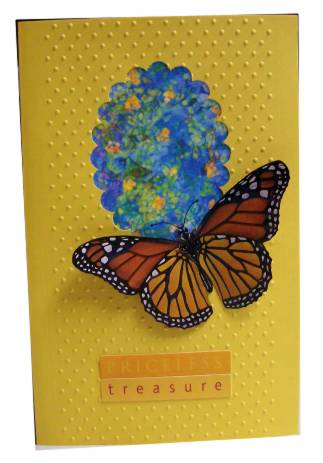
This close-up shot gives a better view of the 3-dimensional quality of this assemblage. The color is better on the image above.

I added two stickers to read "priceless treasure".

Ddd


Posted by studio3d@ccgmail.net at 6:00 AM PST

Saturday, 20 December 2008 - 11:42 AM PST

Name: "Gabi"

Hihi, spring - feeling is coming !

Saturday, 20 December 2008 - 1:23 PM PST

Name: "Merry"

Love your card.  Can you tell me how you managed to get the cuttlebug embossing down the center of the card with the two strips on each side?  Thanks for your help.

Monday, 22 December 2008 - 10:35 PM PST

Name: "Ddd"

Merry

I folded the cardstock, placed the folder over just the front at the top of the card and made the impression. The I moved it to the bottom edge of the card, aligned the dots and impressed it again. The second pass flattens out two rows of the first pass so the back only of the plate is put back under them and you can raise the dots again by pressing with your finger. The side edges are what extend beyond the edges of the plate.

Ddd

View Latest Entries