« December 2008 »
S M T W T F S
1 2 3 4 5 6
7 8 9 10 11 12 13
14 15 16 17 18 19 20
21 22 23 24 25 26 27
28 29 30 31
You are not logged in. Log in
Entries by Topic
All topics  «
3D paperwork
A - Z challenge 5
A - Z challenge 7
A - Z challenge round 4
A to Z challenge round 3
A to Z round 2
A to Z round 6
A-Z round 1
Around the House
Art Challenges
Artist Trading Cards
Backgrounds
Beads
Bible Journaling
Books
Boxes
Collage
Color Challenge
Coloring
cookbook
Die Cuts
Digital Projects
Digital Stamps
Drawing
Dry Embossing
Fabric Stuff
Fantastic Folds
Field Trip
Home Decor
How Does Your Garden Grow?
Hymnal Art
In The Kitchen
In the studio
Jewelry
Lettering
Links
Multi-Technique
Music to Work By
Musings
Nail Art
New Work
Online Class
Other Hobbies
Other Projects
Painting
Paper Embroidery
Paper Piecing
Photo
Pretty Paper
Quilting
Random
reading
Scrap Recovery
scrapbooking
Sewing
Sketch Challenge
Some Backlog
Stamping
Stencils
Stickers
Supplies
Teabag Folding
Techniques
Testing
tips and tricks
Tutorial
Web resources
Welcome to my Blog
Work By My Friends
workflow
Writing
Blog Tools
Edit your Blog
Build a Blog
RSS Feed
View Profile
Group One
In & Out of Studio 3D
Sunday, 21 December 2008
Embrace Butterflies
Topic: New Work

I thought I'd try a different alignment on the blog text today and see how I like it. If it's horrible, we won't go there again!

More snow and ice ...more butterflies!

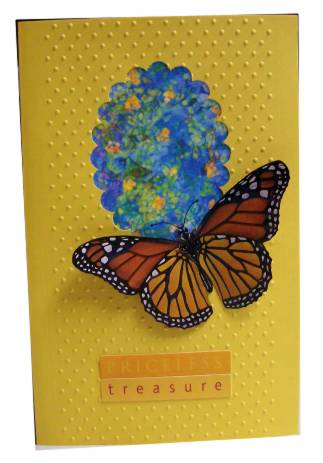
I used pieces of coordunating scrapbook papers for this card, including motif cutouts from the solid purple version. Because of the reddish tones in the butterfly I used Aged Mahogany Ranger Distress Ink to tone the edges of every paper and the card base before attaching. I also used it on the text sticker and on the purple brads. The large brads down the left side have a wide bar on which the legs are mounted so it allowed me to thread ribbon under them without poking through them. I also added an amber rhinestone to each of them and used tiny flower brads to make a flight path for the butterfly. The butterfly is mounted just at the body and the wings tipped up. The antenna are drawn on.

This card has the most work I have done on any card in a long time and it was entirely pre-planned. That never happens!

6 pieces of designer paper (which I got at Dollar Tree); 7 little flower brads; 3 large flower brads; 3 rhinestones; 2 ribbons; 1 cutout magazine picture; 1 card base; 1 text sticker!

Ddd


Posted by studio3d@ccgmail.net at 6:00 AM PST
Saturday, 20 December 2008
Winter Butterfly
Topic: New Work

Sometimes, when the snow is coming down and the ice is thick on the road, what you really need is to get a little floral and butterfly mojo goin' on! Such was the case today.

I used the dotted Cuttlebug folder to impress a large card base of golden sunshine yellow. I used a scalloped oval template with my Coluzzle to open an aperture and then lined the entire inside of the front panel with this batik print floral.  I attached a buterfly cut from a magazine advertisement - just gluing down the body and tipping up the wings.

This close-up shot gives a better view of the 3-dimensional quality of this assemblage. The color is better on the image above.

I added two stickers to read "priceless treasure".

Ddd


Posted by studio3d@ccgmail.net at 6:00 AM PST
Friday, 19 December 2008
Tis the Season
Topic: Around the House

Last year at this time I showed some of the handmade ornaments from my tree. I had misplaced one box though and could not show these two.

This is one of a set my mother made for me - large and small wreaths crocheted in green, red, and white versions. They are made on milk jug rings.


These little drums are made from frozen orange juice cans which are cut down and have the tops reattached. I spray painted them gold, attached velvet ribbon around the sides, glued on gold pony beads and threaded with gold thread. The drumsticks are round toothpicks on which I glued gold beads.

Around the house this year I put together this centerpiece for the dining table:

This arrangement is on one end of the hearth:

I've had this nativity for about 30 years. This year it is arranged on the mantle:

This is the table I set up to display Christmas cards as they arrive. This year it features a cranberry cloth, green runner, and a Bible open to the Christmas story:

The arrangement on the bookcase is of poinsettias and two nesting box sets I got as gifts last year:

And that's the Christmas tour for this year...

Merry Christmas!

Ddd


Posted by studio3d@ccgmail.net at 6:00 AM PST
Thursday, 18 December 2008
Painted Tulips
Topic: New Work

How distressing when the camera skews my colors! Honestly, the tulips match the backing paper.

These flowers were a line drawing from a bulb catalog. It was drawn with blue line on glossy paper which made it perfect for coloring. I used Sharpie markers in three tones of each color and blended with the lightest tone. They are layered on a printed scrapbook paper and then green cardstock base. 

The corners and the greeting are gold peeloffs.

Ddd


Posted by studio3d@ccgmail.net at 6:00 AM PST
Wednesday, 17 December 2008
Take Heart
Topic: New Work

A magazine photo of the fall forest floor sets a peaceful scene. I used various patterned scrapbook papers in complementary colors to frame it out in layers and ended by placing on a colored card base.  

I added two stickers and added handwritten text between them.

Ddd


Posted by studio3d@ccgmail.net at 6:00 AM PST
Tuesday, 16 December 2008
Lighthouse of Hope
Topic: New Work

I started this collage card with a lighthouse photograph. Then I added scraps of maps, lace print paper, denim print paper, and a pink paper to echo the color given off by the lamp. I roughed the edges of each, used 'weathered wood' Ranger distress ink, and then applied a little Stickles on the raw edges and on the lighthouse light.

Here you can see the glitter a little better.

The text is a sticker and I added glittery Stickles to the letters.

Ddd


Posted by studio3d@ccgmail.net at 6:00 AM PST
Monday, 15 December 2008
Cherish Memories
Topic: New Work

Imagine that - another card with calendar illustrations! This sweet little bird was paired with scrapbook paper featuring whimsical  clouds. I used a Tonic distressing tool to rough up the edges of both and another background paper. All were toned with Ranger Distressing Ink (tea dye). I punched a couple of holes to thread a pin from Idea-ology (in teeny tiny print it says "treasure". Then I added a sticker "cherish" through it and a metal text plate "memories".

I added three square brads to the top and glued all to a cream card base.

Ddd


Posted by studio3d@ccgmail.net at 6:00 AM PST
Sunday, 14 December 2008
Fishing With a Smile
Topic: New Work

This card started with the fishing illustration and I went through my piles of scrap paper and pulled out three with complementary colors. I used distress ink to tone the edges of all of them plus the 3D sticker.

After gluing all to one another I added the heart brad before attaching all to the card base.

Ddd


Posted by studio3d@ccgmail.net at 6:00 AM PST
Saturday, 13 December 2008
Wedding Birds
Topic: New Work

I plucked this pair of birds from a calendar page, trimmed one right around with sharp scissors and craft blade and the other was punched with a circle punch. The circle bird was distressed with Tea Dye Ranger Distress ink. This was also used on the pre-printed frame and the background pink paper.

The frame and background were held together with pink flower brads at the 4 corners.

I used two stickers on this card. The center greeting is a clear vellum sticker and the Forever sticker is textured.

Ddd


Posted by studio3d@ccgmail.net at 6:00 AM PST
Friday, 12 December 2008
Joy Birds
Topic: New Work

Not only do I like making cards from calendar illustrations, but it pleases me to know that I'll never run out. They'll make more next year!

This is from a week-at-a-glance desk calendar. I found a scrapbook paper that complemented the picture and then made a mitered-corner frame out of a striped scrapbook paper. After layering all I used watercolor marker to sketch a doodle line around the picture.

I added a sticker for text.

Ddd


Posted by studio3d@ccgmail.net at 6:00 AM PST
Thursday, 11 December 2008
Glittery Night
Topic: New Work

This card front does not show all I added. Every snowy rim has Stickles added giving this a wonderful shimmer. 

I added a fabric text sticker.

Ddd


Posted by studio3d@ccgmail.net at 6:00 AM PST
Wednesday, 10 December 2008
What's In Santa's Stack?
Topic: New Work

Four old cards were used to make this one. 1) The metallic greeting 2) the stack of presents 3) the stars on the packages 4) Santa. The little guy came with glitter on his red hat and suit. I added Stickles to his beard, tassel, and added dots between the red glitter dots.

Ddd


Posted by studio3d@ccgmail.net at 6:00 AM PST
Tuesday, 9 December 2008
Holidays on Ice
Topic: New Work

This was a simple card - just a little cardstock matching for an image from an old card and the addition of a 3D greeting sticker on the top. 

Ddd


Posted by studio3d@ccgmail.net at 6:00 AM PST
Monday, 8 December 2008
Snowmen Hangin' Around
Topic: New Work

These three snowmen were on one of last year's cards. I used a circle punch to cut them out, Rimmed each with a golden watercolor marker and attached them to an irridescent cardstock base. Then I used peel-off sticker waste to create hangers for them.

The text is a peel-off stickers.

Ddd


Posted by studio3d@ccgmail.net at 6:00 AM PST
Sunday, 7 December 2008
Potted Poinsettias
Topic: New Work

This one is NOT made from scraps. I used black cardstock to free-hand a pot and trimmed it with peel-offs. I arranged a bunch of holly stickers and then added four 3D poinsettia stickers to make a potted plant. 

Peel-off waste was used to band the top and bottom of the card and a gold sticker greeting was added to the pot.

Ddd


Posted by studio3d@ccgmail.net at 6:00 AM PST
Saturday, 6 December 2008
Celebration Snowflakes
Topic: New Work

The snowflake panel if from a card front but the text panel is the inside liner of an envelope! Very odd coloring so I had a hard time matching cardstock for it. I did find this seafoam that worked, though. I added silver stickers over top of four of the snowflakes. 

What with the text covering the whole background I didn't even need to add a greeting.

Ddd


Posted by studio3d@ccgmail.net at 6:00 AM PST
Friday, 5 December 2008
Golden Poinsettia
Topic: New Work

I cut this gold poinsettia off an old card front and backed it with poinsettia stickers on a gold metallic cardstock base. The sticker sheet came with a matching greeting block so I used that at the bottom, blocked out the last of the greeting and placed a peel-off over the top. 

Ddd


Posted by studio3d@ccgmail.net at 6:00 AM PST
Thursday, 4 December 2008
Swirls in the Night
Topic: New Work

I saved my Christmas cards from last year and used some to make my own cards this year. 

For this card I used a flat front and ran it through the Cuttlebug for embossing.  I used Stickles on the tree to make it shimmer (sorry it doesn't show) and added a gold punched out star to the top. I added a 3D 'celebrate' sticker to the upper left and then placed a gold peel-off under it.

The whole thing was mounted on a blue folded card base.

Ddd


Posted by studio3d@ccgmail.net at 6:00 AM PST
Wednesday, 3 December 2008

Topic: New Work

I had an inspiration the other day while eating my yoghurt for lunch. We do LOTS of crafts for the preschoolers and many of them use scraps which we ask people to save for us. I looked at my container and envisioned turning it into a little penguin!

I drew up paper patterns, added a 2 inch styrofoam ball, and google eyes and this is the result. 

I formalized the patterns and turned them over to the craft lady - along with this sample.

Ddd


Posted by studio3d@ccgmail.net at 6:00 AM PST
Tuesday, 2 December 2008
Date Book
Topic: Some Backlog

These were the last of the kits I had left - 11 meander books. The 8 1/2 x 11 page that this begins with is printed with the days of the year - one month per page - where the owner can write in birthdays and anniversaries. The last three pages list birthstones, birth flowers, and traditional and modern gifts for anniversaries. I made these with covers of mat board and spines of scrapbook paper. These are the simple books I taught my grandkids to make. 

Ddd


Posted by studio3d@ccgmail.net at 6:00 AM PST

Newer | Latest | Older