« May 2014 »
S M T W T F S
1 2 3
4 5 6 7 8 9 10
11 12 13 14 15 16 17
18 19 20 21 22 23 24
25 26 27 28 29 30 31
You are not logged in. Log in
Entries by Topic
All topics  «
3D paperwork
A - Z challenge 5
A - Z challenge 7
A - Z challenge round 4
A to Z challenge round 3
A to Z round 2
A to Z round 6
A-Z round 1
Around the House
Art Challenges
Artist Trading Cards
Backgrounds
Beads
Bible Journaling
Books
Boxes
Collage
Color Challenge
Coloring
cookbook
Die Cuts
Digital Projects
Digital Stamps
Drawing
Dry Embossing
Fabric Stuff
Fantastic Folds
Field Trip
Home Decor
How Does Your Garden Grow?
Hymnal Art
In The Kitchen
In the studio
Jewelry
Lettering
Links
Multi-Technique
Music to Work By
Musings
Nail Art
New Work
Online Class
Other Hobbies
Other Projects
Painting
Paper Embroidery
Paper Piecing
Photo
Pretty Paper
Quilting
Random
reading
Scrap Recovery
scrapbooking
Sewing
Sketch Challenge
Some Backlog
Stamping
Stencils
Stickers
Supplies
Teabag Folding
Techniques
Testing
tips and tricks
Tutorial
Web resources
Welcome to my Blog
Work By My Friends
workflow
Writing
Blog Tools
Edit your Blog
Build a Blog
RSS Feed
View Profile
Group One
In & Out of Studio 3D
Monday, 12 May 2014
Four Friends
Topic: Quilting

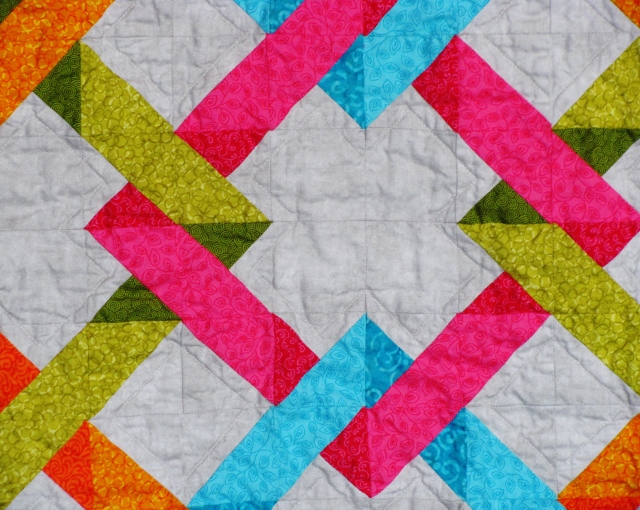
While waiting for someone I had driven to an extended medical appointment I took out a graph paper notebook and started doodling quilt block designs. One that I really liked I drew up in Electric Quilt 7 when I got home and worked on coloring it up.

Loved it! Once I had decided to use two bright warms and two bright cools - with two values of each on a light grey background, I was off to the fabric store. I selected fabrics from P&B Textiles for the most part. I did have to select a teal batik to get one tone and the black and grey are both marble/shadow fabrics.

This quilt came together exactly as I envisioned it - a lap quilt for friends who are moving to a new home. I named this quilt "Four Friends".


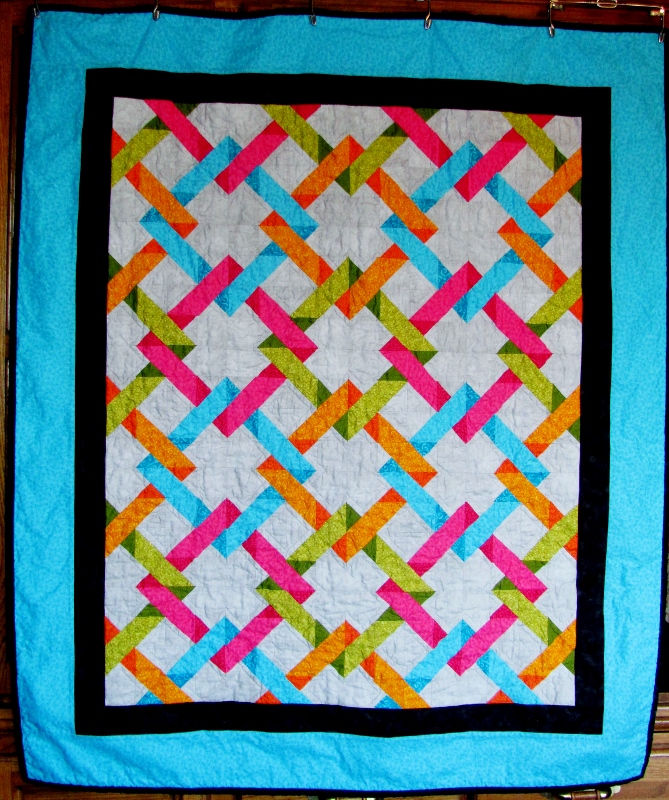
I love how the use of a darker triangle at the intersection really reinforces the visual illusion that one block weaves under the next.

I quilted with shadow lines 1/2-inch inside each of the grey areas.

I decided to use the black borders to work as a logical break point for the continuous design.

Ddd


Posted by studio3d@ccgmail.net at 12:01 AM PDT

View Latest Entries