« August 2009 »
S M T W T F S
1
2 3 4 5 6 7 8
9 10 11 12 13 14 15
16 17 18 19 20 21 22
23 24 25 26 27 28 29
30 31
You are not logged in. Log in
Entries by Topic
All topics  «
3D paperwork
A - Z challenge 5
A - Z challenge 7
A - Z challenge round 4
A to Z challenge round 3
A to Z round 2
A to Z round 6
A-Z round 1
Around the House
Art Challenges
Artist Trading Cards
Backgrounds
Beads
Bible Journaling
Books
Boxes
Collage
Color Challenge
Coloring
cookbook
Die Cuts
Digital Projects
Digital Stamps
Drawing
Dry Embossing
Fabric Stuff
Fantastic Folds
Field Trip
Home Decor
How Does Your Garden Grow?
Hymnal Art
In The Kitchen
In the studio
Jewelry
Lettering
Links
Multi-Technique
Music to Work By
Musings
Nail Art
New Work
Online Class
Other Hobbies
Other Projects
Painting
Paper Embroidery
Paper Piecing
Photo
Pretty Paper
Quilting
Random
reading
Scrap Recovery
scrapbooking
Sewing
Sketch Challenge
Some Backlog
Stamping
Stencils
Stickers
Supplies
Teabag Folding
Techniques
Testing
tips and tricks
Tutorial
Web resources
Welcome to my Blog
Work By My Friends
workflow
Writing
Blog Tools
Edit your Blog
Build a Blog
RSS Feed
View Profile
Group One
In & Out of Studio 3D
Wednesday, 26 August 2009
Sketch Stamp
Topic: Stamping

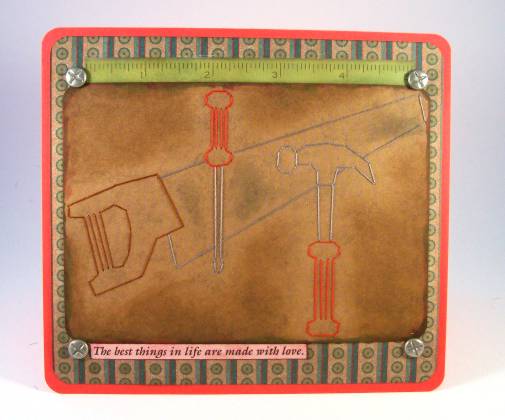
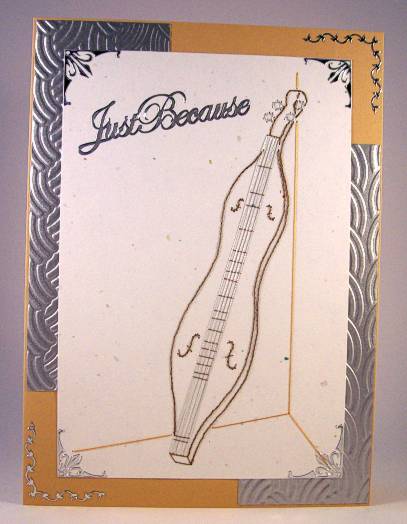
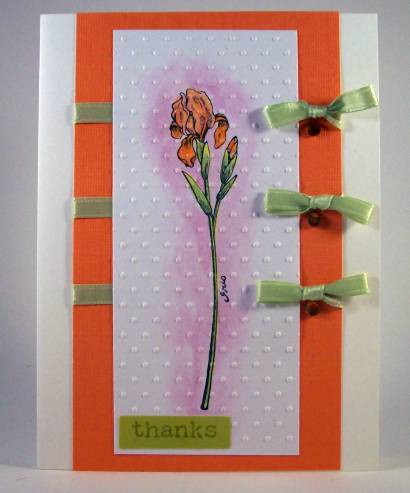
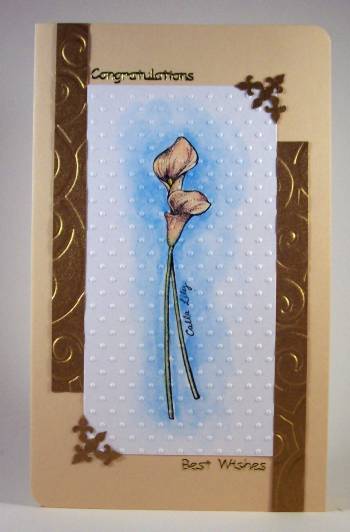
I fell in love with this stamp on a recent trip to Hobby Lobby (yep, there's one in Nebraska, too - and my daughter knows where to find it!) My first concern was how I could stamp it with permanent ink so I could use watercolors on it. I wanted it to retain the look of a pencil sketch but I only have black ink!

Well, I accomplished it by second-generation stamping. I kept a scratch paper at hand and inked, stamped on the scratch paper, then stamped on the cardstock. It worked like a charm.

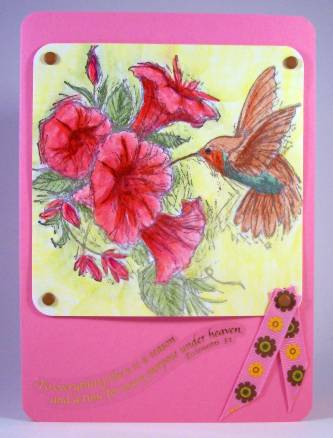
This has been colored with watercolor pencils and blended with a water brush. Rounding the corners, I then attached brown brads to the corners, using one to hold some snippets of ribbon.

The clear sticker at the bottom is Ecclesiastes 3:1 "To everything there is a season and a time for every purpose under heaven."

Ddd


Posted by studio3d@ccgmail.net at 6:00 AM PDT
Tuesday, 25 August 2009
Down By the Riverside
Topic: Field Trip

A recent weekend took us to our southern place for an overnight stay. We took the table from the camper, the lawn chairs and our new gas grill over to the river side for a steak dinner al fresco.


As evening settled we watched the deer amble through the fields, spotted a bald eagle flying up the river with a freshly caught fish, and finally laid out to watch the stars. We saw 10 sattelites pass over in about an hour and a half.

In the morning, while dining back at the river, we watched while an osprey (sitting atop the snag directly above the table in the photo) issued a screaming/ flapping challenge to a passing great blue heron.

Ddd


Posted by studio3d@ccgmail.net at 6:00 AM PDT
Monday, 24 August 2009
Fruit of My Labors
Topic: In The Kitchen

I didn't know whether to code the topic of this 'in the kitchen' or 'in the garden'! This plate was part of our dinner the other night and the surrounding items were sent to the refrigerator for later consumption. All of these were picked from the garden barrels within an hour of this photo! 

So, the garden was a success! Here we have (clockwise on the plate and then surrounding it) radishes, green onions, carrots, cucumber, green beans, tomatoes, and beets. The tomatoes are from those cheater plants. On the left edge of the plate you can see just one pea that DH did not snack away while I was preparing the shot.

Other garden successes not on tonight's menu - spinach, lettuce, cherry tomatoes (yet to ripen), white onions.

Ddd


Posted by studio3d@ccgmail.net at 6:00 AM PDT
Sunday, 23 August 2009
Hummer and Bow
Topic: Stamping

I made this background paper so ling ago I can't remember how it was done! But it made the perfect foil for this stamped project. Layers of coordinating cardstock were corner punched. 

A satin bow is tied through top two layers and all is assembled.

No greeting for this one so it can serve for any occasion.

Ddd


Posted by studio3d@ccgmail.net at 6:00 AM PDT
Saturday, 22 August 2009
Made With Love
Topic: Paper Embroidery

Starting with the stitching, on a brown scrapbook paper, I then distressed with greens and browns. I had a green sticker of a measuring tape and distressed that as well to bring it into the same tonal range.

The background paper was the right colors but just too bright so I toned them down with the same distressing, as well as a text sticker. 

I rounded the corners of the parts and,after stacking and gluing, added some manly brads to the corners.

The whole was glued to a red folded cardstock and its corners were also rounded.

Ddd


Posted by studio3d@ccgmail.net at 6:00 AM PDT
Friday, 21 August 2009
Silver Lined Dulcimer
Topic: Paper Embroidery

I like to use a very simple paper for this pattern so the focus stays on the instrument. This paper has very subtle flecks in it. I stitched with dark brown and silver for the country dulcimer for a bit of realism.

I used a Fiskars texture plate in the Cuttlebug on silver paper to serve as backing corners on a tan folded cardstock.

I carried on with the silver theme (dulcimer strings, backing papers) by adding silver corners - in two types - and a silver peel-off greeting.

Ddd


Posted by studio3d@ccgmail.net at 6:00 AM PDT
Thursday, 20 August 2009
Blend and Bird
Topic: Stamping

This fabulous background paper was a sample from a pack of printing papers I got years ago. I love the gradation in it. I ran it through the Cuttlebug with a Fiskars texture plate for the fantastic design.

Punches at the corners and a scalloped oval cutout bring the focus to the stamped image piece which has been colored with watercolor pencils and waterbrush. 

The central image is mounted with pop-dots and a circular rob-on furnishes the greeting.

Ddd


Posted by studio3d@ccgmail.net at 6:00 AM PDT
Tuesday, 18 August 2009
Mahogany and Glass
Topic: Stamping

The background for this piece is from my junk mail. I liked the abstract stripes. I used the Nestabilities scalloped oval to cut an opening and mounted it over folded yellow cardstock.

The focal piece is a rubber stamped image finished off with watercolor pencils and a water brush. 

I tied a satin bow around the fold of the card and went without a greeting of any kind.

Ddd


Posted by studio3d@ccgmail.net at 6:00 AM PDT
Monday, 17 August 2009
Best Wishes Blocks
Topic: Dry Embossing

This is probably my least favorite of all the cards I've made in a long time.

I started with the brass stencil in the Cuttlebug and then tapped an inkpad onto the raised areas. Although I found two papers that carried the color theme, they don't have enough contrase and the pattern of the checked paper is too large.

After wrestling with this for quite a while I finally decided to add the ribbon to give it some boundaries and did some line-work around the spotted papers.

It still wasn't enough so I added gold peel-off corners and a gold greeting. 

I think I basically wasted a lot of supplies just trying to make the embossed panel work - and it was made from a scrap in the first place!

Whadda ya think? Trash or treasure?

Ddd


Posted by studio3d@ccgmail.net at 6:00 AM PDT
Sunday, 16 August 2009
Purple Happiness
Topic: Dry Embossing

I decided to go with "topics" in the header that were more descriptive of the techniques used instead of the the more general 'new work'. It's basically ALL new work at this point, as I have no more backlog to post.

I used a brass stencil that I cut for myself years ago and used the Cuttlebug to impress it into textured paper with a metallic sheen. I then used a Fiskars corner punch that also embosses. A very pale Sharpie was used to color the raised portions of both. 

White mulberry paper was torn for the backing piece. I also crumpled it before adhering. I made a ribbon slide from more of the purple paper and applied rub-on letters for the text - doesn't that lettering style fit perfectly?

Sheer purple ribbon was laced through the slide and knotted at each end. Everything was mounted to a dark purple cardstock using glue dots.

Ddd


Posted by studio3d@ccgmail.net at 6:00 AM PDT
Saturday, 15 August 2009
Quilting Butterflies
Topic: New Work

I embossed these butterflies onto a metallic finished blue paper with the Cuttlebug and a brass stencil, then trimmed around. The backing paper was emossed into ridges with the Scor-It to create a diamond pattern.

I applied half-pearls at each intersection for a little elegant touch.

The greeting is a white rub-on.

Ddd


Posted by studio3d@ccgmail.net at 6:00 AM PDT
Friday, 14 August 2009
Fruit Stencil
Topic: New Work

I realized that I had several brass stencils in my supplies and that I had read they could be used in the Cuttlebug. So I pulled them out and made several impressions using a variety of papers and cardstock. Some were successful, some not so much. Lighter papers tore :-(

This was done on a light textured cardstock, hand colored with colored pencils and waterbrushed to blend. 

I mounted to cardstock covered with a spotted paper, added two stickers and used two ribbons to tie a bow up top.

Ddd


Posted by studio3d@ccgmail.net at 6:00 AM PDT
Thursday, 13 August 2009
Iris All Tied Up
Topic: New Work

I may be close to winding down this series of stamped and colored card styles. But here is what today brings. The orange cardstock perfectly matched the flower coloring. Before attaching them together, though, I tied three bows around the orange with some green satin ribbon. Each bow then got a 'drop' of orange rhinestone as an accent. 

The focal unit was then attached to a white card base and I added a text sticker in a coordinating green tone.

Ddd


Posted by studio3d@ccgmail.net at 6:00 AM PDT
Wednesday, 12 August 2009
Lily With a Twist
Topic: New Work

This lily went through the Swiss Dots Cuttlebug folder after coloring. The tan cardstock was chosen for the match to the flowers.

I started shuffling scraps from the paper cutter and hit on the fold embossed stripes to apply to each side. They were shorter than the cardstock background which led to their offset placement. Then the other two corners were just left hanging out there so I used a corner punch to make some matching corner trims. 

I added a gold peel-off greeting at the top and at the bottom for balance and then used the corner rounder on two opposing corners of the card base.

Ddd


Posted by studio3d@ccgmail.net at 6:00 AM PDT
Tuesday, 11 August 2009
Rejoice!
Topic: New Work

I started this with just the white folded cardstock and embossed the front. The sticker came next and it was a little too much color in all that sea of white so I chose the colors from the sticker and did light watercolor washes over the raised areas of the image. 

The last step was to add silver peel-off borders along the sides.

Simple, but elegant.

Ddd


Posted by studio3d@ccgmail.net at 6:00 AM PDT
Monday, 10 August 2009
On the Edge
Topic: New Work

I should have taken into consideration the difficulty of photographing whites and pastels before embarking on this long journey of card-making with rubber stamps!

After stamping and watercoloring the image I ran it throught the Distressed Stripes folder for texture. Punching the corners of the green panel allowed me to tuch the corners of the white panel into it. Then I trimmed the right edge with a border made with a Fiskars border punch.

Attached to a folded white card base it left a white block on the left which I filled with a silver peel-off greeting.

The text looked odd just hanging out there so I added some stripes of silver to anchor it.

Ddd


Posted by studio3d@ccgmail.net at 6:00 AM PDT
Sunday, 9 August 2009
Pink on a Field of Hearts
Topic: New Work

I embossed this colored stamping with the Hearts Cuttlebug folder. A simple frame of yellow to bring out the color of the flower and a pink folded card base to bring out the pink on the painting. 

The text is a thick acrylic sticker.

Ddd


Posted by studio3d@ccgmail.net at 6:00 AM PDT
Saturday, 8 August 2009
White Out
Topic: New Work

No color on this one. Just many layers of white embossed with various Cuttlebug folders and a couple of die cuts. The butterfly is mounted 3D and I went to town with the clear rhinestones for embellishment. 

Ddd


Posted by studio3d@ccgmail.net at 6:00 AM PDT
Texture and Color
Topic: New Work

Yep, more watercolor pencils on rubber stamped images. This one I put through the Cuttlebug script folder and then went nuts creating lots of white layers with different folders. On each I used just a hint of color on the raised portions to create depth and coordinate with the image.

I  cut a couple of butterflies with Spellbinders dies and embossed those, too. Then they are mounted with pop-dots to raise the wings up. I punched the corners of the one colored layer (purple). 

No text is added so it stays simple and clean.

Ddd


Posted by studio3d@ccgmail.net at 6:00 AM PDT
Hello, Iris!
Topic: New Work

I liked the texturing of the stamped and colored iris from a couple of days ago so I did it again. Different paint job and differeint embossing folder, though. I used Weathered Wood for this one.

In keeping with the distressed look of the stripes, I tore the side edges and then backed with purple card to bring out the flower's color. Two scraps of green card were embossed with the Swiss Dots folder and I used a Cuttlebug die to cut out the greeting. 

The greeting fot a rhinestone to dot the 'i' and I bordered the open areas with some gold peel-off sticker.

Ddd


Posted by studio3d@ccgmail.net at 6:00 AM PDT

Newer | Latest | Older