« May 2010 »
S M T W T F S
1
2 3 4 5 6 7 8
9 10 11 12 13 14 15
16 17 18 19 20 21 22
23 24 25 26 27 28 29
30 31
You are not logged in. Log in
Entries by Topic
All topics  «
3D paperwork
A - Z challenge 5
A - Z challenge 7
A - Z challenge round 4
A to Z challenge round 3
A to Z round 2
A to Z round 6
A-Z round 1
Around the House
Art Challenges
Artist Trading Cards
Backgrounds
Beads
Bible Journaling
Books
Boxes
Collage
Color Challenge
Coloring
cookbook
Die Cuts
Digital Projects
Digital Stamps
Drawing
Dry Embossing
Fabric Stuff
Fantastic Folds
Field Trip
Home Decor
How Does Your Garden Grow?
Hymnal Art
In The Kitchen
In the studio
Jewelry
Lettering
Links
Multi-Technique
Music to Work By
Musings
Nail Art
New Work
Online Class
Other Hobbies
Other Projects
Painting
Paper Embroidery
Paper Piecing
Photo
Pretty Paper
Quilting
Random
reading
Scrap Recovery
scrapbooking
Sewing
Sketch Challenge
Some Backlog
Stamping
Stencils
Stickers
Supplies
Teabag Folding
Techniques
Testing
tips and tricks
Tutorial
Web resources
Welcome to my Blog
Work By My Friends
workflow
Writing
Blog Tools
Edit your Blog
Build a Blog
RSS Feed
View Profile
Group One
In & Out of Studio 3D
Monday, 17 May 2010
Man-cation
Topic: Fantastic Folds

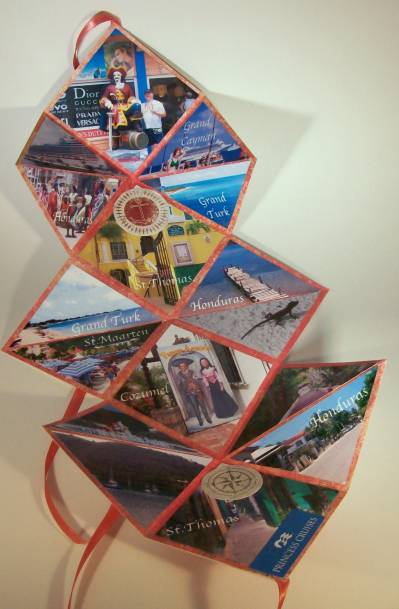
For a challenge to create a 'manly card' with fantastic folds I created another squash-fold booklet from 12 x 12 cardstock. This time the cardstock was double-sided so there was coordinating back and front.

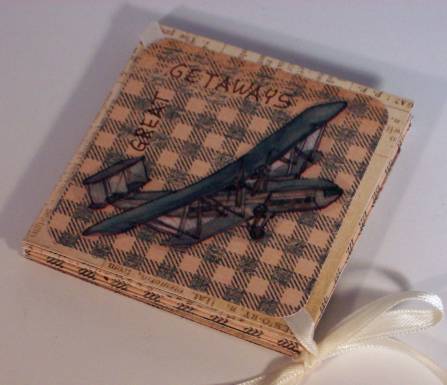
I used 'outdoors', 'travel', and 'Alaska' stickers from different sets to decorate this one and used the checks of the paper as guidelines to add hand-lettered text with brown Sharpie marker.


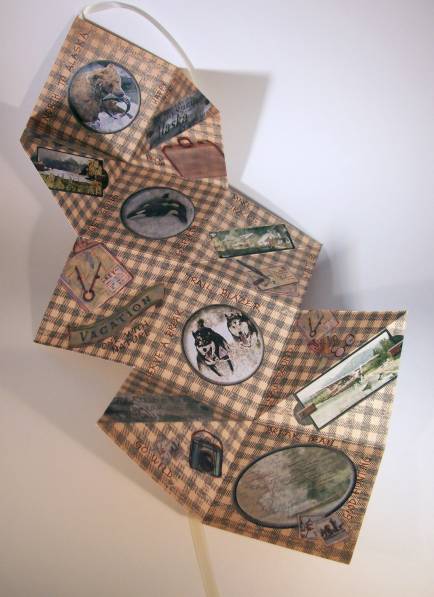
Because I thought bows at top and bottom would take away from the manliness of this card, I left a long enough tail on the top portion to wrap it over the back and tie it once at the bottom.

Ddd


Posted by studio3d@ccgmail.net at 6:00 AM PDT
Sunday, 16 May 2010
Three Petal Card - Stitched
Topic: Paper Embroidery

This card was made from the other half of the 12 x 12 cardstock I started with for the tri-book card the other day. I even used some of the same decor on it. However, since this was for a paper embroidery swap I traded out the rub-on stitching in the center panel for actual stitching.

I added all the text in white rub-ons since this was for a purple and white theme swap. Also, to cover the back of the stitching, I glued the backs of the center panels together. This makes it more 'book like' rather than an accordion fold.


Ddd


Posted by studio3d@ccgmail.net at 6:00 AM PDT
Saturday, 15 May 2010
Squash (no, not a vegetable or a sport)
Topic: Fantastic Folds

I was recently reminded of the squash book structure which generally uses three squares of card scored and overlapped. I decided to try to create it using a single sheet of 12 x 12 inch cardstock.

To do this I scored at 3", 6" and 9" in both directions. Then I trimmed away three blocks in an L on opposite corners. Finally, each remaing block of four is scored on the diagnonal. I also used scraps from the cut-away sections to cover the front and the back cover, trapping a length of ribbon between to tie the book closed.

I printed and trimmed photos from our recent cruise to fill this book.

This may be a record for me, using cruise photos within a week of returning (this is a delayed posting - project was completed on 5/3/10)

Ddd


Posted by studio3d@ccgmail.net at 6:00 AM PDT
Friday, 14 May 2010
Graduated
Topic: Fantastic Folds

Challenge - Make a 'tri-fold' card. 

Answer - OK!

This started out as a 12 x 12 piece of cardstock. From this I got two 6 x 12 strips. For each I accordion folded at 2", 5", and 8"and then trimmed the first panel down 2" and the next two panels down 1".

For this one I used vellum stickers of pansies and rub-on stitching to decorate the panels.

Then added text in clear stickers and peel-offs which you can see in this view slowing the card opened.


The other version will be shown in a few days - not quite done with it yet.

Ddd


Posted by studio3d@ccgmail.net at 6:00 AM PDT
Thursday, 13 May 2010
Purple and White
Topic: Dry Embossing

OK, I signed up to do a Purple and White swap on one of my lists and then sat down and created this card. I used purple printed cardstock for the background and ran it through the Cuttlebug folder to add the script. Then I sanded it to expose the white core. Next are two torn pieces of white mulberry paper with white paper behind to intensify the contrast.

The flower was cut off of a commercial card and mounted with 3D glue dots. Then I made the text block with torn purple card, white rub-ons, and a Cuttlebugged green paper, sanded. This is mounted 3D also.

I looked up who I was supposed to send it to for the swap and discovered my BIG mistake - it was for the wrong group! The Purple and White swap was for a Paper Embroidery group and my card has no embroidery on it. RATS!

Oh well, it works for another groups' swap that was due - one that requires some kind of embossing. Since I used dry embossing for the background I'm all set.

Ddd


Posted by studio3d@ccgmail.net at 6:00 AM PDT
Wednesday, 12 May 2010
Friends and Neighbors
Topic: Paper Embroidery

Birdhouses once again. This time I pricked it out on a shimmery blue card and did all the stitching in a single color - copper brown. I mounted on brown cardstock and added a thick acrylic text sticker. The leggs have been cut off the brads and they are glued in place.

I like this simple look.

Ddd


Posted by studio3d@ccgmail.net at 6:00 AM PDT
Tuesday, 11 May 2010
Love Thy Neighbor
Topic: Paper Embroidery

This time, after stitching my birdhouse pattern, I chose not to color the houses. I used the same backing paper and the same house colors but added a clear sticker for the scripture text.

Doesn't this text just fit perfectly?

Ddd


Posted by studio3d@ccgmail.net at 6:00 AM PDT
Monday, 10 May 2010
Time to Make a Bookmark
Topic: Paper Embroidery

I've been busy mounting the stitching that I did while on vacation. This one is bronze thread on tan cardstock. I used two pieces of paste paper back to back as a base so it would look good on the back, too. 

It is inserted in a plastic bookmark sleeve and topped off with a ribbon.

Ddd


Posted by studio3d@ccgmail.net at 6:00 AM PDT
Sunday, 9 May 2010
Purple Blackwork
Topic: Paper Embroidery

Hmmm - This blackwork pattern looked really neat on the grid and I thought it would make a neat stitching on card. Um, not so much. I used corner punches, corner brackets, gold borders, bright colors - trying to make it look good. I don't think it ever will!

So, there you go... an ugly card.

Ddd


Posted by studio3d@ccgmail.net at 6:00 AM PDT
Saturday, 8 May 2010
Easter Centerpiece
Topic: Around the House

I had some silk flowers I pulled out of an old project and used them with a candle holder I had on hand to create this centerpiece for our Easter table. I liked it so much, I have just kept it on the table.

It makes me smile every time I go theough the dining room.

Ddd


Posted by studio3d@ccgmail.net at 6:00 AM PDT
Friday, 7 May 2010
Butterfly Swirls
Topic: Paper Embroidery

Group Mom on one of the paper embroidery lists I am on sent us this pattern as a challenge last month. I pricked it out on black cardstock and used verigated thread for stitching. I love how this came out! I kind of reminds me of the 'screen saver' on my old computer, though!

I had taken along this 3D butterfly cutting on vacation so I cut it for mounting on this card.

I'll add a greeting at the bottom before senting.

Ddd


Posted by studio3d@ccgmail.net at 6:00 AM PDT
Thursday, 6 May 2010
Made in Mexico
Topic: Paper Embroidery

I did this stitching on vacation. The cardstock is shimmer on top of a red base. After stitching I used a craft knife to scrape the shimmer off the edges to frame up the roses.

This is a free Prick and Stitch pattern that I edited to make fuller roses and stems. I also stitch up the leaves differently than the original design.

Ddd


Posted by studio3d@ccgmail.net at 6:00 AM PDT
Wednesday, 5 May 2010
Snowflake in Stitches
Topic: Paper Embroidery

I stitched this up while on vacation - snowflakes in the Tropics! I pricked out on Christmas Green cardstock and stitched with metallic silver thread.

I'll add a greeting before sending for Christmas.

Ddd


Posted by studio3d@ccgmail.net at 6:00 AM PDT
Tuesday, 4 May 2010
Unique
Topic: Teabag Folding

This teabag was cut around the flowers before assembly for a decorative edging.

The button is a die-cut.

Again, this is severely color edited.

Ddd


Posted by studio3d@ccgmail.net at 6:00 AM PDT
Monday, 3 May 2010
Flower-Stripes-Banner
Topic: Teabag Folding

 More teabag folding, this with square tiles using a simple pyramid fold.

When I am ready to send this one out, it will get a peel-off greeting inside the die-cut banner.

Ddd


Posted by studio3d@ccgmail.net at 6:00 AM PDT
Sunday, 2 May 2010
Laughing at Teabags
Topic: Teabag Folding

The colors on this are not a bizarre as they look here, I have done color editing to obscure the actual papers used as they were part of a product notyet released.

I haven't done anything with round teabags for years. This is a simple half-fold and I added one of the teabags to the center, as well.

Another circle was cut into quarters to serve as corner backets.

Ddd


Posted by studio3d@ccgmail.net at 6:00 AM PDT
Saturday, 1 May 2010
Sailor Girl
Topic: 3D paperwork

This picture is from a 3D cutting sheet given to me several years ago. I took it with me as part of the crafts to work on while on vacation.

I didn't do anything special to finish it off - just mounted to a white folded cardstock.

Here you can see the layers better.

Ddd


Posted by studio3d@ccgmail.net at 6:00 AM PDT
Friday, 30 April 2010
Birthday Stitching
Topic: Paper Embroidery

What goes around, comes around... I made this card at the first of the year and mailed it out for an overseas birthday. This week it came back in the mail for no apparent reason. 

I had forgotten to take a photo for posting on the blog, so now I got my chance! How did it know?

Ddd


Posted by studio3d@ccgmail.net at 6:00 AM PDT
Thursday, 29 April 2010
Cruise Card
Topic: Field Trip

This card is make from a kit of papers, paper flowers, buttons, cardstock, rubber stamps, and ribbon. This was another of the crafts offered on the cruise. Basically, this was the 'free' craft to entice everone into participating in the ones where you had to buy the kit.


These kits come with 'instructions' that show the appropriate layout. The table I sat at had three other ladies that either made cards, stamped, or did scrapbooking. Nobody followed the directions!

Ddd


Posted by studio3d@ccgmail.net at 6:00 AM PDT
Wednesday, 28 April 2010
Vacation Crafts
Topic: Field Trip

Our recent vacation was a couple of cruises. On the first, they had crafts aboard! They gave us kits with frames, papers, rubons, and sticky-backed die-cuts.

I used my scissors to distress the parts and pieces and created this:

I don't have a photo for it yet so you'll have to use your imagination.

Ddd


Posted by studio3d@ccgmail.net at 6:00 AM PDT

Newer | Latest | Older