« October 2010 »
S M T W T F S
1 2
3 4 5 6 7 8 9
10 11 12 13 14 15 16
17 18 19 20 21 22 23
24 25 26 27 28 29 30
31
You are not logged in. Log in
Entries by Topic
All topics  «
3D paperwork
A - Z challenge 5
A - Z challenge 7
A - Z challenge round 4
A to Z challenge round 3
A to Z round 2
A to Z round 6
A-Z round 1
Around the House
Art Challenges
Artist Trading Cards
Backgrounds
Beads
Bible Journaling
Books
Boxes
Collage
Color Challenge
Coloring
cookbook
Die Cuts
Digital Projects
Digital Stamps
Drawing
Dry Embossing
Fabric Stuff
Fantastic Folds
Field Trip
Home Decor
How Does Your Garden Grow?
Hymnal Art
In The Kitchen
In the studio
Jewelry
Lettering
Links
Multi-Technique
Music to Work By
Musings
Nail Art
New Work
Online Class
Other Hobbies
Other Projects
Painting
Paper Embroidery
Paper Piecing
Photo
Pretty Paper
Quilting
Random
reading
Scrap Recovery
scrapbooking
Sewing
Sketch Challenge
Some Backlog
Stamping
Stencils
Stickers
Supplies
Teabag Folding
Techniques
Testing
tips and tricks
Tutorial
Web resources
Welcome to my Blog
Work By My Friends
workflow
Writing
Blog Tools
Edit your Blog
Build a Blog
RSS Feed
View Profile
Group One
In & Out of Studio 3D
Thursday, 28 October 2010
Flashy Poinsettia
Topic: Collage

In a complete reversal from yesterday's understated offering, today's card is all about the glitz!

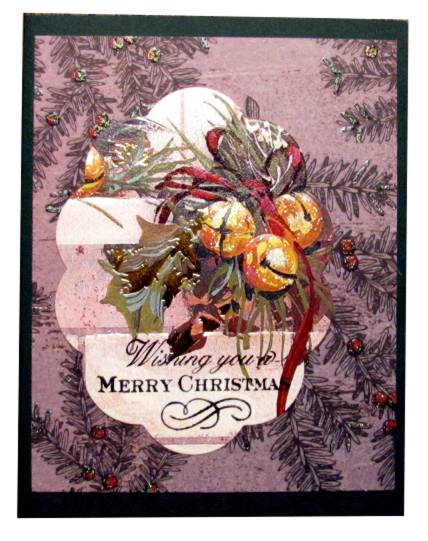
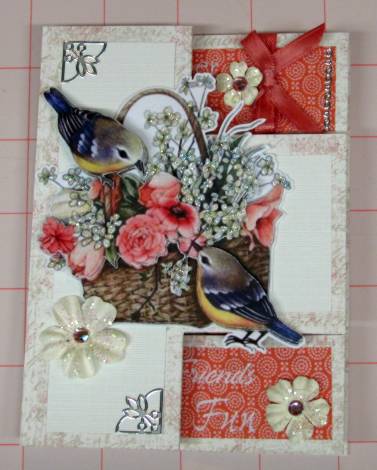
I had these foil leaves from my days as a cake decorator and thought they would make a great poinsettia (I was right). For contrast I placed copper skeleton leaves under the flower. Then I mounted the whole thing with foam tape over silver cardstock that had been run through a Cuttlebug folder and placed a metallic copper cardstock as the base.

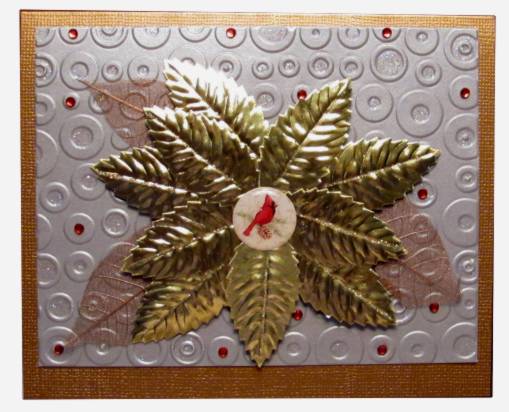
Still not flashy enough! So I put Stickles in all the holes of the background paper. Not done! I applied a line of gold Stickles down the vein of each gold leaf. Not quite there. Red rhinestones in all the solid dots of the background. A final touch... Thick acrylic cardinal sticker for the flower center.

Badda-bing!

Ddd


Posted by studio3d@ccgmail.net at 6:00 AM PDT
Wednesday, 27 October 2010
Candle Stand
Topic: Stamping

The image for today's card comes from a book I bought at a sale for $1.00 just so I could cut it all to pieces! This simple candle called for some simple treatment - a brown oval, shimmery green cardstock, plain brown brads and a creamy card base.

The only fancy thing is the script greeting which I think adds a bit of style. It is an acrylic stamp.

Ddd


Posted by studio3d@ccgmail.net at 6:00 AM PDT
Tuesday, 26 October 2010
Bells and Bows
Topic: Scrap Recovery

Some of the Christmas cards I was cutting up for re-use had an image on the back, too. This was one of them, cut with a Nestability die and mounted on green with folded glue dots.

I punched 1/8 inch holes and made a faux-bow with plaid ribbon and mounted this over cardstock from a 12 x 12 Christmas pad. The snowflakes are glittered so I added gold Stickles over the bells to add even more shine.

Ddd


Posted by studio3d@ccgmail.net at 6:00 AM PDT
Monday, 25 October 2010
Good Tidings Ornament
Topic: Stamping

I love a tall card! This one came together very well, also. I chose the red cardstock to match the ribbon in the Nestability-cut image.

The four corners were done with an acrylic stamp and then I used a pen and ruler to make the border lines. The greeting is from the same stamp set.

The rope in the image has gold Stickles drawn on and I attached the panel with folded-over glue dots to make it stand up a little bit off the surface.

Ddd


Posted by studio3d@ccgmail.net at 6:00 AM PDT
Sunday, 24 October 2010
Jingle Bells
Topic: Scrap Recovery

Technically this could come under 'stamping' but since only the greeting is stamped I gave it the 'scrap recovery' label. The background paper is from a 12 x 12 pad I got last year and it has just a hint of glitter on the berries. (Odd, I've never seen pine trees with berries!)

The base cardstock is actually forest green instead of the black that it appears. After mounting the Nestability-cut focal image I stamped the greeting and then covered all of the bells with gold Stickles.

Ddd


Posted by studio3d@ccgmail.net at 6:00 AM PDT
Saturday, 23 October 2010
Seasonal Angel
Topic: Stamping

Stamped holly borders bring this strangely colored green card base into the season. In fact the green is so strange it won't even photograph correctly (think 'acid green') The border is an acrylic stamp from a set. It is just the length of that top and bottom line so must be 'patched' to fit the length of the sides.

I used a Nestability die for the image and cut the red cardstock to fit, using a punch to round the corners. The 'stitching' is actually pricked holes with a fine black line drawn between them.

The greeting ia a thick acrylic sticker.

Ddd


Posted by studio3d@ccgmail.net at 6:00 AM PDT
Friday, 22 October 2010
Santa's in Snow
Topic: Stamping

Today you get a double blessing! Last year I got the same card from two different people. I cut the images using different scalloped shapes and placed both on backgrounds stamped with peal ink on glossy white cardstock. These snowflakes are all separate acrylic stamps.

Each one got a different greeting stamped and mounted on different colors of base cardstock. I added a doodle line around the red one.

Then the Santa beards got a coating of glittery Stickles and the fur trims all got a gold Stickles.

Ddd


Posted by studio3d@ccgmail.net at 6:00 AM PDT
Thursday, 21 October 2010
Potted Pine
Topic: Stamping

I spent a day making Christmas cards - mostly out of the cards I had received last year. For the next several days you will be treated to a series of them. Maybe I'll go on to something else for awhile but then Christmas cards will be back. Expect this to continue through the holiday!

Here's the first:

The gems and bow were on the original card. I used a Nestability die to cut it. The folded card base in blue was chosen to match the bow and I stamped over it with a collage stamp. The stamp was not large enough to cover the whole surface so I inked it up and stamped around the edges and left the center blank where it would be covered with the image.

I attached the image with foam tape for dimension.

Ddd


Posted by studio3d@ccgmail.net at 6:00 AM PDT
Wednesday, 20 October 2010
Root Vegetables
Topic: Other Hobbies

This year's garden was a dismal failure! I attribute this to the cold and wet spring that lasted through June. I did have success with beets and cherry tomatoes, with sweet onions and green onions. Everything else either came up and had a weak production or the seeds didn't even sprout.

For example, here is a photo of my entire carrot harvest.

This is from a single oak barrel (all of my garden is planted in these). They carrots looked great from the top but when I pulled some they were very stunted. I ended up pulling the whole crop and only one carrot was over 2 inches long.

I scrubbed them and grated the whole lot which made enough for 12 loaves of carrot-pineapple bread.

The photo also shows the beet harvest minus the two I pulled earlier in the summer. These were some tasty beets, too. I boil them in the skins, plunge into cold water, slip the skins, slice, saute in butter, season with salt and pepper. Just like candy!

Next year had better be a good harvest or I may have to give up on the whole gardening 'thing'. Either I'm not good at it, the oak barrels are not suitable, or it takes more time/attention than I am giving it. Since none of those variables are going to change I have better things to do with my energy than fuss over vegetables that don't want to cooperate.

Stay tuned...

Ddd


Posted by studio3d@ccgmail.net at 6:00 AM PDT
Tuesday, 19 October 2010
Cake of Cakes
Topic: In The Kitchen

For a ladies' event at church I offered to make a cake for dessert. The theme is Where the Heart Is so a heart cake was in order. In order to make it easier to serve it is actually 48 cupcakes (red velvet), arranged and frosted as one unit.

The extra off to the side is because the heart really only takes 47  cupcakes! The fact that the cupcakes dictate the design also accounts for the 'wonky' outline of the heart.

The colors and design were matched to a piece of fabric that was selected for the table centerpieces.

Ddd


Posted by studio3d@ccgmail.net at 6:00 AM PDT
Monday, 18 October 2010
Round and Round
Topic: Paper Embroidery

True colors? Nope!

This was made for a swap requiring paper embroidery and circles. I already had the ornaments pricked out (on burgundy cardstock) so stitched them up in irridescent white and metallic gold threads. Then I ran a piece of cardstock (silver) through the Cuttlebug folder and laid both on a (Christmas green) folded cardstock base. 

I finished this up with a simple gold peel-off greeting.

Ddd


Posted by studio3d@ccgmail.net at 6:00 AM PDT
Sunday, 17 October 2010
Fancy Tri-Shutter Card
Topic: Fantastic Folds

Well this is just FULL of awesome stuff:

Tri-shutter card structure cut from printed cardstock, scrapbook paper scraps for color blocks, two plain cardstocks for color blocks, a 3D image with Stickles glitter on the white flowers, glittered paper flowers with rhinestone centers: 

...Silver peel-off corners, white rub-on text, a bit of satin ribbon:


... a thick acrylic sticker, silver peel off borders, a fan made from a paper doily and two nestabilities circles and another rhinestones:

Whew! This was put together for a swap in which the assignment was the tri-shutter structure.

Ddd


Posted by studio3d@ccgmail.net at 6:00 AM PDT
Saturday, 16 October 2010
Thin Ice
Topic: Dry Embossing

Since I didn't stamp the image (sent to me in an image swap) I decided to code this one regarding the background. I ran the blue through the Cuttlebug snowflake folder, pressed all over it with clear Versamark and heat embossed with 'icy sparkle' powder.

I used the image to practice my Copic coloring techniques - made harder since it is a rough paper. I added texture to their outfits with the Copics as well and Stickles to the skates. (As always, I finished the faces of these poor children)

Dots and dashes around the die-cut image simulate stitching. The ribbon is tied around the front panels and a clear thick acrylic sticker was backed with matching cardstock.

Ddd


Posted by studio3d@ccgmail.net at 6:00 AM PDT
Friday, 15 October 2010
Goodie, Goodie for Goodwill!
Topic: Supplies

A trip to Goodwill the other day was a real coup in craft goodies. Here's what I got:

1) An outdated rubber stamp catalog with full-sized illustrations. These I cut out and will color and use just as though I had stamped them:

2) A grab-bag of rubber stamps:

3) Some stamp pad ink:

4) A CD rack which I will use to hold cards while glue/stickes/etc are drying (this would have come in very handy when I was doing the 30 cards recently):

Other random things were not craft related, so I won't share those.

Ddd


Posted by studio3d@ccgmail.net at 6:00 AM PDT
Thursday, 14 October 2010
HB To ME
Topic: Supplies

Since I bought the Copic markers and the airbrush system with the canned air, I have been enjoying both very much. However, the canned air goes pretty quickly.

So, for my birthday, I requested a small compressor... voila! 

Haven't had a chance to use it, yet, but soon... very soon.

Ddd


Posted by studio3d@ccgmail.net at 6:00 AM PDT
Wednesday, 13 October 2010
Sea Sight See
Topic: Stamping

Starting with a stamped image the I had already colored I set about creating a setting for it with complimentary colored materials. The coral frame was first and then I chose to use the specked 'water' paper and a printed 'coral' ground. I liked those branch coral in the background of the stamp so I freehand cut more from lilac cardstock and drew on borders and dots to match the stamped ones. 

The fish and the rest of the coral are stickers from the dollar store and the text is a white rubon.

Ddd


Posted by studio3d@ccgmail.net at 6:00 AM PDT
Tuesday, 12 October 2010
Just Because...
Topic: Stamping

This little image was colored with watercolor pencils and blended with and aquabrush. Then I cut it out with a nestability die and layered on multiple cardstocks, one printed.

The ribbon is a faux bow tucked through two 1/8 inch punched holes. Then I stamped the text with a clear stamp.

Two gold peel-off butterflies were the final touch.

Ddd


Posted by studio3d@ccgmail.net at 6:00 AM PDT
Monday, 11 October 2010
A Relaxing Scene
Topic: Scrap Recovery

This scene is from a page-a-day calendar. I used a nestabilities die to cut out the image and then cut around the outside of the same die on black cardstock to create a thin mat.

I used a Cuttlebug border twice and then applied thin 'shadow' lines with a balck pen.

The text is a rub-on.

Ddd


Posted by studio3d@ccgmail.net at 6:00 AM PDT
Sunday, 10 October 2010
Chalked to Match
Topic: Scrap Recovery

I started today's entry with the illustration cut off of an advertising brochure. It was such a homey picture that I decided to go with that theme and create a housewarming card.

I used Colorbok chalk ink with an clear stamp (two parts arranged on an acrylic block) for the text. Then I applied the same ink to three of the paper flowers.


Layers of brown and cream cardstock bring this all together. I stuck on the flowers with glue dots and placed glittery dome stickers in their centers.

Ddd


Posted by studio3d@ccgmail.net at 6:00 AM PDT
Saturday, 9 October 2010
Assembly Line
Topic: Stamping

I recently had a commission to make 30 invitations and decided the fastest and easiest way to do them was with rubber stamping. The client likes hummingbirds so I pulled out my favorite stamp and used it on a speckled, folded cardstock with archival black ink.

They were then 'watercolored' using stamp inks on a non-stick craft sheet. Some were stamp pads pressed onto the surface and some were re-inkers with a few drops on the sheet. These were picked up with an aquabrush and applied to the stamped image. I did the shadows first then the highlights over the top.

The next step was to apply Stickles to the throat of the hummingbird and the ends of the stamens.

Here is the whole set:

Here you can see the shading close up as well as the glittered bird:

As a final step I tore a mask for the image and used my new airbrush system to spray the blue and yellow background.

Here is a closeup of the card:

I created a clear-lidded box to present the cards and envelopes:

Ddd


Posted by studio3d@ccgmail.net at 6:00 AM PDT

Newer | Latest | Older