« November 2010 »
S M T W T F S
1 2 3 4 5 6
7 8 9 10 11 12 13
14 15 16 17 18 19 20
21 22 23 24 25 26 27
28 29 30
You are not logged in. Log in
Entries by Topic
All topics  «
3D paperwork
A - Z challenge 5
A - Z challenge 7
A - Z challenge round 4
A to Z challenge round 3
A to Z round 2
A to Z round 6
A-Z round 1
Around the House
Art Challenges
Artist Trading Cards
Backgrounds
Beads
Bible Journaling
Books
Boxes
Collage
Color Challenge
Coloring
cookbook
Die Cuts
Digital Projects
Digital Stamps
Drawing
Dry Embossing
Fabric Stuff
Fantastic Folds
Field Trip
Home Decor
How Does Your Garden Grow?
Hymnal Art
In The Kitchen
In the studio
Jewelry
Lettering
Links
Multi-Technique
Music to Work By
Musings
Nail Art
New Work
Online Class
Other Hobbies
Other Projects
Painting
Paper Embroidery
Paper Piecing
Photo
Pretty Paper
Quilting
Random
reading
Scrap Recovery
scrapbooking
Sewing
Sketch Challenge
Some Backlog
Stamping
Stencils
Stickers
Supplies
Teabag Folding
Techniques
Testing
tips and tricks
Tutorial
Web resources
Welcome to my Blog
Work By My Friends
workflow
Writing
Blog Tools
Edit your Blog
Build a Blog
RSS Feed
View Profile
Group One
In & Out of Studio 3D
Friday, 5 November 2010
Bluebell Ladder Card
Topic: Fantastic Folds

I have no idea if these are really bluebells but I'm calling them by that name anyway.

For the construction of this card I skewed the ladder to one side as I liked the balance better. Also, instead of making up the 3D as designed I took all the parts and constructed a second flower grouping for the background. Stickles used liberally on the flowers, again.

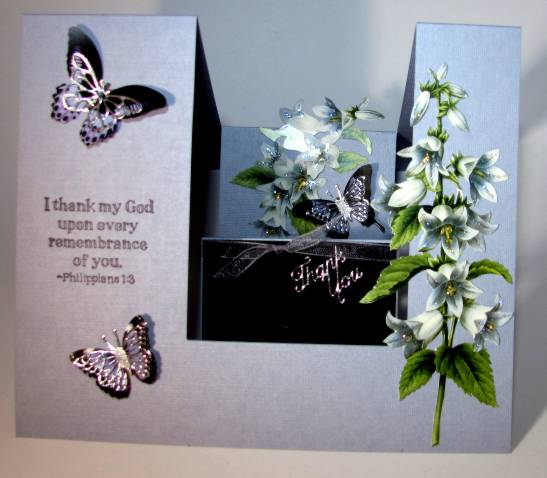
The three butterflies were on the 3D sheet but I overlaid each with a silver peel-off butterfly and mounted all of them with the body stuck down and the wings raised.

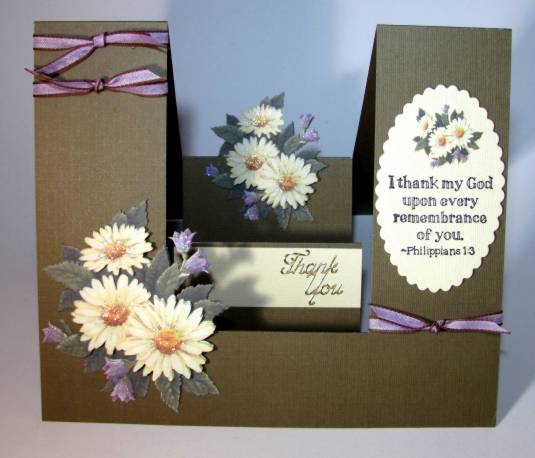
I added black card on the first step to make the peel-off easier to see and added an organza tie. The text on the front panel is stamped.

Ddd


Posted by studio3d@ccgmail.net at 6:00 AM PDT
Thursday, 4 November 2010
Daisy Thank You
Topic: Fantastic Folds

One of my groups had a challenge to create a 'step ladder card' - so I created 6. I needed some appreciation cards for a pastor appreciation Sunday and these seemed to be special enough to suit.

The first is made with some new 3D sheets I just got. This sheet had three sizes of the daisy bouquet - the smallest one is cut out but not 3D. I chose cardstock that matched the main flowers and ribbon that matched the background flowers.

The daisies all have gold Stickles in the centers and the purple flowers are covered in silvery Stickles. The text in the scalloped nestability die cut is stamped. The 'thank you' text is a gold peel-off sticker.

Ddd


Posted by studio3d@ccgmail.net at 6:00 AM PDT
Wednesday, 3 November 2010
Let's Ride
Topic: Multi-Technique

I had to add a new Topic category for cards like this one. It uses dry embossing in 2 areas, 3D elements, a constructed piece with die-cut parts, and stickers.

I started with the 3D element from a sheet given me years ago. Then I had a sketch challenge on one of my groups and set about trying to put them together. The circle was a part of the sketch and I had an inspiration to use a nestabilities die set and some spirelli with silver cord to make a motorcycle tire. Cool, huh?

I next recalled that I had the Cuttlebug folder for diamond plate and used that on some silver cardstock. The red checked paper fit the colors in the illustration. I pulled out a sheet of cardstock stickers with a sports theme to make the top and bottom borders and added a Cuttlebug border of 'wheels' along the bottom.

The base cardstock is a gray distressed surface and the final touch was the thick silver metal stickers 'RIDE'.

This is going to a friend who will soon be setting out on a 2 month motorcycle ride.

Ddd


Posted by studio3d@ccgmail.net at 6:00 AM PDT
Tuesday, 2 November 2010
Wishing Santa
Topic: Scrap Recovery

Simple.

Die-cut image - glued to patterend cardstock - glued to folded card base - stamped with greeting.

Done.

Ddd


Posted by studio3d@ccgmail.net at 6:00 AM PDT
Monday, 1 November 2010
Sparkling Flakes
Topic: Scrap Recovery

Oooh la-la! Somebody must have paid a lot of money for their Christmas cards last year - this one was covered with holographic foil flakes. I took the only one that was not layered under another one and cut it with the circle die. Then I found another that was 'almost' all there and punched it out with my big Martha Stewart punch. I layered these with foam tape and added a blue rhinestone to the center.

To continue the glitzy theme I used some of the embossed embossed background I created a while back (dry embossed with Cuttlebug folder then heat embossed with Versamark clear and Icy Sparkle embossing powder.)

The backing paper is silver metallic over white folded cardstock.

Ddd


Posted by studio3d@ccgmail.net at 6:00 AM PDT
Sunday, 31 October 2010
Cops & Robbers
Topic: Dry Embossing

Ooooh, Lookie! A BONUS POSTING!

I wanted to share our Halloween 'costumes' for a party. We went as 'cops and robbers' and the scary thing is that we dressed 90% from things around the house and our own wardrobe! I did buy my shirt from Goodwill, bought hubby's ski mask for 40% off, I made his swag-bag and my badge:

I just noticed he forgot to put on his black gloves for the picture: 

For his bag, I used an old T-shirt turned upside down, stitched and cut off the collar and sleeves. It is stuffed with poly-fill and I hung jewelery coming out of the center.

For my badge I used gold foil cardstock, cut with a nestability die, placed another nestability die and re-cut the top, ran it through a Tim Holtz Texture Fades embossing folder, cut a ring of more gold cardstock. placed a silver Dazzles sticker in the center, creased on the embossed lines, attached 'stacked' craft foam to the back to hold the shape, and attached a pin back.

Here is the front:

the stacked foam support shown from the top end

and the back

We both had little squirt guns in holsters but never had occasion to use them!

HAPPY HALLOWEEN!

Ddd


Posted by studio3d@ccgmail.net at 11:13 PM PDT
Group Glowing
Topic: Scrap Recovery

I fussy-cut this image from it's card because portions of it extended beyond the border. Then I mounted it on a rectangle of cardstock to make the focal image. One would not normally pick this green cardstock as a Christmas paper but I think it works with the right illustration (and it was scrap, so I used it).

The greeting was stamped and everything got added to a red folded card base. Then I was having a withdrawal from Stickles so I got out some gold to add to the candle flames.

Ddd


Posted by studio3d@ccgmail.net at 6:00 AM PDT
Saturday, 30 October 2010
Double Tree
Topic: Scrap Recovery

Similar, but different, these tree images were cut from a card that originally had three of them.

I started with the same red folded card bases but them gave the trees different background srom my pad of 12 x 12 Christmas cardstock.

The trees were already glittered so I just added some 'ornaments' ov glitter dots and called it done.

Ddd


Posted by studio3d@ccgmail.net at 6:00 AM PDT
Friday, 29 October 2010
Blue Christmas
Topic: Stamping

I liked that teal snowflake background so much I made more of it! It exactly matches this snowman, too. Yay for that!

I treated the corners with a snowflake corner punch andlayered over silver paper. Then I filled in the snowman and the corner snowflakes with Stickles.


The greeting was stamped and the results were layered on glossy white folded cardstock.

Ddd


Posted by studio3d@ccgmail.net at 6:00 AM PDT
Thursday, 28 October 2010
Flashy Poinsettia
Topic: Collage

In a complete reversal from yesterday's understated offering, today's card is all about the glitz!

I had these foil leaves from my days as a cake decorator and thought they would make a great poinsettia (I was right). For contrast I placed copper skeleton leaves under the flower. Then I mounted the whole thing with foam tape over silver cardstock that had been run through a Cuttlebug folder and placed a metallic copper cardstock as the base.

Still not flashy enough! So I put Stickles in all the holes of the background paper. Not done! I applied a line of gold Stickles down the vein of each gold leaf. Not quite there. Red rhinestones in all the solid dots of the background. A final touch... Thick acrylic cardinal sticker for the flower center.

Badda-bing!

Ddd


Posted by studio3d@ccgmail.net at 6:00 AM PDT
Wednesday, 27 October 2010
Candle Stand
Topic: Stamping

The image for today's card comes from a book I bought at a sale for $1.00 just so I could cut it all to pieces! This simple candle called for some simple treatment - a brown oval, shimmery green cardstock, plain brown brads and a creamy card base.

The only fancy thing is the script greeting which I think adds a bit of style. It is an acrylic stamp.

Ddd


Posted by studio3d@ccgmail.net at 6:00 AM PDT
Tuesday, 26 October 2010
Bells and Bows
Topic: Scrap Recovery

Some of the Christmas cards I was cutting up for re-use had an image on the back, too. This was one of them, cut with a Nestability die and mounted on green with folded glue dots.

I punched 1/8 inch holes and made a faux-bow with plaid ribbon and mounted this over cardstock from a 12 x 12 Christmas pad. The snowflakes are glittered so I added gold Stickles over the bells to add even more shine.

Ddd


Posted by studio3d@ccgmail.net at 6:00 AM PDT
Monday, 25 October 2010
Good Tidings Ornament
Topic: Stamping

I love a tall card! This one came together very well, also. I chose the red cardstock to match the ribbon in the Nestability-cut image.

The four corners were done with an acrylic stamp and then I used a pen and ruler to make the border lines. The greeting is from the same stamp set.

The rope in the image has gold Stickles drawn on and I attached the panel with folded-over glue dots to make it stand up a little bit off the surface.

Ddd


Posted by studio3d@ccgmail.net at 6:00 AM PDT
Sunday, 24 October 2010
Jingle Bells
Topic: Scrap Recovery

Technically this could come under 'stamping' but since only the greeting is stamped I gave it the 'scrap recovery' label. The background paper is from a 12 x 12 pad I got last year and it has just a hint of glitter on the berries. (Odd, I've never seen pine trees with berries!)

The base cardstock is actually forest green instead of the black that it appears. After mounting the Nestability-cut focal image I stamped the greeting and then covered all of the bells with gold Stickles.

Ddd


Posted by studio3d@ccgmail.net at 6:00 AM PDT
Saturday, 23 October 2010
Seasonal Angel
Topic: Stamping

Stamped holly borders bring this strangely colored green card base into the season. In fact the green is so strange it won't even photograph correctly (think 'acid green') The border is an acrylic stamp from a set. It is just the length of that top and bottom line so must be 'patched' to fit the length of the sides.

I used a Nestability die for the image and cut the red cardstock to fit, using a punch to round the corners. The 'stitching' is actually pricked holes with a fine black line drawn between them.

The greeting ia a thick acrylic sticker.

Ddd


Posted by studio3d@ccgmail.net at 6:00 AM PDT
Friday, 22 October 2010
Santa's in Snow
Topic: Stamping

Today you get a double blessing! Last year I got the same card from two different people. I cut the images using different scalloped shapes and placed both on backgrounds stamped with peal ink on glossy white cardstock. These snowflakes are all separate acrylic stamps.

Each one got a different greeting stamped and mounted on different colors of base cardstock. I added a doodle line around the red one.

Then the Santa beards got a coating of glittery Stickles and the fur trims all got a gold Stickles.

Ddd


Posted by studio3d@ccgmail.net at 6:00 AM PDT
Thursday, 21 October 2010
Potted Pine
Topic: Stamping

I spent a day making Christmas cards - mostly out of the cards I had received last year. For the next several days you will be treated to a series of them. Maybe I'll go on to something else for awhile but then Christmas cards will be back. Expect this to continue through the holiday!

Here's the first:

The gems and bow were on the original card. I used a Nestability die to cut it. The folded card base in blue was chosen to match the bow and I stamped over it with a collage stamp. The stamp was not large enough to cover the whole surface so I inked it up and stamped around the edges and left the center blank where it would be covered with the image.

I attached the image with foam tape for dimension.

Ddd


Posted by studio3d@ccgmail.net at 6:00 AM PDT
Wednesday, 20 October 2010
Root Vegetables
Topic: Other Hobbies

This year's garden was a dismal failure! I attribute this to the cold and wet spring that lasted through June. I did have success with beets and cherry tomatoes, with sweet onions and green onions. Everything else either came up and had a weak production or the seeds didn't even sprout.

For example, here is a photo of my entire carrot harvest.

This is from a single oak barrel (all of my garden is planted in these). They carrots looked great from the top but when I pulled some they were very stunted. I ended up pulling the whole crop and only one carrot was over 2 inches long.

I scrubbed them and grated the whole lot which made enough for 12 loaves of carrot-pineapple bread.

The photo also shows the beet harvest minus the two I pulled earlier in the summer. These were some tasty beets, too. I boil them in the skins, plunge into cold water, slip the skins, slice, saute in butter, season with salt and pepper. Just like candy!

Next year had better be a good harvest or I may have to give up on the whole gardening 'thing'. Either I'm not good at it, the oak barrels are not suitable, or it takes more time/attention than I am giving it. Since none of those variables are going to change I have better things to do with my energy than fuss over vegetables that don't want to cooperate.

Stay tuned...

Ddd


Posted by studio3d@ccgmail.net at 6:00 AM PDT
Tuesday, 19 October 2010
Cake of Cakes
Topic: In The Kitchen

For a ladies' event at church I offered to make a cake for dessert. The theme is Where the Heart Is so a heart cake was in order. In order to make it easier to serve it is actually 48 cupcakes (red velvet), arranged and frosted as one unit.

The extra off to the side is because the heart really only takes 47  cupcakes! The fact that the cupcakes dictate the design also accounts for the 'wonky' outline of the heart.

The colors and design were matched to a piece of fabric that was selected for the table centerpieces.

Ddd


Posted by studio3d@ccgmail.net at 6:00 AM PDT
Monday, 18 October 2010
Round and Round
Topic: Paper Embroidery

True colors? Nope!

This was made for a swap requiring paper embroidery and circles. I already had the ornaments pricked out (on burgundy cardstock) so stitched them up in irridescent white and metallic gold threads. Then I ran a piece of cardstock (silver) through the Cuttlebug folder and laid both on a (Christmas green) folded cardstock base. 

I finished this up with a simple gold peel-off greeting.

Ddd


Posted by studio3d@ccgmail.net at 6:00 AM PDT

Newer | Latest | Older