« June 2012 »
S M T W T F S
1 2
3 4 5 6 7 8 9
10 11 12 13 14 15 16
17 18 19 20 21 22 23
24 25 26 27 28 29 30
You are not logged in. Log in
Entries by Topic
All topics  «
3D paperwork
A - Z challenge 5
A - Z challenge 7
A - Z challenge round 4
A to Z challenge round 3
A to Z round 2
A to Z round 6
A-Z round 1
Around the House
Art Challenges
Artist Trading Cards
Backgrounds
Beads
Bible Journaling
Books
Boxes
Collage
Color Challenge
Coloring
cookbook
Die Cuts
Digital Projects
Digital Stamps
Drawing
Dry Embossing
Fabric Stuff
Fantastic Folds
Field Trip
Home Decor
How Does Your Garden Grow?
Hymnal Art
In The Kitchen
In the studio
Jewelry
Lettering
Links
Multi-Technique
Music to Work By
Musings
Nail Art
New Work
Online Class
Other Hobbies
Other Projects
Painting
Paper Embroidery
Paper Piecing
Photo
Pretty Paper
Quilting
Random
reading
Scrap Recovery
scrapbooking
Sewing
Sketch Challenge
Some Backlog
Stamping
Stencils
Stickers
Supplies
Teabag Folding
Techniques
Testing
tips and tricks
Tutorial
Web resources
Welcome to my Blog
Work By My Friends
workflow
Writing
Blog Tools
Edit your Blog
Build a Blog
RSS Feed
View Profile
Group One
In & Out of Studio 3D
Thursday, 14 June 2012
Step Right Up
Topic: Other Projects

I made posters for the VBS kick-off party again this year. As you saw in the giant advertising banners a few days ago the theme is based on an amusement park. The kickoff will have a variety of games for the kids to play to earn 'tickets'. These posters will mark these stations.


These are all lettered and drawn free-hand using alcohol markers.

Ddd


Posted by studio3d@ccgmail.net at 12:01 AM PDT
Wednesday, 13 June 2012
Summer Decor
Topic: Around the House

Occasionally I like to show the little seasonal vignettes I set up around the house for decoration. In the summer, from Memorial Day to Labor Day, I like to stick with a patriotic theme and go with red, white and blue, stars and stripes, flags and banners.

If you started outside you would see a bunting swag on the porch railing that sets the tone for what you will encounter inside.

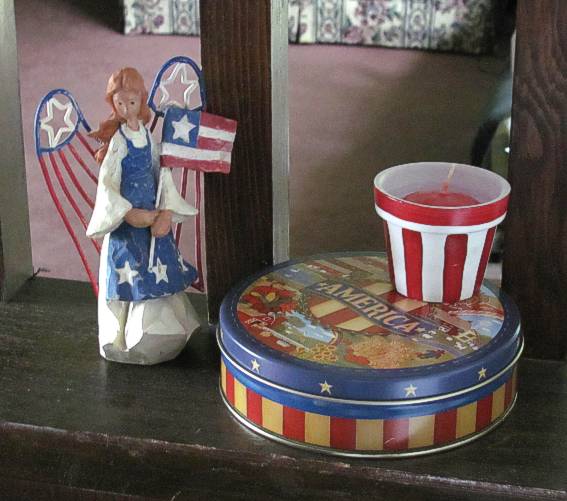
Upon entering, this little grouping greets you in the entryway.


Then you would find this setup on the fireplace mantel. The letter blocks are a merry mix-up from my seasonal block set. I can't spell the word out properly for lack of a U. You get the drift, though.

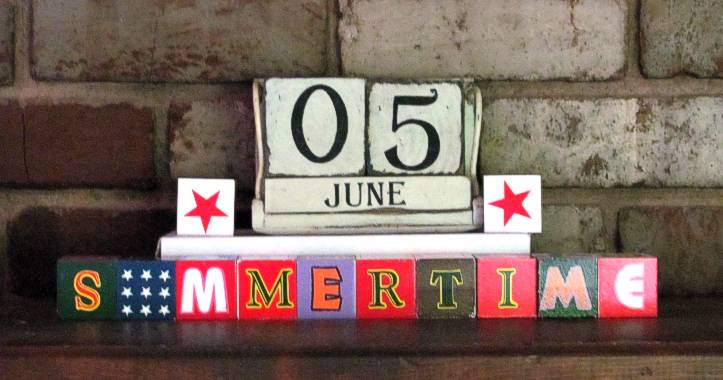
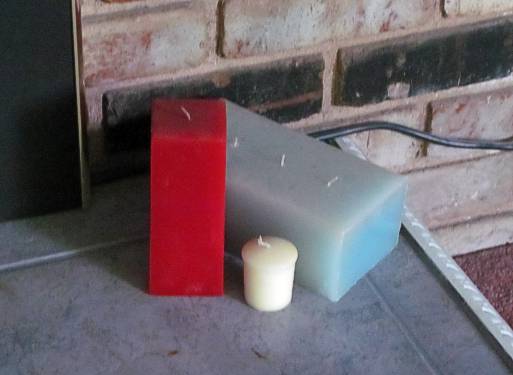
At the base of the fireplace I put a little group of candles.

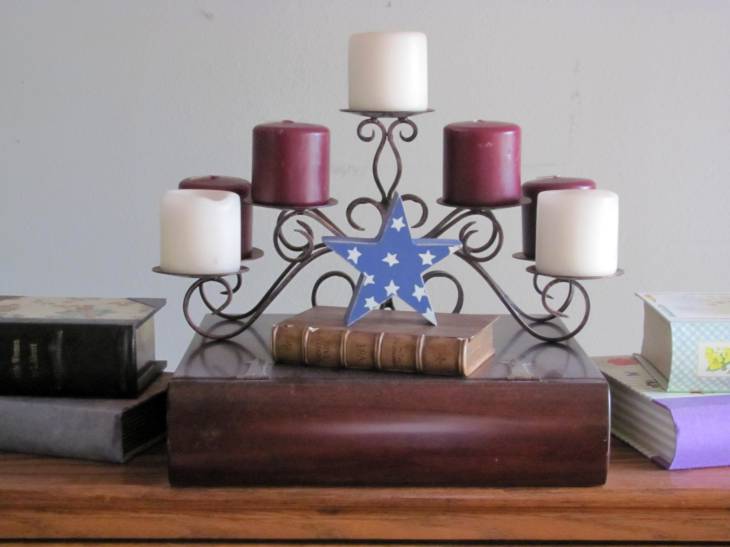
In the dining room I have a roll-top desk with this setup on top. The 'books' are all really boxes. The wooden star is from a set of 6 that you'll see more of later.

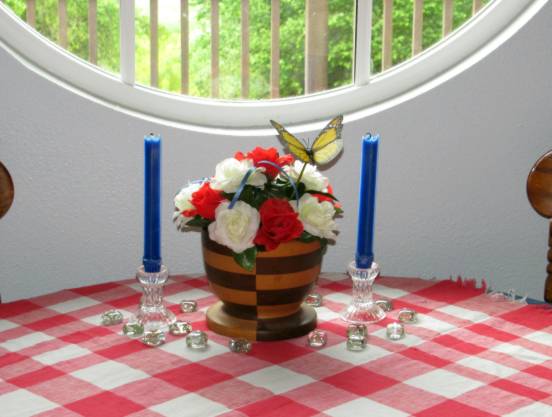
Next up is the dining room table. The table cloth is a blue round with a checked square over top. Red and white silk roses from the dollar store are arranged in a custom-made wooden bowl. I've added snippets of blue ribbon and a plastic butterfly pick. A few glass 'ice cubes' surround the base and I've placed two square blue candles to the arrangement.

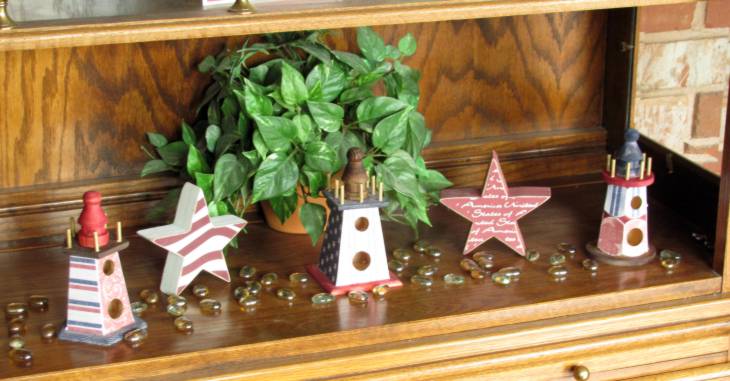
In the china cabinet I placed the new lighthouses along with more of the wooden stars and some glass 'pebbles'.

The garden window in the kitchen feature my poseable wooden bunny and the last of the wooden stars.


Hope you enjoyed the tour.

Have an awesome summer!

Ddd


Posted by studio3d@ccgmail.net at 12:01 AM PDT
Updated: Wednesday, 13 June 2012 8:37 AM PDT
Tuesday, 12 June 2012
We're Expanding
Topic: Around the House

OK, so it is the GARDEN that is expanding. DH took my hint for a small raised bed for berries and fed it steroids! Now I have a 8 x 25 bed about 18" deep off the back patio. Added to the 12 barrels and three hanging planters I have been using for several years it gives me room for 25 varieties of foodstuffs.

Here's a view from the yard:

And one from the patio:

This is the planting plan:

There are also bulb onions planted along the perimeter of the three berry beds. Three varieties of potatoes in that bed: russet, yukon gold, and purple. Three tomatoes in hanging planters: roma, early girl, and jelly bean. Three herb pots in the garden window: thyme, rosemary, and sage. I planted 6 strawberry plants: 2 june-bearing, 2 everbearing, 2 earlybearing. There are just two blueberry and two raspberry plants this year. Will add more next year.

I will share progress of the growing season and harvest (assuming it is a success)

Ddd


Posted by studio3d@ccgmail.net at 12:01 AM PDT
Monday, 11 June 2012
Big Money
Topic: Other Projects

My daughter needed some props for a skit and asked me to make them for her. We pulled up images of 'big check' on Google Images and I sketched  them out on white foam-core. Everything is then drawn with markers.

You can get an idea of the scale of these as they are sitting on the couch for these photos.


I thought that there should be a logo on the checks and since the 'skit' didn't have a logo, I created this one to use.


This puts the project into the realm of 'art' and therefore, it gets a blog entry.

Ddd


Posted by studio3d@ccgmail.net at 12:01 AM PDT
Sunday, 10 June 2012
Interlock
Topic: Backgrounds

Back to the background made with waxed paper in the Cuttlebug...

I made two with the same interlocking circles folder. One is color blended with extreme pastels and one is spot-colored with brights. What amazingly different effects with one folder!

The soft-toned one got strips and circles of pastel designer papers and then I stamped over all of them with the greeting. Where the strip edges were I had to do a little touch-up with a fine black pen to fill the gaps. I found the tag in my stash but it was too large so I trimmed both width and length for a better fit, tied sheer ribbon through the hole and mounted it on foam tape.


The brighter background is so busy and beautiful that I didn't want to cover it up or take away from it too much. I had this lovely table scrap that has a gradation of Glimmer Mist colors and they matched beautifully. I added a strip of Martha Stewart patterned tape under it. The image is stamped with Festive Berries distress ink on golden-yellow paper. I used a gold Krylon pen to border the edges and add some flecks and stripes in the image.

I stamped the text on the paper strip and mounted the image with foam tape.

Ddd


Posted by studio3d@ccgmail.net at 12:01 AM PDT
Saturday, 9 June 2012
That's Wild
Topic: Stamping

The original stamp of this image is square with very detailed corners and borders. With the use of the marker for inking and the rough cardstock for stamping a lot of that detail was lost. So I simply cut it away! Once I got home, I used the colorless blending pencil to smooth out the color and used a fine-line marker to reinforce the lines in the image. I think it looks like stained glass, now.

I started with very simple color blocking for the background and then felt it was too plain. So I added faux stitching with a white gel pen around all the blocks.

Ddd


Posted by studio3d@ccgmail.net at 12:01 AM PDT
Friday, 8 June 2012
First Play
Topic: Stamping

I bought this stamp for my daughter and then, when the kids and I were playing with stamping, she said she had never used it. In fact, she forgot ever having seen it before. Now that is a stamp that needs some lovin'. Yes, this is a very large stamp to ink up using a marker.

I colored it pretty much as shown on the index image on the wood mount, doing a lot of blending with the colored pencils. I was working on a rough cardstock so it was not solid color when I was done. I used a colorless blending pencil when I got home to smooth out the color.


I stayed with simple color blocking for the background so as to not compete with the large, busy image.

Ddd


Posted by studio3d@ccgmail.net at 12:01 AM PDT
Thursday, 7 June 2012
Masked Rabbit
Topic: Stamping

This was the image I used to teach the grandkids about masking images for dimension. There are really just two stams here, the bunny and a set of 3 tulips. We were using pieces torn from the edge of our papers to do the masking and holding it in place with our fingers so the images do not meet up closely over the bunny's back. A little hit and miss on the black lines is because of using markers instead of ink pads to ink up the images.

I stamped the greeting from one of my sets once I got home, trimmed the top with a very wide border and layered it on foam tape over table scraps on a yellow card base.

Ddd


Posted by studio3d@ccgmail.net at 12:01 AM PDT
Wednesday, 6 June 2012
Grubby Garden Topiary
Topic: Stamping

The lessons continued when I got home... If you use a Crayola washable marker to stamp your image, it will smear when you try to use Distress Ink on it. Yeah, thanks for telling me! I took this little lesson to heart and intentionally smeared the REST of the image to match the first boo-boo. If fact, it then smeared those lovely student-grade colored pencils. So now we have a very soft image as a focal. All the papers I had selected for layering were now too bright so they all got distress ink as well. And now that they all match, again, we are happy.


A bit of sheer ribbon and a stamped and distressed sentiment are the finishing touches.

Ddd


Posted by studio3d@ccgmail.net at 12:01 AM PDT
Tuesday, 5 June 2012
Just For Ewe
Topic: Stamping

If you go to visit someone you should always ask if they have any rubber stamps you can use. Then you get to stamp images that you do not personally own. I tried this trick with my grandkids and had a fun time stamping with them. Along the way we shared some stamping lessons: I taught them to use a black water-based Crayola marker to color their stamps and huff on it because we only had a red stamp pad. I taught them how to mask images so something else stamped would appear behind. I taught them to use stamps in unexpected ways as we had 'face parts' that became other things when turned upside down.

For myself I had to learn that is it OK to create even when you don't have your go-to supplies so I colored with student grade standard colored pencils. I stamped and colored on plain white computer paper and just mounted it to cardstock with Xyron when I got home. And when the kids got bored and moved on to video games I stayed and finished my work.

Lots of lessons learned!

I used one stamp twice and colored it two different ways for totally different looks. First is this fairly standard coloring of a little sheep. I gave him some background scraps in coordinating colors and pupped him up on foam tape. The lettering is made with a punch set I have but had not used for a long time. I don't know why I cannot use a sheep image without including the 'ewe' pun in some way.

For the second stamping I colored the sheep in blues to further the pun. This time I used the punches to create the words in patterned paper strips. I punched first on longer strips and then centered them on the card and trimmed the ends. Some little paper flowers that I had experimented in coloring a while back suddenly found a home on this card.  attached them with glue dots and filled the centers with blue rhinestones.


Oh, the silliness!

Ddd


Posted by studio3d@ccgmail.net at 12:01 AM PDT
Monday, 4 June 2012
Rest Your Eyes
Topic: Paper Embroidery

After the cross-eyed adventure of stitching yesterday's card (on dark, busy, complicated print in low light) it was a rest for the eyes to stitch on a plain blue background. Especially since this was such an intricate pattern.

The assignment was for a card with 'summer flowers' so I went with 'weeds' which are the only summer flowers I am capable of growing. The stalk on the right is supposed to be wheat but I changed up the color and I'm pretending it is lavender. I suppose the other two are bachelor button and dandelion.


I used white rub-ons from two different sets to construct the text and added a dragonfly punched from a paint strip.

Ddd


Posted by studio3d@ccgmail.net at 12:01 AM PDT
Sunday, 3 June 2012
No Roads
Topic: Paper Embroidery

I needed to do a paper embroidery card with a 'train' theme and remembered I had this pattern of a famous toy train. I kept with the original coloring scheme but muted each of them for a softer look. I needed to keep it bright enough to be seen on the dotted yellow cardstock background, though. I layered with another patterned paper and a blue folded card base to bring out colors from the stitching. I used a couple of cardstock stickers for text.


NOTE TO SELF: No matter how cute the cardstock you want to stitch on, check out the back for overly busy or complicated prints. They are horrible to see your holes on the back and will cost you hours of frustration, especially if the lighting is poor - and if you insist on using it anyway, it will probably turn out that the lighting will be poor just to annoy you!

Ddd


Posted by studio3d@ccgmail.net at 12:01 AM PDT
Saturday, 2 June 2012
Thin Ice
Topic: Paper Embroidery

Hooray for little vacations when you get dead time (sitting in airports, sitting on airplanes, riding in shuttles) to stitch cards like crazy... when not reading.

I had just such an adventure lately and the first project I whipped up was this Christmas card. I had never stitched this pattern before but I do like it. I used some ColorMe paper bor the background that had been tinted with silver Glimmer Mist. I thought with all the shine and the swirls it suited a skating theme well. The text is a rub-on and the snowflakes are clear stickers. They have a metallic finish to the flakes.


The base card has a pearlescent finish as well, making this a sparkly card in a low-key kind of way.

Ddd


Posted by studio3d@ccgmail.net at 12:01 AM PDT
Friday, 1 June 2012
Daisy Chain
Topic: Backgrounds

Better get your sunglasses, it's going to be BRIGHT today!

Lots of orange and yellow on the over-all daisy patterned waxed paper background. So I just kept going with those colors for the cards and added some unexpected colors for variety.

First up is an irregular striped background that brings in some teal, rust and grey into the mix. The, there's that crazy rabbit AGAIN!. This time I colored his flowers with rusty colored ink and gave the centers some yellow Stickles. The strip at the top is stamped with the same ink and popped up on foam. Then I added some faux stitching to this and the rusty strip of 'ground' at the bottom.


I gave the stripes on this one a more symetrical arrangement and added some greens to the mix. The string of dragonflies are punched from the blocks on a paint sample strip. The sentiment is stamped directly on the card face across all the strips.


For this last card I remembered a pierced cardstock in my stash. I centered the cut design on an orange card base and mounted the remaining bit of daisy chain paper horizontally on top of two layers. I stamped the greeting and then added some stamped daisies on the text strip as well ad inside the cut design. I jazzed these up by coloring them in with orange Stickles.


Now aren't you sorry you didn't get out your sunglasses like I asked?

Ddd


Posted by studio3d@ccgmail.net at 12:01 AM PDT
Thursday, 31 May 2012
FIVE YEARS and counting
Topic: Backgrounds

First of all, I'd just like to say "Happy Blog-iversary to ME"! I started this blog 5 years ago today and have posted every single day of that 5 years. That's quite an accomplishment!

Now - on to the art!


Today I pulled out the waxed paper background with the repeating hearts. I gave it some table scrap layers and stamped the text repeatedly to echo the heart pattern. I pulled the rabbit out of the hat again and lightly inked it. Then, by sanding the surface, I revealed the raised dots. I added punched flowers over the stamped ones and gave each a Liquid Pearl center. The finishing touch was faux stitching around the edges.

For this card I used a single width of the heart paper and lots of different table scraps. I worked to bring out the orange tones this time. I stamped the house and text from the Hero Arts / OWH set and added the heart over the door. I used a grey marker to create shading on the house parts, too.

So, I had one strip of the heart background left and it was two hearts wide. More table scraps create a center box which is stamped with another of the Hero Hart / OWH sets. Love this sentiment.

Not only do I have lots of these waxed paper backgrounds but by judicious planning (or dumb luck) I can get multiple cards out of each one.

Ddd


Posted by studio3d@ccgmail.net at 12:01 AM PDT
Wednesday, 30 May 2012
Flowers and Frills
Topic: Scrap Recovery

Today's card is JUST scraps. I've been matching table scraps to backgrounds to make little 'kits' to work from and ended up with several scraps that went so well together that they didn't need a background of their own.

I started with the lovely floral centerpiece and added strips to each side using colors from the illustration. For the crosswise section I used a lacy print and then scallop punched a border on it. The blue layer has been stamped then I distressed and black-inked the edges.


After mounting this I stamped silhouette flowers in opposing corners.

Ddd


Posted by studio3d@ccgmail.net at 12:01 AM PDT
Tuesday, 29 May 2012
Iron Dragonflies
Topic: Backgrounds

So far I think these background cards are turning out better and better. Today I am using the Ironworks folder colored with blue-grey. With a stack of blue-grey and golden table scraps I just started layering them in stripes. I wanted a little more definition so I used black pen to make faux stitching on the golden and white pen to do the same on the center blue strip.

I used a tiny dragonfly punch to make 6 golden and 5 blue out of paint sample strips. I glued then on in ombre fashion.


I combined words from two different stamp sets for the greeting.

Ddd


Posted by studio3d@ccgmail.net at 12:01 AM PDT
Monday, 28 May 2012
Time For a Card
Topic: Backgrounds

I used a new-to-me folder with a clock-works pattern for this background. Then when I got ready to make a card with it I realized that one of the new Hero Arts stamp sets that partners with OWH has two clock images. Tah-dah! I stamped the images over the appropriate colored areas and added the clock hands to show random times. The dots down the right are cut from a Halloween paper and the tiny stripes bordering the text strip is the reverse of it. I backed the dots with an orange table scrap and the stripes with a piece of brown.


The same stamp set with the clock images also had the text for the greeting.

In my metallic miscellany bin I found the clock face and the big arrow. I layered them and attached to the card with a brad.

Ddd


Posted by studio3d@ccgmail.net at 12:01 AM PDT
Sunday, 27 May 2012
Waxy Herringbone
Topic: Backgrounds

This card may seem familiar, but it is just the same image stamped on the same block as yesterday's card. I did, however, add some extra partial-fish around the edges and lightly brushed the center one with liquid pearls for some shine.

For this herringbone background I wanted to emphasize the blues and browns so I bordered all the elements with chocolate brown. I cut the bottoms of the strips at angle to echo the pattern and tied scrappers floss around the strips.


The vertical strips are striped paper that just happened to have all the colors of the background. I didn't add a greeting to this card.

Ddd


Posted by studio3d@ccgmail.net at 12:01 AM PDT
Saturday, 26 May 2012
Two Argyles in Wax
Topic: Backgrounds

For today's entry I used both of the argyle waxed paper backgrounds that I had created.

The first is made with the pastel version. I combined with dark grey patterned paper for layering and a strip of definitions scrapbook paper. I used some sticker letters that look like postage stamps and a silver peeloff to create the text greeting. I cut out another of those bunnies and popped it up on foam tape. Then I filled in all his flowers with Liquid Pearls in colors to match the background paper.


The second argyle background uses brighter colors. I pulled out lots of table scraps with coordinating colors and layered strips, scallops, a tag and a star. The star got faux stitching in gold pen, the tag was stamped with a greeting, the block was stamped with a fish image and then all three elements were mounted with foam tape. I added a tied piece of scrappers floss and placed gold 'nail head' sticker dots along the scallop.


I put this one on a blue base card to match the star.

Ddd


Posted by studio3d@ccgmail.net at 12:01 AM PDT

Newer | Latest | Older