« November 2010 »
S M T W T F S
1 2 3 4 5 6
7 8 9 10 11 12 13
14 15 16 17 18 19 20
21 22 23 24 25 26 27
28 29 30
You are not logged in. Log in
Entries by Topic
All topics
3D paperwork
A - Z challenge 5
A - Z challenge 7
A - Z challenge round 4
A to Z challenge round 3
A to Z round 2
A to Z round 6
A-Z round 1
Around the House
Art Challenges
Artist Trading Cards
Backgrounds
Beads
Bible Journaling
Books
Boxes
Collage
Color Challenge
Coloring
cookbook
Die Cuts
Digital Projects
Digital Stamps
Drawing
Dry Embossing
Fabric Stuff
Fantastic Folds  «
Field Trip
Home Decor
How Does Your Garden Grow?
Hymnal Art
In The Kitchen
In the studio
Jewelry
Lettering
Links
Multi-Technique
Music to Work By
Musings
Nail Art
New Work
Online Class
Other Hobbies
Other Projects
Painting
Paper Embroidery
Paper Piecing
Photo
Pretty Paper
Quilting
Random
reading
Scrap Recovery
scrapbooking
Sewing
Sketch Challenge
Some Backlog
Stamping
Stencils
Stickers
Supplies
Teabag Folding
Techniques
Testing
tips and tricks
Tutorial
Web resources
Welcome to my Blog
Work By My Friends
workflow
Writing
Blog Tools
Edit your Blog
Build a Blog
RSS Feed
View Profile
Group One
In & Out of Studio 3D
Monday, 8 November 2010
Yellow Rose Ladder Card
Topic: Fantastic Folds

I liked the scalloped die cuts so much that I did it again for this card. However, I did add more of the gold peel-offs in the form of borders and an outline rose to counterbalance the main element.

Sorry that so much metallic and foil is a hard read for the camera. These look awesome in person.

Ddd


Posted by studio3d@ccgmail.net at 6:00 AM PST
Sunday, 7 November 2010
Pansy Ladder Card
Topic: Fantastic Folds

Hey! It's a flower I know the name of!

The flowers and borders for this card are from a foil 3D sheet. I used scalloped nestability die cuts to create some framing and added stamping and a silver peel-off sticker for text.

All of the 3D sheets I've been showing on these cards are from some new realeases over at Paper Wishes. They do NOT require hours of tedious citting as they are all die cut and just punch out! Awesome!

Ddd


Posted by studio3d@ccgmail.net at 7:00 AM PDT
Saturday, 6 November 2010
Lady Slipper Ladder Card
Topic: Fantastic Folds

Another unidentified flower that I'm calling Lady Slippers - even if they are not!

This is another 3D element that I took the extra parts to create a separate arrangement with. I've had these checkered borders in my sticker stash forever and this seemed like the right place for them. The butterflies were on this same sticker sheet and I mounted them like yesterday's - stuck in the center, raised wings. Then I outlined the butterflies and decorated the flowers with gold Stickles.

The same stamp and gold peel-off were used for the text.

Ddd


Posted by studio3d@ccgmail.net at 6:00 AM PDT
Friday, 5 November 2010
Bluebell Ladder Card
Topic: Fantastic Folds

I have no idea if these are really bluebells but I'm calling them by that name anyway.

For the construction of this card I skewed the ladder to one side as I liked the balance better. Also, instead of making up the 3D as designed I took all the parts and constructed a second flower grouping for the background. Stickles used liberally on the flowers, again.

The three butterflies were on the 3D sheet but I overlaid each with a silver peel-off butterfly and mounted all of them with the body stuck down and the wings raised.

I added black card on the first step to make the peel-off easier to see and added an organza tie. The text on the front panel is stamped.

Ddd


Posted by studio3d@ccgmail.net at 6:00 AM PDT
Thursday, 4 November 2010
Daisy Thank You
Topic: Fantastic Folds

One of my groups had a challenge to create a 'step ladder card' - so I created 6. I needed some appreciation cards for a pastor appreciation Sunday and these seemed to be special enough to suit.

The first is made with some new 3D sheets I just got. This sheet had three sizes of the daisy bouquet - the smallest one is cut out but not 3D. I chose cardstock that matched the main flowers and ribbon that matched the background flowers.

The daisies all have gold Stickles in the centers and the purple flowers are covered in silvery Stickles. The text in the scalloped nestability die cut is stamped. The 'thank you' text is a gold peel-off sticker.

Ddd


Posted by studio3d@ccgmail.net at 6:00 AM PDT
Sunday, 17 October 2010
Fancy Tri-Shutter Card
Topic: Fantastic Folds

Well this is just FULL of awesome stuff:

Tri-shutter card structure cut from printed cardstock, scrapbook paper scraps for color blocks, two plain cardstocks for color blocks, a 3D image with Stickles glitter on the white flowers, glittered paper flowers with rhinestone centers: 

...Silver peel-off corners, white rub-on text, a bit of satin ribbon:


... a thick acrylic sticker, silver peel off borders, a fan made from a paper doily and two nestabilities circles and another rhinestones:

Whew! This was put together for a swap in which the assignment was the tri-shutter structure.

Ddd


Posted by studio3d@ccgmail.net at 6:00 AM PDT
Friday, 17 September 2010
September Girl
Topic: Fantastic Folds

Another challenge: make a folded paper frame and use it on a card, box, etc. I chose to use mine on a card. I already had the image stamped and circle-cut and had the scalloped circle to borker it already selected.

So I made the frame and mounted this on two patterned cardstocks. I added corner stickers, a ribbon bow, and a tag upon which I used a burgundy rub-on, hand lettering, and a brad.

I chose the folded cardstock base using a light peach from the pink pattened card.

Ddd


Posted by studio3d@ccgmail.net at 6:00 AM PDT
Tuesday, 14 September 2010
Sweet Memories
Topic: Fantastic Folds

This card is under the heading 'fantastic folds' but it really is simply a tri-fold card.

The top layer (chocolate+ice cream) swings open on a left hinge and the craft stick is encased in the ice cream of the right side and the back. These two layers do not open.

The chocolate layer is textured cardstock which I cut with a deckle nestabilities die on one edge. I folded and cut the rounded corners on the ice cream layers and then glued on the chocolate and trimmed to match on all sides.

The text is a clear thick acrylic sticker that I mounted on matching white cardstock and trimmed around.

Ddd


Posted by studio3d@ccgmail.net at 6:00 AM PDT
Thursday, 10 June 2010
Tea Party
Topic: Fantastic Folds

LOTS of teapots! I made many more so they could be used as centerpieces at an upcoming event. They will actually be used as floral containers with the lids set aside and a glass inserted to hold the flowers in water. Here are all 7 of them:

And here they all are individually:


That's it!

Ddd


Posted by studio3d@ccgmail.net at 6:00 AM PDT
Saturday, 5 June 2010
Here Is My Handle, Here Is My Spout
Topic: Fantastic Folds

A reprise of the teapot adventure. I couldn't resist making another one and this time I did it without the directions! They each take about an hour to make.

The cardstock I chose for this one has a sheen to it that makes it look more like porcelain.

Ddd


Posted by studio3d@ccgmail.net at 6:00 AM PDT
Friday, 4 June 2010
I'm a Little Teapot...
Topic: Fantastic Folds

Back when I was in school we always had these tests with multiple choice questions. One of my favorite was when they would show an object and you had to choose the flat pattern that would make it or, conversly, a pattern was shown and you had to choose which of four objects would be created when it was folded. I was always very good at that.

So, when I decided I wanted to create a paper teapot, I designed it all on the computer in a flat pattern first. To do this I had to 'assemble' it in my head as I went and then design the next fold or measurement to fit with what I already had. When I used the directions I had written to make the actual object I had to change only ONE thing (the order of assembly of the bottom which would be attached later to the base.

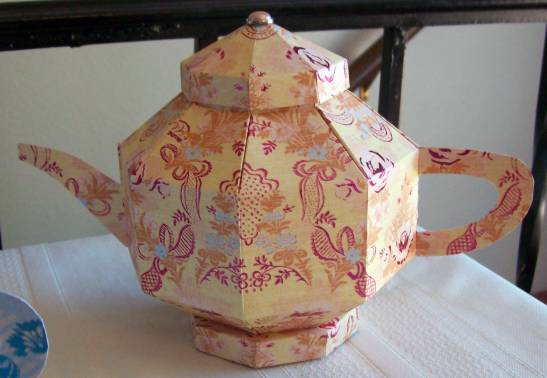
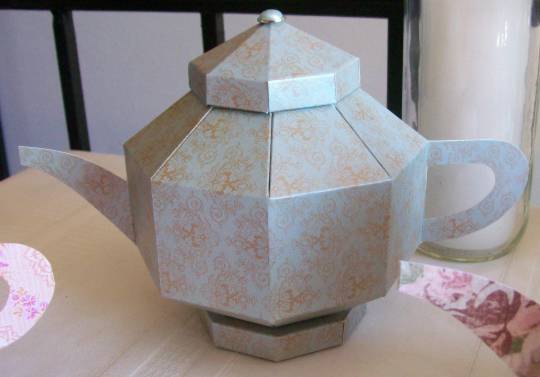
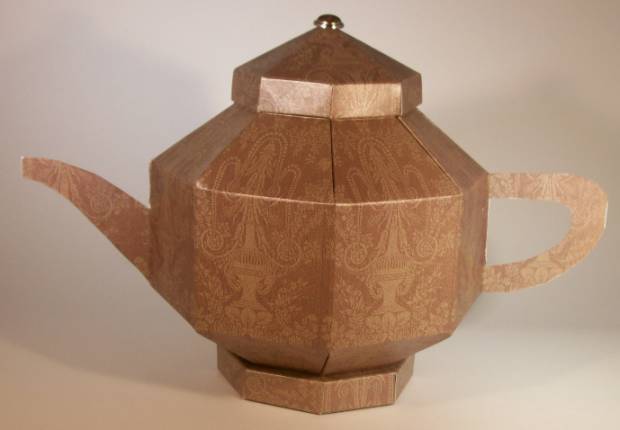
So, are you ready to see it? This is the side view:

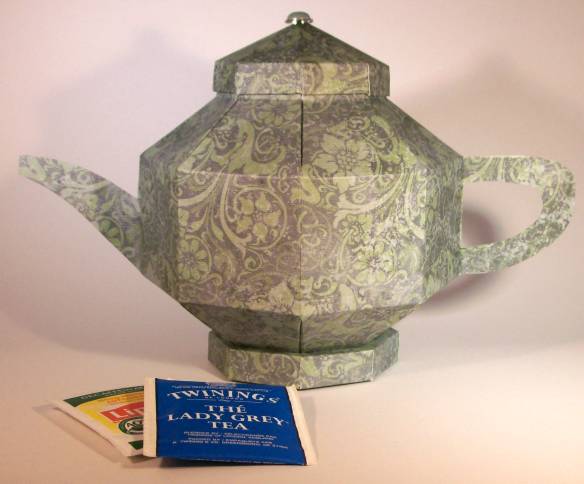
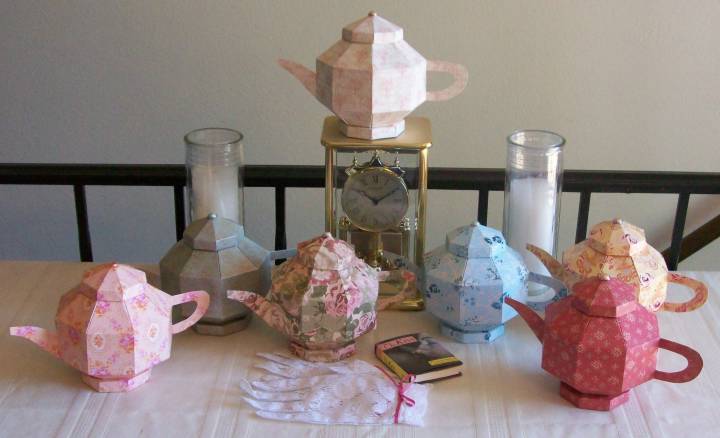
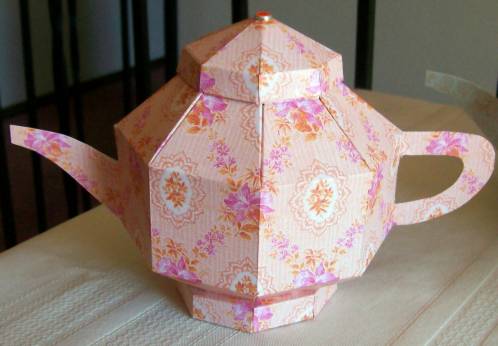
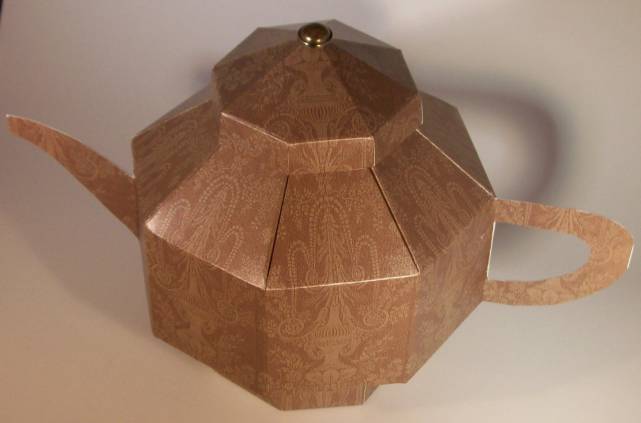
Of course you can't actually USE it for tea, the bags are just laying there for scale. This is the top view:

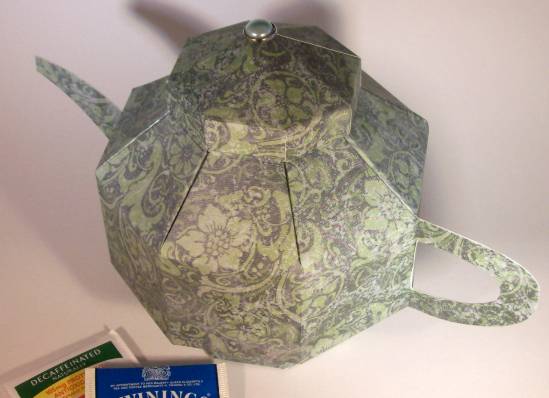
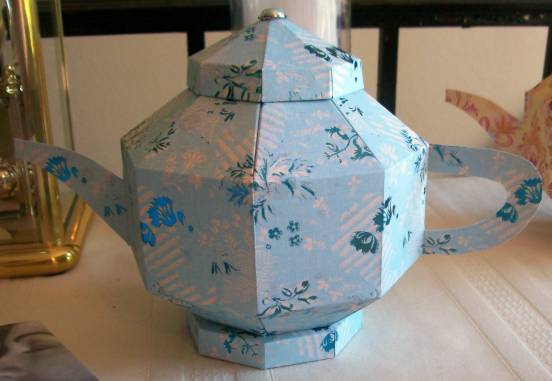
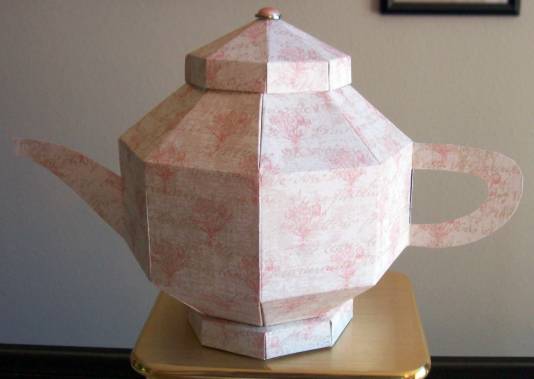
You can see that the handle and the spout are not 3-dimensional, but you can't have everything! Here is a view showing the lid removed:

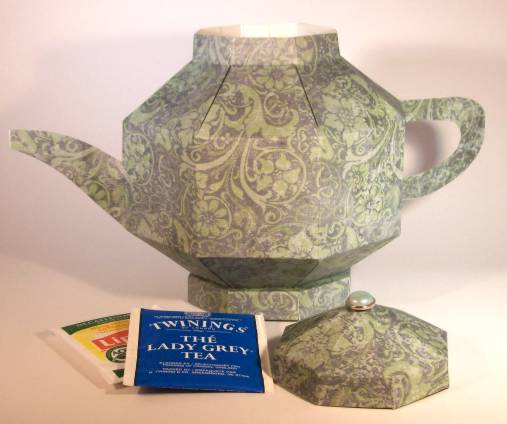
You could actually use it to store teabags if you wanted to! It is ov a size that would make a good centerpiece, too.

This project uses three pieces of printed cardstock 12 x 6 inches and a large decorative brad.

Ddd


Posted by studio3d@ccgmail.net at 6:00 AM PDT
Sunday, 30 May 2010
Vacation in a Box Car(d)
Topic: Fantastic Folds

I picked up this structure on someone's blog - it's called a box card. It folds flat to 5 1/2 x 4 1/4 and then pops out to a box that stands up on its own. The punched hole provides a view to the inside that displays a greeting or more decoration.

I used some 'travel' cardstock, stickers, punchouts, and rub-ons to decorate this bon voyage card.

Here you can see from the bottom how it pops out.

Ddd


Posted by studio3d@ccgmail.net at 6:00 AM PDT
Saturday, 29 May 2010
A Real Treat
Topic: Fantastic Folds

This card was made for a challenge to do this particular structure. I starts as a single 8 1/2 x 11 piece of cardstock. Folds and a cutout make the basic model.

I went on to add a pop-up in the frame to add interest.

The front is decorated with the piece from the inside cutout (showing its reverse side). I stamped on it with a text stamp and a bird then trimmed it up with gold peel-offs.

The inside features silk flowers, glitter domes and more gold peel-offs.

Ddd


Posted by studio3d@ccgmail.net at 6:00 AM PDT
Friday, 28 May 2010
Birds on a Ladder
Topic: Fantastic Folds

Used the other half of the cardstock from yesterday to make the same card structure - just different decorative content.

I cut these two birds from a calendar illustration, along with their branches. The tag is leftover from a kit and I mounted it with foam dots and tied on a ribbon. Three stickers finish it off: The round text, the bottom border text and the 'remember' block.

I do love this structure.

Ddd


Posted by studio3d@ccgmail.net at 6:00 AM PDT
Thursday, 27 May 2010
Step It Up
Topic: Fantastic Folds

I saw a similar card on Andrea Walford's blog and had to have a go at it. I changed up the measurements and made mine from double-sided cardstock. This requires a 12 x 6 piece and is scored 6 times and cut once. VERY simple to do.

I decorated each step with stickers and then placed paper on the back of the overhang and trimmed it out. The text block is a rub-on and there are gold peel-offs finishing it off.

For a final step I rounded the lower corners.

Ddd


Posted by studio3d@ccgmail.net at 6:00 AM PDT
Monday, 17 May 2010
Man-cation
Topic: Fantastic Folds

For a challenge to create a 'manly card' with fantastic folds I created another squash-fold booklet from 12 x 12 cardstock. This time the cardstock was double-sided so there was coordinating back and front.

I used 'outdoors', 'travel', and 'Alaska' stickers from different sets to decorate this one and used the checks of the paper as guidelines to add hand-lettered text with brown Sharpie marker.


Because I thought bows at top and bottom would take away from the manliness of this card, I left a long enough tail on the top portion to wrap it over the back and tie it once at the bottom.

Ddd


Posted by studio3d@ccgmail.net at 6:00 AM PDT
Saturday, 15 May 2010
Squash (no, not a vegetable or a sport)
Topic: Fantastic Folds

I was recently reminded of the squash book structure which generally uses three squares of card scored and overlapped. I decided to try to create it using a single sheet of 12 x 12 inch cardstock.

To do this I scored at 3", 6" and 9" in both directions. Then I trimmed away three blocks in an L on opposite corners. Finally, each remaing block of four is scored on the diagnonal. I also used scraps from the cut-away sections to cover the front and the back cover, trapping a length of ribbon between to tie the book closed.

I printed and trimmed photos from our recent cruise to fill this book.

This may be a record for me, using cruise photos within a week of returning (this is a delayed posting - project was completed on 5/3/10)

Ddd


Posted by studio3d@ccgmail.net at 6:00 AM PDT
Friday, 14 May 2010
Graduated
Topic: Fantastic Folds

Challenge - Make a 'tri-fold' card. 

Answer - OK!

This started out as a 12 x 12 piece of cardstock. From this I got two 6 x 12 strips. For each I accordion folded at 2", 5", and 8"and then trimmed the first panel down 2" and the next two panels down 1".

For this one I used vellum stickers of pansies and rub-on stitching to decorate the panels.

Then added text in clear stickers and peel-offs which you can see in this view slowing the card opened.


The other version will be shown in a few days - not quite done with it yet.

Ddd


Posted by studio3d@ccgmail.net at 6:00 AM PDT
Wednesday, 14 April 2010
Side Hinge Card
Topic: Fantastic Folds

Taking up the 'challenge' again, I put together this 'side hinge' card. The front and back are scored at 1/4 inch from the fold then the front only is slit and the front piece slides in and the whole hinge is sealed closed. 

This allows the front to swing away and allows you to decorate under it.

It still opens as a card normally would so the final greeting can be placed inside.

I decorated with cutouts, ribbon, stamping, gel pens, and stickers.

Ddd


Posted by studio3d@ccgmail.net at 6:00 AM PDT
Saturday, 10 April 2010
Diamond Thanks
Topic: Fantastic Folds

Another diamond fold from the 'I'll use that later' pile has its day in the sun.

The stamping of the flower background is also a leftover from last summer. It has been colored up with watercolor pencils. A diecut 'thanks' block was the extra when I cut out another piece with a multi-text die.

I added a silk flower with a flower brad center and added the rest of the greeting with black pen.

Ddd


Posted by studio3d@ccgmail.net at 6:00 AM PDT

Newer | Latest | Older