« September 2019 »
S M T W T F S
1 2 3 4 5 6 7
8 9 10 11 12 13 14
15 16 17 18 19 20 21
22 23 24 25 26 27 28
29 30
You are not logged in. Log in
Entries by Topic
All topics
3D paperwork
A - Z challenge 5
A - Z challenge 7
A - Z challenge round 4
A to Z challenge round 3
A to Z round 2
A to Z round 6
A-Z round 1
Around the House
Art Challenges
Artist Trading Cards
Backgrounds
Beads
Bible Journaling
Books
Boxes
Collage
Color Challenge
Coloring
cookbook
Die Cuts
Digital Projects
Digital Stamps
Drawing
Dry Embossing
Fabric Stuff
Fantastic Folds
Field Trip
Home Decor
How Does Your Garden Grow?
Hymnal Art
In The Kitchen
In the studio
Jewelry
Lettering
Links
Multi-Technique
Music to Work By
Musings
Nail Art
New Work
Online Class
Other Hobbies
Other Projects
Painting
Paper Embroidery
Paper Piecing
Photo
Pretty Paper
Quilting  «
Random
reading
Scrap Recovery
scrapbooking
Sewing
Sketch Challenge
Some Backlog
Stamping
Stencils
Stickers
Supplies
Teabag Folding
Techniques
Testing
tips and tricks
Tutorial
Web resources
Welcome to my Blog
Work By My Friends
workflow
Writing
Blog Tools
Edit your Blog
Build a Blog
RSS Feed
View Profile
Group One
In & Out of Studio 3D
Tuesday, 17 September 2019
Asian Dreams
Topic: Quilting

At a yard sale last year I picked up a variety of Asian fabrics. They were from a sample pack so the sizes varied. I set these aside while keeping an eye out for just the right pattern that would have a feel of asian design but would look good with the scrappy look of mixed fabrics.

When I saw this pattern in an advertisement for a fabric line in a magazine, I immediately knew that it was the one.

I cut it so that there are NO DUPLICATE fabrics in the whole thing. There are some with the same design but in a different colorway from the fabric line so they coordinate.

I made the top while on a quilting retreat in June and set it aside to do on the longarm machine. But I wanted to have lots of practice under my belt so I would not ruin it. I found a pantograph roll that was included in the things I got delivered with the longarm. Perfect!


Here is a closer photo of the quilting.


I found great prints to use for the borders, backing and binding - all having some gold pattern overlaying them. This coordinated with the golds featured on the prints.

Ddd


Posted by studio3d@ccgmail.net at 12:01 AM PDT
Friday, 13 September 2019
A Chain Of Diamonds
Topic: Quilting

I made this quilt top this summer and got it sandwiched back in June. I was prepared to do the quilting on my domestic machine but set it aside for other stuff. Then I got the longarm machine and figured I would do the quilting on that.

Well, two issues with that: 1) I had spray basted the three layers together so I wouldn't be able to do the standard loading of the machine and 2) I had wanted tonot have a lot of extraneous material beyond the top so I could fit it in my domestinc sewing machine. That left me no fabric to attach to the leaders on the longarm.

So I found some heavier fabric and sewed it on the two edges - about 7 inches of it. This was what I used to load the quilt onto the machine.

Then I just practiced making patterns on the quilt with free-hand stitching - different patterns in different decorative areas.


I had a lot of tension problems and thread breaks on this but I think it was due to the spray baste that was in the sandwich.

Ddd


Posted by studio3d@ccgmail.net at 12:01 AM PDT
Saturday, 7 September 2019
Wall To Wall
Topic: Quilting

I needed something to use for practice on my new longarm quilting machine I found a couple of printed panels in my stash and loaded one backing and batting to put both of them on.

The first is fall-themed illustrations set up in framed areas. I used these to practice echo quilting - steering around the outer edges of the decorative elements using the edge of the round foot as my distance guide. I had a bit of an issue with the tension of the quilt sandwich as some nuts on the collar of the back roller didn't get tightened. This allowed the quilt to sag whenit should have stayed taut resulting in some bubbling.

In any case...


The second panel is much narrower and has three gourds in framed sections. I used the gourgs to try some thread painting, tracing over the top of the decorative swirls on them. 

I then tried tracing along the edges of the frame lines to practice vertical and horizontal control.


I gave both of these hanging sleeves and bound them with the same print as the backing.

Ddd


Posted by studio3d@ccgmail.net at 12:01 AM PDT
Saturday, 17 August 2019
Milestone Moments
Topic: Quilting

Thanks to YouTube I was able to figure out on my own how to load my first quilt onto the longarm machine. Yay Me!

Then, with YouTube I was able to figure out how to set the stitch regulator as I wanted and baste the first section of the quilt sandwich. Hooray For Me!

And finally, I went to my class on Thursday and had hands-on training on the whole enchilada. We used a sample sandwich of plain fabric to practice a wide variety of free-motion fill patterns plus how to thread, change bobbins, fix problems (most user error) and maintain our machines.

So today... two days later... I approached the already loaded lap quilt, fired up the machine, gave it a new bobbin and thread cone, cleaned the rails, and adjusted the stitch regulator for 'the real deal'.

About an hour later, voila! It was fully quilted and ready to take off the machine. Another hour to trim it and bind it - label added - and DONE!


This quilt is from the book by Ricky Tims on Convergence Quilts which I had to order from a different library system. - Fascinating concept that had found me selecting about a dozen sets of fabric from my scores of fat quarters. I will be making MANY of these quilts. So easy with stunning results.


For the quilting, I did large rosettes in the four corners and then echoed ripples out about 3/4 of the way across the quilt in both directions. The ripples all cross one another and overlap at the center.


Theinner border was not quilted. The outer border got leaves and vines. I use this a lot on my domestic machine and I wanted to test with a pattern I was familiar with.


This quilt will go to the hospital's Passages program.

Ddd


Posted by studio3d@ccgmail.net at 11:11 PM PDT
Wednesday, 31 July 2019
Squatch Is In the House
Topic: Quilting

I have been gifted with a longarm quilting machine! We drove up to central Washington in the middle of July  to disassemble it and transport it back home. Then we had to wait until today for the service techs to do the reassembly and add a few features.

Now I have to wait for a new power cord for the computer and then for August 15 when I can take a class.

I have never laid hands on a longarm machine before and I don't want to break anything! I don't know how to load a bobbin, thread the machine, or anything.

I plan to spend a lot of time watching various YouTube videos to bring me up to speed.

I named it Sasquatch (Squatch for short) because it has a big footprint (bigfoot print)! The frame is 12 feet long and 4.5 feet deep. It has a 26" sewing head on it.


You'll no doubt be hearing a lot about this in the future - or at least seeing a lot of the resulting quilts!

Ddd


Posted by studio3d@ccgmail.net at 12:01 AM PDT
Thursday, 23 May 2019
The Echo On Ringo Lake
Topic: Quilting

On the Quiltville blog in November 2017, a new mystery quilt was started. Now, I have said to myself ('declared' is more accurate) several times that I would never do another mystery quilt, but I got sucked in by the inspiration photo, the name and the color palette (coral, teal, chocolate, cream).

While I worked off and on toward the goal what I didn't like was:

  1. I had too wide a range of values within each color reducing the continuity in the pattern.
  2. This designer works with REALLY small pieces.
  3. The pattern is for a queen sized quilt with no details on downsizing it. I didn't NEED a queen sized but had to make all the parts anyway becuse you don't know how they all go together until you have all the pieces in hand.
So, I made ALL the parts called for (grumping all the way, mind you) and came to the 'reveal' with a dissapointed "yikes"!
 
I decided to make enough extra of the side setting triangle units that I could break the pattern in half and finish off the edges where they split apart.
 
One is backed with a dirty coral print with small dragonflies. The other has a solid coral backing from the same fabric as the binding on both. One is quilted with stitch-in-the-ditch around major shapes in the blocks. The other is quilted with a large meander in coral.
 
The best thing I can say about these is "they are done". I am naming them Thing One and Thing Two.


Because of the split I ended up with 4 blocks left over. I told the ladies at my group that, if someone wouldn't take them I would rotary trim them into small pieces and toss them. One of the ladies took them to make a doll blanket for a niece. Nice save!

Now, I hereby declare, "I will never make another mystery quilt." And, this time, I mean it!

Ddd


Posted by studio3d@ccgmail.net at 11:16 AM PDT
Wednesday, 5 December 2018
Goal Fulfilled
Topic: Quilting

At the last posting of quilt finishes I indicated that I had three more to finish off to meet my goal of having six to donate to the hospital. Well, I have finished those three with a week and a half to spare!

I've shared before about the quilter whose children gave our group all her fabrics when she passed away. The last piece I had of those I took was a yardage with half-square-triangles printed on it. I found a tutorial on Missouri Star Quilt Company for a block called 'Royal Wedding', that used 4 blocks of 4 hst. I cut the yardage into groups of 4 units with a 1/4-inch border for the seam allowance. Other 'Betty' fabrics with coordinating colors went into the internal sashings. TOTALLY different measurements than MSQC pattern but I got the effect and I'm very happy with this result.


The next one was made from fabrics I got on deep discount. I selected the butterfly feature fabric and then chose several coordinates. The pattern was torn out from a very old magazine.

What looks like plain yellow is actually a gold imprinted over yellow.

When I was buying that discount fabric, I bought more of the gold and then added several tone-on-tone fabrics in jewel colors.

This is a pattern that I scratched out on paper and I have no idea what the source is!


So this wraps up the year with 15 quilts finished. I have two more in progress, one cut but not started and one ready to cut. I have no illusions about any of these being complete by the end of the year so I am closing off the count.

Of those, 14 went to charity (hospital or pregnancy center) and one to a lady who had just lost her companion dog.

Many plans for next year. After all, the BIG fabric store just went out of business and I have three large bags of brand new fabric from their final sale!

Ddd


Posted by studio3d@ccgmail.net at 2:25 PM PST
Wednesday, 28 November 2018
Warmth of Charity
Topic: Quilting
I am continuing to tackle the 'almost' quilts I started back in June.
 
I put the binding on two yesterday and have only one left that needs only this step. I have two more to quilt and bind and that will finish up the 6 that I want to donate to the hospital next month.
 
This one is called 'Sunblock'. It uses 5 fabrics that I bought to go together. The tone-on-tone prints coordinate with the tropical floral in the large squares.


This second one is called 'Doubly Charmed'. I started with two fall charm packs (same set) and chose a Missouri Star Quilt Company tutorial called Grand Square for block directions.

Their directions required more of each matching print than I had so I mixed and matched the blocks. The background creams are scrappy as well and I had to add more fabrics that coordinated with the charm squares to get a quilt large enough. Then, because they were already scrappy, I decided to twist and turn them away from the pattern layout and this is how it ended up.

Whew! I still have plenty of 'in progress' quilts but they are all still 'in pieces' so I will set them aside to work on in the new year.

Ddd

Posted by studio3d@ccgmail.net at 1:41 PM PST
Monday, 26 November 2018
A Bit Of This, a Dash Of That
Topic: Quilting

I kind of set aside quilting for a bit to work on other hobbies but I had six in the final stages waiting for me. I got four of those quilted earlier this month and then actually finished one up. This is a lap quilt.

I had a fabric bundle that I thought was fat quarters so I picked out this pattern. Unfortunately, when I opened the fabrics up I discovered they were all only fat eighths! That did not give me enough of each fabric to cut and lay out the way they were supposed to go so I cut more coordinating fabrics at home and went with dark/light combinations in the four-patches within each block. Originally the light in the four-patch and the light in the adjoining half-square triangle would have been the same.


I really like my version of this! I will donate this to the Passages program at the hospital.

Ddd


Posted by studio3d@ccgmail.net at 11:55 AM PST
Saturday, 14 April 2018
No Habla Applique!
Topic: Quilting

It is a good thing the fabric I was given had applique elements PRINTED on it because I don't DO applique! This was another of those printed 'cheater' fabrics. The blue blocks were all part of a printed fabric and all I had to do was cut blocks with an added 1/4 inch around them, piece them together using a sashing and add a border of cute houses from the same donation source.

The applique elements on the blocks as well as the mitered-corner frames on them are all part of the printing.

I did NOT want to do free-motion outlining of the frames or elements so I did an all over free-motion medium meander. It is backed with the same medium-blue showing in the binding.

This will go to the hospital's Passages program - my 72nd quilt for them.

Ddd


Posted by studio3d@ccgmail.net at 9:43 PM PDT
Saturday, 7 April 2018
Cheater Pants
Topic: Quilting

This quilt started out as a piece or yardage printed with a pattern of patchwork. I cut out 9 portions of the pattern, eliminating sections that I didn't want. What I ended up with was stars with 4-patch corners.

I pieced these together using sashings from a striped fabric (you've seen this fabric a lot lately on recent projects) and cornerstones I cut from scraps of other parts of the yardage.

I quilted this around the stars and the 4-patches.

The binding is made from scraps of the original yardage.

Ddd


Posted by studio3d@ccgmail.net at 8:42 PM PDT
Saturday, 24 March 2018
How To Save a Quilt Top
Topic: Quilting

I had made available to me a partially finished quilt top with six diagonally pieced string blocks. They had been arranged strangely and bordered several times. The top was not large enough and the 'design' was not something I wanted to just add more borders around.

I thought to spread out the string piecing a bit so I used a square ruler to 'extract' the pieced blocks, cut them on the diagonal across the strings and added a triangle of patterned fabric to bring it back square again. This gave me 12 blocks.

That activity shrank the overall size of the blocks and they weren't going to be enough. So I made 4 more string blocks in the same style as the originals, cut those diagonally and attahed the patterned fabric as with the first set. This gave me 8 more blocks for a total of 20.

I used sashing between and arranged them to create chevrons across with a 4 x 5 layout.


I added a border all around and quilted it with stitch-in-the-ditch around each block and on its diagonal.

The bonding matches the sashing on this lap quilt for Passages.

Ddd


Posted by studio3d@ccgmail.net at 11:16 PM PDT
Homework's Done
Topic: Quilting

Remember when I showed the recently made bracelet from the class at the Sew and Stitchery Expo in Puyallup? Well, today I finally finished all the other homework that I had left from three other classes I took.

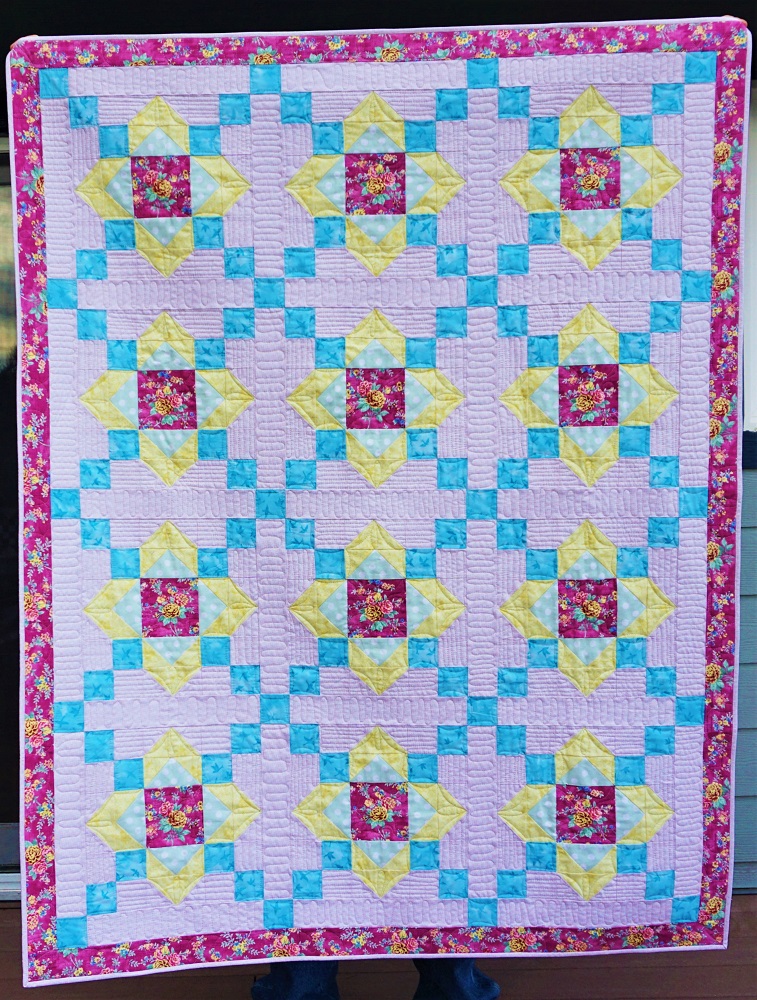
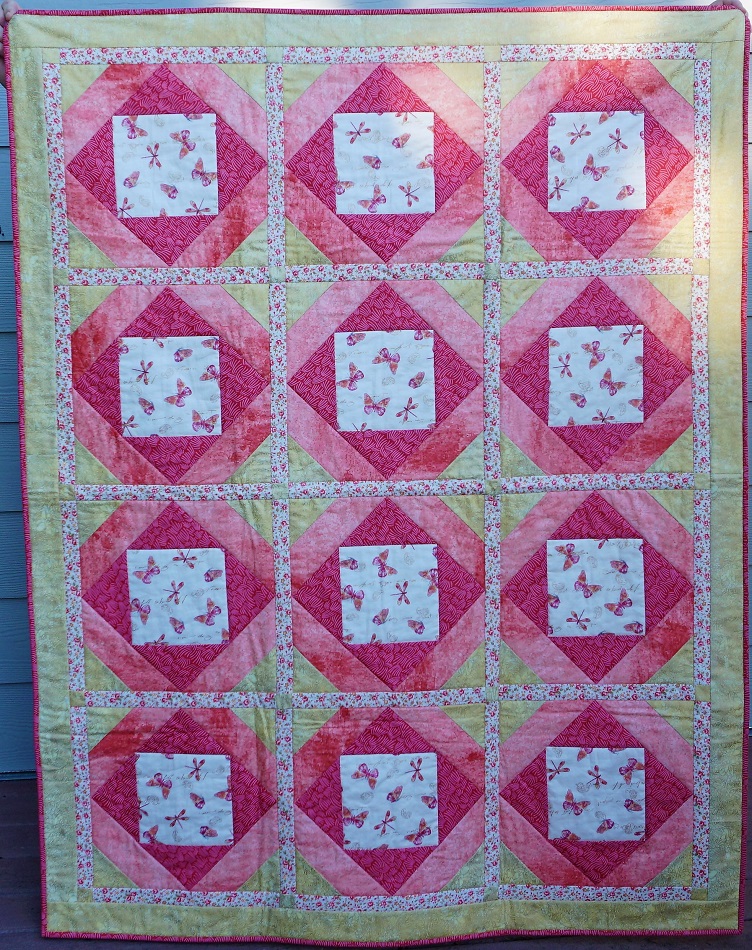
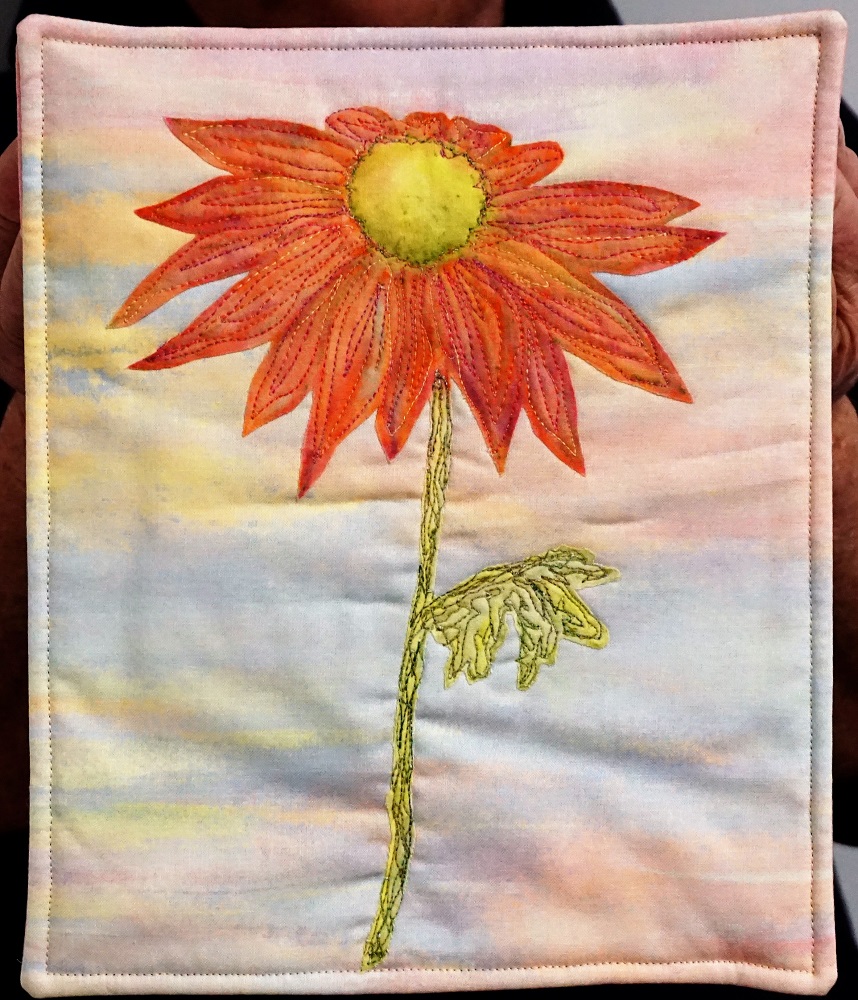
First up was a class where we used Gelatos and Inktense Watercolor pencils to 'paint' a flower on muslin. Then we cut it out and mounted it to a background fabric with a fusible glue. With verigated thread we did thread painting over the flower. The instructor showed us a different way to bind it without any showing on the front side. Here is my finished wall hanging.


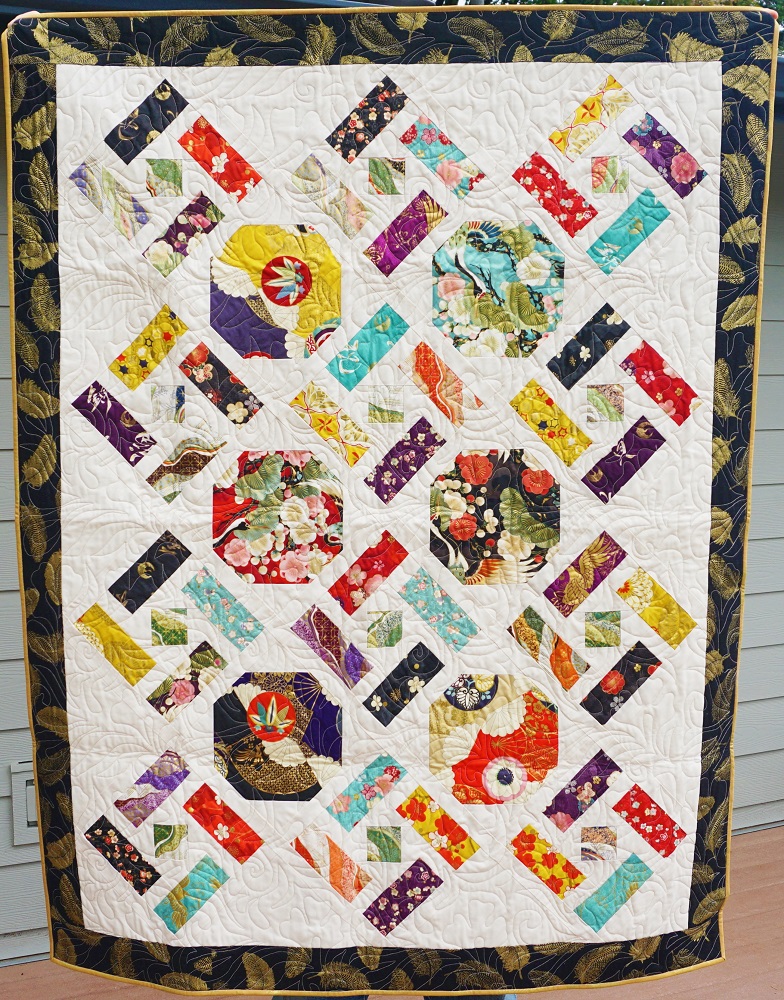
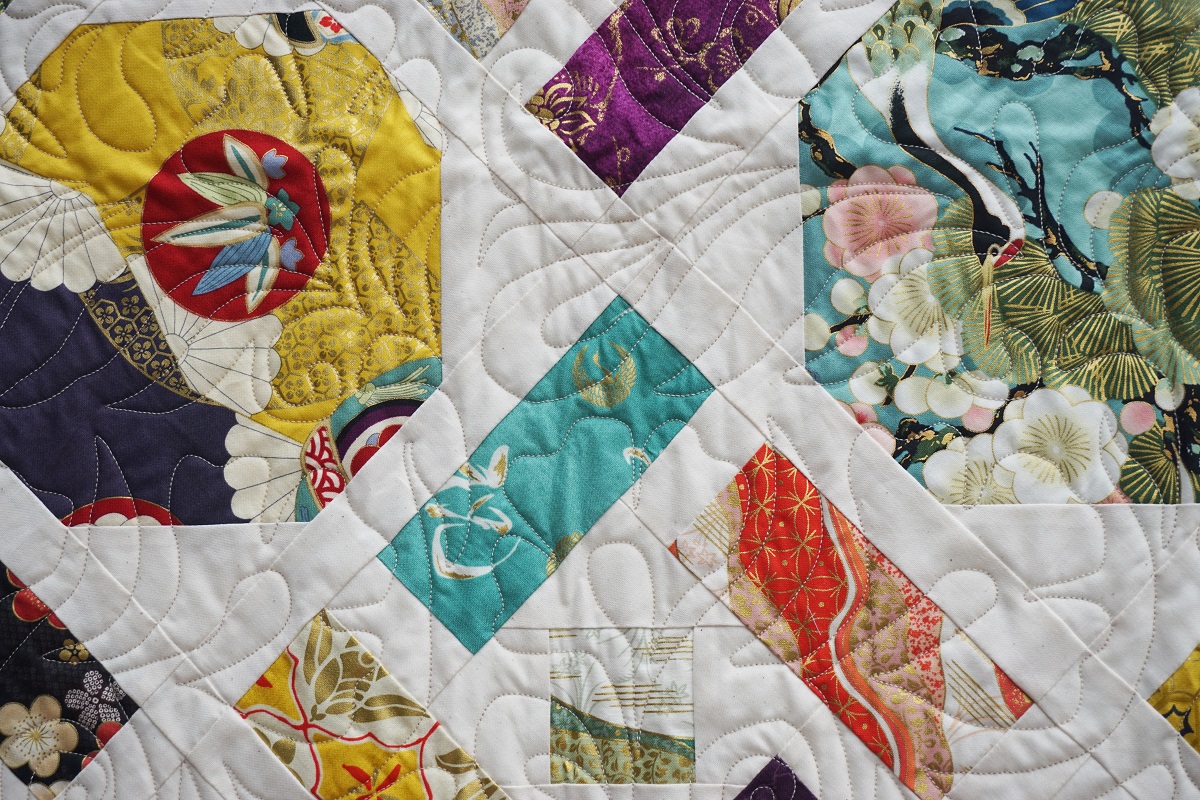
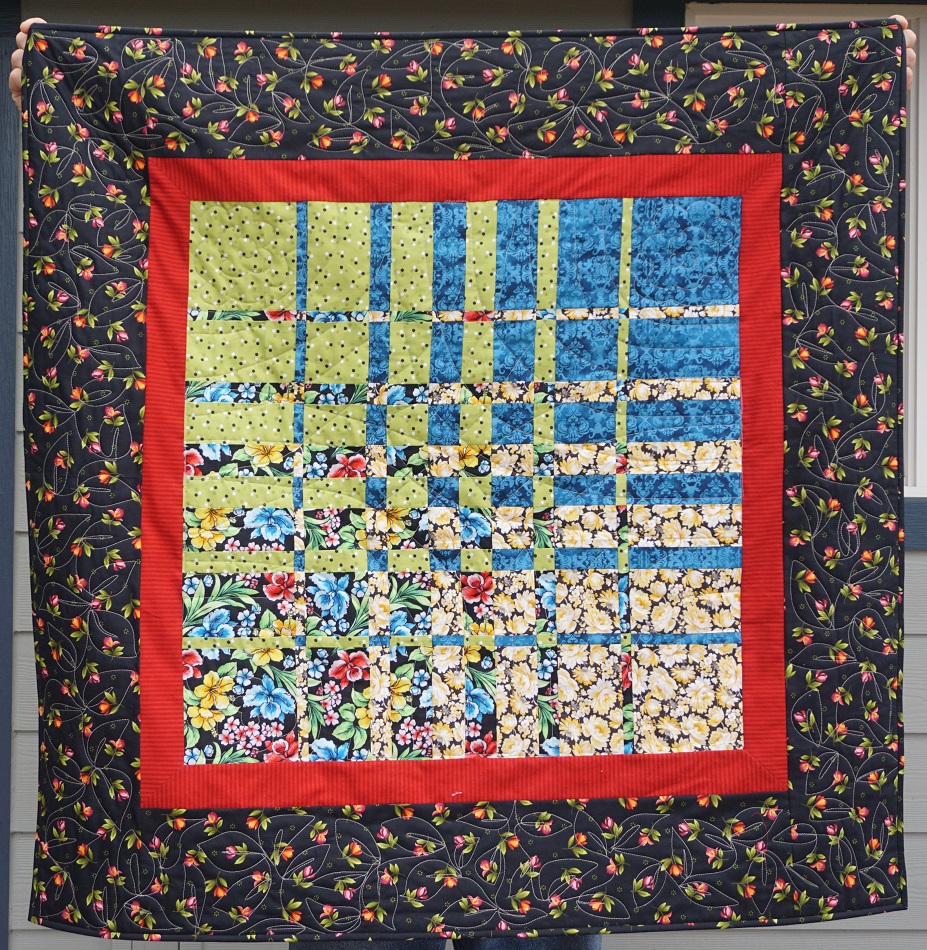
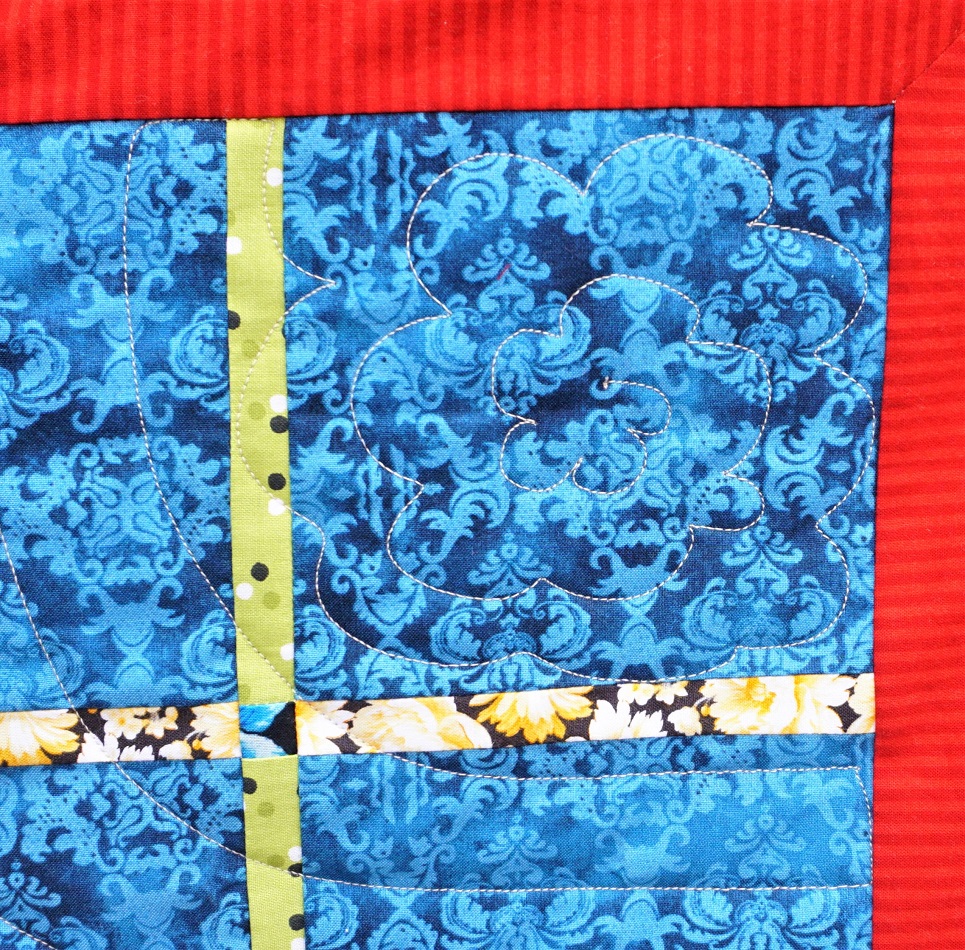
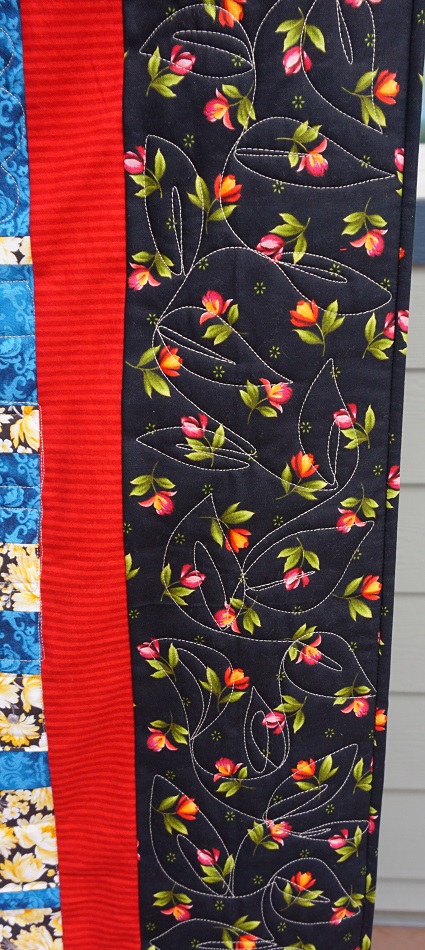
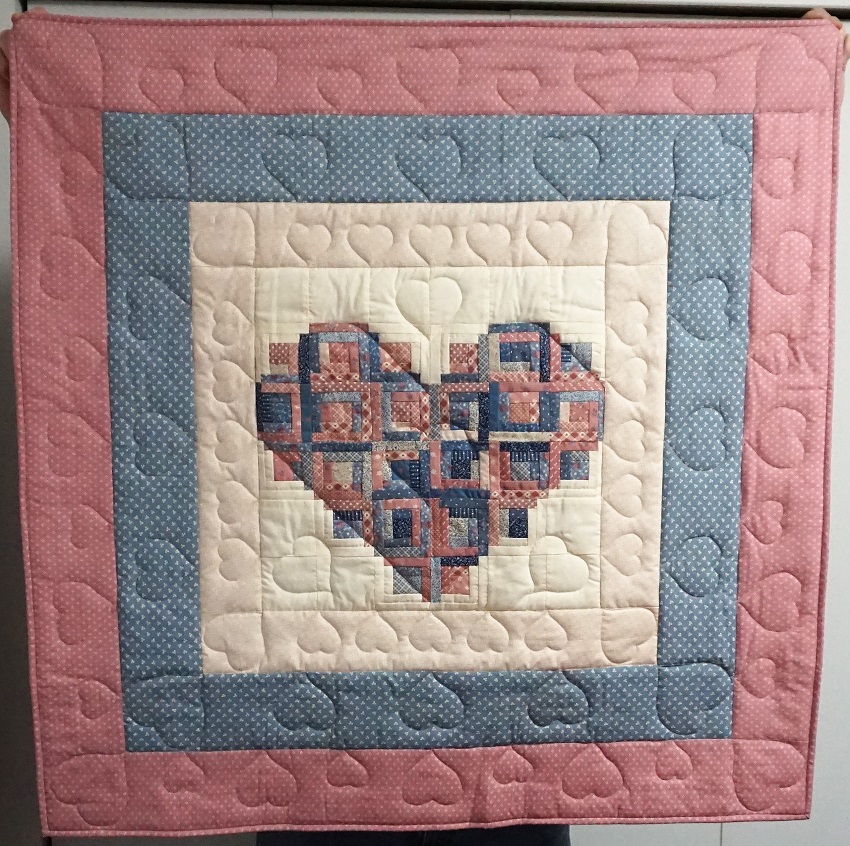
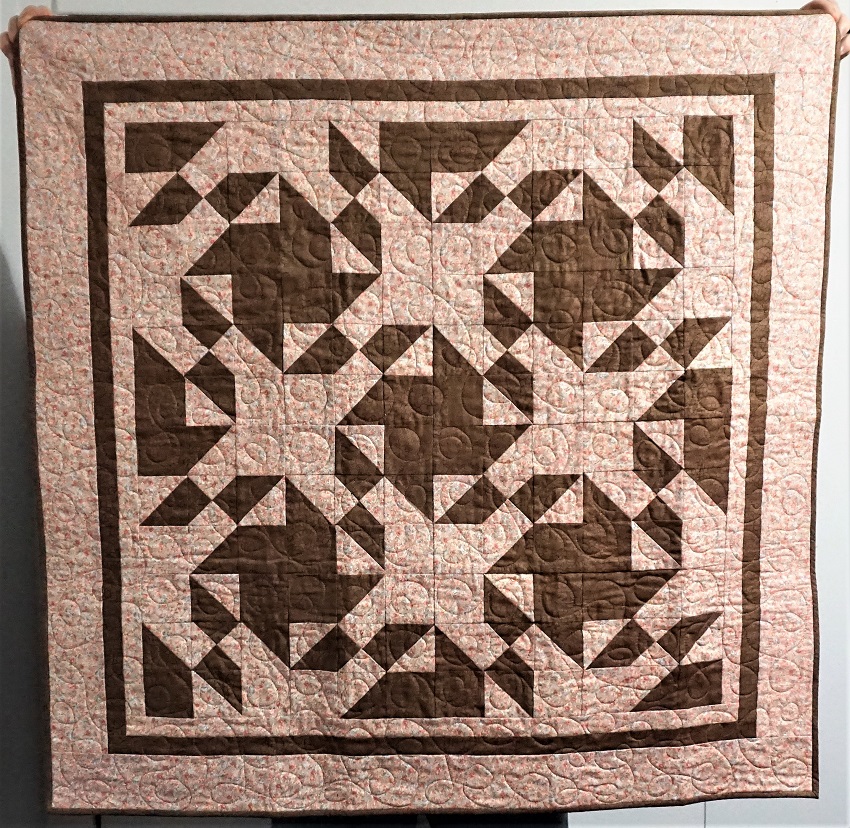
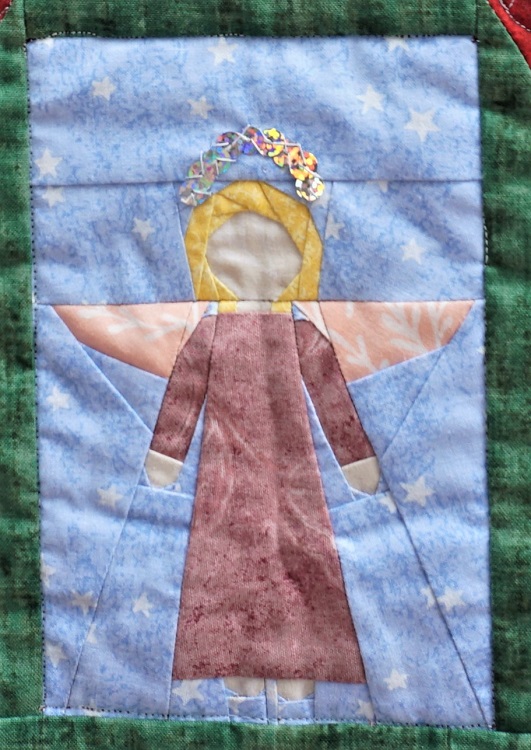
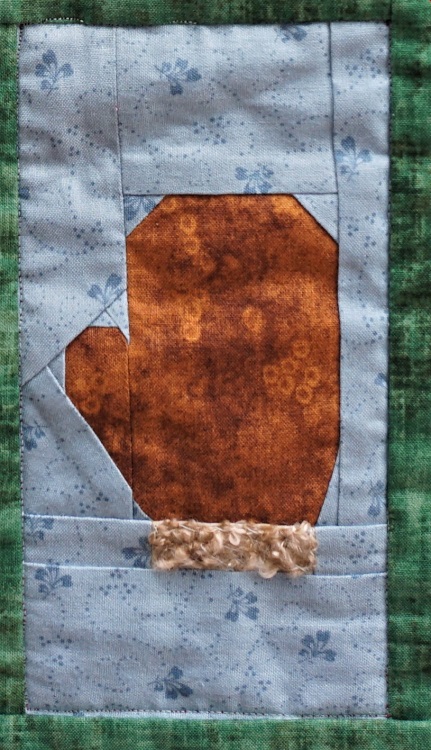
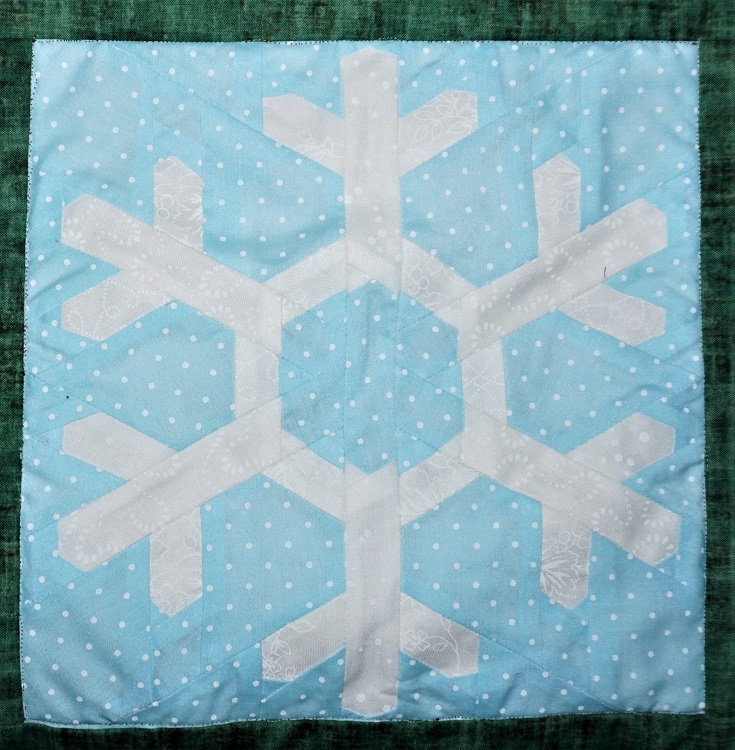
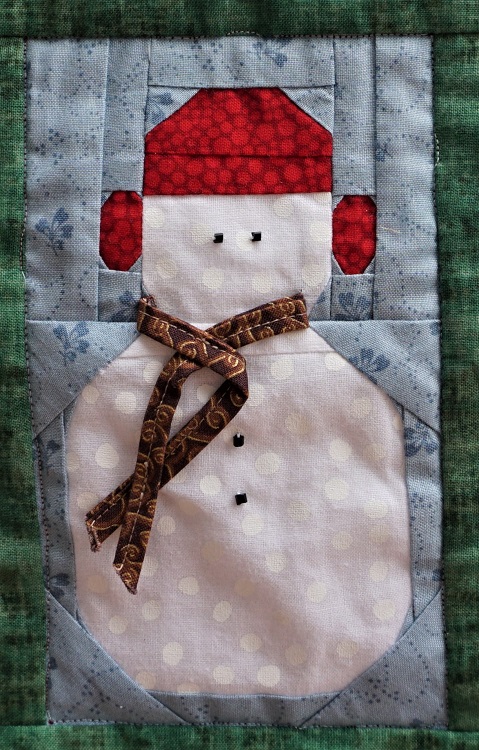
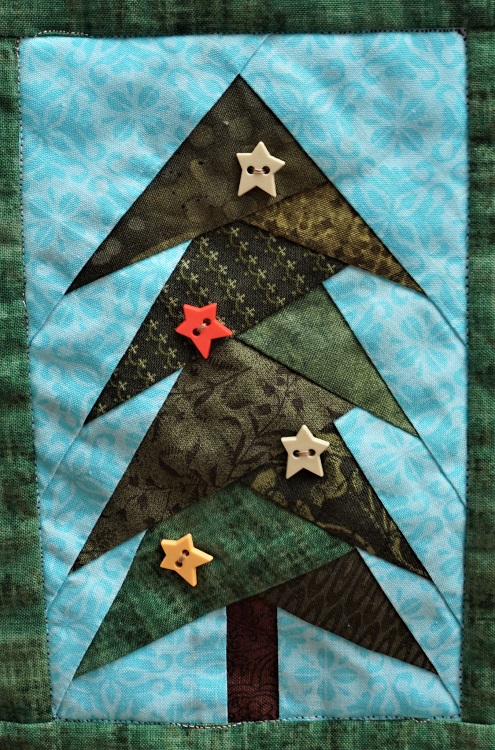
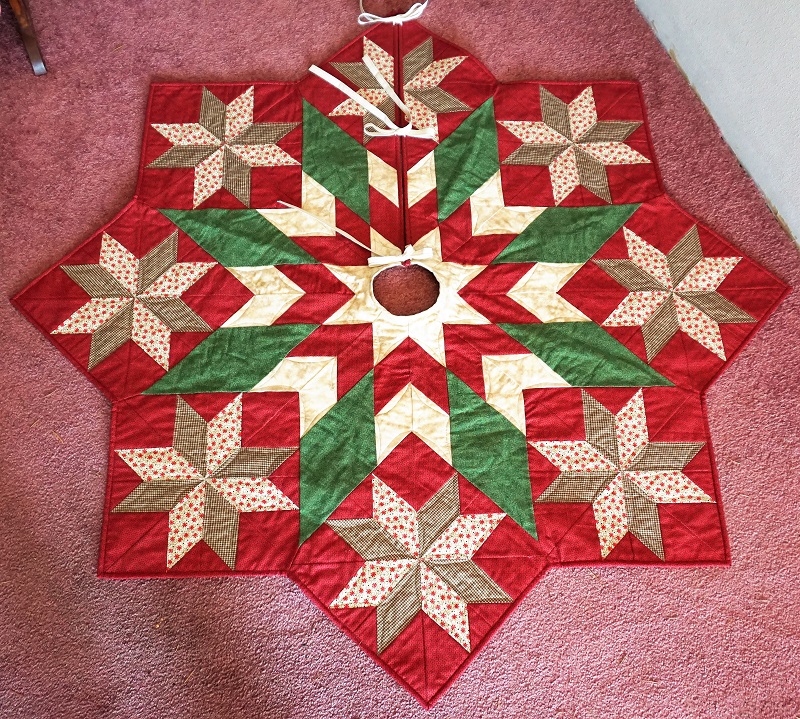
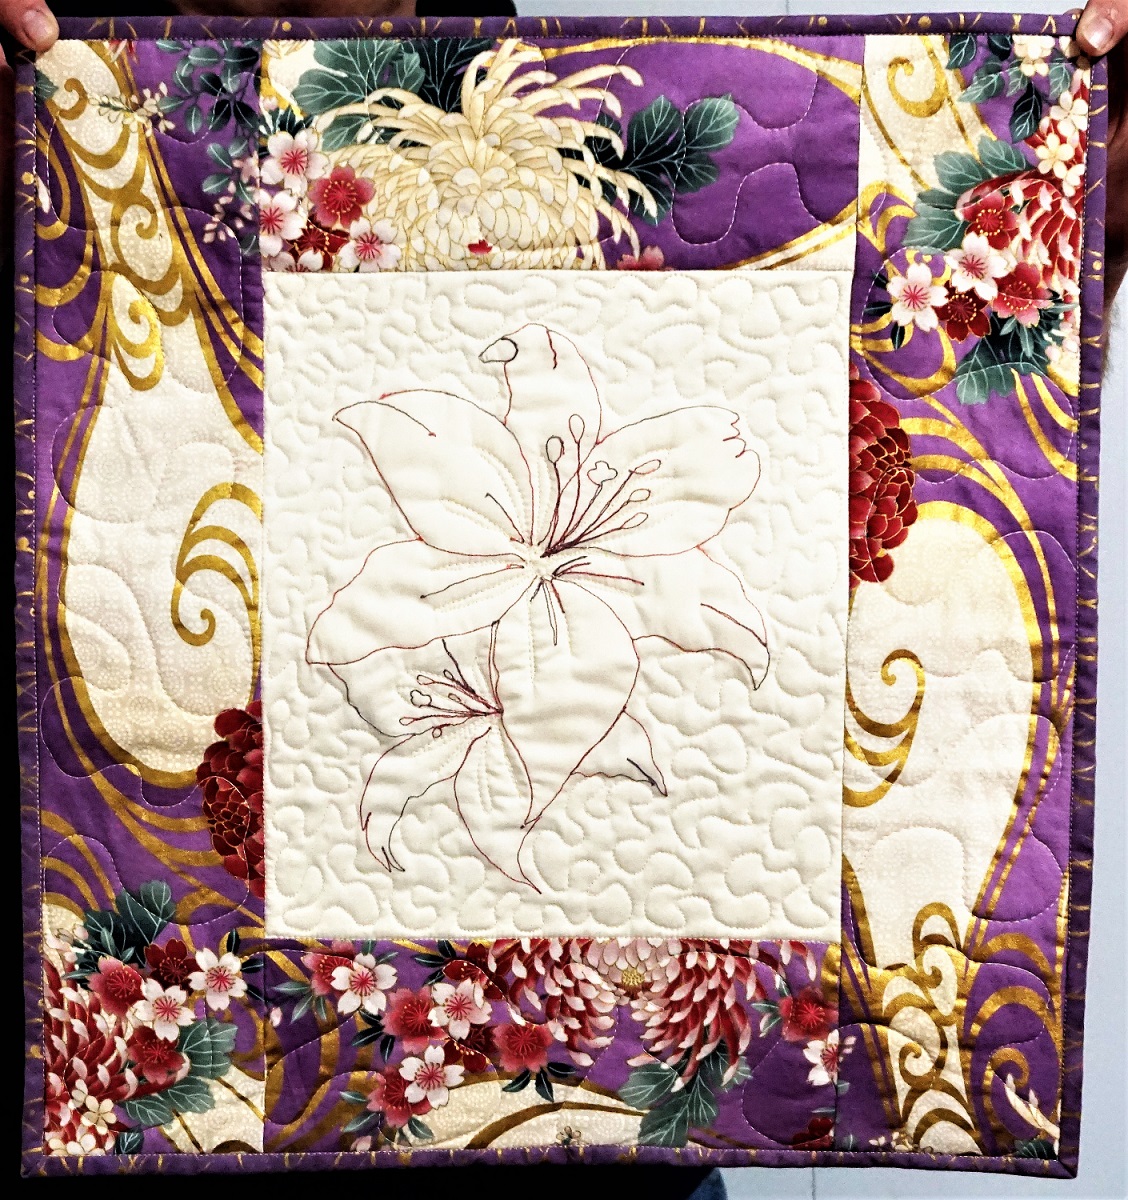
Another class had us learning to do free-motion embroidery. This was just like free-motion quilting but with no batting. We did have water-soluble stabilizer on both top and bottom. We stitched with verigated thread, following the lines on a provided illustration.

At home we had to soak off the stabilizer, add batting to the back and stitch around the image and trim away extra batting. The rest of the finishing was just like any other quilt with borders, quilting and binding.

And here is my finished wall hanging:


The third project was a wallet. The class was advertised as a 'serger project' but when we got to class the only use of the serger was a new feature - the machine sewed a chain stitch. REALLY!?!?! I wanted to learn to use a serger and I get a chain stitch? I could have constructed the whole project on a regular maching. Harrumph!

The other thing they were overly excited about was 'cork fabric'. May I just say... Big deal!

So, beyond that, we did make a wallet (with extremely poor instructors and assistants and instructions) and I had a lot of work to do at home, including the hardware.

I have several photos of this project. Here you see it closed.

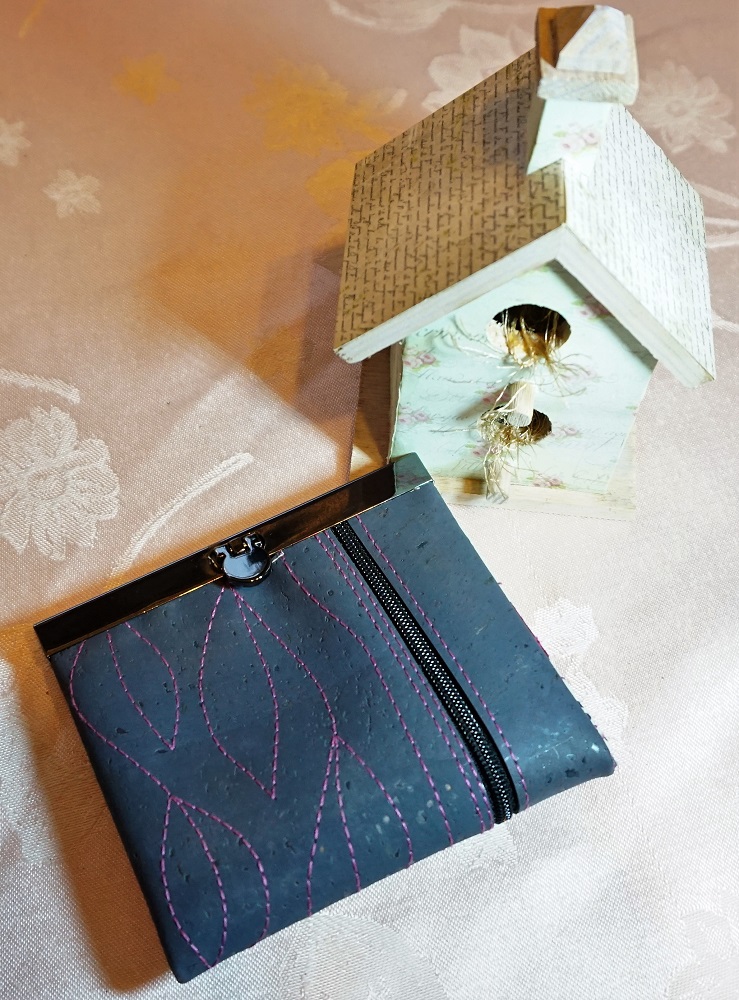
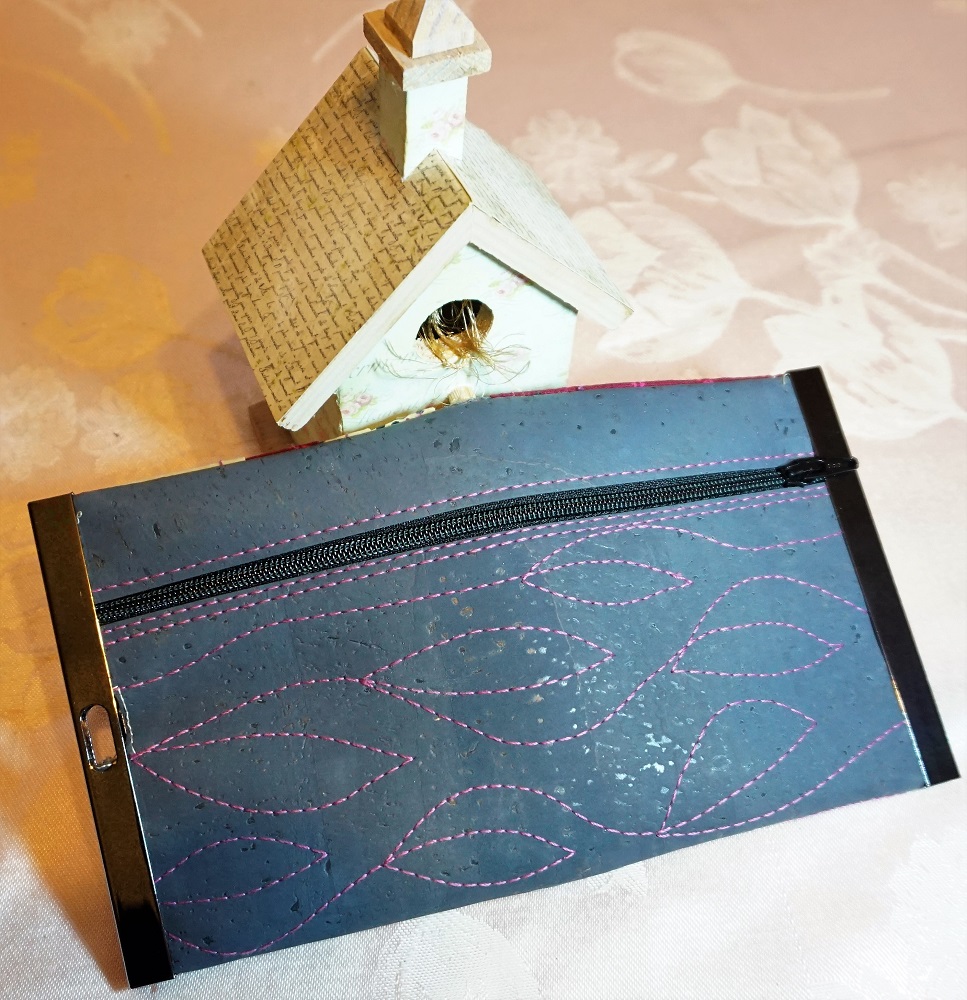
I did all that top-stitching on the cork fabric, too.

Here is a view that shows the hardware.

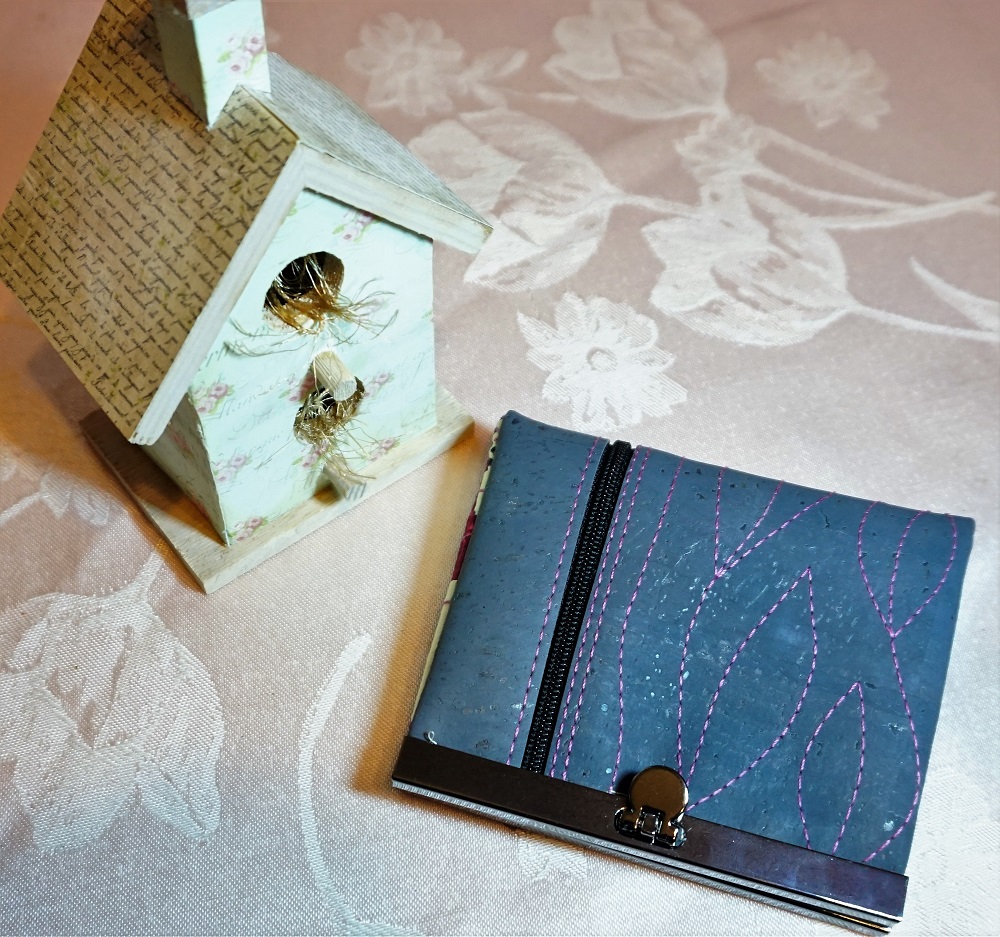
That little tongue flips up straight out and then you can open the wallet.

This is a view of the outside when opened. There is a full zippered pocket for carrying currency.


And, finally, the inside view. On the top is a zippered pocket for coins and on the bottom are slots for credit cards.


You can see in the photo above how the hardware is held on with ittsy-bitsy screws.

So, homework all done - and it only took me three weeks to get it done!

Ddd


Posted by studio3d@ccgmail.net at 10:15 PM PDT
Wednesday, 21 February 2018
Every Quilt Counts
Topic: Quilting

When I went to log this quilt into my spreadsheet I realized this is the 70th one I have made for the hospital's Passages program. I am so glad that this program exists and that I have a place to donate the quilts I make where they will serve as a comfort to a dying patient and a remembrance for their survivors.

The fabrics for this are more from the stash we were given by the family of a recently deceased quilter. 

I used two reds, two greens, two blues and two browns - each color having a dark and a light version. The colors were chosen out of the focus fabric which is printed with a faux quilt pattern.


The quilting is done with diagonal lines both directions through the frames and squares.

Ddd


Posted by studio3d@ccgmail.net at 11:10 PM PST
Saturday, 17 February 2018
Left Behind
Topic: Quilting

Back in December there was a lady who received one of our Passages quilts at the local hospital. When she passed away, her family contacted our group with the offer of all of the fabric their mother had in her house. You see... she was a quilter!.

So three of us went and picked up about 14 totes-worth of fabrics and sorted them all out. We had a 'stash bash' where anyone in our group (and several people from other groups we had invited) chose whatever we wanted to work with.

So far, I have made 4 quilts from her materials:

This first baby quilt will go to the pregnancy center. The center portion had alteady been pieced, perhaps with the intention of using it for a pillow. I used coordinating fabrics to add multiple borders to extend the size to 40 inches.

From a different donation we had on hand some flannel and some polyester batting. I quilted it with three sizes of hearts and it is so cute with all that puffiness!


The second baby quilt was constructed with the online instructions for a 'disappearing hourglass' block. It also finished at 40 inches and got a flannel backing.


Third up is a quilt that will go to the Passages program. On this one, our donating lady had completed the ladder portions of fabric strips. I used more of her stash to create sashings to set these into a lap quilt size.


And last is a rail fence quilt that started as a striped fabric. Those stripes were of alternating prints of 'pieced fabrics'.

I cut apart all those stripes and alternated them with a coordinating stripe. With sections that were 4 strips wide, I cut them to make square blocks and then twisted back and forth to complete the rail-fence layout.

This is lap quilt size and will also go to the Passages progerm.


So, the donation of a quilt led to the gift of fabric which was made into quilts to make more donations... full circle.

The gift goes on.

Ddd


Posted by studio3d@ccgmail.net at 6:40 PM PST
Friday, 17 November 2017
Farm Country Flyover
Topic: Quilting

Another quilt today, actually finished up yesterday along with the trio already showed.

At a warehouse sale at the fabric store I picked up a bunch of matching mini-charm packs and two charm packs of cream solid. The pattern I found (a tutorial from Missouri Star Quilt Company) needed 96 units of each and I only had 84 so I had to cut a few extras from the stash.

All the blocks are constructed by sewing a half square triangle of the mini-charm onto the corner of each cream block. Then they are twisted and turned to form circles.

In the tutorial there are circles all over the quilt and no diamond shapes out in the middle.

One could also move the half circles on one side to join those on the other so there would be 6 full circles.


However, this is the arrangement I settled on:


The circles made me think of the big circles of crops that one sees when flying over the midwest. I quilted nested shapes in diagonals to represent the furrows in fields and I'm letting those diamonds out in the open spaces represent the farm houses.

I filled the wide borders with continuous triangles.

The binding matches the border.

Ddd


Posted by studio3d@ccgmail.net at 4:22 PM PST
Thursday, 16 November 2017
Three Big Finishes
Topic: Quilting

What do you do when you have a LOT of a specialty fabric to use up and you don't like to do the same project over and over? Well, you could make three different patterns with the fabric. But it took so long to finally find a pattern that I liked for it that I didn't really want to do that.

So I cut all the parts for three quilts from the same pattern, subbing in alternate fabrics where there wasn't enough to use the same (mostly the sashings, but also the lightest squares).

I worked through them all step-by-step all at the same time - sew fabric A to B on all the quilts, then AB to C on all the quilts, etc. This followed through all the way - borders on all, backings on all, quilting all, binding all.

The whole process took a little over two weeks from cutting to binding (not working on them every day and some days only a few hours.)

Since I don't like to do the same thing over and over I changed up the quilting on each of them. The quilting choices inform the titles for the quilts.

This first one is called 'Exit 10' and the quilting is loop-the-loops. The freeway exit we go through the most has flocks of Canada Geese hanging out in the grassy areas surrounded by the ramps. The loops in the quilting represent those freeway ramps.


The second one is called 'Gander At This'. Obviously, gander refers to the geese on the feature fabric. The quilting is overall leaves. You get the best view of this in the white areas. Both the sashings andthe fabric with the open pattern have leaves.


The third quilt is named 'To Each His Own' as each fabric type is quilted in a different manner. Geese have a wavy line side to side, dark green has loops, white tree prints have trees, leafy print has leaves, plaid has 'plaid' quilting, and sashings have leaves on vines.


So, the same.... but different.

Each has binding to match its sashing.

Ddd


Posted by studio3d@ccgmail.net at 3:50 PM PST
Thursday, 9 November 2017
Quilt Stats
Topic: Quilting

I have had a spreadsheet detailing my quilt finishes since near the beginning. Today I made a second sheet for it that gathers statistics and sumarizes several categories (sizes, disposition and pattern source). This is the current tabulation:


Start date for first quilt 9/2010    
Total Quilts completed to date 146    
Average per month 1.6437    
DISPOSITION     PERCENTAGE
Mine 18   12%
Family 17   12%
Friends 15   10%
Charity (itemized below) 96   66%
Will. Falls Hospital   66  
Warm Springs Indian Res.   25  
Hope 360 Pregnancy Clinic   4  
Project Linus   1  
SIZES     PERCENTAGE
Wall 13   9%
Baby 29   1%
Lap 92   63%
Twin 1   1%
Full 5   3%
Queen 3   2%
King 1   1%
Other 2   14%
DESIGNS      
Missouri Star Quilt Co. 19    
Quilt in a Day 5    
Fons & Porter - TV or mag 6    
Magazine 16    
Web 20    
Original 25    
Sewing With Nancy 3    
Mystery Quilt - various sources 7    
Purchased Pattern 1    
Traditonal 29    
Can't remember 2    
Live Class 2    
Shop Hop materials 2    
Craftsy 4    
Book 5    


It's kind of fun to see them categorized these different ways.

Ddd


Posted by studio3d@ccgmail.net at 3:42 PM PST
Sunday, 5 November 2017
Wall Tree
Topic: Quilting

I wanted to ‘build a snowman’ and I did it!

I started in March with a paper piecing pattern that I had won as a door prize several years ago and had not stitched up. It included three snowmen and a pair of mittens. They were arranged in the pattern to be a horizontal banner.


So I stitched up these 5 blocks and laid them out as instructed –


Then I yawned because, not only is this boring but I don’t have a place to display a horizontal banner.

I tried some other arrangements:


Then I brainstormed with the hubby and finally decided to make MORE motifs and create a row-by-row Christmas tree wall hanging.


The angel was from an outline of a pattern found on Pinterest. I added a halo of sequins.


Then came the pair of mittens from the original design. I added fluffy yarn to the cuffs.


I drew my own paper piecing pattern for the wreaths. They have a fabric bow and red seed beads as decoration.


I also drew my own paper piecing pattern for the candle. It is decorated with a single gold tube bead in the flame.


I used the outline of a paper pieced pattern found on Pinterest for the poinsettias. They have yellow seed beads stitched into a cluster for the center.


The snowflake is the one motif I am most disappointed with. The pattern I found online was very small. I had to enlarge it a LOT to get the size I wanted. Unfortunately, any inconsistencies in the seam matching on those small pattern pieces were magnified in my version so there are some snaggly edges toward the center. I used scrappy whites throughout this block and I chose not to use any embellishments.


The snowmen were part of the original pattern. I left off pom-poms on their hats but added fabric scarves and small tube beads for eyes and buttons.


I drew my own paper piecing pattern for the trees. They got star buttons (that I had on hand!) sewn on for decorations.


I set in green half-rectangles for the overall tree shape. I obviously had some problems with the math on these!

After stitching in the ditch around all the blue background blocks I did free-motion ‘snow’ and ‘icicles’ around the tree branches.


I also did a stitch in the ditch across the rows where they connect and used a 1 ½ inch vertical line to quilt the background.


Finally, I added a hanging sleeve the same fabric as the binding.


So – 9 months to birth this baby! I can’t wait for it to be time to put up the Christmas decorations. This will be front and center at my house.

Ddd


Posted by studio3d@ccgmail.net at 12:37 PM PDT
Thursday, 26 October 2017
Another Finely Dressed Tree
Topic: Quilting

When my daughter saw the tree skirt I made for myself last Christmas she requested one 'just like it'. I had to move some of the colors around because of the amount of fabric I had on hand, but it is essentially the same.

I used a pattern from the November/December 2015 issue of Fons and Porter's Love of Quilting magazine that uses the LeMoyne Star. I don't have their special tool so I made the directions fit my own method. That makes the outer diamonds into trapezoids but I like them anyway.

This is the new one:

Compared to the one last year:


On last year's skirt I used a pieced back but for this new one I found a neat metallic 'brush painting' fabric for the backing.

Now it's off to arrive as a birthday gift and dress up the upcoming Christmas festivities.

Ddd


Posted by studio3d@ccgmail.net at 8:21 PM PDT

Newer | Latest | Older