« April 2012 »
S M T W T F S
1 2 3 4 5 6 7
8 9 10 11 12 13 14
15 16 17 18 19 20 21
22 23 24 25 26 27 28
29 30
You are not logged in. Log in
Entries by Topic
All topics  «
3D paperwork
A - Z challenge 5
A - Z challenge 7
A - Z challenge round 4
A to Z challenge round 3
A to Z round 2
A to Z round 6
A-Z round 1
Around the House
Art Challenges
Artist Trading Cards
Backgrounds
Beads
Bible Journaling
Books
Boxes
Collage
Color Challenge
Coloring
cookbook
Die Cuts
Digital Projects
Digital Stamps
Drawing
Dry Embossing
Fabric Stuff
Fantastic Folds
Field Trip
Home Decor
How Does Your Garden Grow?
Hymnal Art
In The Kitchen
In the studio
Jewelry
Lettering
Links
Multi-Technique
Music to Work By
Musings
Nail Art
New Work
Online Class
Other Hobbies
Other Projects
Painting
Paper Embroidery
Paper Piecing
Photo
Pretty Paper
Quilting
Random
reading
Scrap Recovery
scrapbooking
Sewing
Sketch Challenge
Some Backlog
Stamping
Stencils
Stickers
Supplies
Teabag Folding
Techniques
Testing
tips and tricks
Tutorial
Web resources
Welcome to my Blog
Work By My Friends
workflow
Writing
Blog Tools
Edit your Blog
Build a Blog
RSS Feed
View Profile
Group One
In & Out of Studio 3D
Monday, 23 April 2012
Pockets Inside and Out
Topic: Fantastic Folds

Need a card with two pockets? Neither did I, but I saw a neat tutorial for one and I had to go try it out. 

I can't figure out how to make a link to a video 'clickable' so I'll just put the URL here and you can cut and paste if you want to go watch the tutorial for yourself. Patty is using the scoring board from Stampin' Up but it was easy to follow the same measurements and make the card on my Martha Stewart scoring board as well as my ScorPal. If you have none of these, you could easily score with a ruler and stylus. Here's the video link: http://www.youtube.com/watch?feature=player_embedded&v=b6WlQbBXUKY 

And here's the card I made:

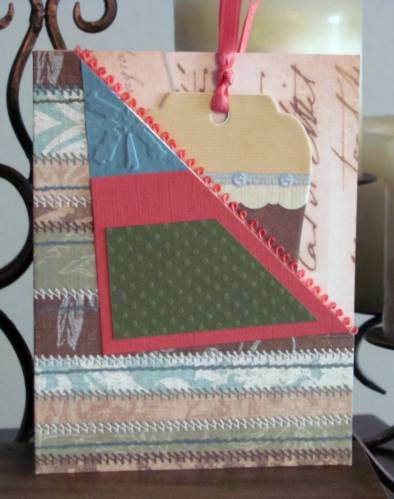
If you don't go to watch the video I'll summarize - this is made from a single sheet of 8 1/2 x 11 reversible cardstock. It requires 4 folds, no cuts, and a bit of glue. I filled my two pockets with pre-made tags mounted back to back so they are also reversible. The front decoration is made with some table scraps and I glued a bit of picot-edge trim to the pocket edge.

Ddd


Posted by studio3d@ccgmail.net at 12:01 AM PDT

View Latest Entries