« February 2016 »
S M T W T F S
1 2 3 4 5 6
7 8 9 10 11 12 13
14 15 16 17 18 19 20
21 22 23 24 25 26 27
28 29
You are not logged in. Log in
Entries by Topic
All topics
3D paperwork
A - Z challenge 5
A - Z challenge 7
A - Z challenge round 4
A to Z challenge round 3
A to Z round 2
A to Z round 6
A-Z round 1
Around the House
Art Challenges
Artist Trading Cards
Backgrounds
Beads
Bible Journaling
Books
Boxes
Collage
Color Challenge
Coloring
cookbook
Die Cuts
Digital Projects
Digital Stamps
Drawing
Dry Embossing
Fabric Stuff
Fantastic Folds
Field Trip
Home Decor
How Does Your Garden Grow?
Hymnal Art
In The Kitchen
In the studio
Jewelry
Lettering
Links
Multi-Technique
Music to Work By
Musings
Nail Art
New Work
Online Class
Other Hobbies
Other Projects
Painting
Paper Embroidery
Paper Piecing
Photo
Pretty Paper
Quilting  «
Random
reading
Scrap Recovery
scrapbooking
Sewing
Sketch Challenge
Some Backlog
Stamping
Stencils
Stickers
Supplies
Teabag Folding
Techniques
Testing
tips and tricks
Tutorial
Web resources
Welcome to my Blog
Work By My Friends
workflow
Writing
Blog Tools
Edit your Blog
Build a Blog
RSS Feed
View Profile
Group One
In & Out of Studio 3D
Thursday, 4 February 2016
Baby Quilt Slide Show
Topic: Quilting
I wanted to share a slide show I created with all 60 of the baby quilts our group finished. Unfortunately, I am new to the world of video creation and cannot get the video itself to post here.

However, I did get it to post on my Flickr page so I can give you a link to click on and you can view it there.

https://www.flickr.com/photos/mystudio3d/24132612803

I hope you enjoy seeing what we created.

Ddd


Posted by studio3d@ccgmail.net at 12:01 AM PST
Updated: Monday, 1 February 2016 1:52 PM PST
Tuesday, 26 January 2016
Floral Shuffle
Topic: Quilting

So, today really IS the last baby quilt in the donation project. I finally reached the nice round number of 25 and have decided that is the best place to stop.

I used the same pattern as yesterday from Karla Alexander the author of Stack, Shuffle and Slide.

This time the fabrics were leftovers from my duffle bag and coordinating fabrics from the stash.


Again, I finished the backing, quilting and binding on this one so I could go as a completed project to the collection point on time.

Project done - What's next?

Ddd


Posted by studio3d@ccgmail.net at 12:01 AM PST
Monday, 25 January 2016
I Only Thought I Was Done
Topic: Quilting

I must admit to a bit of a quirk when it comes to numbers I feel comfortable with. I like numbers that are 'fun' like 11:11 on the clock, 318830 that spells my name upside down, and 252 that goes with an old joke by George Carlin.

I also like getting out of bed when the clock reads on the hour and will actually watch the clock to wait for it!

I feel uncomfortable when things don't come out evenly and so, when I ended up my baby quilt top project with 23, I couldn't stop thinking about 'rounding up' to 25 as a good stopping point.

I had taken a workshop with Karla Alexander, the author of this book:

She gave us a handout with one of the easiest blocks to make with just 5 fabrics and I used that to make my two additional quilts.

Sharing today the one made from scraps left over from my mystery quilt made on the cruise last fall.


Since I was running up against the deadline for the end of the project I chose to do the whole job, right through the backing and quilting. These quilts all have a binding made by double-turning the border to the back and top stitching it.

Tomorrow will be the last (25th) quilt in the baby quilt project.

Ddd


Posted by studio3d@ccgmail.net at 12:01 AM PST
Sunday, 24 January 2016
Top Of the Heap
Topic: Quilting

And as my final baby quilt top for the church project I created a 14 x 14 grid of 2.5 inch squares that were the final small scraps from all the other baby quilt tops I had made.

This collection of scraps was brighter than those I used in the last grid quilt and I enhanced that by using a bright turquoise border.


This is number 23 - and I am done!

Ddd


Posted by studio3d@ccgmail.net at 12:01 AM PST
Friday, 15 January 2016
Quilt Top Baby Project - Number 22
Topic: Quilting

The tops for the baby quilt project are not due until the 16th so I took scraps from the other ones I had made and cut up enough 3 1/2 inch squares to do another. The result is a 12 x 12 grid with a 2 1/2 inch border of navy blue.

This is number 22 for the project:


This will make a great quilt for a little boy.

Ddd


Posted by studio3d@ccgmail.net at 12:01 AM PST
Tuesday, 12 January 2016
Maple Leaf - No Rags
Topic: Quilting

This is the final quilt I pieced on the November 2015 quilting cruise. The instructor was Kimberly Einmo.

We were sent an illustration ahead of time along with the yardages we would need and cutting instructions. We cut the fabrics as specified and packaged them with coding so we would be able to quickly access the right ones for each step.

The class was taught with step by step directions and the use of a special ruler that Kimberly designed (and I bought).

The illustrated quilt design had  similar colors in solids and the center was an appliqued sunshine graphic, giving the quilt a southwestern feel. I chose similar colors but chose prints that featured fall flowers. then I created four maple leaves to applique on the center panel.

The quilt design stopped with the sunburst area but this left it too small for my taste. So I added a wide border in the background color to expand it.


The starburst areas end up looking like maple leaves, as well.

I quilted all the teal areas with vines and leaves and all of the starbursts with an echo line 3/8 inch inside them.

The finished size is about 48" square.

Ddd


Posted by studio3d@ccgmail.net at 12:01 AM PST
Monday, 11 January 2016
Sour Patch
Topic: Quilting

The second class I took on the quilting cruise in November (2015) was a mystery quilt with instructor Kimberly Einmo.

Before I signed up for this class I took a mystery class on Craftsy with her as the instructor to see if I liked her style. Out of that came two lovely quilts from my stash.

For this class we were sent a set of direction on how to select fabrics, how much of each to buy and cutting instructions for each one. These were then labeled and packaged so we could easily pull out the right pieces to work with at each step.

Kimberly would have us pull out the specific fabrics cut to the right sizes and stitch them according to the current 'clue'. Then those pieces would be cut, if needed, and set aside. When we had worked through all the clues we had a sizeable stack of blocks which were then laid out according to her pattern and assembled into the mystery quilt.

We had even precut our two borders and binding!

I worked through all the available 'open sew' times and got my whole top done.


I did not take batting or the backing with me so I had to wait to assemble this at home. I quilted it with diagonal lines that go through all the large blocks and the purple small blocks - about 8 inches apart. A stitch in the ditch line runs on either side of the inner blue border as well.

The finished quilt is about 61 inches square and will be set aside to gift to someone special when the occasion arises.

Ddd


Posted by studio3d@ccgmail.net at 12:01 AM PST
Sunday, 10 January 2016
3D From Studio 3D
Topic: Quilting

Yay and Hooray! I finished one of the three quilts I made on the quilting cruise in November.

The 11-day cruise, through Quilting Seminars At Sea, went from Fort Lauderdale to the Bahamas, Curacao, Aruba, Columbia, the Panama Canal, Panama and Costa Rica.

When we were in port we were free to go as we wished. Then on the days at sea we had classes from 8:30 am to 4 pm. We had pre-selected from one of 4 workshops to take from the 4 instructors who were with us.

I took 2 classes with Kimberly Einmo and one from Karen Combs and finished a quilt top in each one of them. Of course, we had 'open sew' time when we could go in to work on our projects on the machines that were provided by Janome.

The first class I took was the one with Karen so that is the quilt that I backed, quilted and bound first.

We used fabric designed by Karen that contains dark, medium and light across the fabric, providing all the shades needed to create her 3D effects. The pattern we worked on is called 'A Chip Out Of Every Block'.

We got to choose the colors we wanted to use from about 20 available. I chose to use all blues and greens to make a banner for my fireplace end wall.

By turning half the blocks upside-down they are changed from being a solid block with a corner missing to a room with a box in the corner.

I quilted with just a stitch in the ditch around the perimeter of each area of value.


I am really pleased with how this came out.

Ddd


Posted by studio3d@ccgmail.net at 12:01 AM PST
Wednesday, 6 January 2016
Colorado Christmas
Topic: Quilting

I'm really not as late as it appears in completing this Christmas quilt. I finished it up on December 23 but had already filled the blog postings up to today with the last of the Christmas cards.

I wanted the quilt to be in the seasonal colors but not to be so bright as traditionally used. So I dug in the stash and found burdundy, mottled green, taupe and greenish yellow.

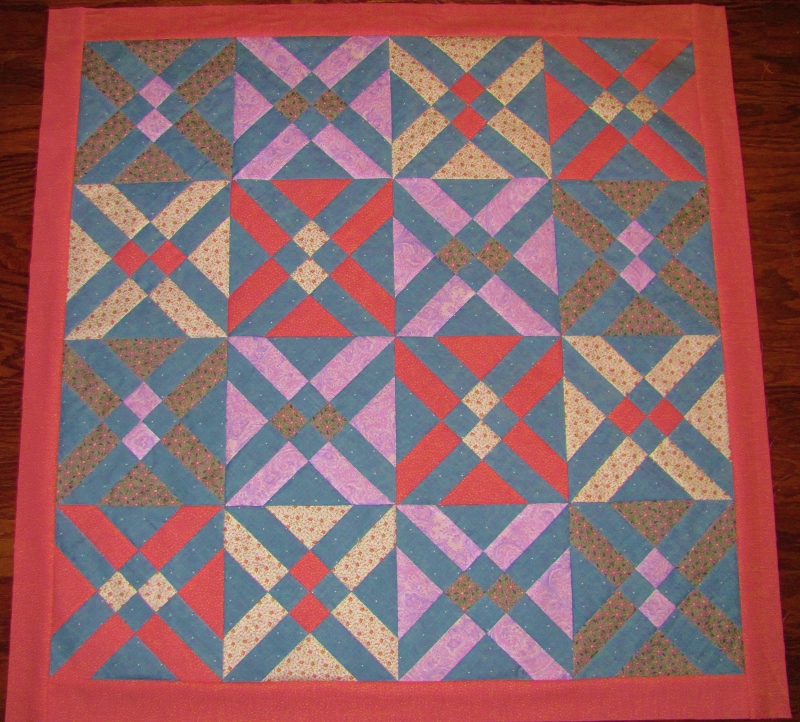
These sat for a while waiting for inspiration until I saw the tutorial on the Missouri Star Quilt Company for the block called 'Colorado'. I played with the coloring in EQ7 and decided to make the center pinwheels with the yellow to represent the Star of Bethlehem.

The construction method makes a bazillion half-square triangles which are arranged into this 14-inch block:

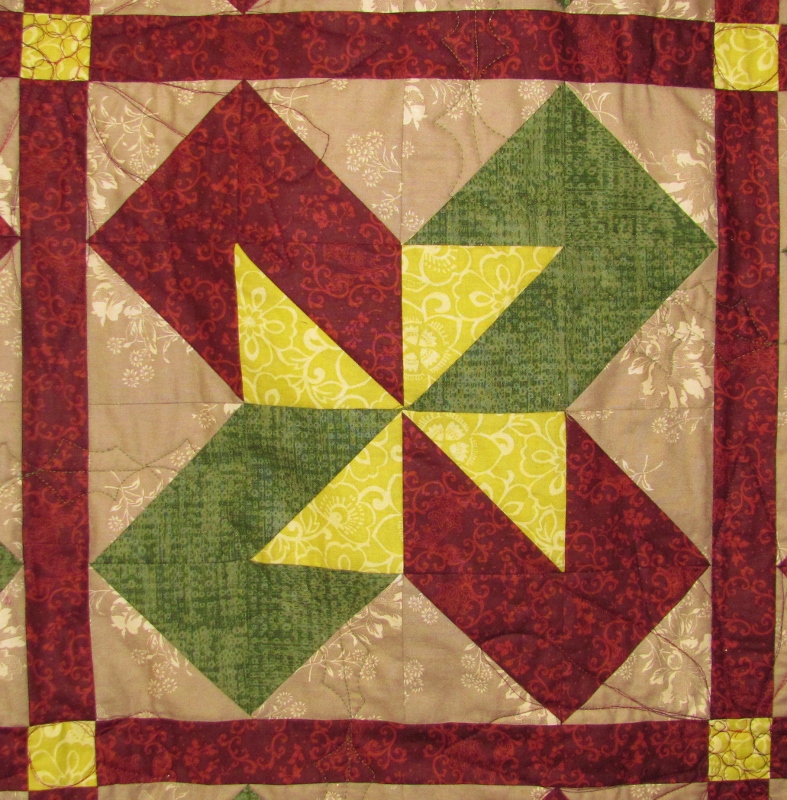
Actually, the outer border showing is the sashing and cornerstones between the blocks.

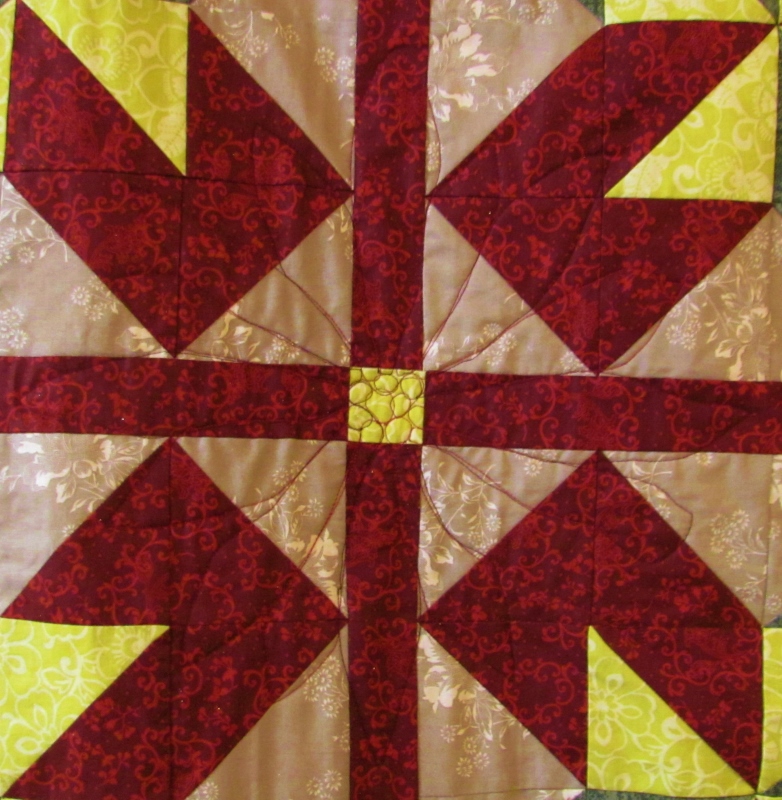
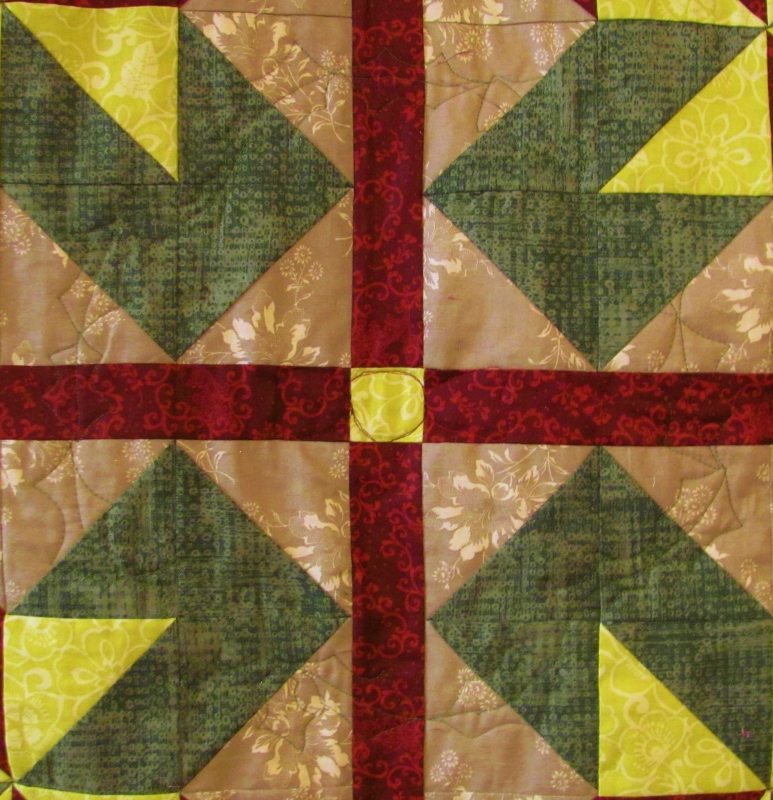
The blocks are arranged so that all the greens come together around one cornerstone and all the reds around the next cornerstone. What this does is create a secondary pattern.

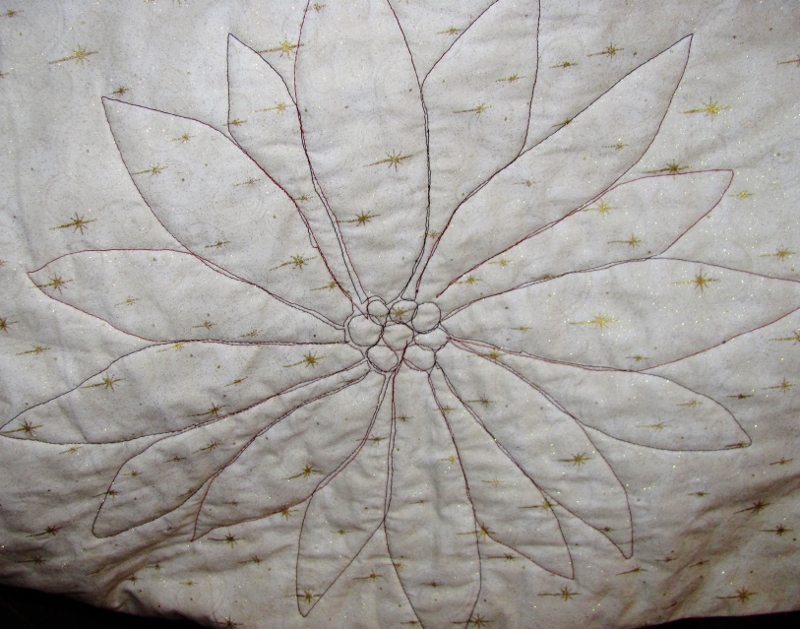
On the red sections I quilted a poinsettia:

I used verigated dark red thread and a 'sketch' style rather than a very controlled outline. Here you can see the stitching on the back:


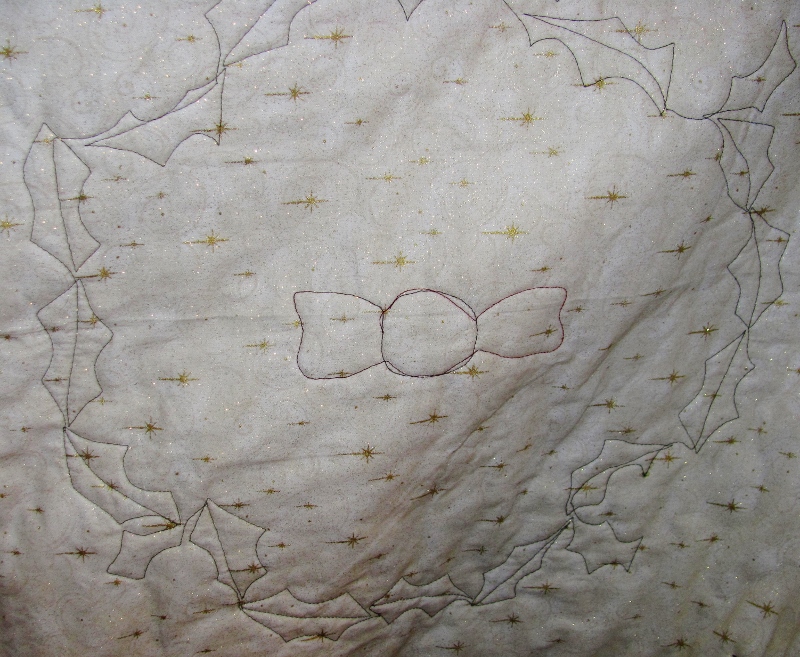
Where the green blocks formed I quilted a bow in the center surrounded by a holly wreath:


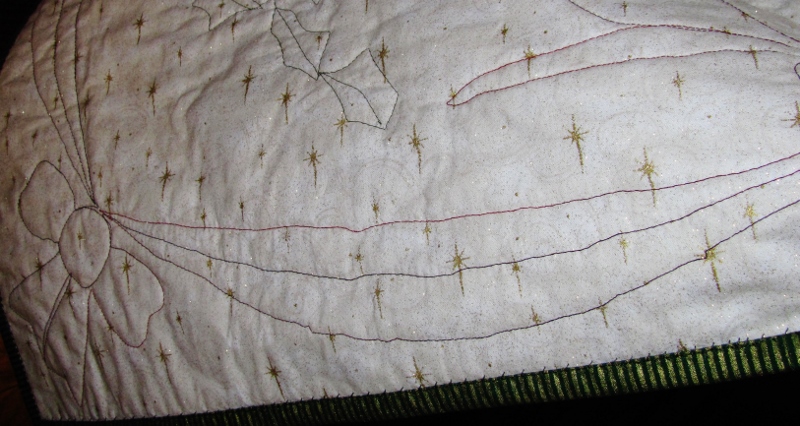
I used green thread for this and here you can see the view from the back:

The 4-inch borders are quilted with bows and garland and the finish is a green and gold striped binding:


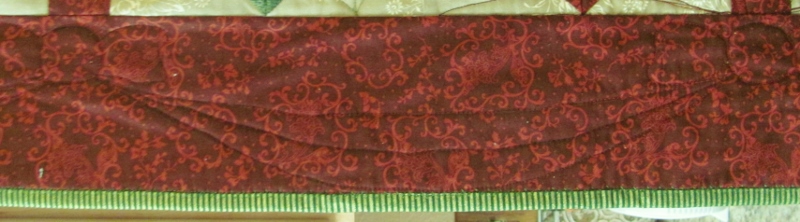
You can see the quilting pretty well on the photo above so the back view shows how I treated the corners:


I am delighted with how this came out! This will be a quilt for me to keep.

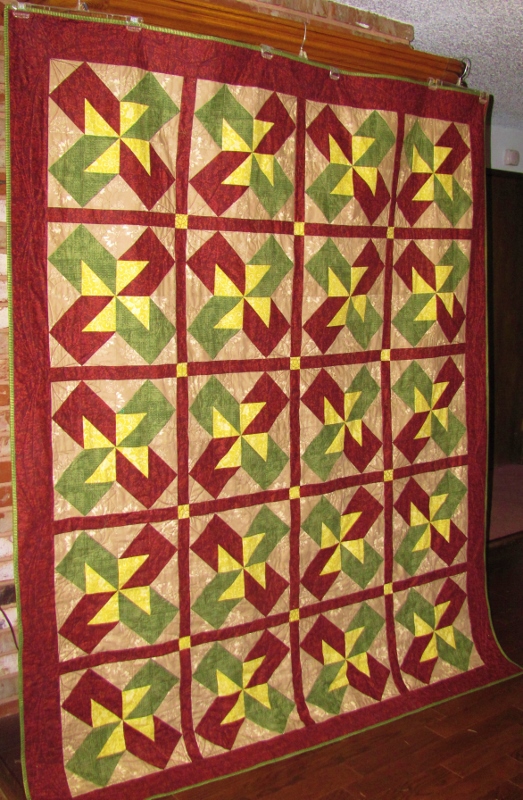
It is a very generous 70 x 84 inches.

Ddd


Posted by studio3d@ccgmail.net at 12:01 AM PST
Saturday, 12 December 2015
Owl Love Your Forever
Topic: Quilting

Today I'm showing the 21st baby quilt top - the second of the owl fabric used in a disappearing 9-patch.

This looks a lot like yesterday's quilt but the owls are those that were on the outer edges of the cut fabric. The layout was constructed so the cutting of the 9-patch would slice down the center between the owls.

Because the yellow is the large block it makes that the dominant color in the quilt.


I was careful to arrange the owl fabric in the original block so that the finished pieces would face in all directions.

This is number 21 in the project.

Ddd


Posted by studio3d@ccgmail.net at 12:01 AM PST
Friday, 11 December 2015
Owl Always Love You
Topic: Quilting

And Sew on, and Sew forth.... I'm back at the baby quilt tops again.

Remember back to the frog quilt with the yellow star fabric and the bright coral? Well, when I bought those three fabrics, I also bought a cute owl fabric what had the same colors in it. This allowed me to use the same yellow star fabric and the coral.

I also used the same layout and construction.

Today's quilt top uses the owl fabric in the big squares. I didn't fussy-cut the fabric so after I cut it up I divided it into two groups - those with an image near the center of the block (which I used for this quilt) and those with parts of the image off to the sides (which will be used on tomorrow's quilt).

The fabric has three main owl images:


The disappearing 9-patch construction was laid out so tha, when the blocks were quartered the owls would face in every direction.

Here is the finished quilt top.


I used the coral fabric for a 3-inch border.

This is number 20.

Ddd


Posted by studio3d@ccgmail.net at 12:01 AM PST
Wednesday, 2 December 2015
Sunset on the Frog Pond
Topic: Quilting

I put the odd fabric versions together first and have finally come to the version that I bought the fabric for in the first place.

THIS version of the disappearing 9-patch appears just as I designed it in my head when I first saw these three fabrics: the blue with frogs, the yellow with stars and the bright orange. The orange matches some of the stars and some of the frogs. Some of the stars also match the blue in the water.


This is the 19th quilt top for the baby donation project.

Ddd


Posted by studio3d@ccgmail.net at 12:01 AM PST
Tuesday, 1 December 2015
Spring at the Frog Pond
Topic: Quilting

I combined the frog print fabric with some yellow star yardage and some green from the stash. I didn't have enough of the frogs for all the blocks so I used another blue for the blocks in the center.

The center was not quite big enough so I added an inner border of striped fabric.

The outer border is more of the green used in the smaller blocks.

The construction is a disappearing 9-patch which is so easy and quick to put together.


The frog print and yellow with stars were bought together for this project.

Ddd


Posted by studio3d@ccgmail.net at 12:01 AM PST
Sunday, 29 November 2015
Orange Frog Pond
Topic: Quilting

Here is number 17 in my series of tops for baby quilts.

The blue fabric is covered with yellow and orange frogs along with some sort of bugs. I used a dark coral patterned fabric and some brighter marbled fabric.

This is constructed as a disappearing 9 patch.

When I got the center done I discovered I had been a little enthusiastic with the trimming in squaring up and was goung to be short one inch of the desired 40 for the quilt top. So I added a striped 1/2 inch inner border before the patterned coral outer border which had already been cut.


Yes, it really IS this bright!

Ddd


Posted by studio3d@ccgmail.net at 12:01 AM PST
Wednesday, 25 November 2015
Baby Garden
Topic: Quilting

More from the scrap stash and the donation box... I had enough of four fabrics to cut big squares to make a different arrangement of the disappearing pinwheel from Missouri Star Quilt Company.

I made four of one color combo and five of the other so I could arrange them in an alternating setting.

I've mentioned before how challenging it is to work with so many bias edges. I did spray and press the squares with Mary Ellen's Best Press before I started stitching and cutting so they were better stabilized. I hope to keep this in mind for the future.

I used a striped fabric for the border that I picked up at a yard sale. It was over 2 yards in length and I got it for fifty cents!


This is the 16th quilt top in this project series.

Ddd


Posted by studio3d@ccgmail.net at 12:01 AM PST
Tuesday, 24 November 2015
Baby Quilt 15
Topic: Quilting

The baby quilt project continues.

I pulled out an old tutorial from Craftsy that I had used before. So complicated looking and absolutely easy and quick to construct. This whole thing came together in about 6 hours!


I think I have 8 more tops prepped and ready to stitch. If I do a couple more after that (I have LOTS of scraps left) I will have 25 of them to contribute to the project.

Ddd


Posted by studio3d@ccgmail.net at 12:01 AM PST
Monday, 23 November 2015
Baby Diamond Strips
Topic: Quilting

I am back at the Baby quilt tops again. This is number 14.

The idea for the design is from a recent tutorial on Missouri Star Quilt Company. Jenny started with layer cakes so her rectangles were 4 1/2 x 9 1/2 finished. I wanted mine to finish with two rectangles at 6 inch squares so the center area would be 36 inches. This made my rectangles 3 x 6 finished. I cut my flippy corners at 2 inches.

All of the rectangles were scraps from my stash and gifted to me. I went with mostly florals, focusing on red, rose and blue flowers. Some supporting fabrics pulled out more blue.

The flippy corners, sashing and inner borders were from some yardage that matched the darker colors in the florals.


I added a 1 inch border to the sides and 2 inch borders to the top and bottom to bring the final size to 40 inches.

Ddd


Posted by studio3d@ccgmail.net at 12:01 AM PST
Monday, 9 November 2015
Wide Yellow Bordered Blocks
Topic: Quilting

After making those blocks stretched with white diagonals I still had a pile of the same fabrics cut to 6x6 inches. I decided to make a balanced grid of them with the colors running on the diagonal.

The blocks finished at 5 1/2 inches square which required a wider border to bring the finished top up to 40 inches. I had to cut the border at 4 inches which will finish at 3 1/2.


I was short of all the colors except the yellow to use in the border. It turned out to be the perfect one to use as it brightens this quilt top right up.

Ddd


Posted by studio3d@ccgmail.net at 12:01 AM PST
Friday, 6 November 2015
Baby Boxes
Topic: Quilting

When I was cutting up fabric scraps I did a stack of them cut at 6 inches square. Then I started making all these quilts and realized the math (not my favorite subject) worked out perfectly with 6 1/2 inch squares so they would be even after the seam allowances were stitched.

Harrumph!

So I cut all of them in half diagonally and added a white fabric strip and squared them up. Still more math problems as they ended up 1/8 inch less than what I had intended.

I went ahead with the construction and then added a 1/2 inch white border and finished with a dark blue border.


With all this math fiddling I only ended up 1/4 inch short overall. I'm calling that good.

Ddd


Posted by studio3d@ccgmail.net at 12:01 AM PST
Thursday, 5 November 2015
Patriotic Stars
Topic: Quilting

I'm still churning out the tops for baby quilts. I pulled out a star-covered white fabric that featured two tones of blue stars plus red ones, all in varying sizes. To this I added a single red and a dark and light blue.

I cut pieces measuring 6 1/2 by 3 1/2 and matched each color to a star. These created square blocks which I arranged to come up with a 36 inch arrangement of diagonal chevrons.


The addition of a 2 inch border brings this up to 40 inches square.

Ddd


Posted by studio3d@ccgmail.net at 12:01 AM PST

Newer | Latest | Older